Okay, so raise your hand if you’ve ever walked into Dollar Tree just for paper towels and left with a whole cart of craft supplies you didn’t know you needed? Yeah, me too! That’s exactly how this super cute Boho Celestial Moon Phase Wall Art (Dollar Tree DIY) project started. My oldest, Lily, saw something similar on TikTok and begged me to try it, and honestly, it was so much fun and turned out better than I imagined!
See also: Farmhouse Mirror Wall Decor Diy 7 Simple Steps
Theme: Farmhouse / Rustic
Materials Needed
- Foam Board & Foam Sheets
- Assorted Faux Greenery & Flowers
- Acrylic Craft Paints (Cream/Beige, Brown, Black)
- Hot Glue Gun & Glue Sticks
- Craft Knife, Scissors, Sponge Brush
- Floral Wire or Brown Pipe Cleaners
- Jute Twine or Hanging Strip (Optional)
📋 Love staying organized while crafting? Check out our printable planners & craft designs at CraftersDT on Etsy and use code CRAFT20 for 20% off your entire order!
Why This Craft Works
This little gem is just perfect for adding a touch of cozy to so many spots in your home. I’m thinking a dreamy accent in a Farmhouse / Rustic themed bedroom, maybe above a reading nook, or even hanging in a sweet nursery. It brings a calm, earthy vibe that just makes a room feel more put together, without being fussy at all.
📱 Free to Download
Join 50,000+ crafters already using Craftino
Browse 98+ Farmhouse / Rustic ideas and thousands more in the app
✓ Save crafts & browse fully offline
✓ Download printable PDF guides for every project
✓ Step-by-step photo tutorials, nothing left out
✓ 1,000+ craft projects with new ones added every week

And get this, we’re talking serious budget crafting here. Most of the supplies for this Boho Celestial Moon Phase Wall Art (Dollar Tree DIY) came straight from my local Dollar Tree. You can totally make this whole thing for about $3-4, which is less than a fancy coffee! Talk about a win for your wallet.
You’ll love how easy this project is, truly a beginner-friendly craft. From start to finish, you’re looking at about 30-45 minutes, maybe a little more if you take extra drying breaks. It’s absolutely perfect for a quick afternoon project, a fun craft night with friends, or even for older kids to help with.
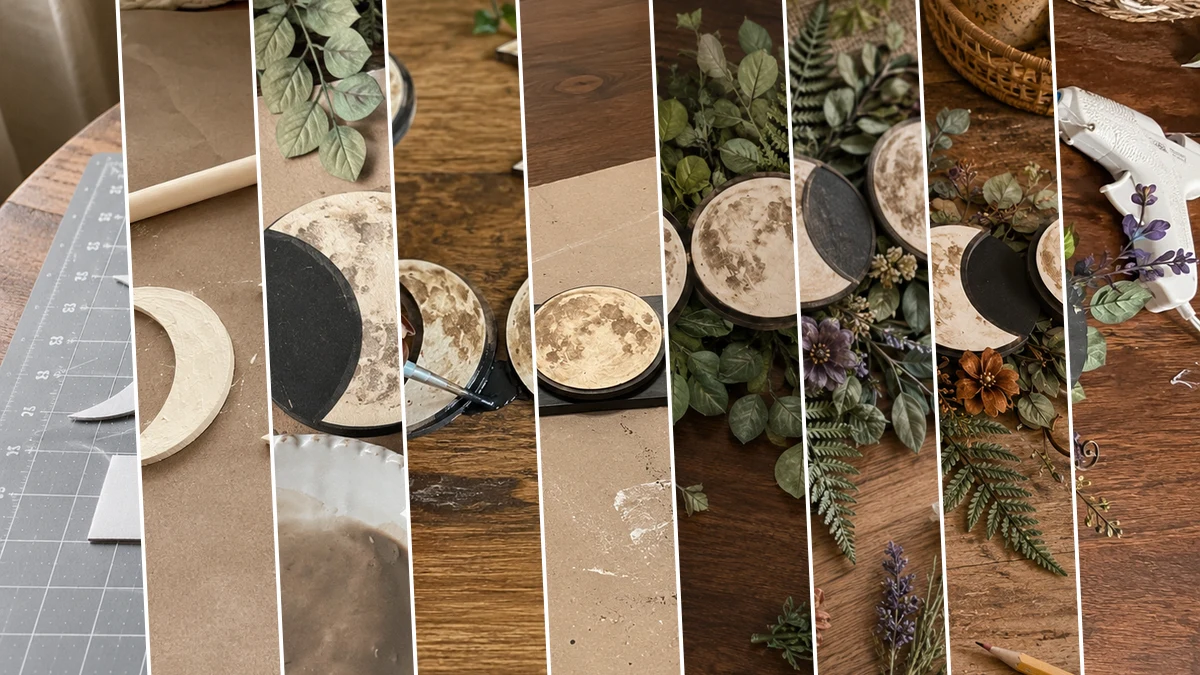
Step-by-Step Instructions for Boho Celestial Moon Phase Wall Art (Dollar Tree DIY)
Alright, my fellow crafters, are you ready to get your hands a little dirty and make some magic? I promise you, creating your own Boho Celestial Moon Phase Wall Art (Dollar Tree DIY) is going to be such a blast and way easier than you think. It’s seriously one of those projects that gives you big results with minimal effort, and you’ll be so proud to hang it up. Grab your Dollar Tree goodies, because we’re about to make some beautiful Home Decor!
Step 1: Cut Moon Shapes & Backing
Begin by sketching or printing templates for your moon phases: two crescent moons (mirror images), two half moons, two gibbous moons, and one full moon for the center. The full moon will be a complete circle, and the other phases will derive from it. Carefully cut these shapes from foam board or thick poster board using a craft knife. Also, cut one long, narrow strip of foam board to serve as the hidden backing support for your entire piece.
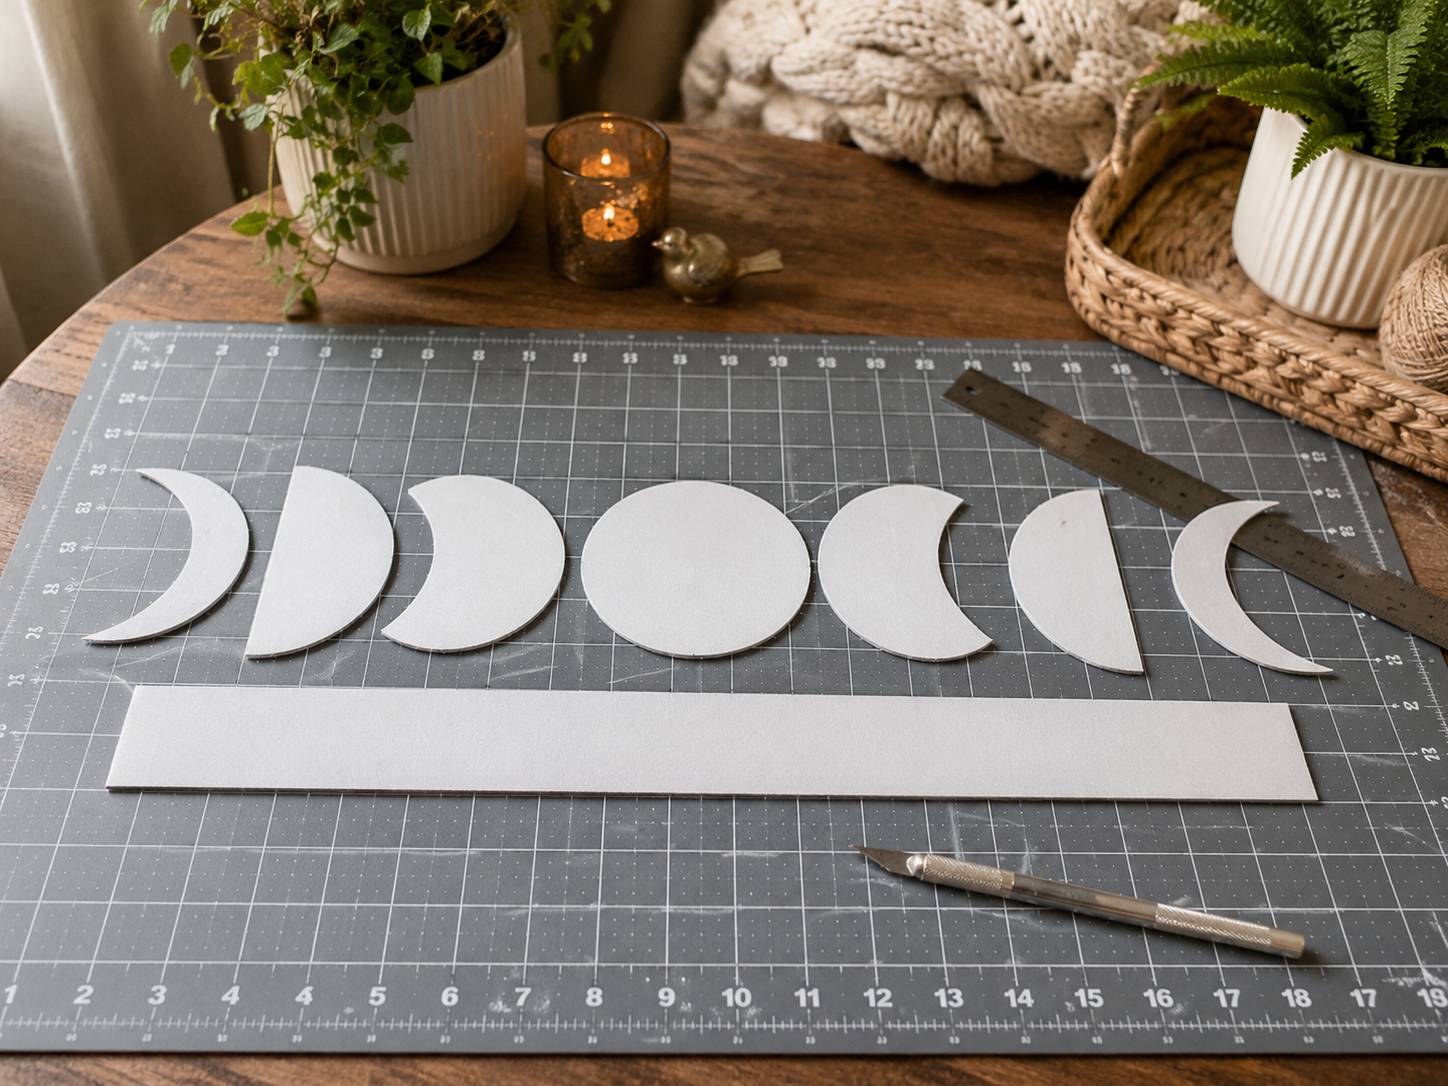
💡 Pro Tip: For perfectly symmetrical moons, trace a circular object for the full moon, then use a smaller circle or a ruler to create the curved lines for the other phases. Always use a self-healing cutting mat under your foam board to protect your work surface and achieve clean cuts.
Step 2: Base Coat the Moons
Paint all of your moon phase pieces with a warm cream or light beige acrylic paint. Apply an even, opaque coat using a sponge brush or regular paintbrush. This base layer will give the moons a unified, light background before adding texture and shadows.
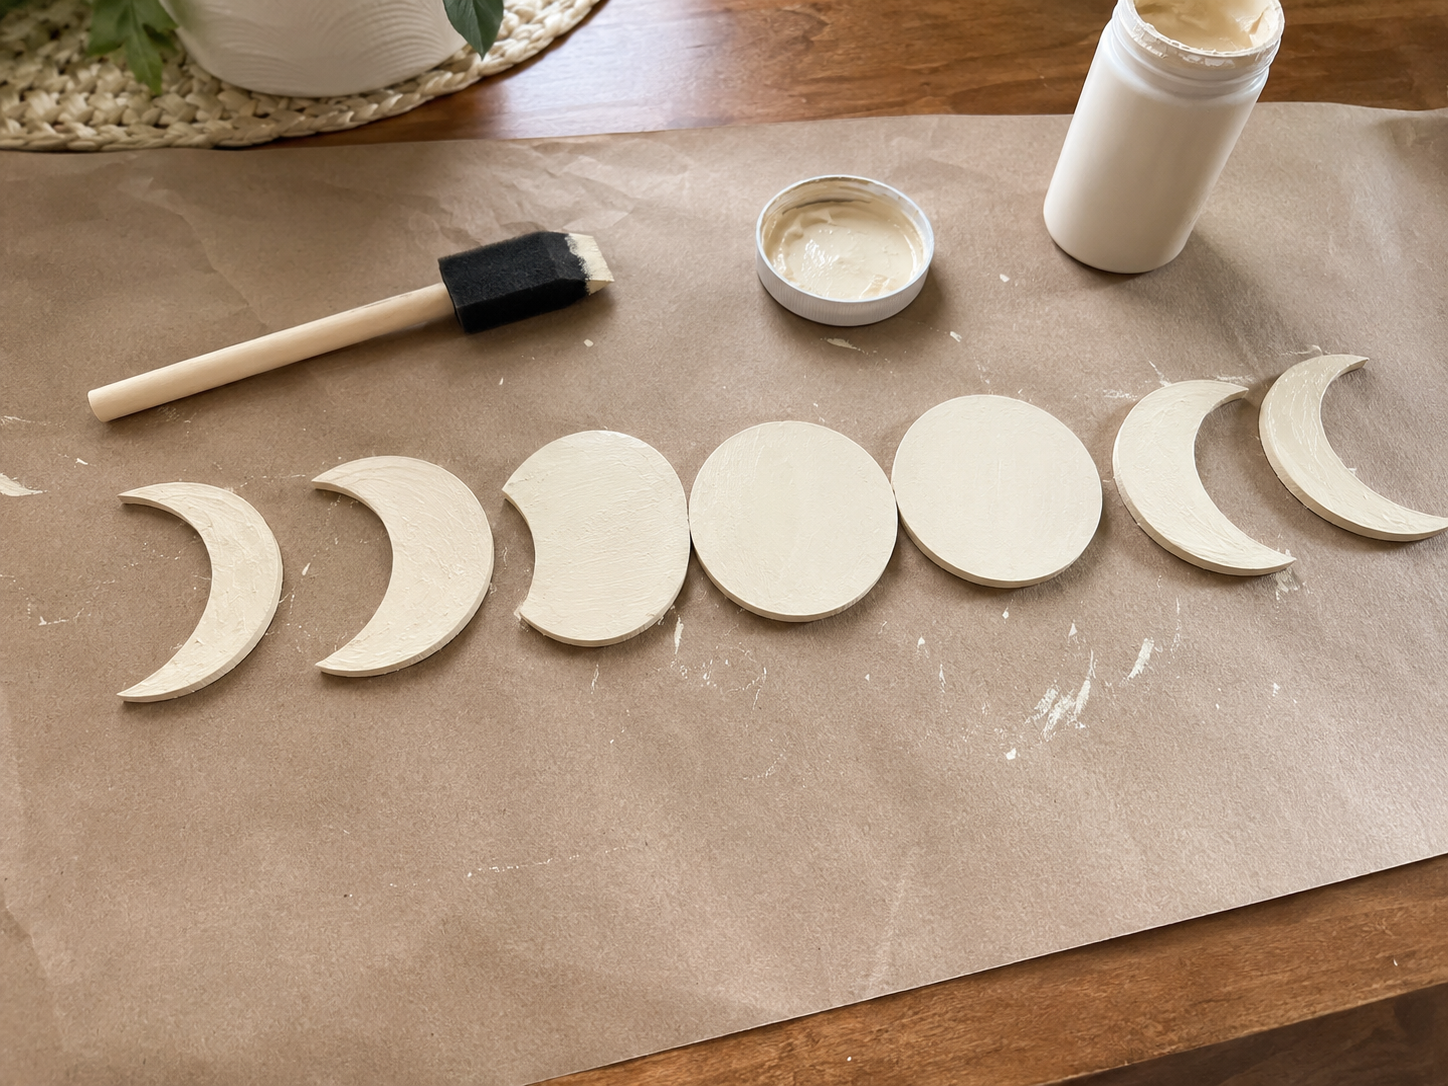
💡 Pro Tip: Apply paint in thin, even layers to prevent the foam board from warping. Allow each side to dry completely before flipping or adding another coat. For a truly smooth finish, you can lightly sand the foam board edges before painting, but for a rustic look, it’s not strictly necessary.
🗓️ Keep all your craft projects on track! Explore our printable planners & templates at CraftersDT on Etsy and use code CRAFT20 for 20% off!
Step 3: Add Moon Texture Details
Once the base coat is fully dry, create a textured, aged moon surface. Dilute a small amount of light brown or gray acrylic paint with water (or a glazing medium). Dab a clean sponge brush or natural sea sponge very lightly onto the diluted paint, then gently pounce and blot it over the beige moon surfaces. This technique will create subtle craters, shadows, and a mottled, realistic moon-like appearance, making them look aged and handmade.
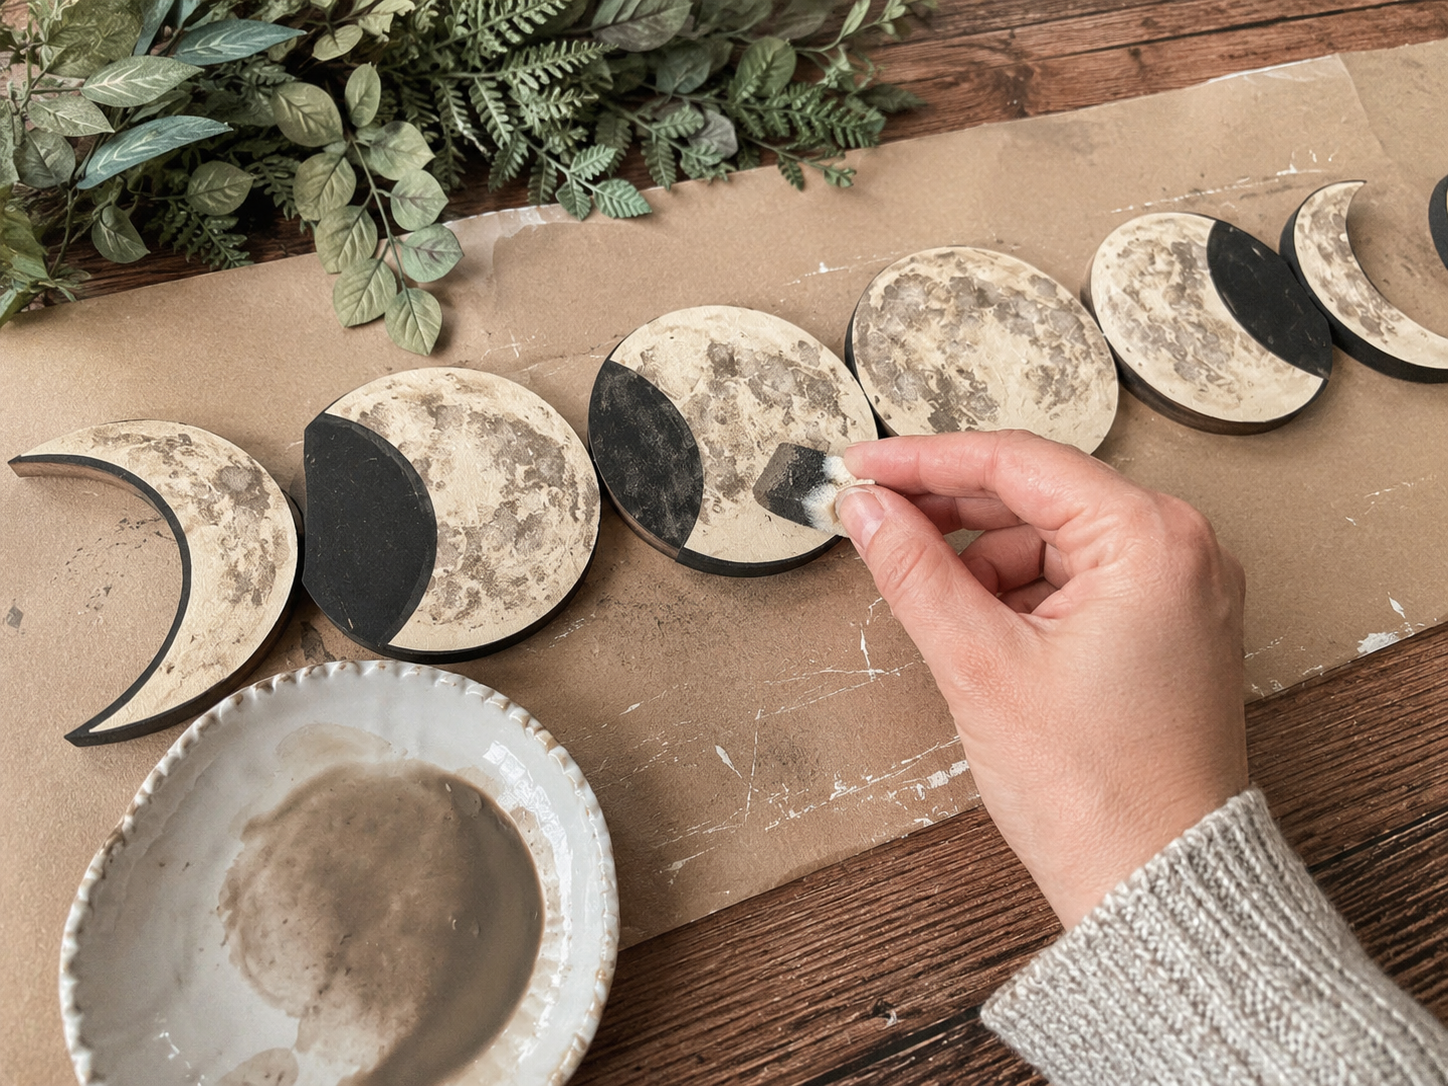
💡 Pro Tip: Start with very little paint on your sponge and build up the texture gradually. It’s easier to add more paint than to remove it. Practice on a scrap piece of foam board first. Focus on creating an irregular, organic pattern, mimicking the moon’s surface rather than a uniform coverage.
Step 4: Paint Lunar Phase Shadows
With your textured moons completely dry, it’s time to define the lunar phases. Using matte black or dark brown acrylic paint and a small, fine-tipped brush, carefully paint the ‘shadowed’ parts of the crescent, half, and gibbous moons. Ensure the edges are clean and distinct, creating a clear visual of each moon’s phase. The full moon piece will remain entirely textured beige/cream.
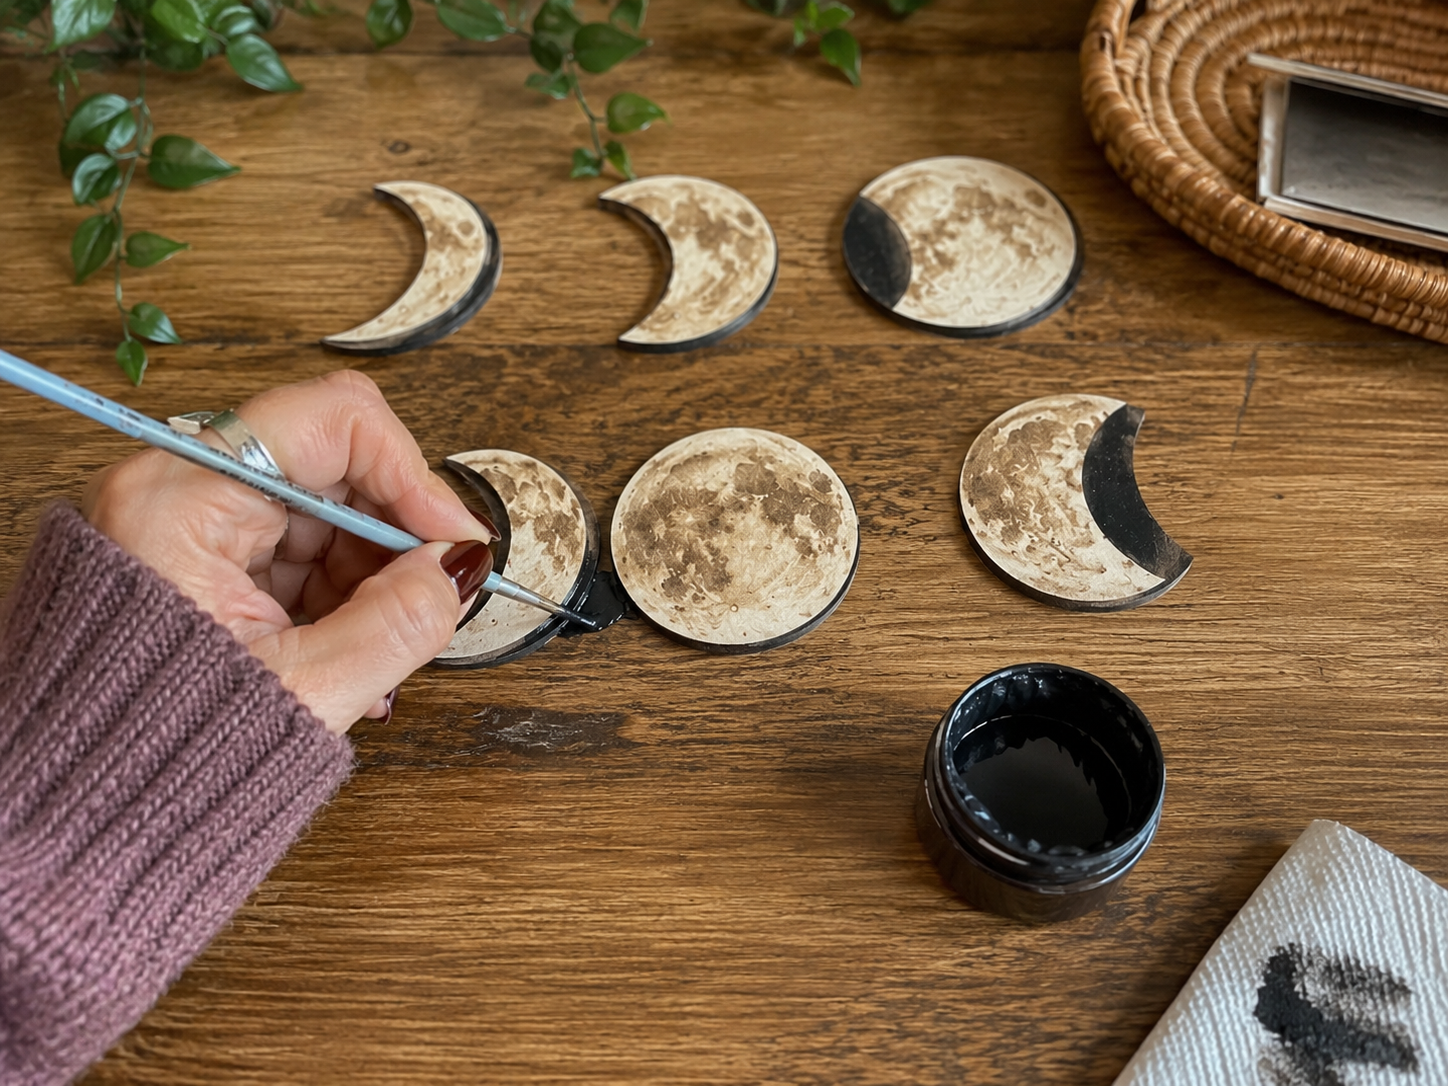
💡 Pro Tip: For crisp, clean lines between the illuminated and shadowed parts of the moon, you can use painter’s tape or a straight edge as a guide. Press the tape down firmly to prevent bleed, and remove it while the paint is still slightly wet for the sharpest edge.
Step 5: Assemble Moon Structure
Take your long, narrow foam board backing strip and paint it a dark brown or matte black. This will help it disappear behind the greenery. Once dry, arrange your finished moon phase pieces (crescent to full moon and back to crescent) on the painted backing strip, ensuring even spacing. Hot glue each moon securely to the strip. This creates the foundational structure for your wall decor.
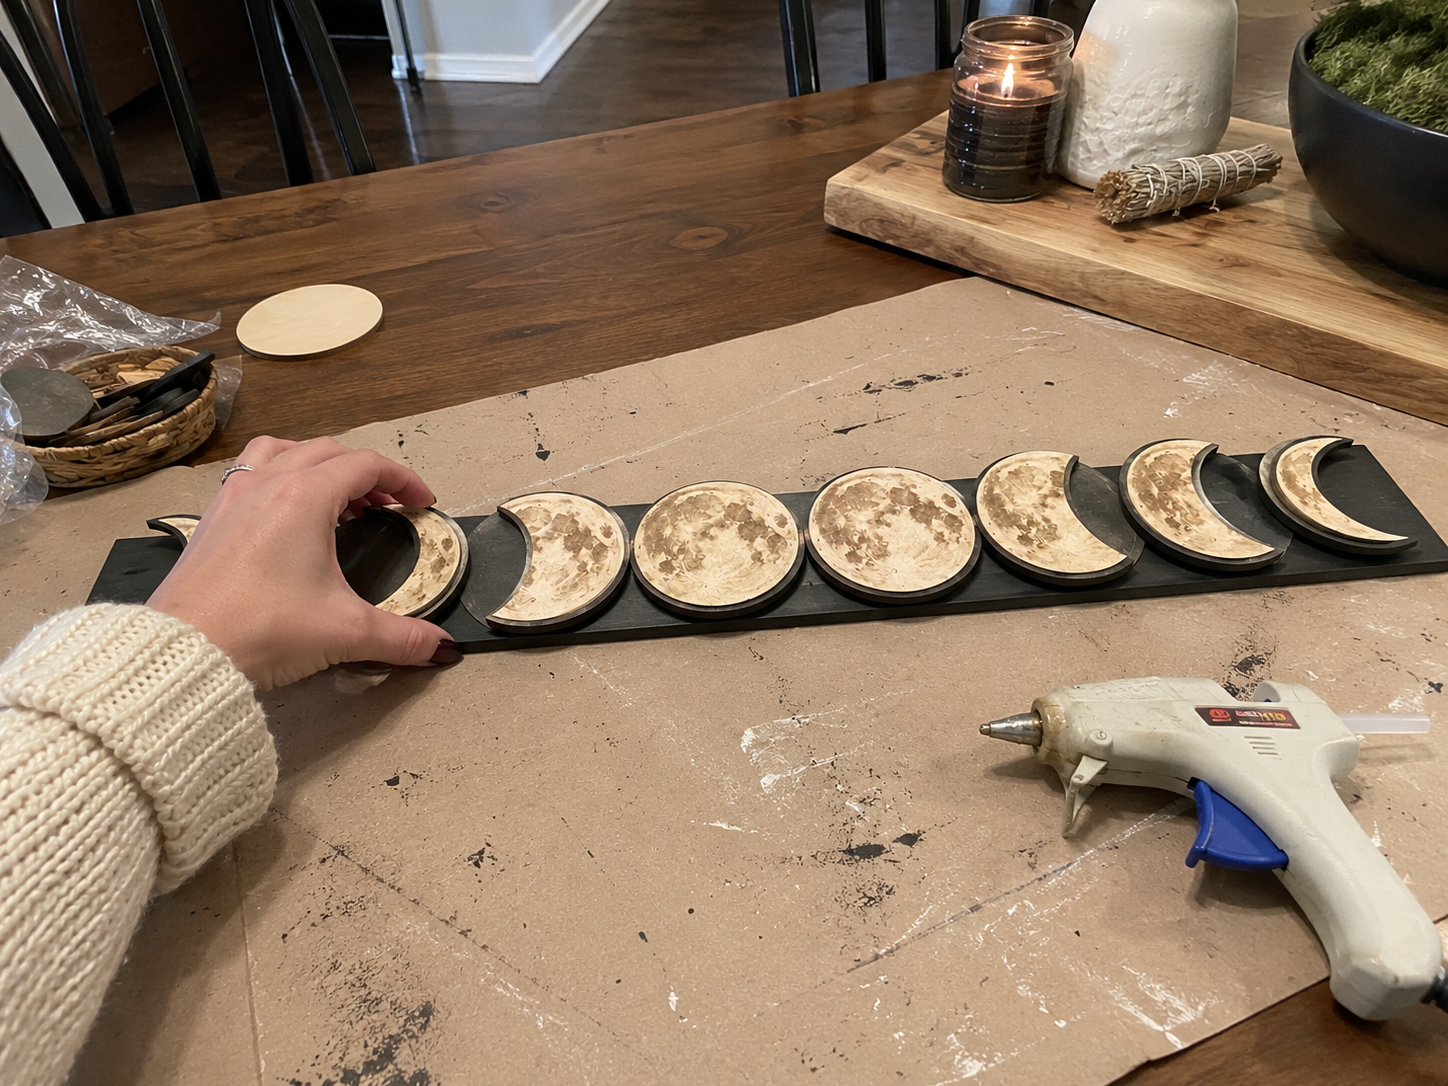
💡 Pro Tip: Before applying hot glue, dry-fit all your moon pieces on the backing strip to finalize their spacing and alignment. Use a ruler to ensure consistent gaps between moons. Hot glue sets quickly, so work efficiently but carefully.
Step 6: Layer Base Greenery
Now, begin building the botanical elements around your moon phases. Using your Dollar Tree faux greenery stems and fern picks, start by hot gluing larger pieces behind and around the moons. Aim to create a wide, balanced horizontal spread. This initial layer establishes the volume and overall shape of your botanical frame, making sure the dark backing strip is largely concealed.

💡 Pro Tip: Start with the longest and fullest pieces of greenery first to create your overall ‘envelope’ of foliage. Bend and shape the stems to add natural dimension. Overlap stems slightly to build density, always ensuring the moon pieces remain the focal point.
Step 7: Add Flowers & Accent Foliage
Once your base greenery is in place, begin adding the smaller, more colorful elements. Tuck in small faux flowers in muted purple, rust, cream, and blue tones between the leaves. Integrate additional, finer fern picks and smaller sprigs of greenery to add depth and varied textures. Distribute the flowers evenly for pops of color without overcrowding or obscuring the moon shapes.
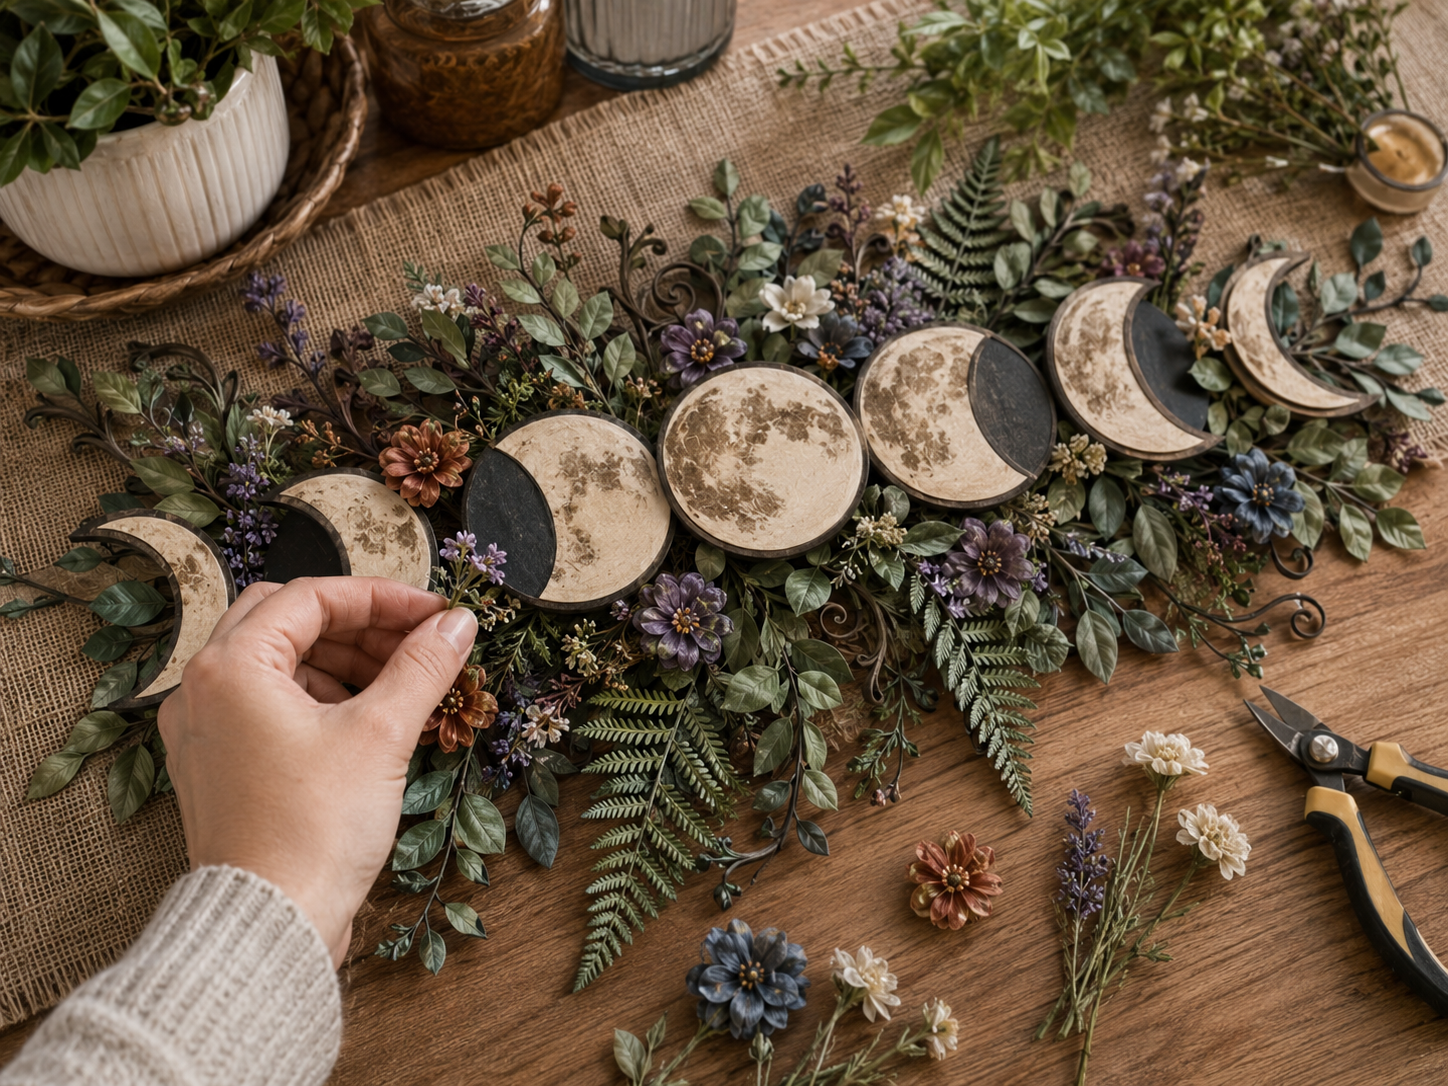
💡 Pro Tip: Use a variety of leaf shapes and shades of green to add visual interest. For flowers, trim them from their main stem so you can place individual blooms exactly where you want them. ‘Test fit’ your flowers before gluing to ensure a pleasing arrangement.
Step 8: Detail with Curly Vines
To add a final touch of boho whimsy, create curly vine details. Wrap thin floral wire or brown pipe cleaners tightly around a pencil or a small dowel to create spirals. Gently stretch them slightly to form loose, natural-looking curls. Hot glue these curly vines strategically amongst the greenery and flowers, letting them peek out and add an organic, flowing element to the design.
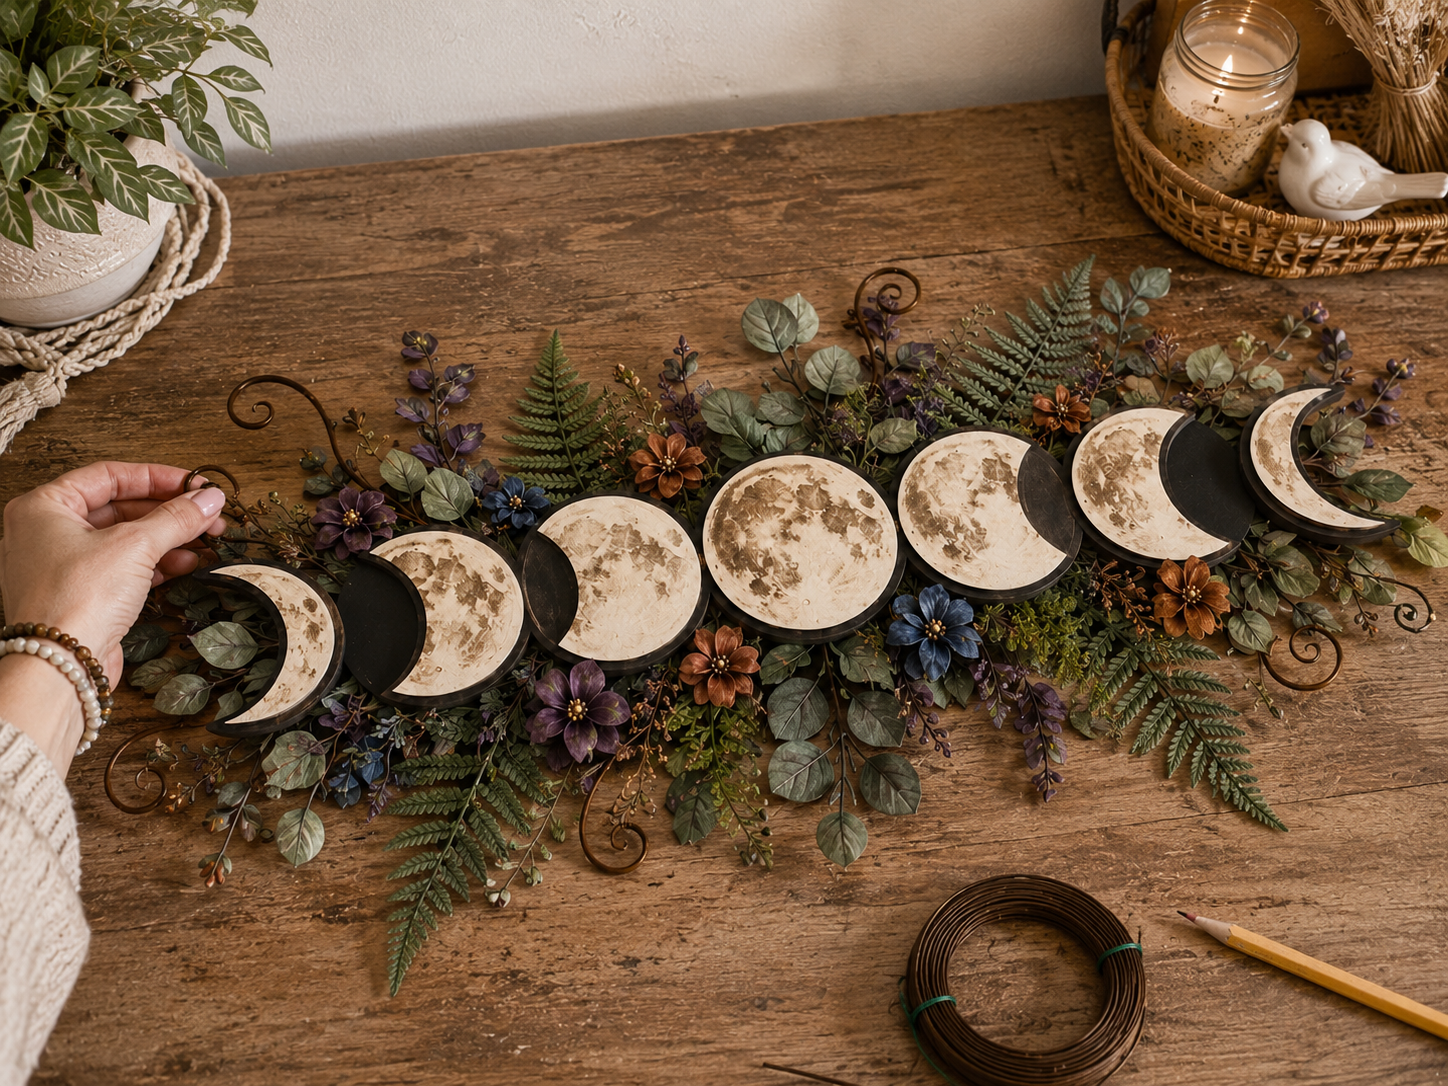
💡 Pro Tip: Vary the tightness and length of your curls for a more organic, natural look. Place them so they add visual movement and draw the eye along the piece, rather than clustering them in one spot. Ensure they are securely glued but appear to float effortlessly.
📱 Free to Download
Join 50,000+ crafters already using Craftino
Browse 38+ Farmhouse / Rustic ideas and thousands more in the app
✓ Save crafts & browse fully offline
✓ Download printable PDF guides for every project
✓ Step-by-step photo tutorials, nothing left out
✓ 1,000+ craft projects with new ones added every week
Step 9: Attach Hanging Mechanism
Finally, prepare your moon phase decor for hanging. Cut a length of jute twine, create a loop, and hot glue each end securely to the back of the dark foam board backing strip. Alternatively, you can attach a self-adhesive picture-hanging strip to the top center of the back. Reinforce any glued areas with extra hot glue or a strong tape if desired, ensuring it’s robust enough to support the finished piece on the wall.
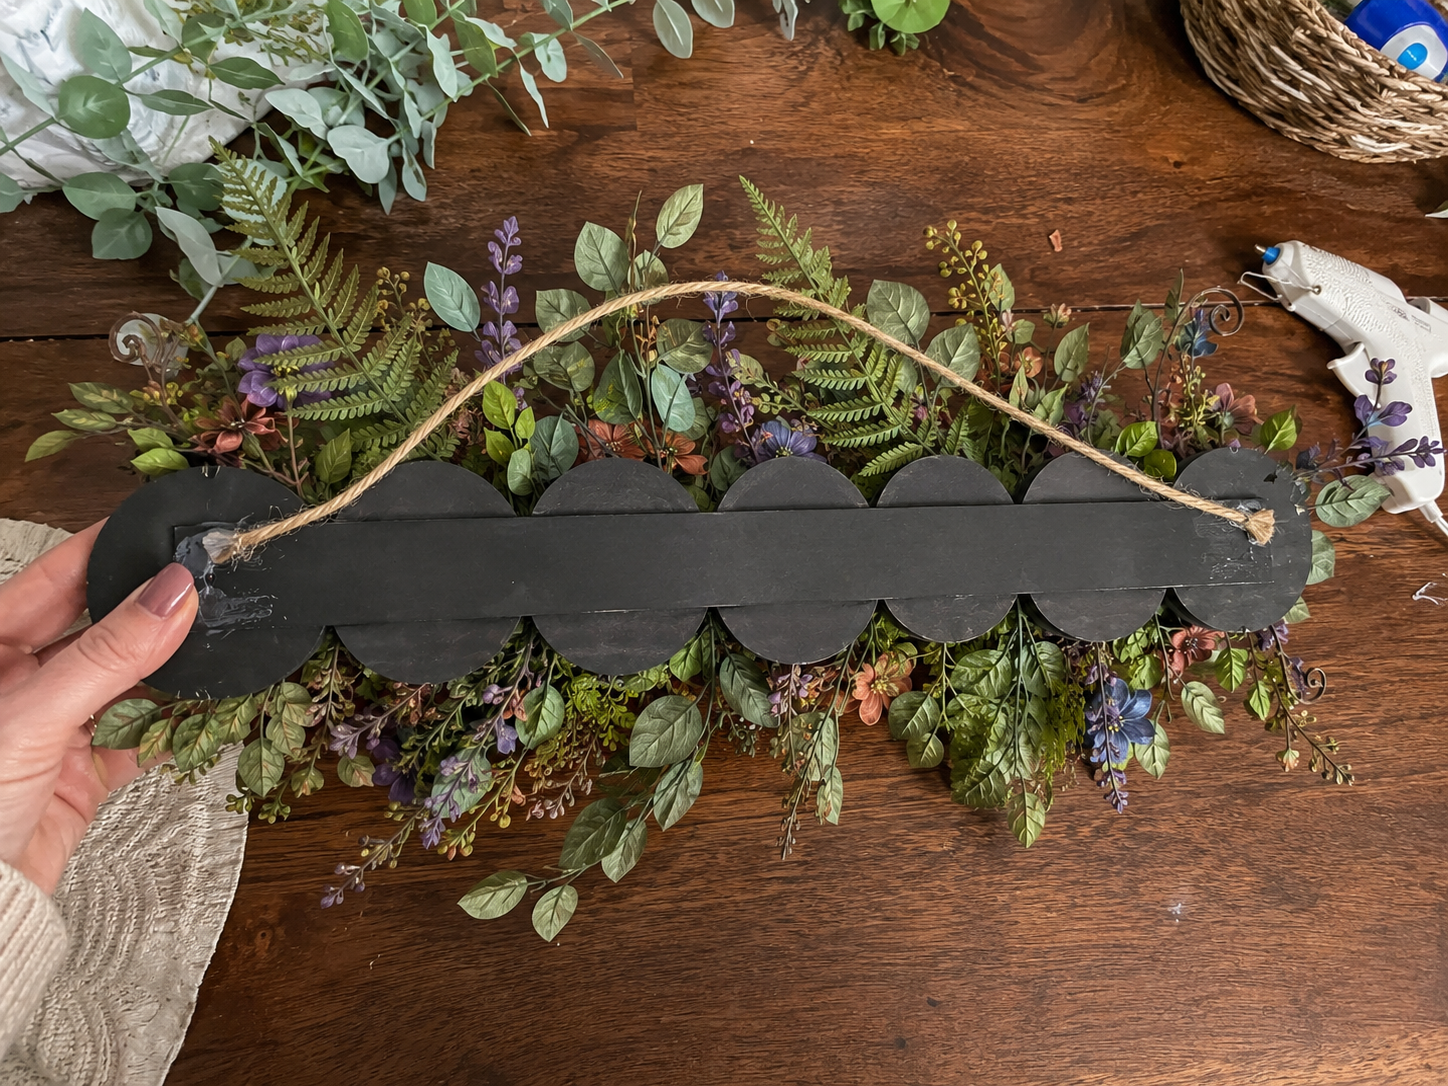
💡 Pro Tip: If using twine, create a small ‘hanger’ by gluing a short strip of extra foam board over the twine ends on the back. This reinforces the attachment point and prevents the twine from pulling directly on the glue. Test the strength of your hanger before displaying.
Your Dreamy Moon Phase Wall Art Awaits!
See, I told you it would be super easy and fun! Your new Boho Celestial Moon Phase Wall Art (Dollar Tree DIY) is going to look amazing, whether you hang it in a Farmhouse / Rustic bedroom or give it as a thoughtful gift. Don’t forget to show off your creation on social media and tag me, I’d love to see what you made!
📱 Free to Download
Join 50,000+ crafters already using Craftino
Browse 42+ Farmhouse / Rustic ideas and thousands more in the app
✓ Save crafts & browse fully offline
✓ Download printable PDF guides for every project
✓ Step-by-step photo tutorials, nothing left out
✓ 1,000+ craft projects with new ones added every week
Frequently Asked Questions
How many moon shapes do I need for this Boho Celestial Moon Phase Wall Art (Dollar Tree DIY)?
You’ll need five moon shapes for a standard display, typically one full moon and two waxing/waning crescent moons on each side. I used 3-inch wooden rounds from Dollar Tree and cut them into moon shapes.
What’s the best type of paint to use for Dollar Tree wood crafts like this Farmhouse / Rustic project?
Acrylic craft paint works perfectly for Dollar Tree wood items. I used a chalk-finish acrylic paint in a soft white or cream color for a lovely Farmhouse / Rustic look, and it dries in about 15-20 minutes.
How much does it cost to make the Boho Celestial Moon Phase Wall Art (Dollar Tree DIY)?
This craft is incredibly budget-friendly, costing around $3-4 total if you buy all supplies at Dollar Tree. The wood rounds are $1.25 for a pack of 8, and the twine and paint are also $1.25 each.
How long does it take to complete this Dollar Tree DIY moon phase project?
You can typically finish this project in about 30-45 minutes, including drying time between paint coats. It’s a quick craft that’s great for an afternoon.
Can I customize my Boho Celestial Moon Phase Wall Art for different Home Decor styles?
Absolutely! You can easily customize it by using different paint colors, like black for a more modern look, or by adding beads or small faux flowers to the string. For a Farmhouse / Rustic vibe, try distressing the paint a little.
What kind of string or cord should I use to hang my Dollar Tree moon art?
Jute twine or macrame cord works beautifully and adds to the Boho Celestial feel. I used a natural jute twine from Dollar Tree, which comes in a roll of about 50 feet, perfect for several projects.
Read more official craft tips & tricks on the Dollar Tree Value Seekers Blog.
Leave a Reply