
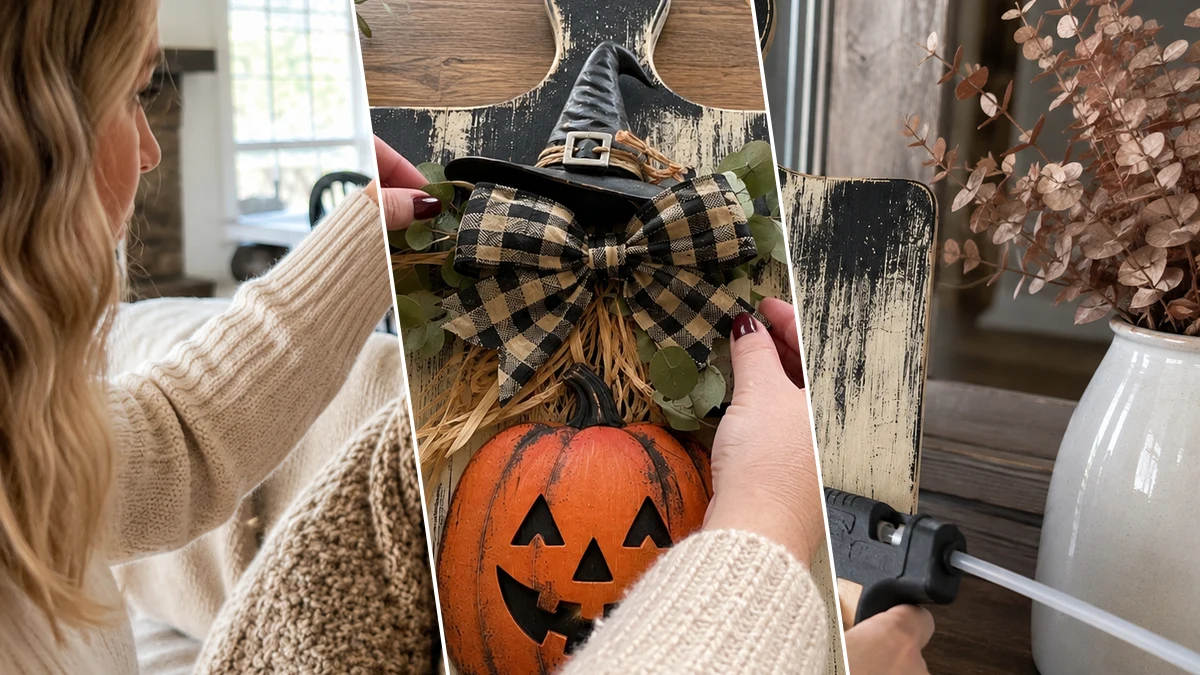
Okay, so I was walking through Dollar Tree last week, just grabbing a few things, and totally spotted these cute cutting boards. Immediately, my brain went, ‘Halloween!’ That’s how this super fun Rustic Halloween Cutting Board Wall Decor idea popped into my head. It’s truly one of those projects that just makes you smile when you see it finished.
Theme: Halloween
Materials Needed
- Large Unfinished Wooden Cutting Board/Sign
- Black & Ivory/White Acrylic/Chalk Paint
- Orange Wooden Pumpkin Cutout
- Small Witch Hat & Bat Cutouts
- Black & Tan Buffalo Plaid Ribbon
- Raffia/Straw & Faux Eucalyptus Greenery
- Jute Rope
- Hot Glue Gun & Paintbrushes
- Fine-Grit Sandpaper
Why This Craft Works
This cute Rustic Halloween Cutting Board Wall Decor is just perfect for adding a little spooky charm to your kitchen or entryway this fall. I even hung mine right by my coffee bar and it looks so good. It’s that cozy, rustic touch you want for your Holiday & Seasonal decorating.
You guys know I love a good budget-friendly craft, and this one totally delivers! All the main supplies came straight from my favorite place, Dollar Tree, and the whole project ran me about $11-14 total. Seriously, you can’t beat that for custom Halloween decor!
And guess what else? This craft is super easy, perfect for beginners or even a fun project to do with older kids. From start to finish, the whole thing took me about 20-35 minutes, not counting drying time, of course. It’s great if you need some last-minute Halloween decorations!
Step-by-Step Instructions for Rustic Halloween Cutting Board Wall Decor
Alright, are you ready to get crafty? This Rustic Halloween Cutting Board Wall Decor project is honestly one of the quickest and most satisfying crafts I’ve done lately. You won’t believe how simple it is to put together, and it’s perfect if you’re a beginner crafter or just want a fun little project for a rainy afternoon. Let’s gather our supplies and make some adorable Halloween magic!
Step 1: Prepare & Base Coat Board
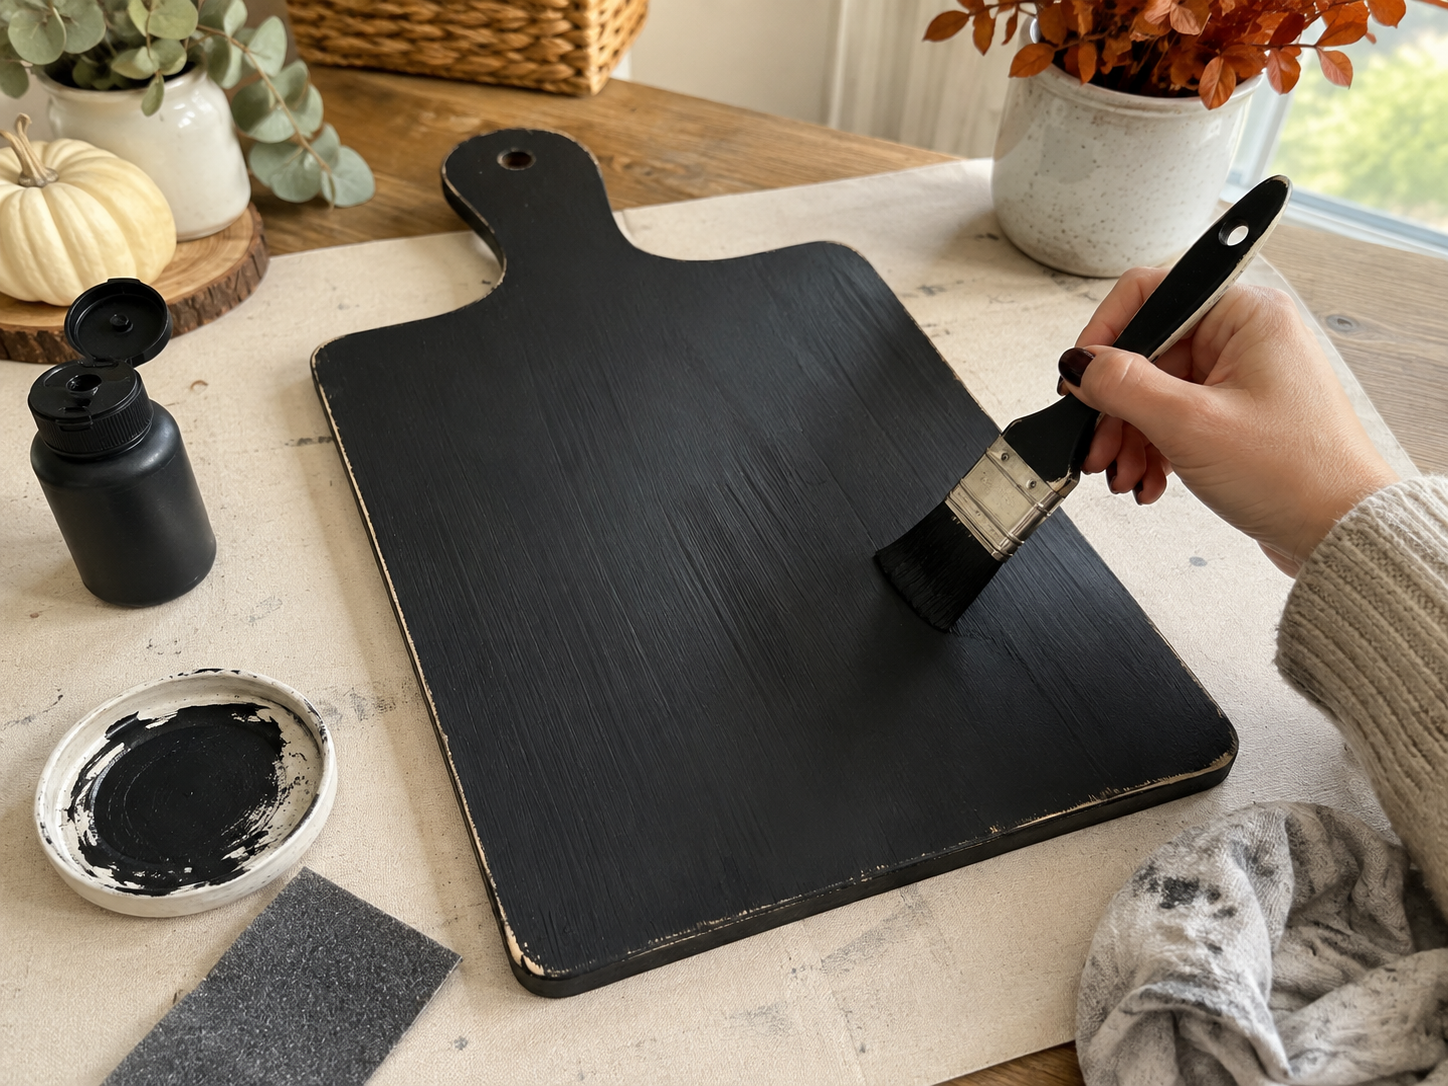
Begin by ensuring your wooden cutting board or paddle sign is smooth. Use fine-grit sandpaper to lightly sand any rough edges or surfaces. Wipe away all dust with a damp cloth and allow it to dry completely. Once clean, apply a uniform coat of black acrylic or chalk paint over the entire front surface and edges of the board. This black layer will serve as the base for our distressed finish.
Step 2: Create Distressed Finish
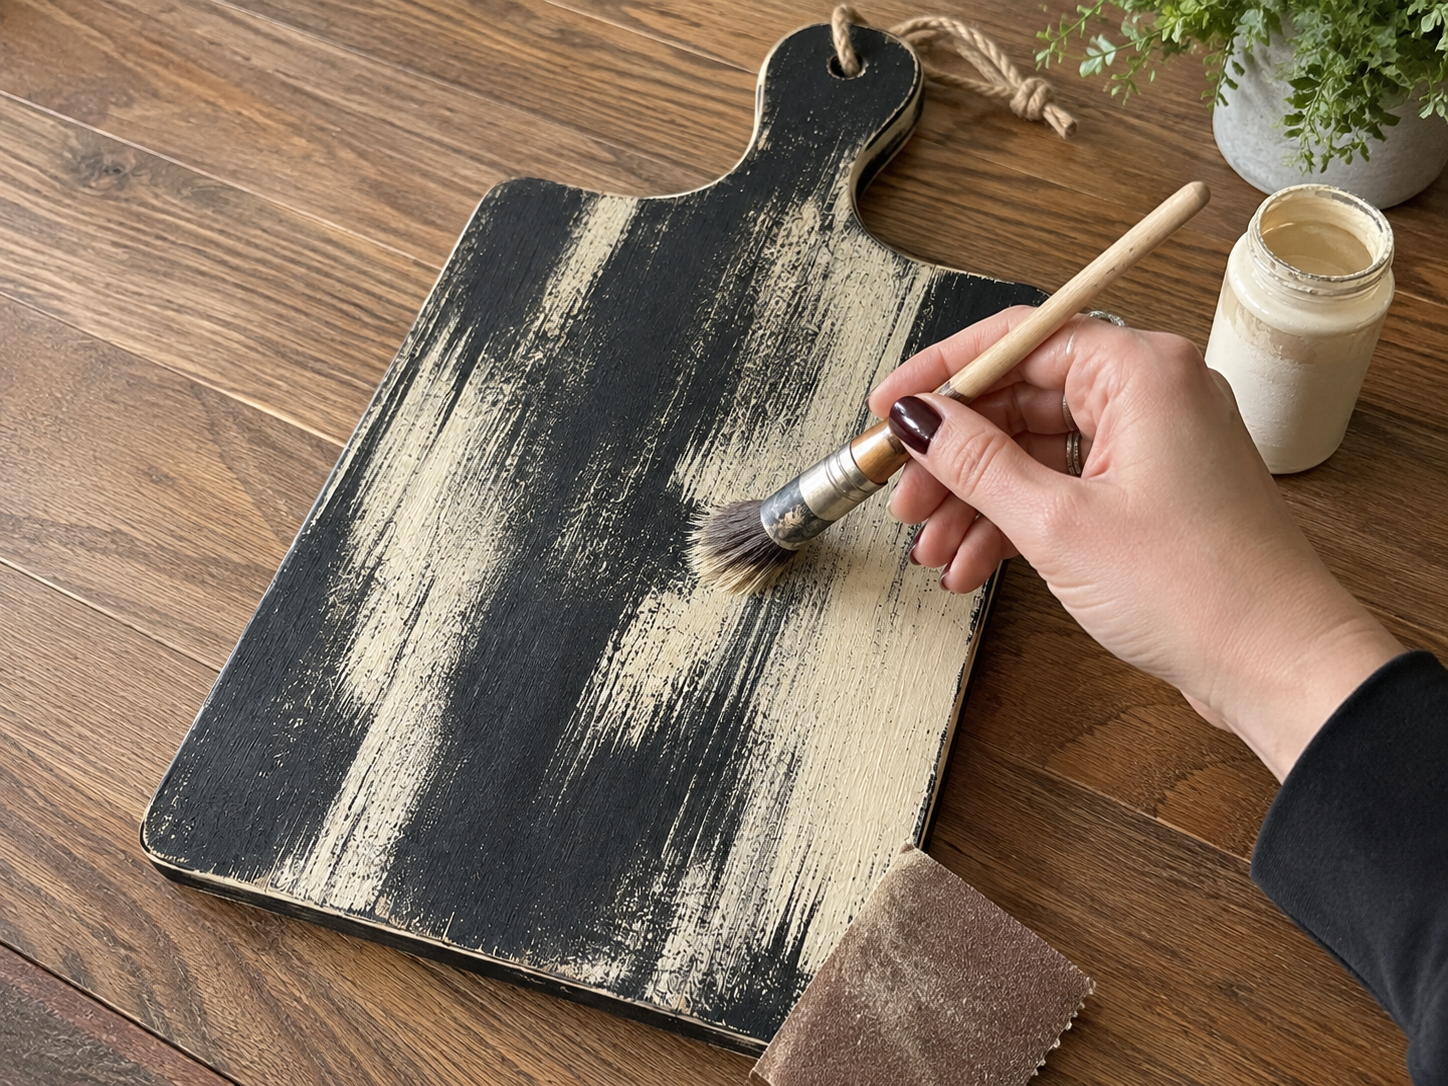
Once the black base coat is fully dry, it’s time to add the rustic, distressed look. Dip a dry paintbrush into your ivory or antique white paint, then blot off most of the excess on a paper towel. Using very light, uneven strokes, dry-brush the ivory paint across the black surface. Focus on sweeping strokes, allowing the black to show through in many areas. The goal is an imperfect, worn-out farmhouse finish, not full coverage. Once the paint is dry, lightly sand the edges of the board to enhance the aged, chippy appearance.
Step 3: Paint & Distress Pumpkin
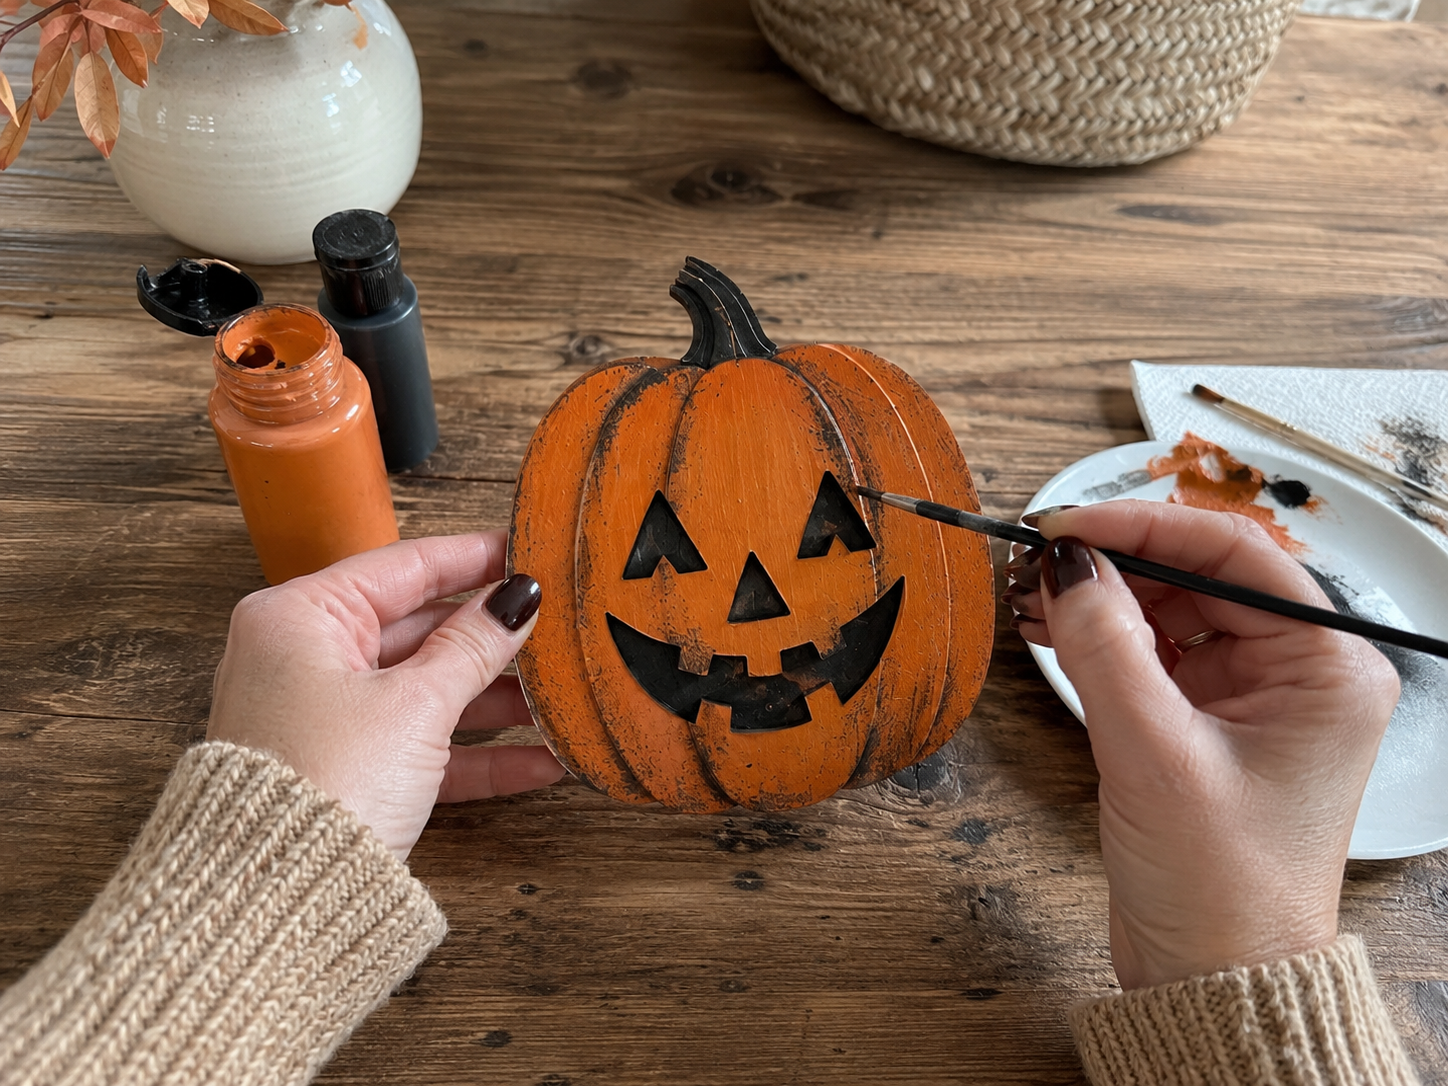
Take your wooden pumpkin cutout and paint it with a burnt orange or classic bright orange acrylic paint. Apply a solid, even coat. Once the orange paint is dry, use a small paintbrush and black paint to carefully add the classic jack-o’-lantern face details (eyes, nose, mouth) and the stem. For an aged look, you can lightly dry-brush some dark brown or black paint over the edges of the pumpkin once the orange is dry, then lightly sand specific areas to reveal the wood or underlying paint for a distressed effect.
Step 4: Attach Pumpkin & Hanger
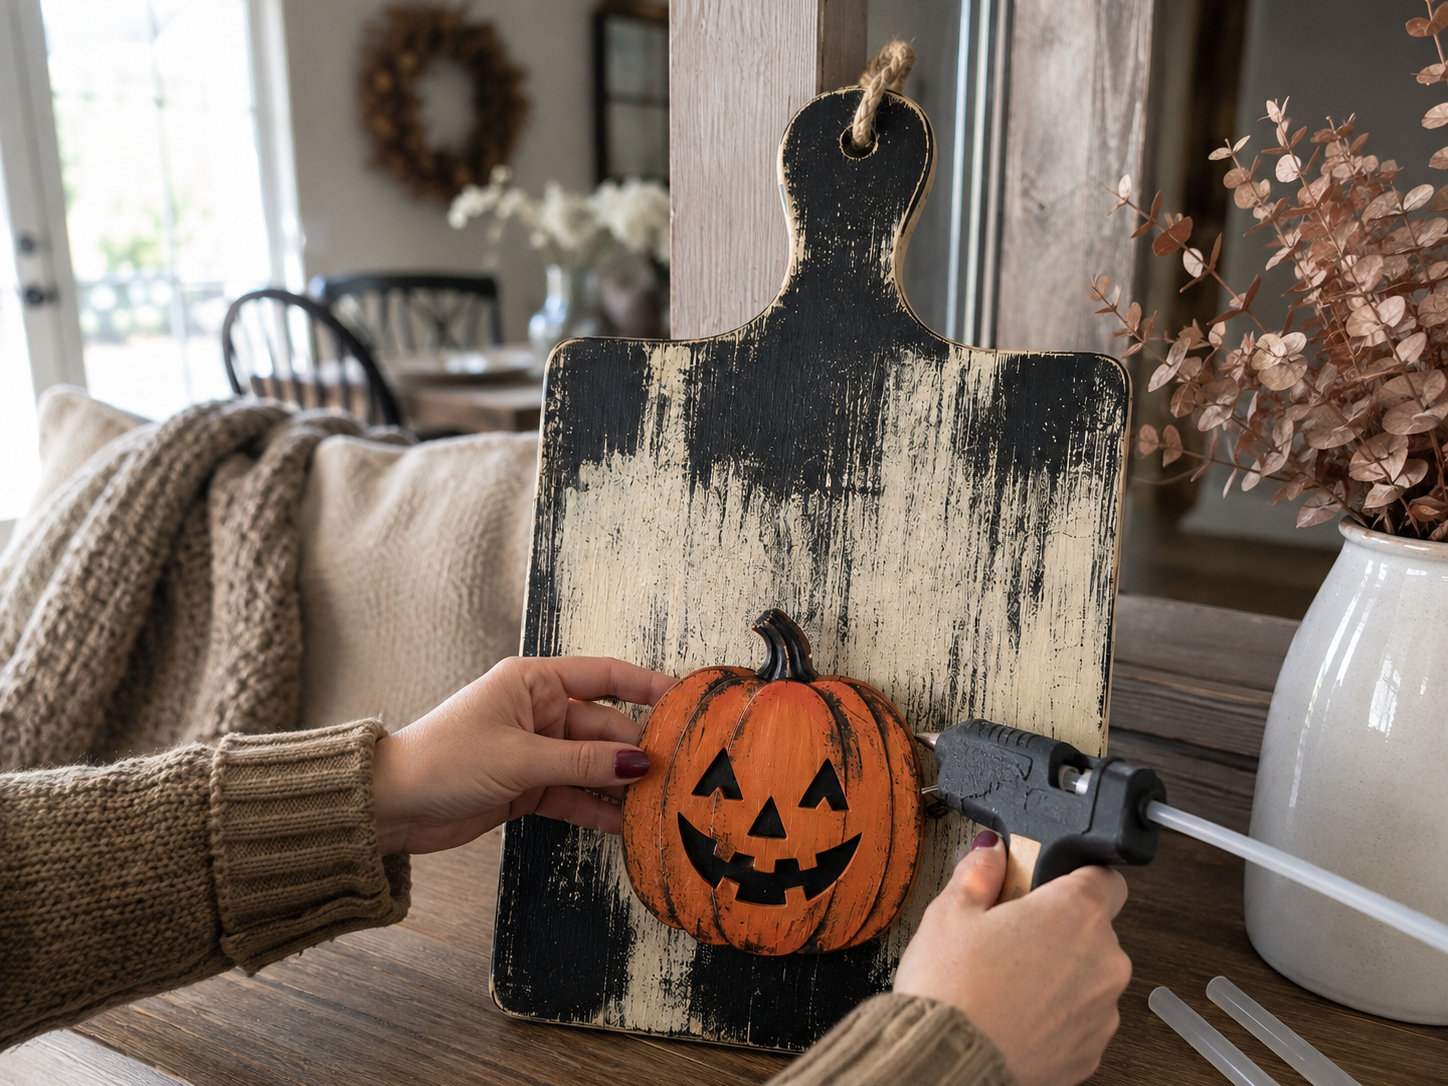
Arrange your completed pumpkin cutout onto the lower half of the distressed cutting board. Once you’re happy with its placement, apply hot glue generously to the back of the pumpkin and firmly press it onto the board. Hold in place for a few seconds until secure. Next, cut a piece of jute rope about 12-15 inches long. Thread it through the pre-drilled hole in the cutting board handle and tie the ends together in a secure knot, creating a hanging loop.
Step 5: Assemble Witch Hat & Bow
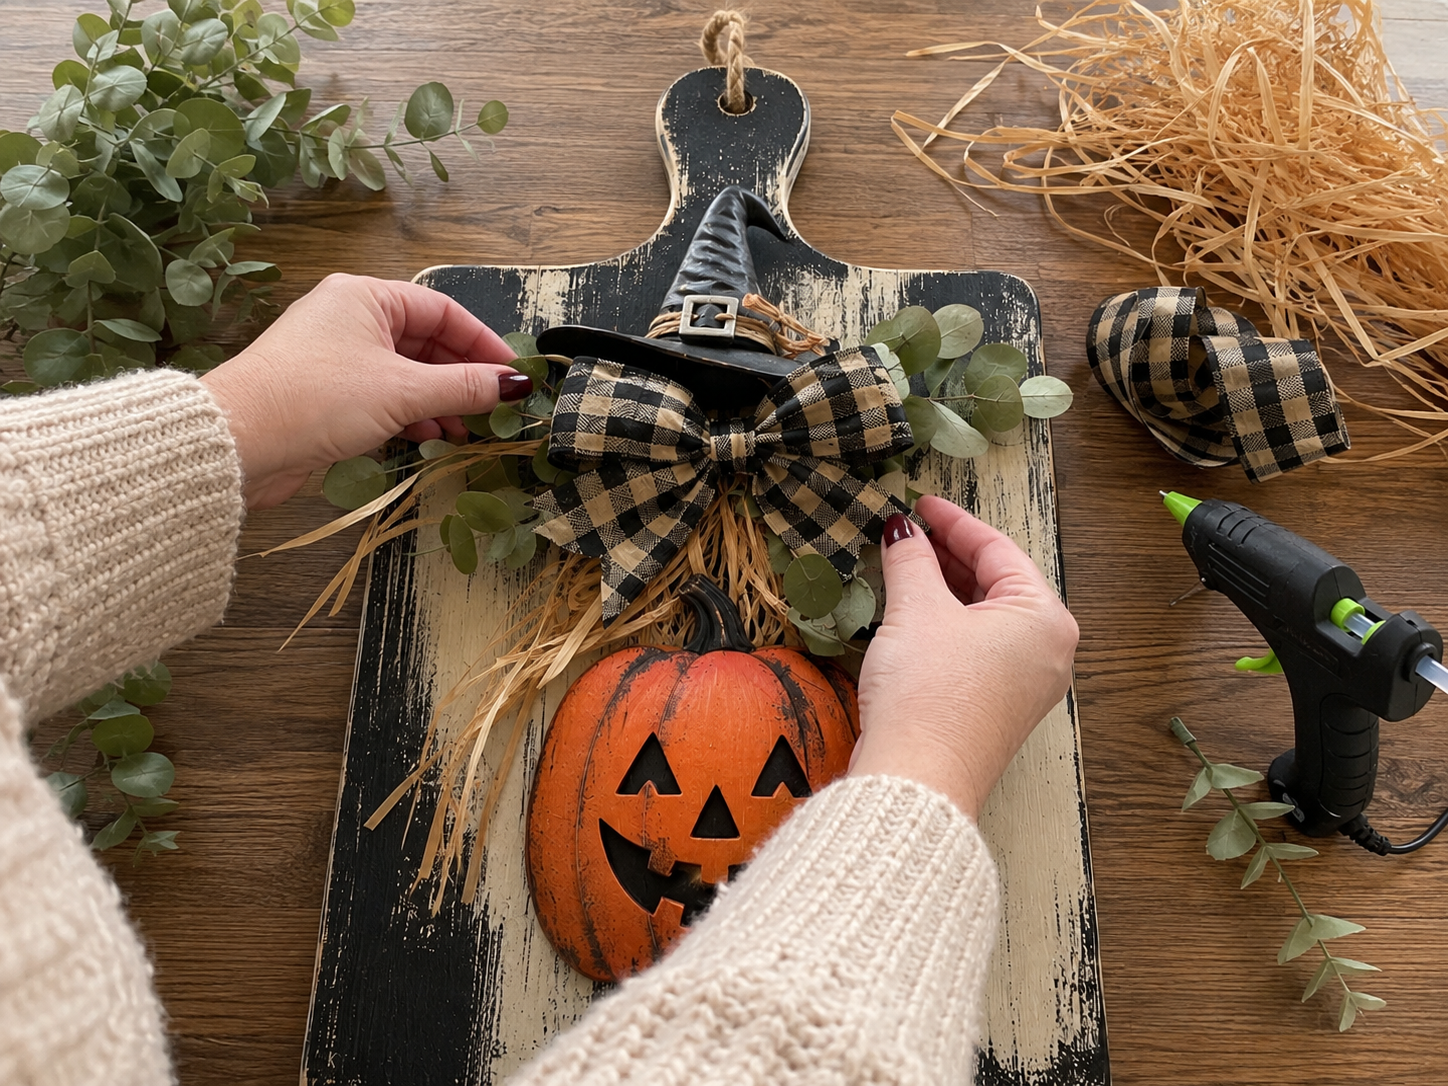
Take your faux eucalyptus greenery and arrange a few sprigs to create a base for your decorative cluster. Hot glue them above the pumpkin, fanning outwards slightly. Next, create a multi-loop bow from your black-and-tan buffalo plaid ribbon. You can use several layers of raffia or straw ribbon, fanning them out slightly. Hot glue the raffia/straw onto the eucalyptus, then hot glue your plaid bow centrally on top of the raffia/straw. Finally, position the small witch hat ornament or cutout slightly overlapping the top of the bow and secure it with hot glue.
📱 Craftino App
Make more crafts like this
1,000+ Halloween ideas with photo guides & Pro Tips
✓ Step-by-step photo tutorials, nothing left out
✓ Pro Tips for every step
✓ Save crafts & browse fully offline
✓ New ideas added every week


Step 6: Add Playful Bats & Finish
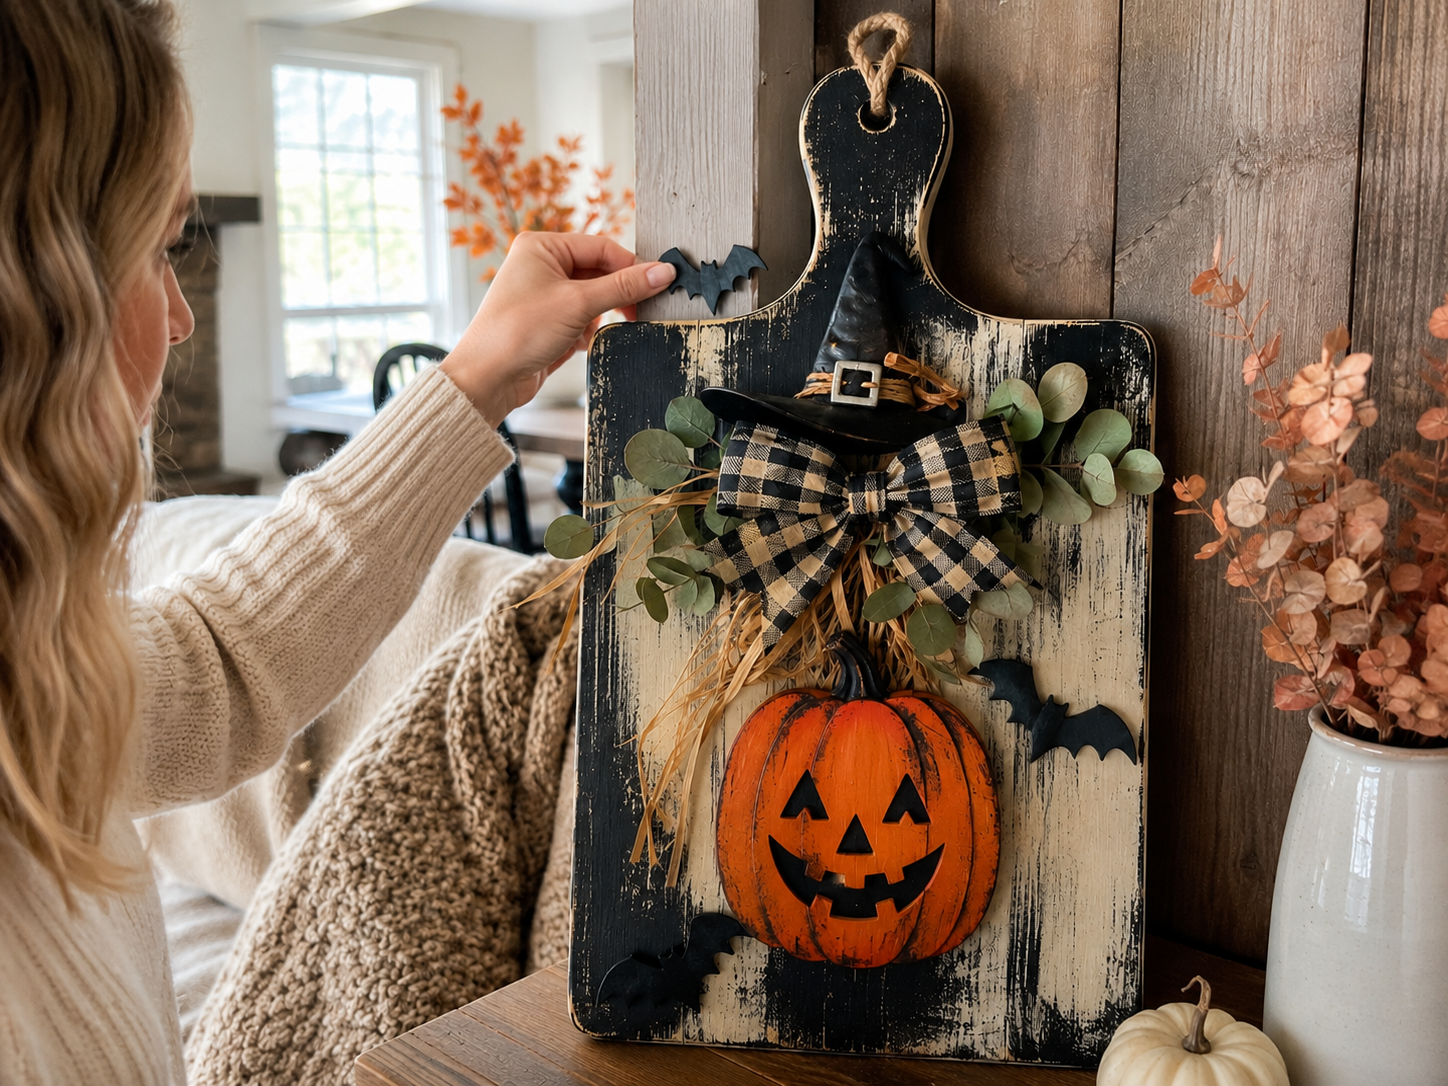
Arrange your two or three small black bat cutouts around the board for a playful Halloween accent. Place one or two higher up near the handle or witch hat, and another lower down near the pumpkin, varying their positions for visual interest. Once satisfied with their placement, hot glue each bat securely onto the board. Take a moment to inspect your entire piece, trimming any stray glue strings, adjusting ribbon loops, or adding extra glue where needed. Your Rustic Halloween Cutting Board Wall Decor is now complete!
See also: Rustic Stacked Pumpkin Wall Plaque
📋 Love staying organized while crafting? Check out our printable planners & craft designs at CraftersDT on Etsy and use code CRAFT20 for 20% off your entire order!
Hello, Gorgeous Rustic Halloween Decor!
See? Wasn’t that fun and easy? Your new Rustic Halloween Cutting Board Wall Decor is going to look amazing in your home, maybe on your kitchen wall or propped up on a shelf. Don’t forget to share your version with me, I’d love to see how you styled it!
📱 Craftino App
Make more crafts like this
1,000+ Halloween ideas with photo guides & Pro Tips
✓ Step-by-step photo tutorials, nothing left out
✓ Pro Tips for every step
✓ Save crafts & browse fully offline
✓ New ideas added every week
Frequently Asked Questions
How much does it cost to make the Rustic Halloween Cutting Board Wall Decor?
The Rustic Halloween Cutting Board Wall Decor costs about $11-14 in total supplies. Most items can be found at Dollar Tree, making it a very budget-friendly DIY project for Holiday & Seasonal decorating.
How long does it take to complete this DIY Halloween cutting board craft?
It takes approximately 20-35 minutes to complete the Rustic Halloween Cutting Board Wall Decor. This time estimate does not include paint or glue drying times, which can vary.
Is the Rustic Halloween Cutting Board Wall Decor project suitable for beginners?
Yes, the Rustic Halloween Cutting Board Wall Decor is an easy project, perfect for beginners. It involves simple steps like painting, gluing, and attaching embellishments, requiring no advanced crafting skills.
Where can I find the supplies for this Dollar Tree Halloween craft?
You can find most of the supplies for the Rustic Halloween Cutting Board Wall Decor at Dollar Tree, including the cutting board, paint, and embellishments. For specific items like twine or hot glue, craft stores like Hobby Lobby or Walmart are also good options.
Can I customize the colors for my Rustic Halloween Cutting Board Wall Decor?
Absolutely, you can customize the colors for your Rustic Halloween Cutting Board Wall Decor to match your home decor. Instead of traditional orange and black, try using muted greens, grays, or even purples for a unique Halloween touch.
Is the DIY Rustic Halloween Cutting Board a good gift idea?
Yes, the DIY Rustic Halloween Cutting Board makes a wonderful handmade gift for friends, family, or neighbors during the Halloween season. Its rustic charm and personal touch are perfect for anyone who loves Holiday & Seasonal decor.
What type of paint is best for the Rustic Halloween Cutting Board Wall Decor?
Acrylic craft paint is best for the Rustic Halloween Cutting Board Wall Decor due to its quick drying time and versatility. You’ll typically need 2-3 colors, such as black, white, and orange, which are readily available at Dollar Tree or any craft store.
What’s a common mistake to avoid when making a Dollar Tree Halloween craft like this?
A common mistake to avoid when making the Rustic Halloween Cutting Board Wall Decor is rushing the drying time for paint and glue. Allow at least 15-20 minutes for paint to dry between coats and ensure hot glue has fully set before handling, to prevent smudges or pieces coming loose.
Shop halloween decor & supplies at Dollar Tree.

Leave a Reply