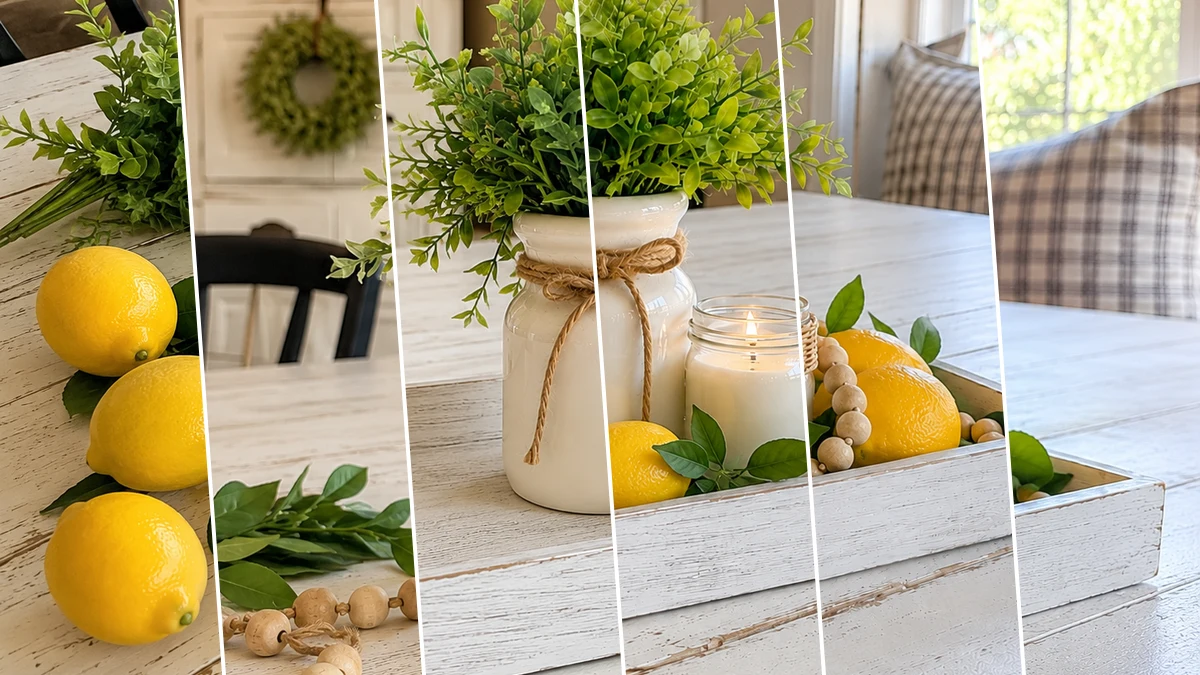
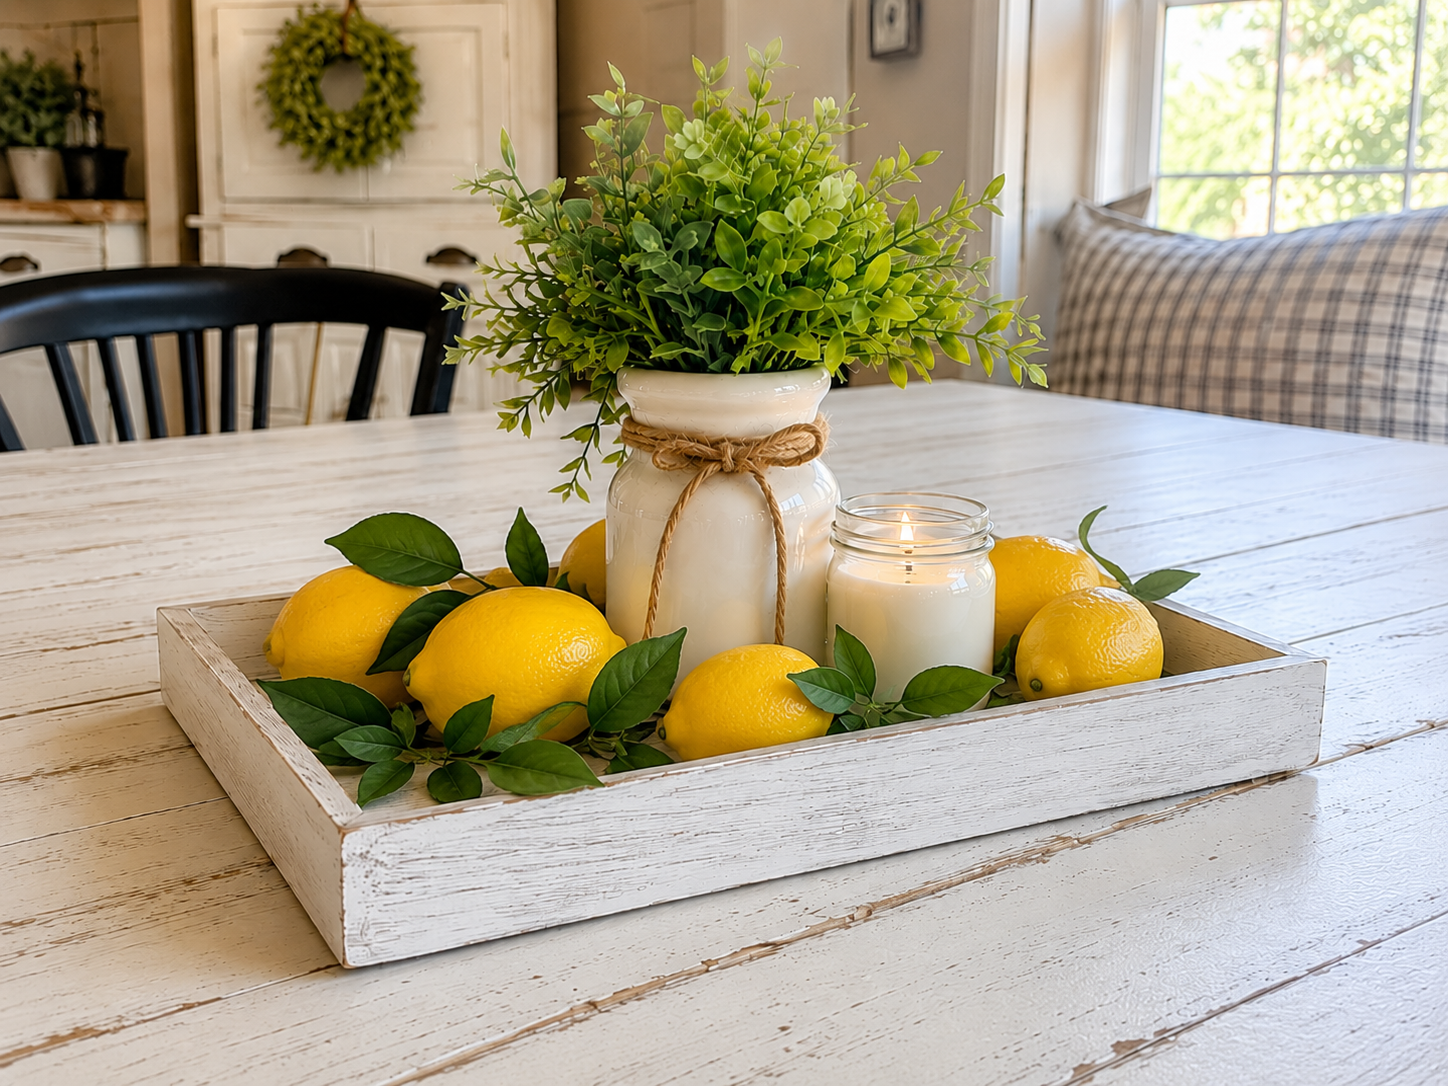
Y’all know that feeling when you walk into Dollar Tree just for one thing, and suddenly your cart is full of sunshine? That’s exactly how this Cheerful Farmhouse Lemon Summer Tray Centerpiece came to life! I saw those cute little lemons and just knew they needed to become something amazing for my kitchen island.
See also: Chic Blessed Minimalist Farmhouse Tray Decor
Theme: Summer & Beach
Materials Needed
- Rustic White Decorative Tray
- Assorted Faux Lemons & Greenery (whole lemons, slice, leaves)
- Small White Ceramic Jar or Vase
- Glass Candle Jar (with candle)
- Natural Jute Twine
- Wooden Bead Garland
- Craft Scissors
📋 Love staying organized while crafting? Check out our printable planners & craft designs at CraftersDT on Etsy and use code CRAFT20 for 20% off your entire order!
Why This Craft Works
This little tray centerpiece is just perfect for adding a pop of sunshine to your home. I love how it brightens up my farmhouse kitchen island, but it would also look super cute on an entryway table, a coffee bar, or even a bathroom counter. It instantly gives that happy, summery vibe to any space you put it!
📱 Free to Download
Join 50,000+ crafters already using Craftino
Browse 99+ Summer & Beach ideas and thousands more in the app
✓ Save crafts & browse fully offline
✓ Download printable PDF guides for every project
✓ Step-by-step photo tutorials, nothing left out
✓ 1,000+ craft projects with new ones added every week

And can we talk about the price tag? Most of the supplies for this project came straight from my favorite place, Dollar Tree! We’re talking about a total cost of under $10, maybe even closer to $5 or $6 if you already have some basic craft supplies at home. Seriously, you can’t beat that for a custom piece of Home Decor!
You’ll be thrilled to know this craft is super easy, even for total beginners! It took me about 20 to 30 minutes from start to finish, not counting drying time. It’s truly a perfect project for a quick afternoon craft session, or even to do with older kids who want to help make some fun Summer & Beach decor.
Step-by-Step Instructions for Cheerful Farmhouse Lemon Summer Tray Centerpiece
Alright, crafters, get ready to unleash your inner sunshine! You are going to love how quickly this Cheerful Farmhouse Lemon Summer Tray Centerpiece comes together. It’s so much fun and honestly, the hardest part is waiting for the paint to dry, ha! This is a fantastic project for beginners, and you’ll be so proud to display your new Home Decor piece.
Step 1: Gather Your Summer Supplies
Begin by gathering all your materials on a clean, flat workspace, preferably a distressed white table to complement the farmhouse aesthetic. Place the rustic white wooden tray centrally. Neatly arrange the faux lemons, various faux greenery (lemon leaves or generic sprigs), the white ceramic jar/vase, the small glass candle jar, a roll of natural jute twine, scissors, and the wooden bead garland around the tray. This initial setup ensures all components are readily accessible for a smooth crafting process.
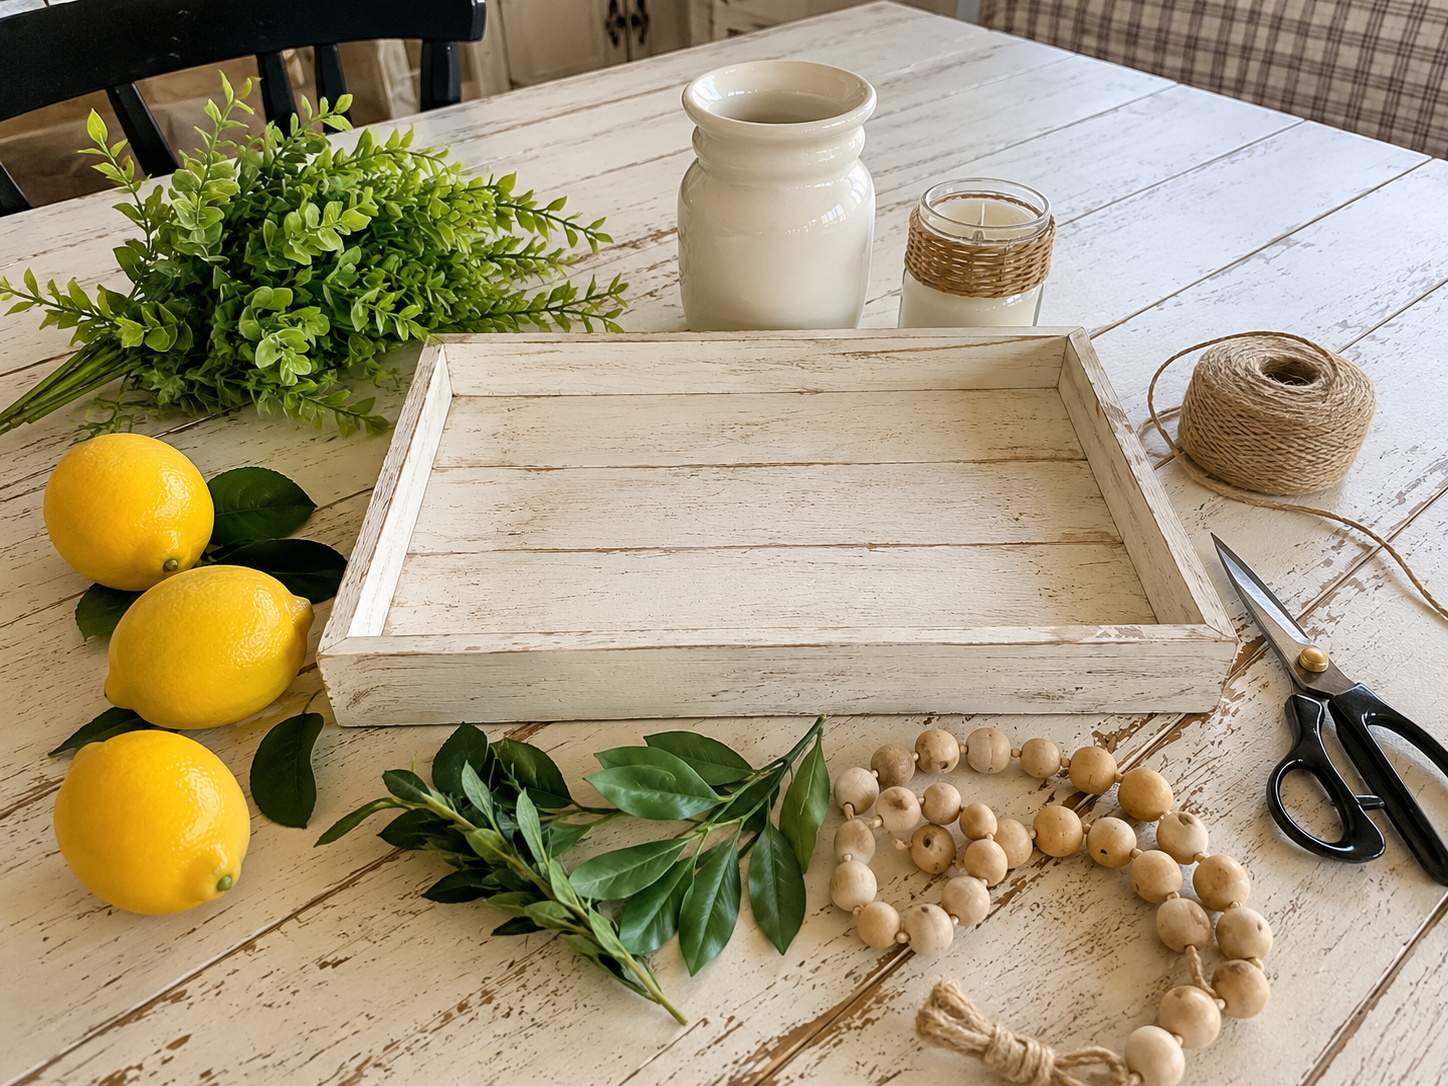
💡 Pro Tip: Organize your materials by type to easily see what you have. For a true ‘Dollar Tree’ feel, check dollar stores or craft store dollar bins for inexpensive faux lemons, greenery, and jars.
Step 2: Embellish the White Jar
Take your white ceramic jar or vase. Measure a piece of natural jute twine long enough to wrap around the neck of the jar twice, with extra length for tying a bow. Wrap the twine securely around the jar’s neck. Tie a small, simple knot and then form a neat, small bow. Trim any excess twine tails. Once the twine is secure, carefully insert the faux greenery sprigs into the jar, arranging them so they stand upright and create a full, natural-looking vertical centerpiece.
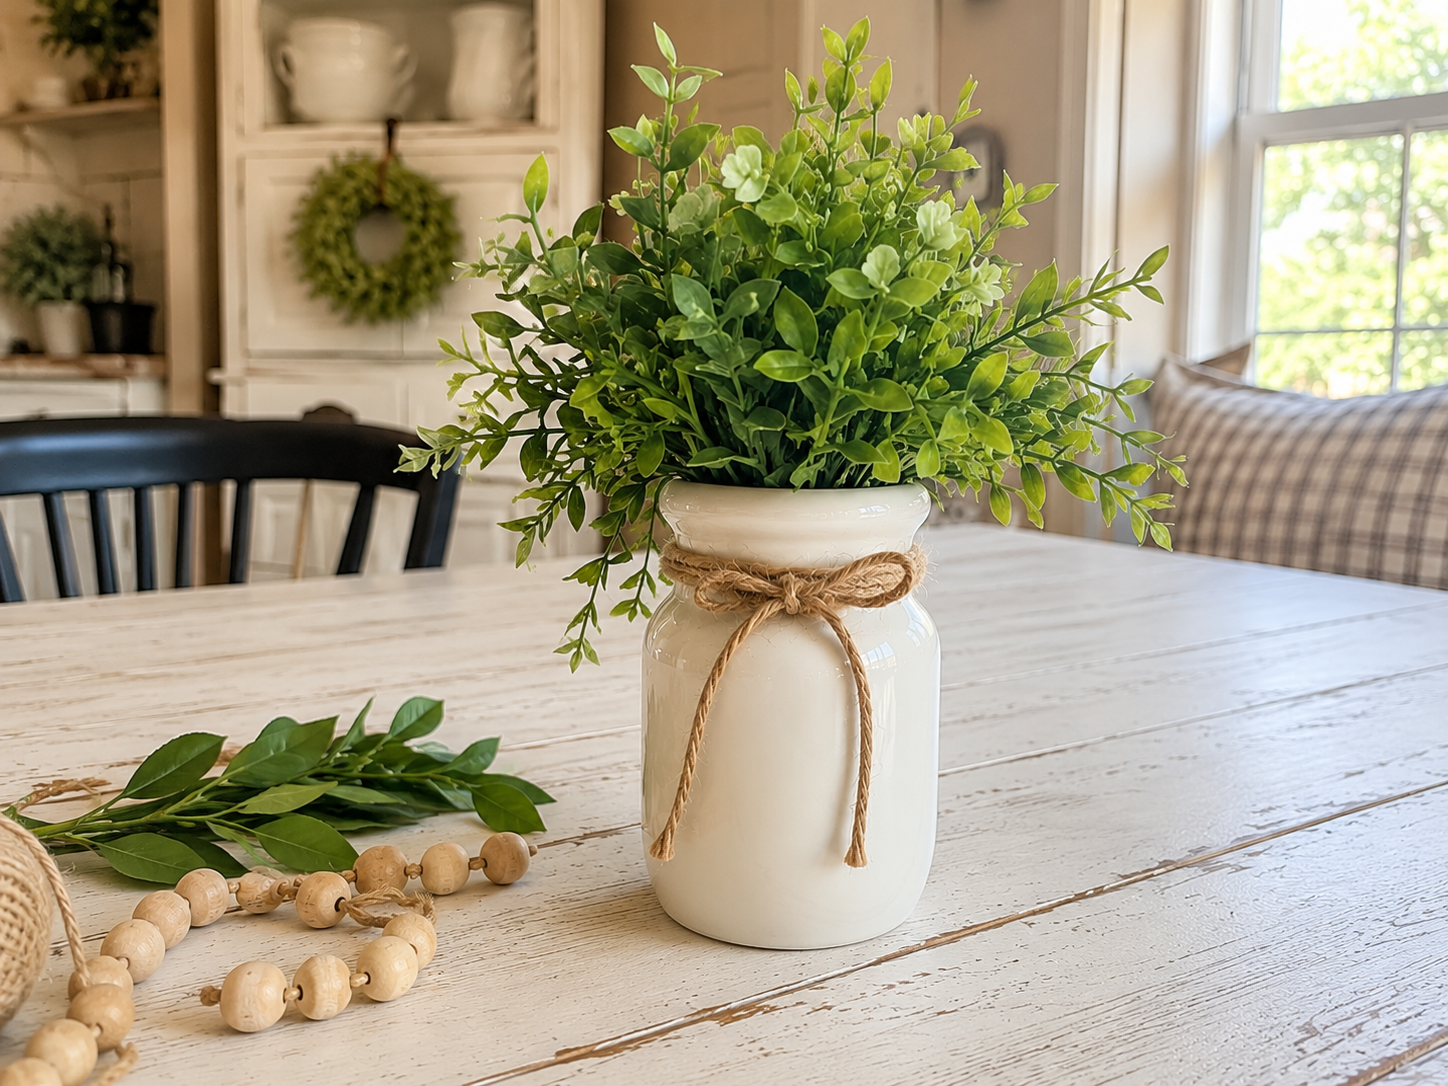
💡 Pro Tip: If your faux greenery stems are too long, you can gently bend them or use wire cutters to trim them to fit the jar and achieve the desired height. A touch of hot glue can secure the twine knot if it tends to slip.
🗓️ Keep all your craft projects on track! Explore our printable planners & templates at CraftersDT on Etsy and use code CRAFT20 for 20% off!
Step 3: Anchor with Jar and Candle
Carefully place the prepared white jar with its greenery into the rustic white tray. Position it either towards the back center or slightly off-center, depending on your preference for balance. Next, place the small glass candle jar beside the white jar. Experiment with their proximity; they can be close together or slightly separated to create visual interest. At this stage, the tray should have its two main vertical elements positioned, starting to form the basic structure of your centerpiece.
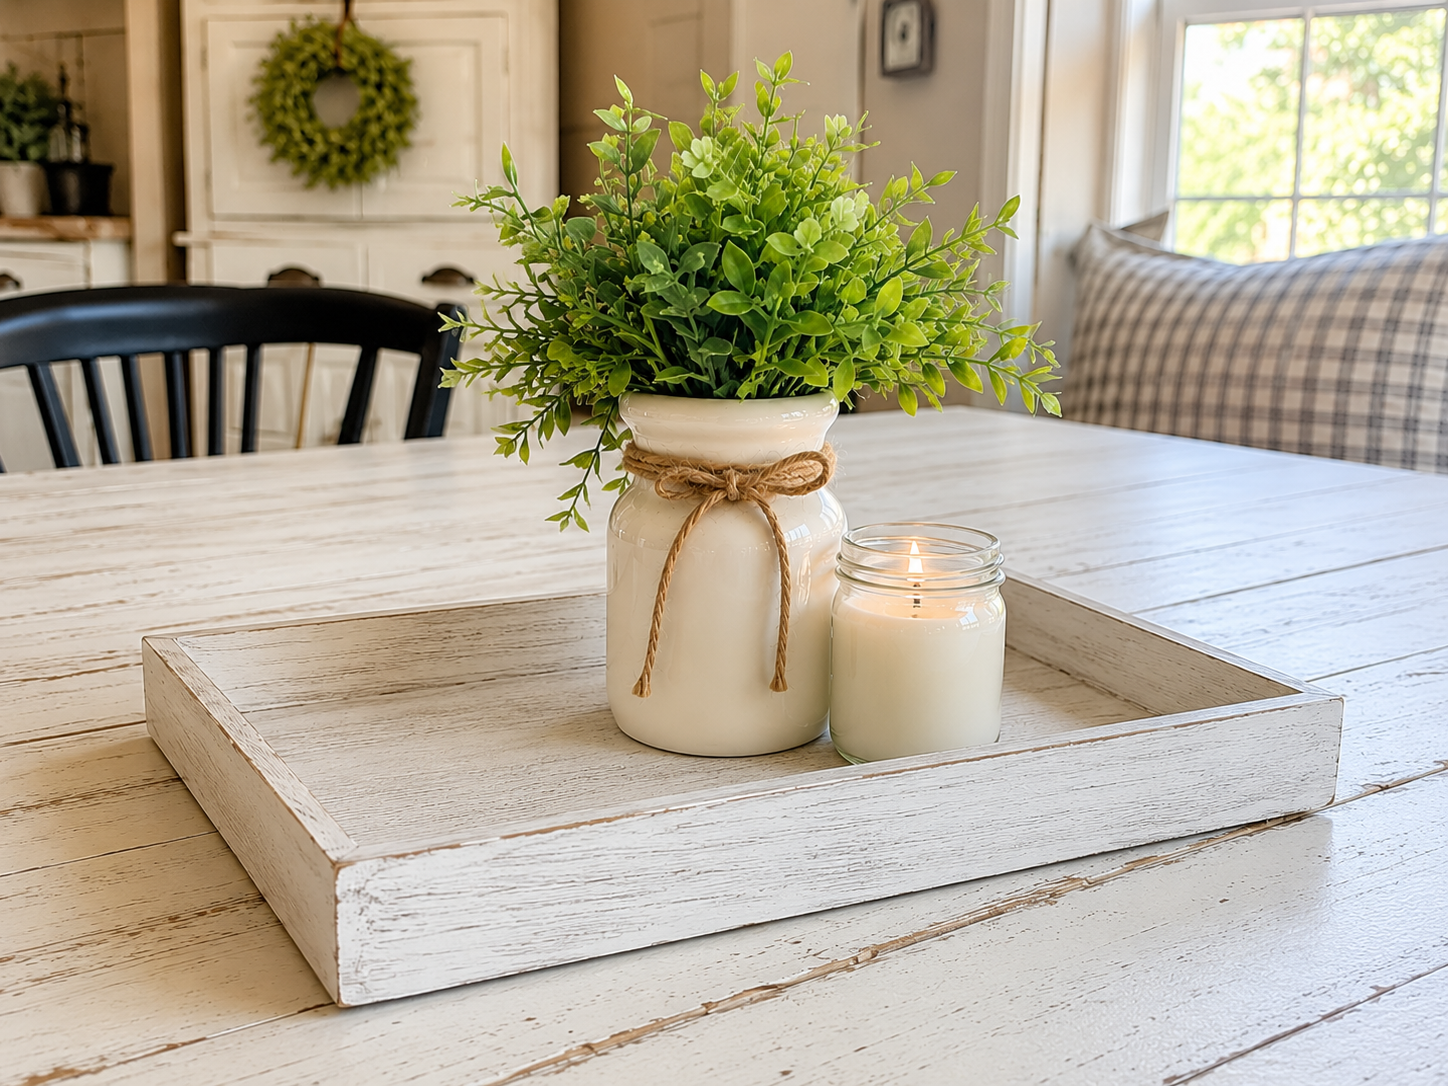
💡 Pro Tip: Consider the ‘rule of odds’ when arranging elements. Using an odd number of primary items (like the jar and candle as two main anchors, later adding more lemons) often creates a more pleasing and dynamic composition than an even number.
Step 4: Fill with Lemons and Leaves
Begin adding your bright faux lemons to the tray. Scatter several whole lemons around the base of the white jar and candle. Don’t aim for a perfectly symmetrical arrangement; instead, let them fall naturally, tucking some slightly under the jar or beside the candle. Next, take individual faux lemon leaves or small greenery sprigs and intersperse them among the lemons and around the bases of the jars. This helps to fill empty spaces, add texture, and enhance the fresh, organic summer feel.
💡 Pro Tip: Use a mix of whole lemons and a faux lemon slice (if you have one) for added visual interest. Arrange the leaves slightly unevenly to mimic how they would naturally fall from a tree, avoiding a stiff, artificial look.
Step 5: Drape Garland and Finish
Now, introduce the natural wooden bead garland. Gently drape it loosely across the tray, weaving it around and through the arranged lemons, the base of the white jar, and the candle. Allow it to coil organically, adding a touch of rustic charm and filling any remaining gaps. If you have a faux lemon slice, position it prominently among the whole lemons. Take a moment to step back and assess the arrangement. Add any final small pieces of greenery or adjust the position of elements to ensure the tray looks cohesive, full, but not overcrowded.
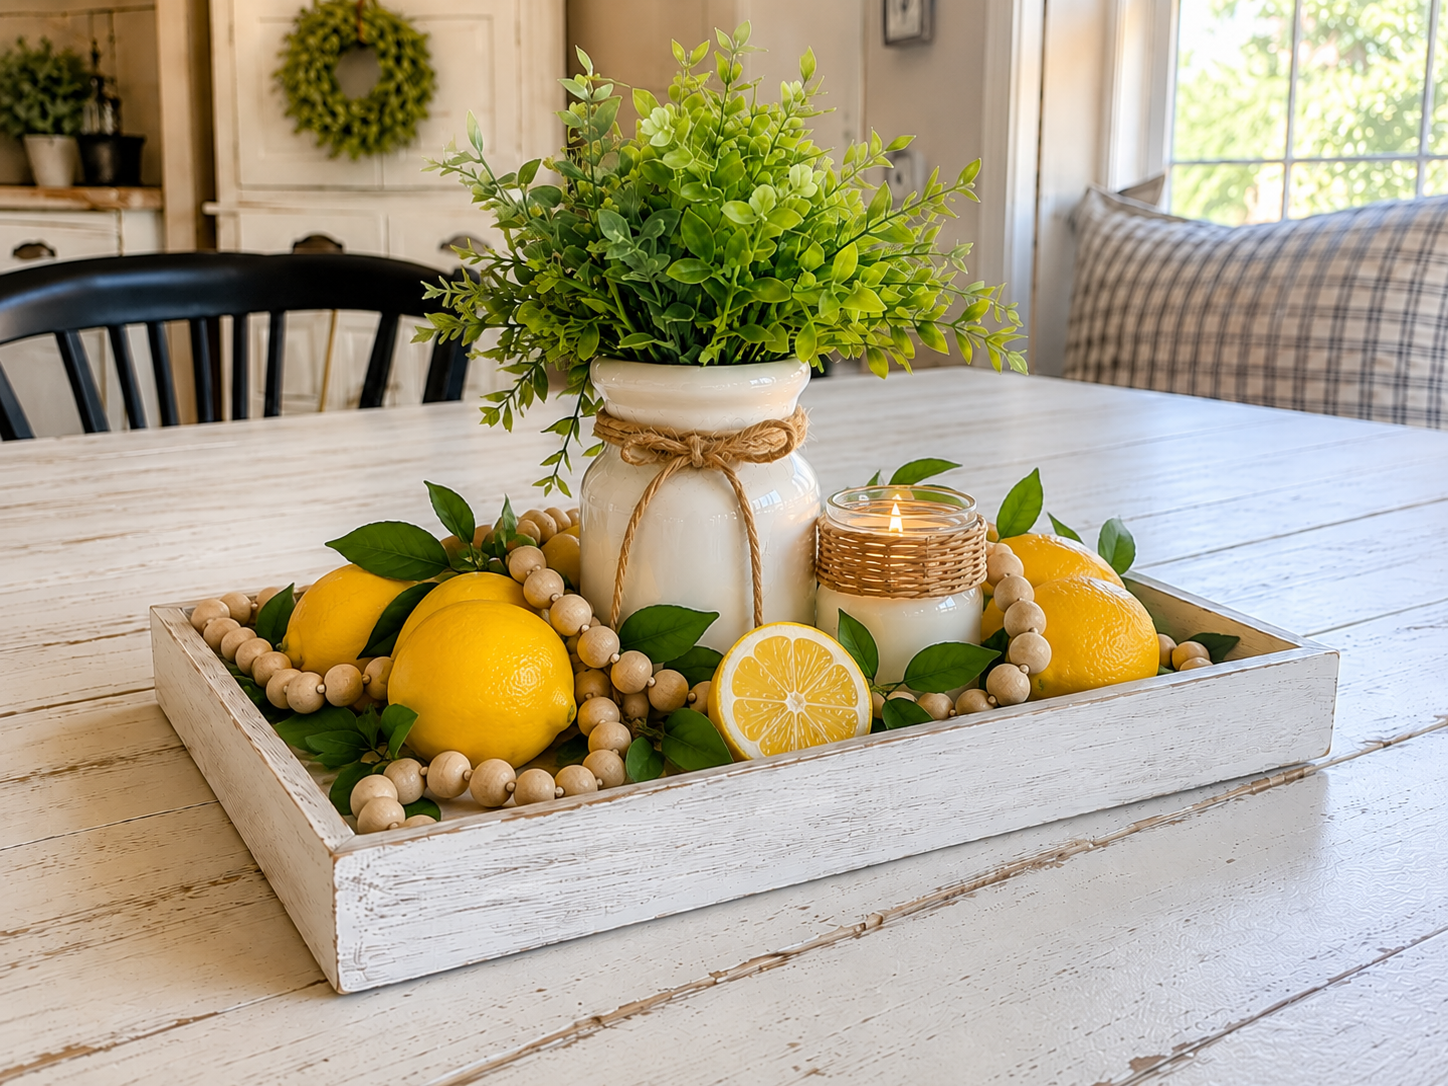
💡 Pro Tip: For the garland, avoid making it too taut or perfectly aligned. A natural, flowing drape looks best. If your garland is very long, you can coil parts of it or even cut it into smaller sections to better fit the tray size and desired look.
📱 Free to Download
Join 50,000+ crafters already using Craftino
Browse 25+ Summer & Beach ideas and thousands more in the app
✓ Save crafts & browse fully offline
✓ Download printable PDF guides for every project
✓ Step-by-step photo tutorials, nothing left out
✓ 1,000+ craft projects with new ones added every week
Step 6: Display Your Summer Creation
Your cheerful Lemon Summer Tray Decor is now complete! Place your finished tray in a prime location in your home, such as a distressed white kitchen island, dining table, coffee table, or entryway console. Arrange it to complement your existing farmhouse-style decor. Ensure good lighting to highlight its bright, fresh appeal. This final placement brings your DIY project to life, ready to add a touch of sunny charm to your living space.
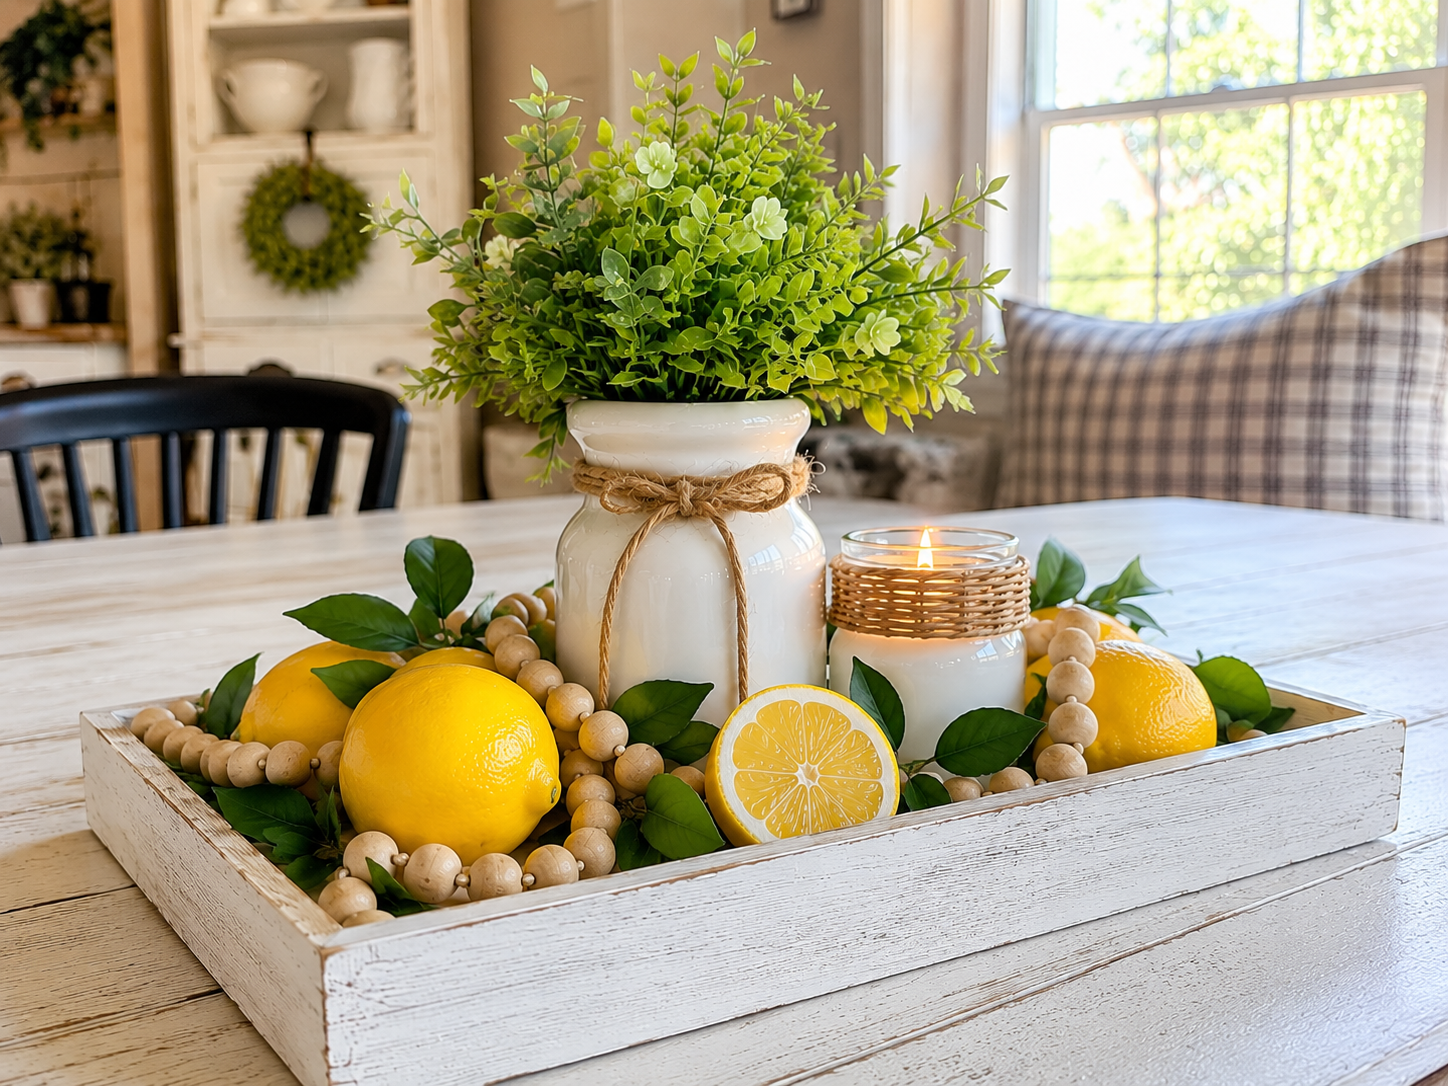
💡 Pro Tip: To truly integrate your tray into its surroundings, consider pairing it with other small farmhouse accents like a simple linen runner, a stack of white dishes, or a small pitcher of fresh flowers nearby. Adjust the elements slightly if needed after placement to catch the light beautifully.
Display Your Cheerful Lemon Tray!
See? Wasn’t that just the sweetest project ever? Your Cheerful Farmhouse Lemon Summer Tray Centerpiece is now ready to spread joy! Place it on your kitchen island, a patio table, or give it to a friend who needs a little sunshine. Don’t forget to tag me if you try a different fruit or color scheme!
📱 Free to Download
Join 50,000+ crafters already using Craftino
Browse 46+ Summer & Beach ideas and thousands more in the app
✓ Save crafts & browse fully offline
✓ Download printable PDF guides for every project
✓ Step-by-step photo tutorials, nothing left out
✓ 1,000+ craft projects with new ones added every week
Frequently Asked Questions
How much does it cost to make this Cheerful Farmhouse Lemon Summer Tray Centerpiece?
You can make this entire Cheerful Farmhouse Lemon Summer Tray Centerpiece for about $5-10, depending on what supplies you already have. I got most of my items for just $1.25 each at Dollar Tree.
What kind of glue works best for a Dollar Tree Summer & Beach craft like this?
I always recommend using a strong craft glue like E6000 or even hot glue for quick adhesion. Hot glue works well for attaching the faux lemons and greenery securely to your tray.
How long does it take to create this DIY lemon tray centerpiece?
This project is super quick! You can easily put together your DIY Cheerful Farmhouse Lemon Summer Tray Centerpiece in about 20-30 minutes, not including any paint drying time which might add another hour or two.
Can beginners make this Dollar Tree Home Decor project?
Absolutely! This is an easy-level craft perfect for beginners. There are no complicated steps, just simple painting and gluing, making it a great first project for Dollar Tree Home Decor.
What are some ways to customize my Cheerful Farmhouse Lemon Summer Tray Centerpiece?
You can easily customize your tray! Try painting the tray a different color, like a soft blue or mint green, or swap out the lemons for faux oranges or berries to match other seasonal decor.
Are the supplies for this Lemon Summer Tray Centerpiece usually available at Dollar Tree?
Yes, Dollar Tree typically carries the main items like small wooden trays, faux lemons, and various greenery stems, especially during the spring and summer months. You might need to check a few stores if you’re looking for specific shades of ribbon.
Check out the official Dollar Tree store for more holiday crafts & supplies here.
Leave a Reply