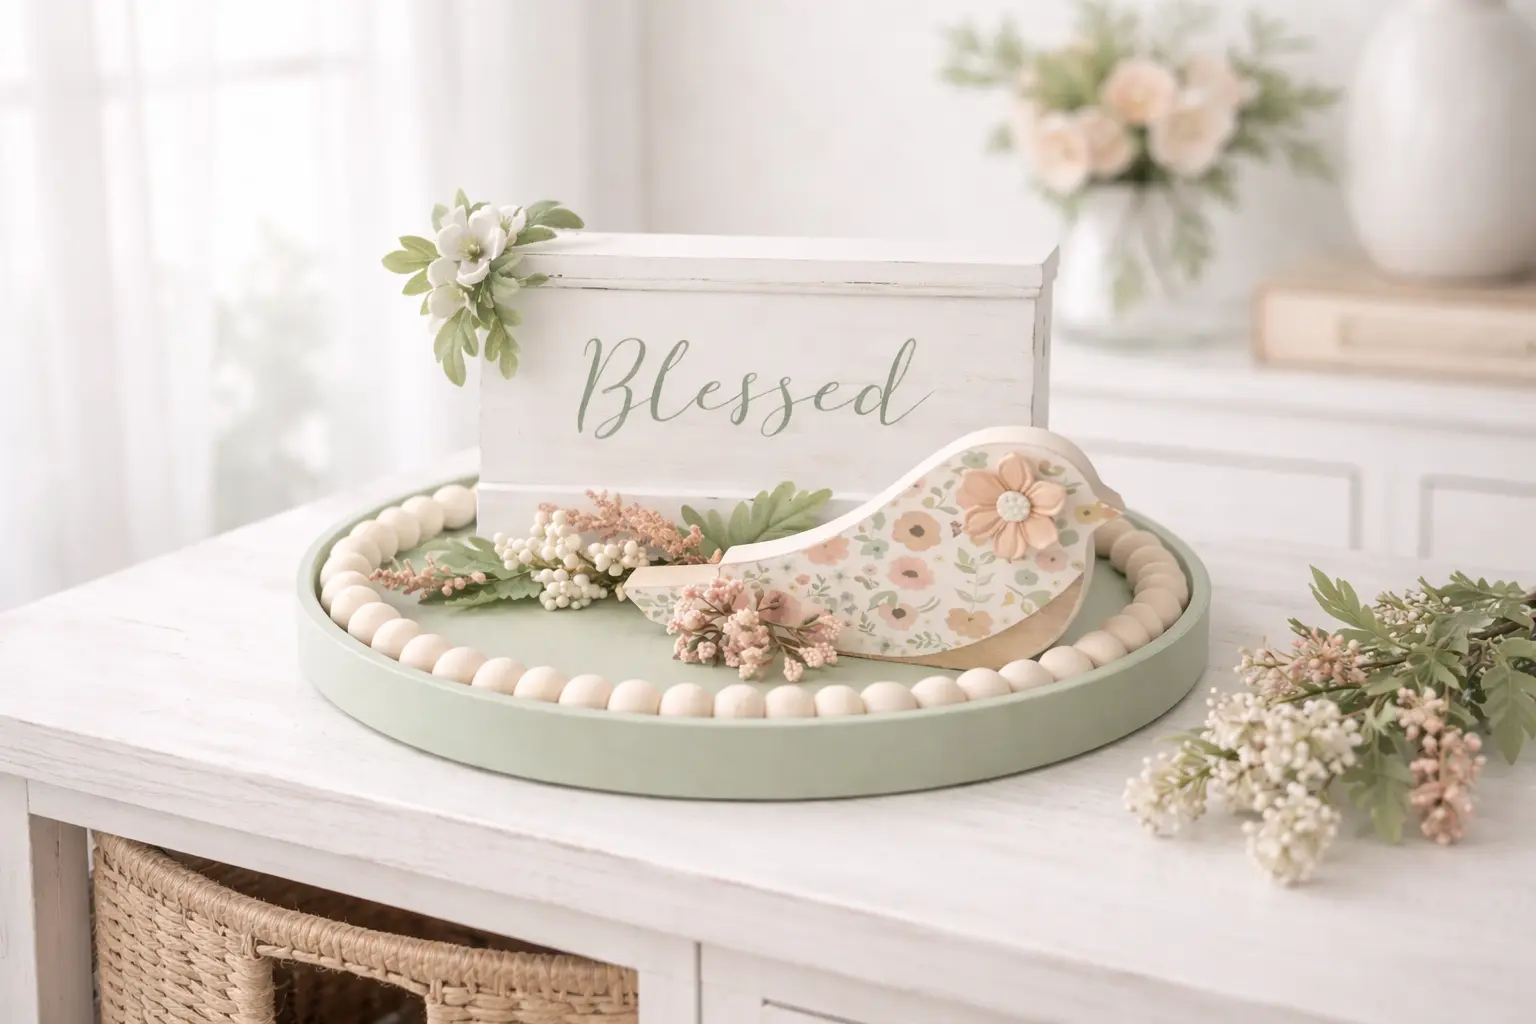
Okay, so I was scrolling Pinterest the other day, just looking for some fresh Home Decor ideas, and saw this super cute tray. I knew right away I needed to make my own version, but with a simple, Farmhouse / Rustic vibe. That’s how I came up with this ‘Chic & Blessed: Minimalist Farmhouse Tray Decor’ project that I just know you’re gonna love!
See also: Dollar Tree Wood Crafts Round Wood Tray
Theme: Farmhouse / Rustic
Materials Needed
- Wooden Round Tray (or similar)
- Assorted Wooden Beads (approx. 20-30, 20mm)
- Acrylic Craft Paint (Sage Green, White)
- Wooden Box or Plaque (for ‘Blessed’ sign)
- Wooden Bird Cut-out
- Faux Floral Picks & Greenery (pastel pink/white flowers, green leaves)
- Craft Glue / Hot Glue Sticks
- Floral Patterned Scrapbook Paper
- ‘Blessed’ Vinyl Decal or Stencil
- Sandpaper (fine-grit)
- Mod Podge (matte finish)
- Sponge Brushes / Paint Brushes
📋 Love staying organized while crafting? Check out our printable planners & craft designs at CraftersDT on Etsy and use code CRAFT20 for 20% off your entire order!
Step-by-Step Instructions for Chic & Blessed: Minimalist Farmhouse Tray Decor
You guys, get ready to have some serious fun with this one! This project is so easy and quick, you’ll probably finish it before your coffee gets cold. It’s perfect for beginners, kids, or anyone who just wants to add a little touch of Farmhouse / Rustic charm to their space without a lot of fuss. Seriously, you’re gonna be so proud of your new Home Decor piece, it’s that good!
📱 Free to Download
Join 50,000+ crafters already using Craftino
You’re still missing out?
✓ Save crafts & browse fully offline
✓ Download printable PDF guides for every project
✓ Step-by-step photo tutorials, nothing left out
✓ 1,000+ craft projects with new ones added every week
Step 1: Prep Wooden Surfaces
Gently sand all wooden components – the round tray, the sign box/plaque, and the wooden bird cut-out – using fine-grit sandpaper. This creates a smoother surface for painting and helps the paint adhere better. Wipe away any dust with a clean, dry cloth.
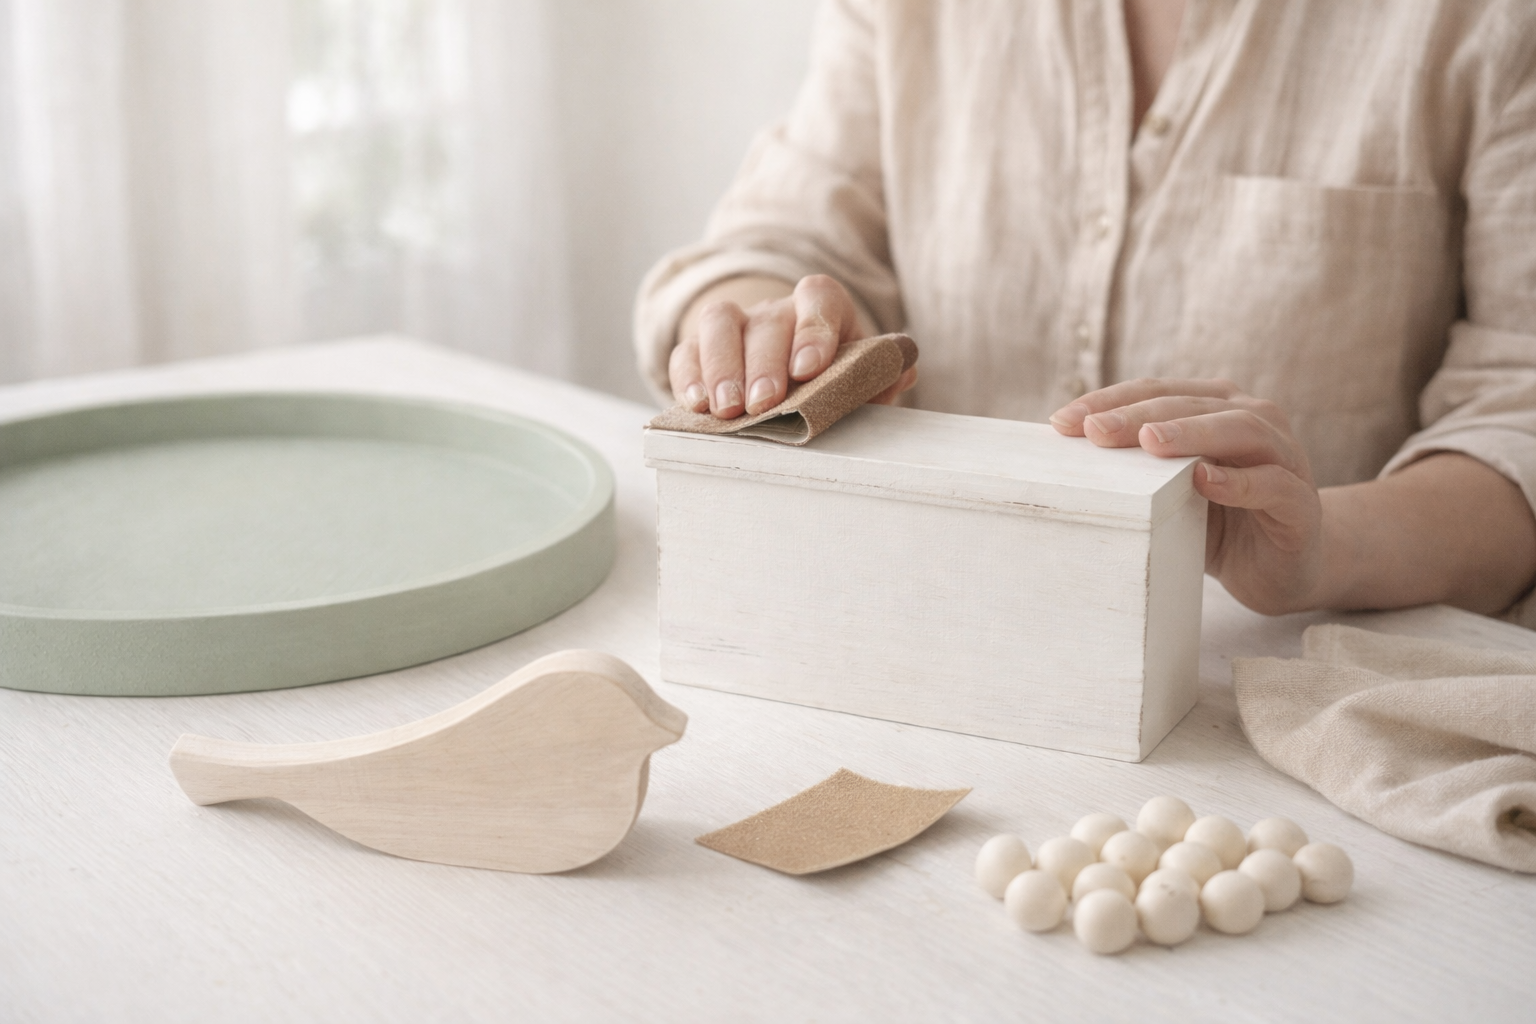
💡 Pro Tip: Pro Tip: Always sand with the grain of the wood to avoid visible scratches. For Dollar Tree wood, a quick pass is often enough to remove factory imperfections.
Step 2: Paint Base Colors
Apply two thin coats of sage green acrylic paint to the round tray, allowing adequate drying time between coats. Paint the wooden sign box/plaque with two thin coats of white acrylic paint. For the wooden bird, paint it a light, neutral base color like white or a very pale tan to ensure the patterned paper colors pop. Use a sponge brush for a smooth finish or a bristle brush for a slightly textured look.
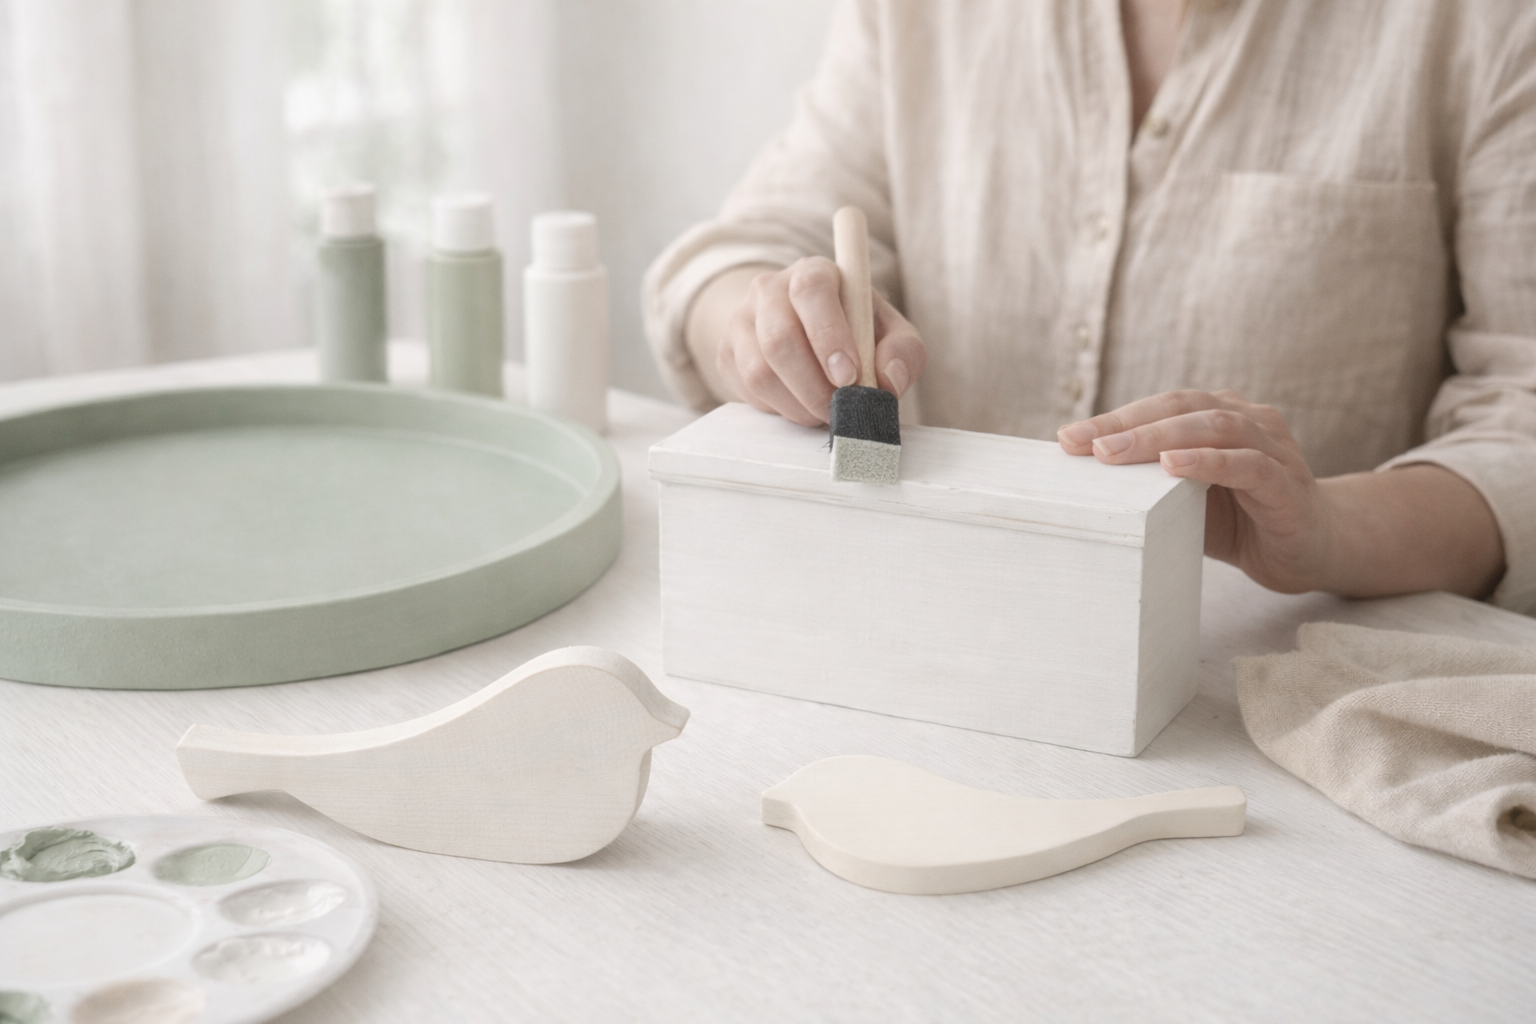
💡 Pro Tip: Pro Tip: Thin coats prevent streaks and drips, and allow for better adhesion. If your paint is too thick, add a drop or two of water. Let each coat dry for at least 20-30 minutes, or until touch-dry, before applying the next.
🗓️ Keep all your craft projects on track! Explore our printable planners & templates at CraftersDT on Etsy and use code CRAFT20 for 20% off!
Step 3: Apply ‘Blessed’ & Distress Sign
Once the white paint on the sign is completely dry, carefully apply the ‘Blessed’ vinyl decal. Smooth it out to remove any bubbles. If using a stencil, center it and dab on sage green paint. For a distressed look, use fine-grit sandpaper to lightly sand the edges and corners of the sign, revealing hints of the natural wood or primer beneath. You can also lightly sand over the painted surface for a weathered feel.
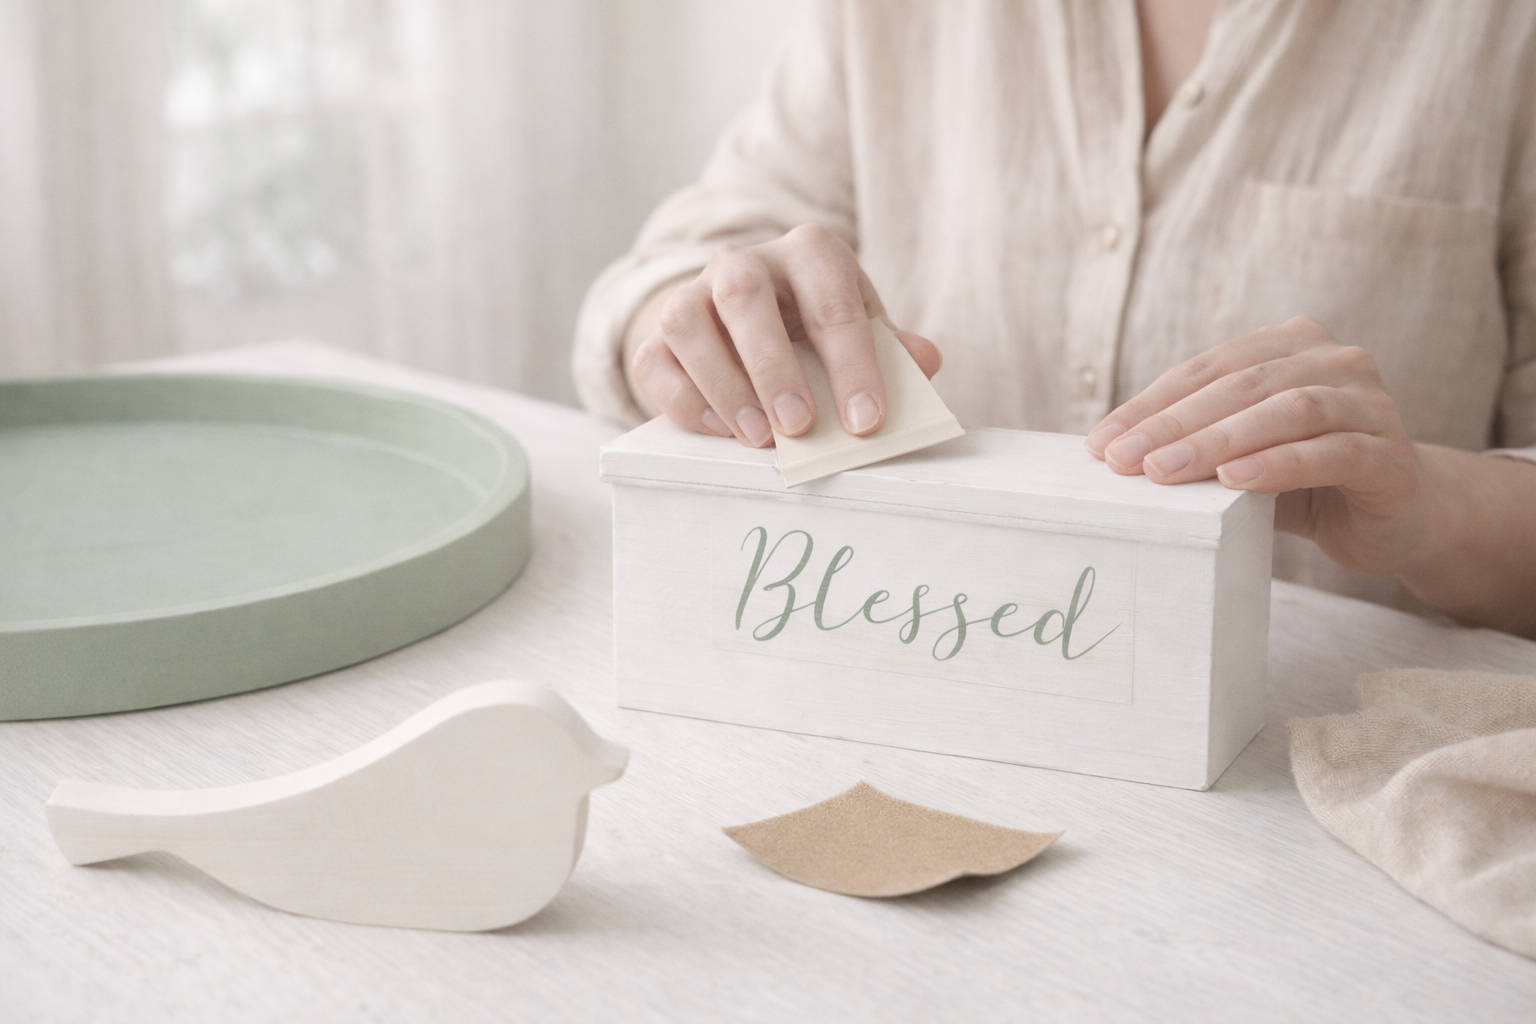
💡 Pro Tip: Pro Tip: For a natural distressed look, focus sanding on areas where natural wear would occur. If using a stencil, use minimal paint on your brush and dab straight down to prevent bleeding under the stencil.
Step 4: Decoupage & Embellish Bird
Cut the floral patterned scrapbook paper to fit the body of the wooden bird. Apply a thin, even coat of Mod Podge to the bird’s surface where the paper will go. Carefully place the paper, smoothing out any air bubbles with your fingers or a craft brayer. Apply another thin coat of Mod Podge over the top of the paper to seal it. Once dry, hot glue a small 3D decorative flower to the bird’s chest area, as shown in the inspiration image.
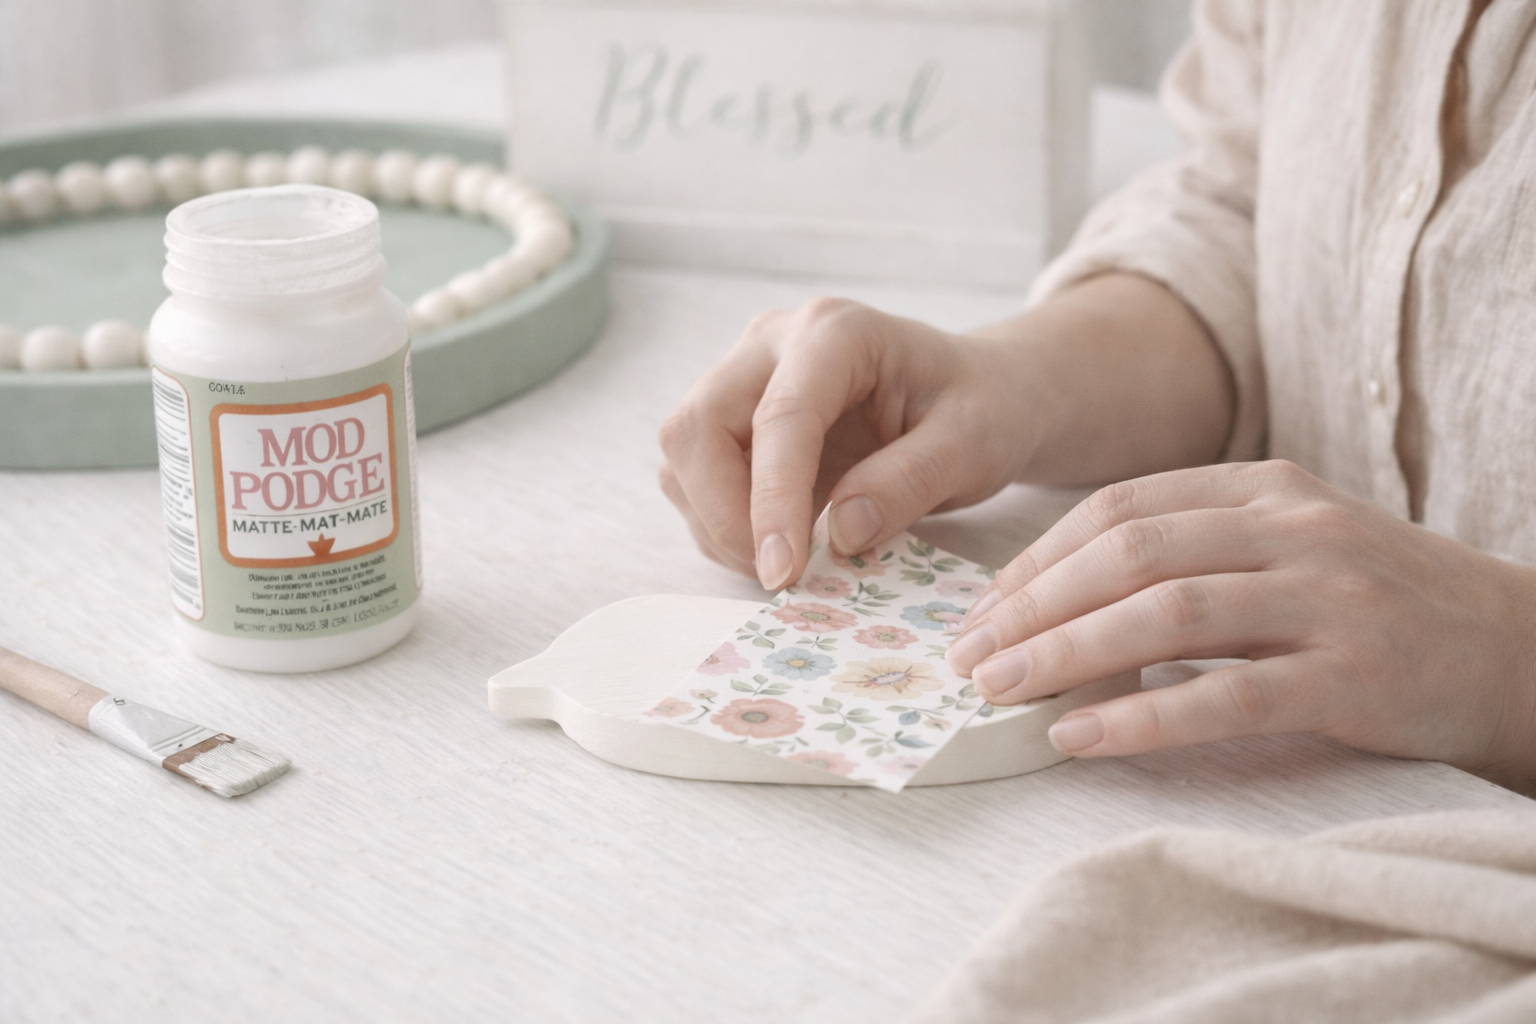
💡 Pro Tip: Pro Tip: When decoupaging, work quickly as Mod Podge dries fast. To avoid wrinkles, start from the center and push outwards. A credit card can be used to smooth out bubbles if you don’t have a brayer. Let the Mod Podge cure fully (up to 24 hours) for durability.
Step 5: Attach Bead Garland
Arrange the individual wooden beads around the inner rim of the sage green tray. Once you have a pleasing layout, use hot glue to secure each bead in place, one by one. Apply a small dot of hot glue to the back of each bead and press it firmly against the tray’s rim. Ensure consistent spacing between beads for a neat finish.
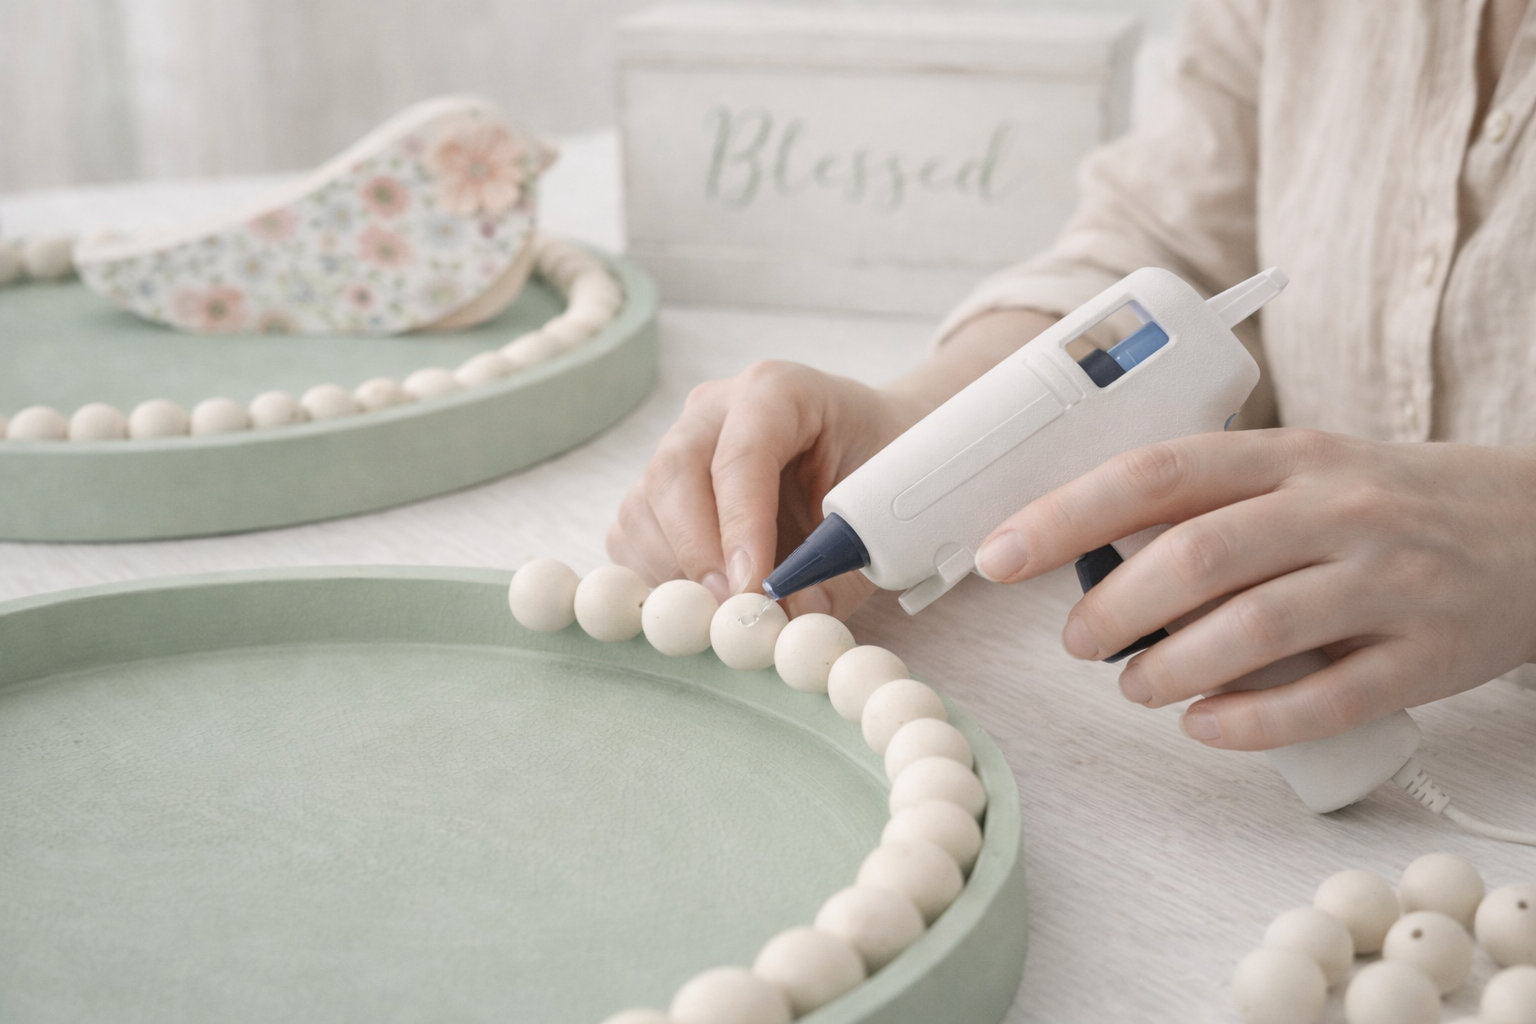
💡 Pro Tip: Pro Tip: Use low-temp hot glue for better control and less risk of burns. Work in small sections, gluing 2-3 beads at a time, to prevent the glue from drying before you can position them. You can use a ruler or a visual guide to ensure even spacing.
Step 6: Final Floral Embellishments
Gather your faux floral picks and greenery. Trim them to size if necessary. Use hot glue to attach a small cluster of white flowers and green leaves to the top left corner of the ‘Blessed’ sign, mimicking the picture. Arrange a few smaller sprigs of pink and white flowers and greenery around the base of the ‘Blessed’ sign and near the wooden bird on the tray. Be mindful of placement to create a balanced, natural look.
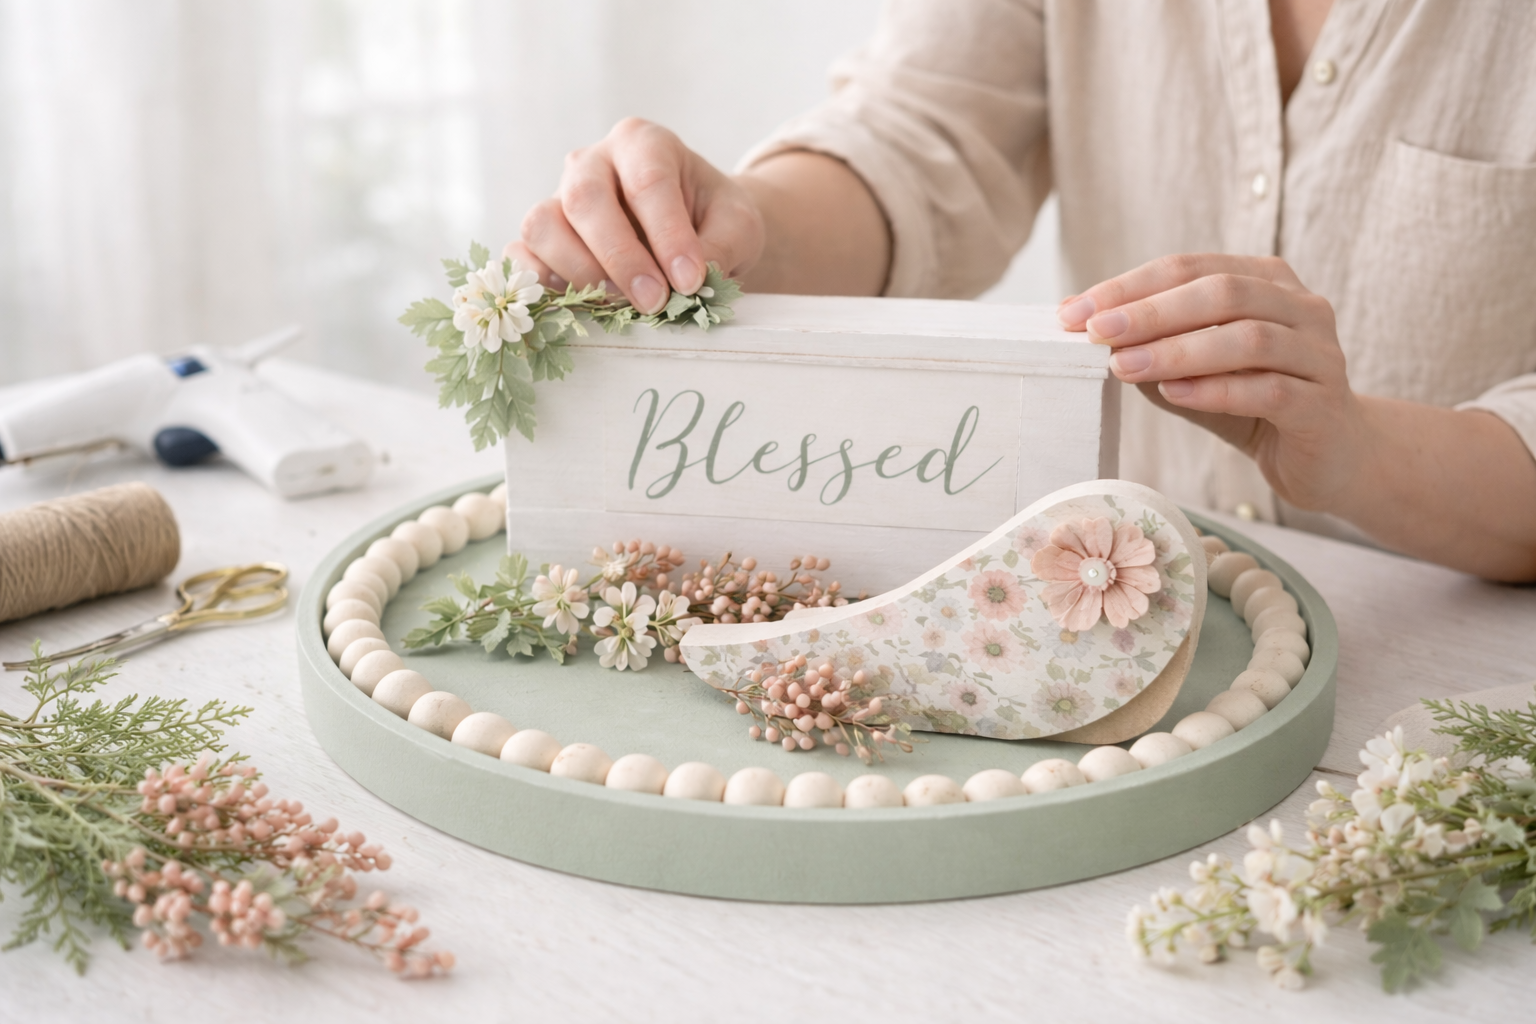
💡 Pro Tip: Pro Tip: Before gluing, dry-fit your floral arrangements. This allows you to experiment with placement and volume without commitment. Use small amounts of hot glue, applied directly to the stem or base of the flower, for a clean finish and to avoid visible glue strands.
Your Chic & Blessed Farmhouse Home Decor is Ready!
And there you have it, your beautiful ‘Chic & Blessed: Minimalist Farmhouse Tray Decor’ is all done! It looks so good on my coffee table, but it would also be perfect on an entryway table or even as a thoughtful gift. Don’t forget to share your finished trays with me, I can’t wait to see your spin on it!
📱 Free to Download
Craftino, The #1 Craft App
✓ Save crafts & browse fully offline
✓ Download printable PDF guides for every project
✓ Step-by-step photo tutorials, nothing left out
✓ 1,000+ craft projects with new ones added every week
Frequently Asked Questions
How long does it take to make this Chic & Blessed: Minimalist Farmhouse Tray Decor?
You can totally whip this up in about 20-30 minutes, not counting drying time for any paint or glue.
Is this a good Home Decor project for beginners?
Absolutely! This Farmhouse / Rustic tray is super simple, no fancy skills needed at all.
What kind of materials can I use for my Farmhouse / Rustic tray?
You can use a wooden tray, metal tray, or even a sturdy cardboard box that you paint. Get creative!
Where can I display my finished Chic & Blessed tray?
It looks great on coffee tables, kitchen counters, entryways, or even as a centerpiece for your dining table.
Check out the official Dollar Tree store for more holiday crafts & supplies here.
Inspiration / Credit: Sherry Drennen
Leave a Reply