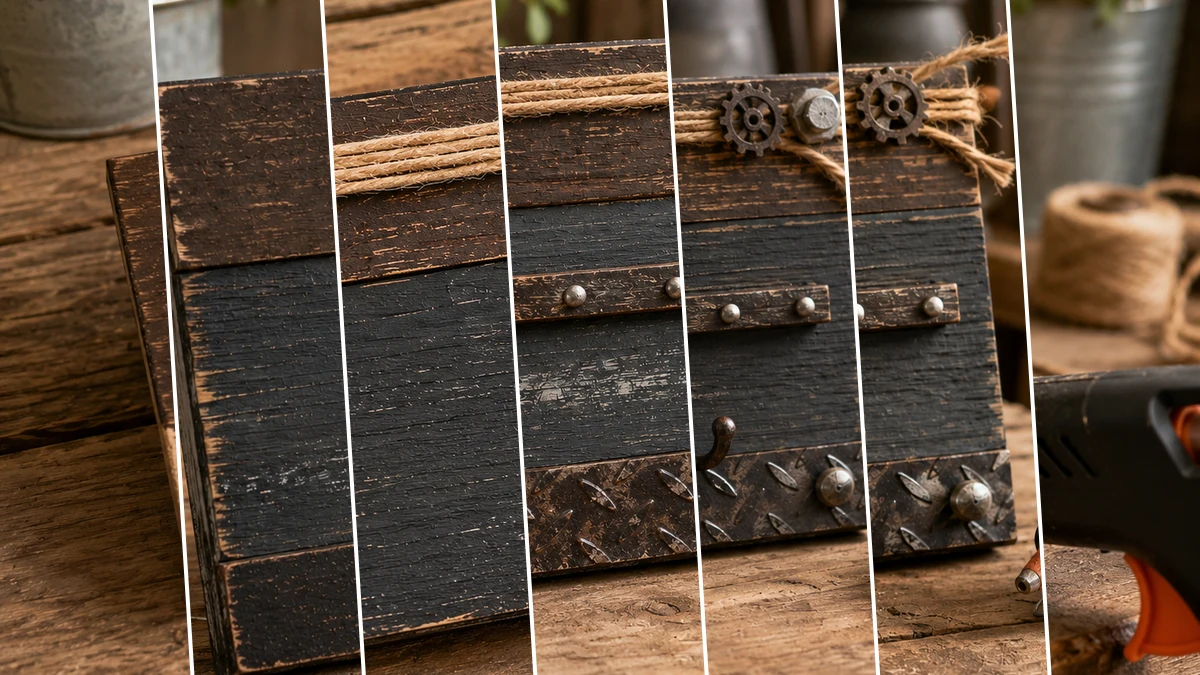
Father’s Day is right around the corner, and I wanted to make something special for my husband’s garage, you know, his little ‘man cave.’ Nothing too frilly, just something rustic and cute that actually fits his style. That’s how I came up with this super easy Dad’s Garage Rustic Mini Sign, and honestly, it turned out even better than I hoped!
See also: Dollar Tree Buffalo Check Gather Sign Diy
Theme: Farmhouse / Rustic
Materials Needed
- Small wooden plaque
- Acrylic craft paints (dark brown, charcoal gray, black)
- Sponge brush
- Jute twine
- Assorted rustic embellishments (miniature wrenches, gears, faux metal strips, decorative bolts/rivets, small utility hook)
- Hot glue gun and glue sticks
- Fine-grit sandpaper
📋 Love staying organized while crafting? Check out our printable planners & craft designs at CraftersDT on Etsy and use code CRAFT20 for 20% off your entire order!
Why This Craft Works
This sweet little sign is just perfect for so many spots! It’s obviously great for Dad’s actual garage or workshop, giving it that cozy, personalized feel. But honestly, it also looks super cute on a shelf in a farmhouse-style living room or even in a ‘man cave’ corner. It brings that lovely Farmhouse / Rustic vibe wherever you put it, making any space feel more homey and personal.
📱 Free to Download
Join 50,000+ crafters already using Craftino
Browse 99+ Farmhouse / Rustic ideas and thousands more in the app
✓ Save crafts & browse fully offline
✓ Download printable PDF guides for every project
✓ Step-by-step photo tutorials, nothing left out
✓ 1,000+ craft projects with new ones added every week

And let’s talk about the best part, the cost! Most of what you need for this Dad’s Garage Rustic Mini Sign can be grabbed right from your local Dollar Tree. We’re talking about a total project cost of usually under $5, maybe even just $3 or $4 if you already have some paint at home. It’s truly a budget-friendly way to add some charm.
You’ll be so happy to hear that this craft is super easy, even for total beginners! You can whip up this Dad’s Garage Rustic Mini Sign in about 20-30 minutes, maybe a little longer if you’re taking your time. It’s a fantastic project for anyone looking for a quick win, a last-minute gift, or just a fun way to spend a half hour crafting. No fancy skills needed here, promise!
Step-by-Step Instructions for Dad’s Garage Rustic Mini Sign
Alright, crafters, are you ready to get started? This Dad’s Garage Rustic Mini Sign project is so much fun and goes together super fast, you won’t believe it! I bet you’ll have it done in less than an hour, even if you’re a beginner. So grab your supplies, put on some tunes, and let’s make something awesome for Dad!
Step 1: Prepare & Base Coat Plaque
Begin by ensuring your wooden plaque is clean and dry. Using a sponge brush, apply a generous, even coat of dark brown acrylic craft paint across the entire front and edges of the plaque. This layer will serve as the deep, earthy base for your distressed ‘garage’ look.
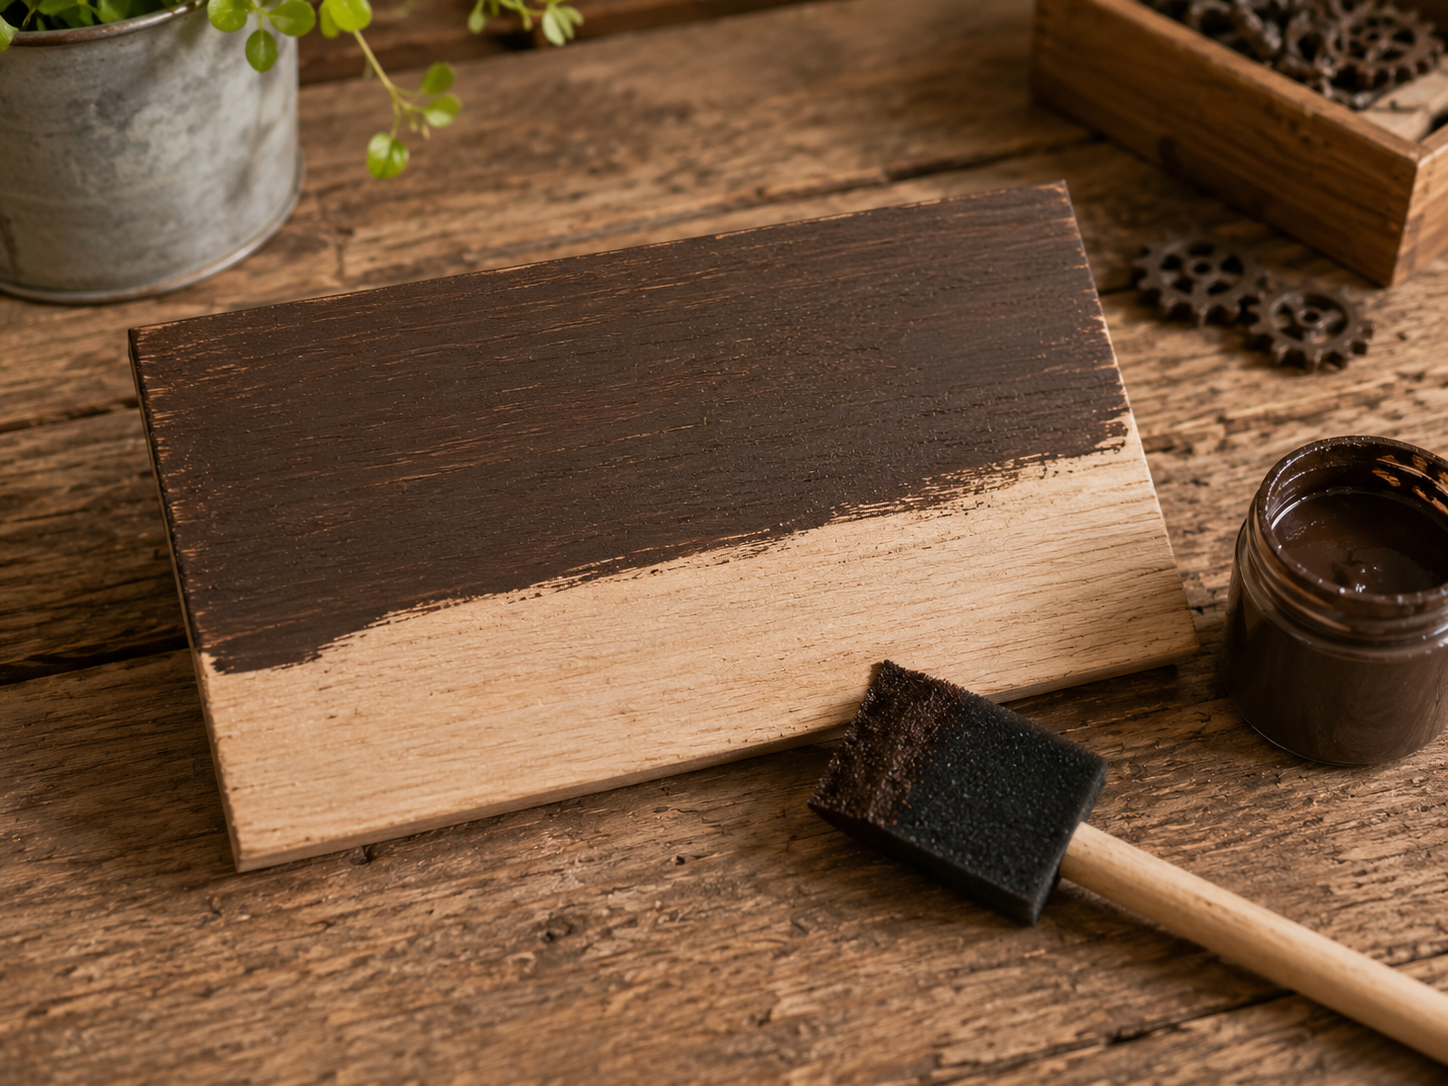
💡 Pro Tip: For best adhesion and coverage, make sure the wooden plaque is free of dust. Apply the paint in a single direction, allowing this base coat to dry completely for at least 30 minutes before proceeding to prevent lifting or smudging with subsequent layers.
Step 2: Layer Paints & Distress Edges
Once the dark brown base is dry, lightly dry brush charcoal gray and then black paint over the surface, focusing on leaving some of the brown visible underneath to create depth. Allow these layers to dry slightly, then use fine-grit sandpaper to gently distress the edges and high points of the plaque, revealing bits of the wood and lower paint layers for a weathered, aged effect.
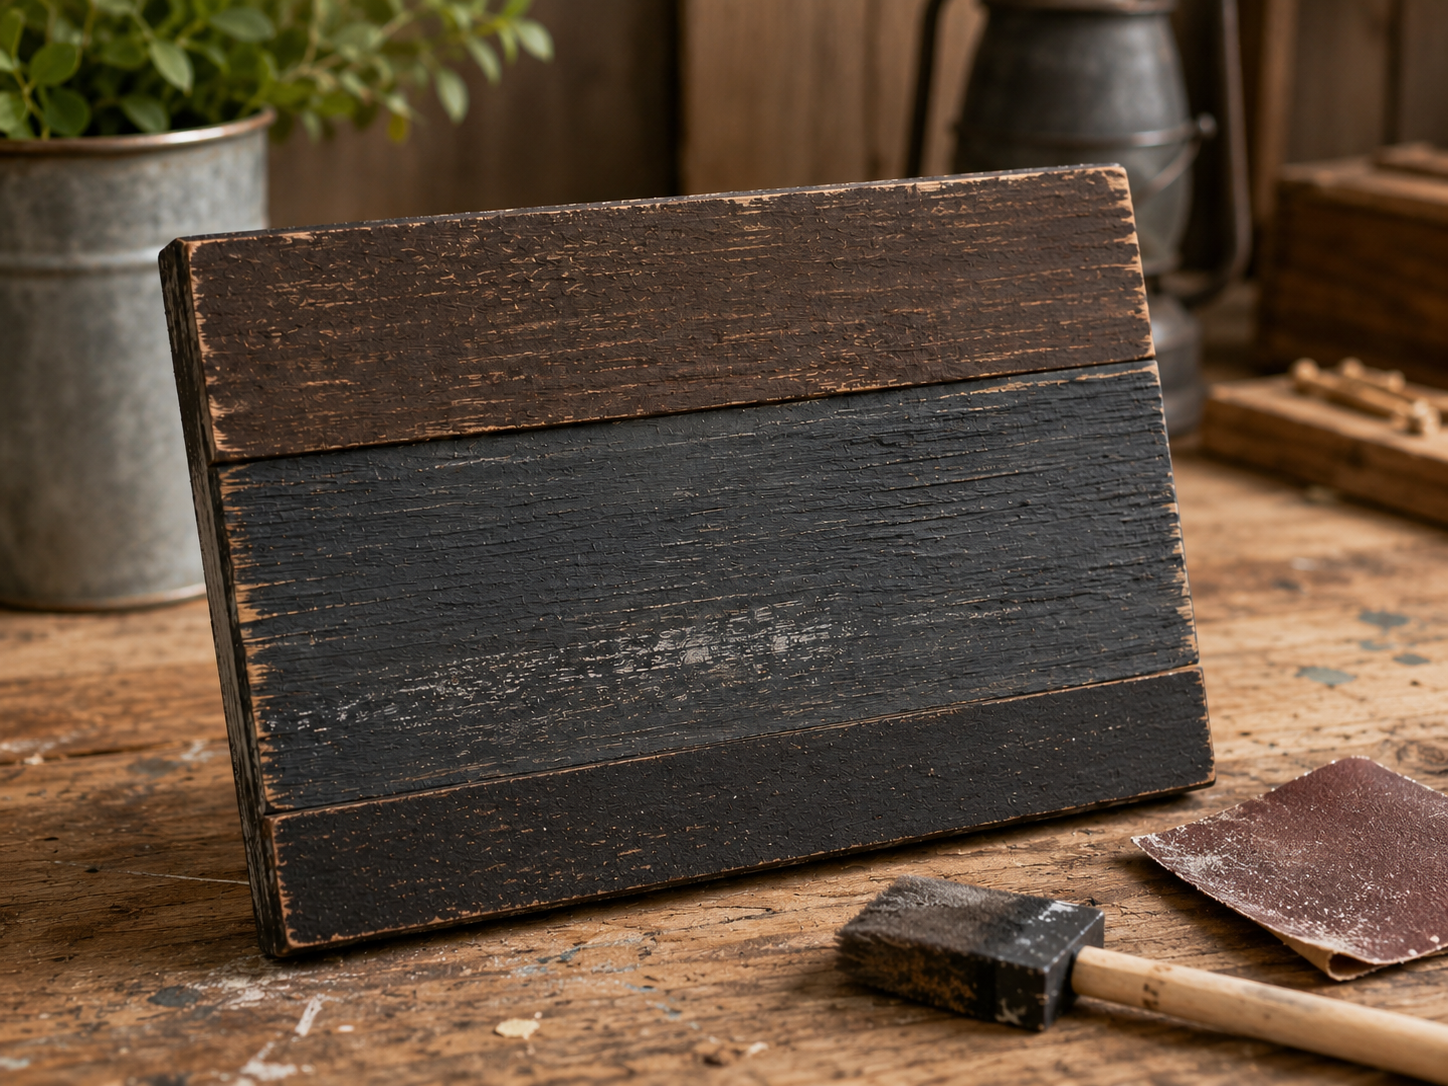
💡 Pro Tip: When dry brushing, dip your sponge brush lightly into the paint, then offload most of it onto a paper towel before applying. Use a very light hand for distressing; you can always remove more, but you can’t easily add paint back once sanded. Sanding with the grain helps achieve a more natural distressed look.
🗓️ Keep all your craft projects on track! Explore our printable planners & templates at CraftersDT on Etsy and use code CRAFT20 for 20% off!
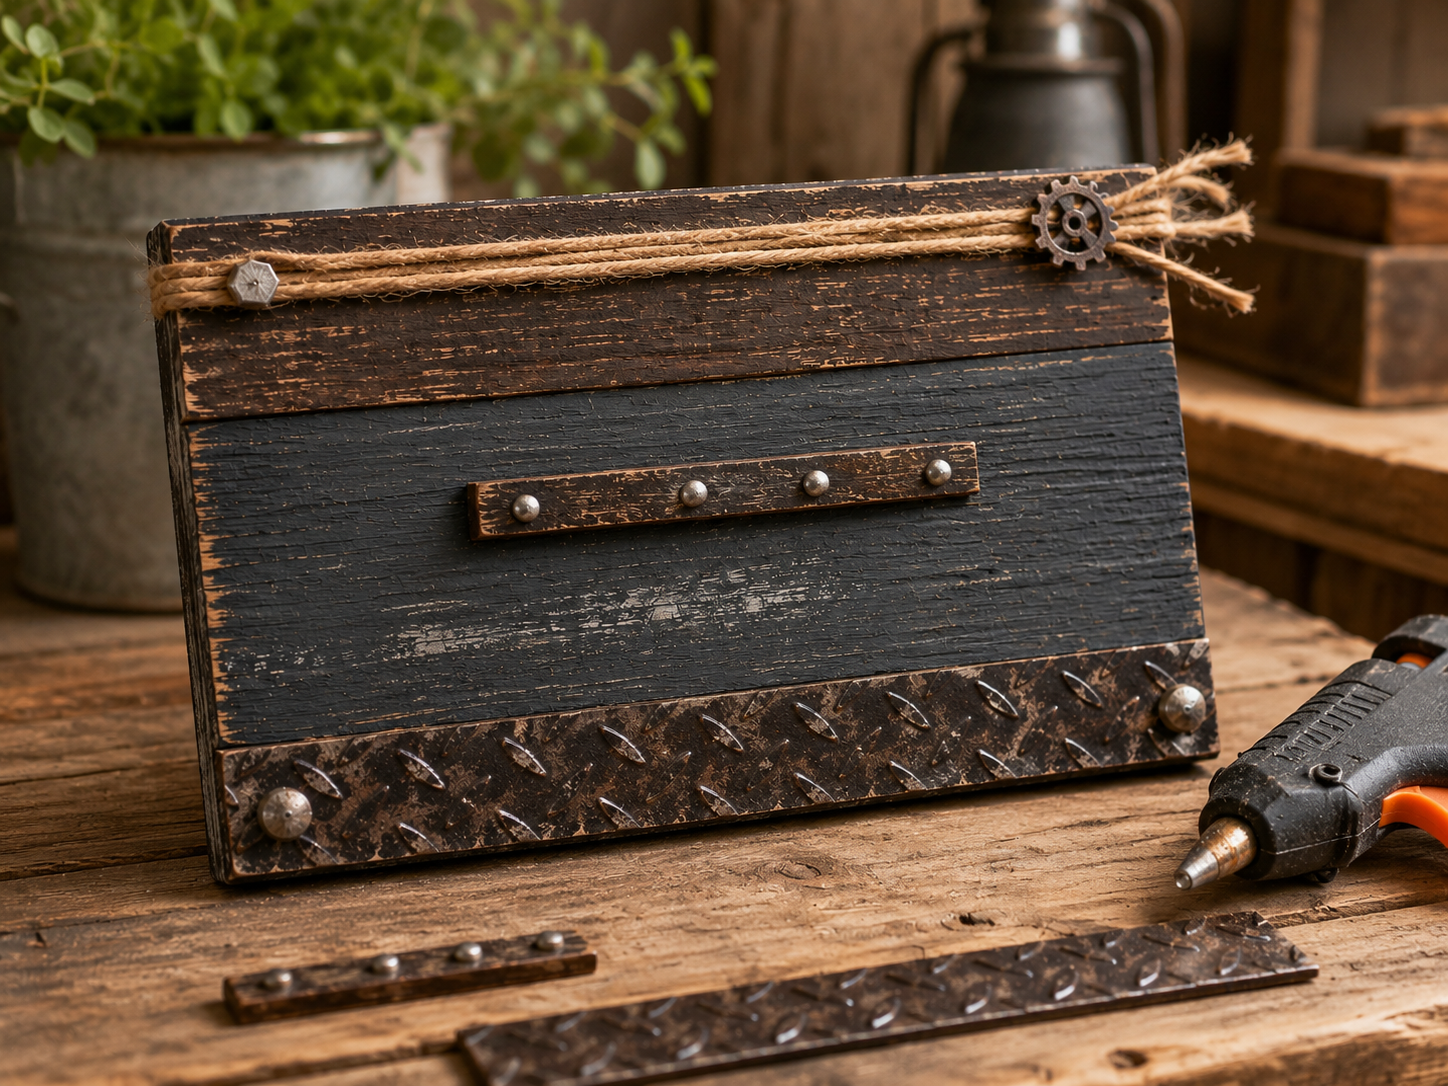
Step 3: Wrap Jute Twine Detail
Add a rustic touch by wrapping jute twine around the top edge of your painted and distressed plaque. Apply small dots of hot glue to the back or sides of the plaque to secure the twine as you wrap it tightly and evenly. Create a small knot or bow on one side for an extra decorative element, trimming any excess twine.
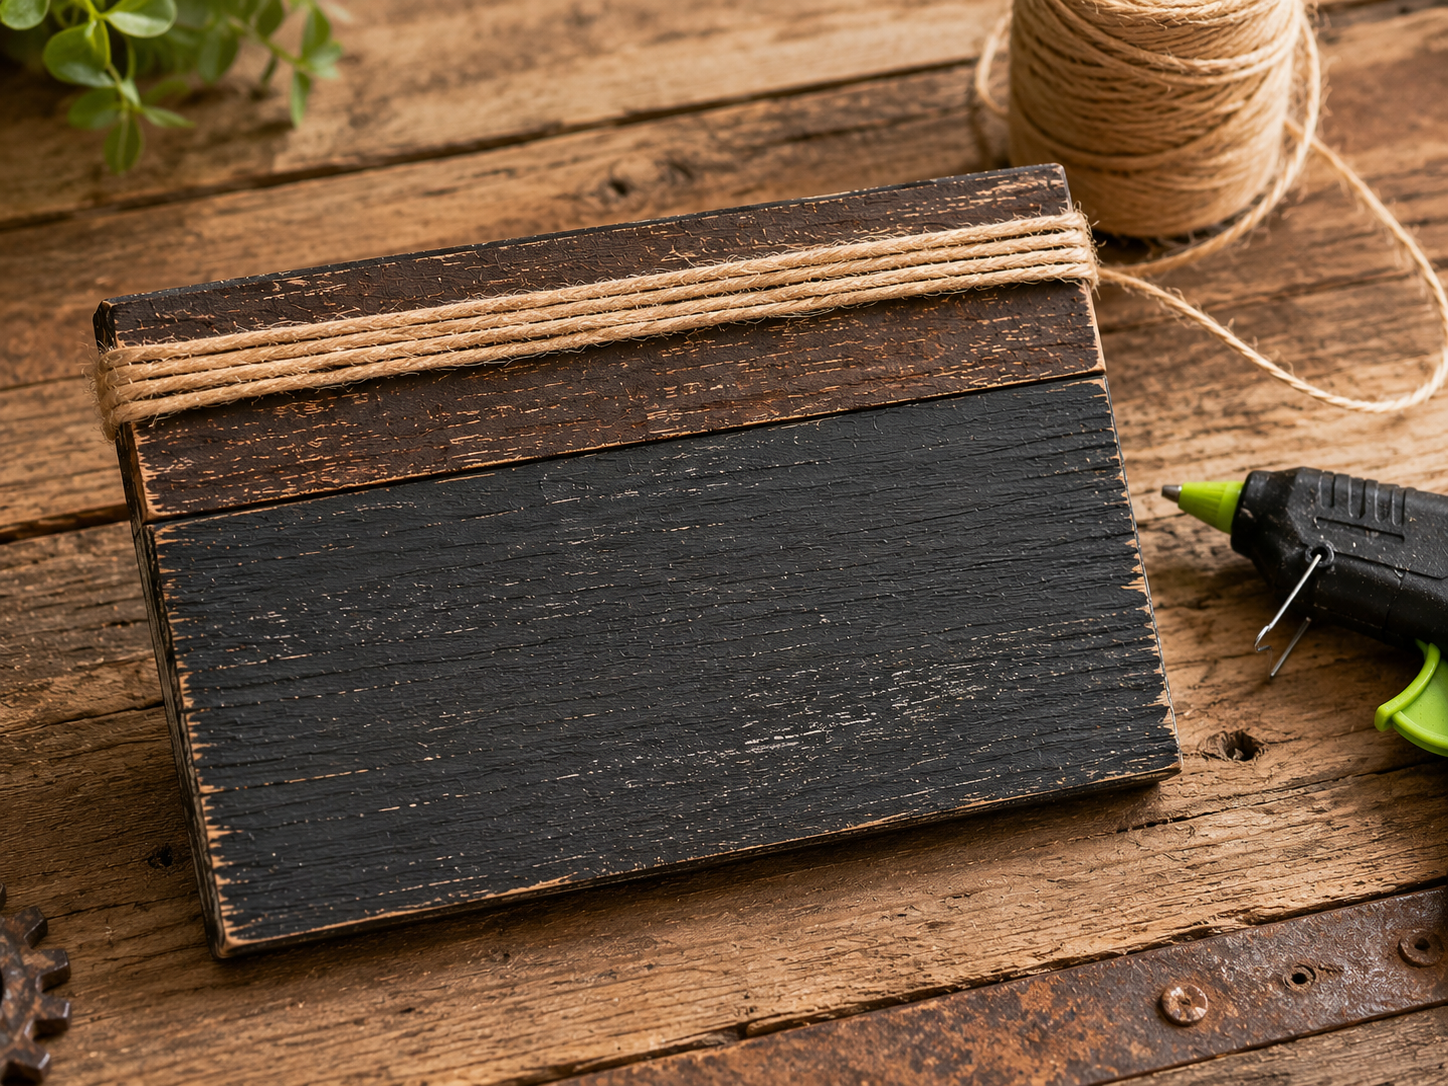
💡 Pro Tip: To ensure the twine lays flat and stays put, use small, strategic dabs of hot glue. Avoid overly large glue spots that might show through. Holding the twine taut as you wrap will give a cleaner, more professional finish. You can secure the ends by tucking them under the wrapped twine with a tiny dot of glue.
Step 4: Attach Faux Metal Strips
Take your faux diamond plate strip and carefully position it along the bottom edge of the plaque. Apply a bead of hot glue to the back of the strip and press it firmly into place. Repeat this process for the smaller faux metal strip with integrated pegs, positioning it higher up on the plaque, ensuring it’s level and centered.
💡 Pro Tip: Before applying glue, dry-fit all your embellishments to confirm placement and balance. Use a ruler or straight edge to ensure your faux metal strips are perfectly horizontal. Hot glue sets quickly, so work efficiently and press firmly for good adhesion.
Step 5: Secure Decorative Bolts/Rivets
Now, add the decorative bolt or rivet details. Carefully hot glue two larger decorative bolts to the top corners, overlapping slightly with the jute twine, as seen in the finished example. Also, secure smaller decorative rivets to the corners of the faux diamond plate strip at the bottom. These details enhance the industrial, garage-inspired aesthetic.
💡 Pro Tip: Use a small dot of hot glue for each rivet/bolt to avoid excess glue squeezing out. If you’re using faux metal embellishments with adhesive backings, reinforce them with a tiny amount of hot glue for a more permanent hold, especially on distressed surfaces.
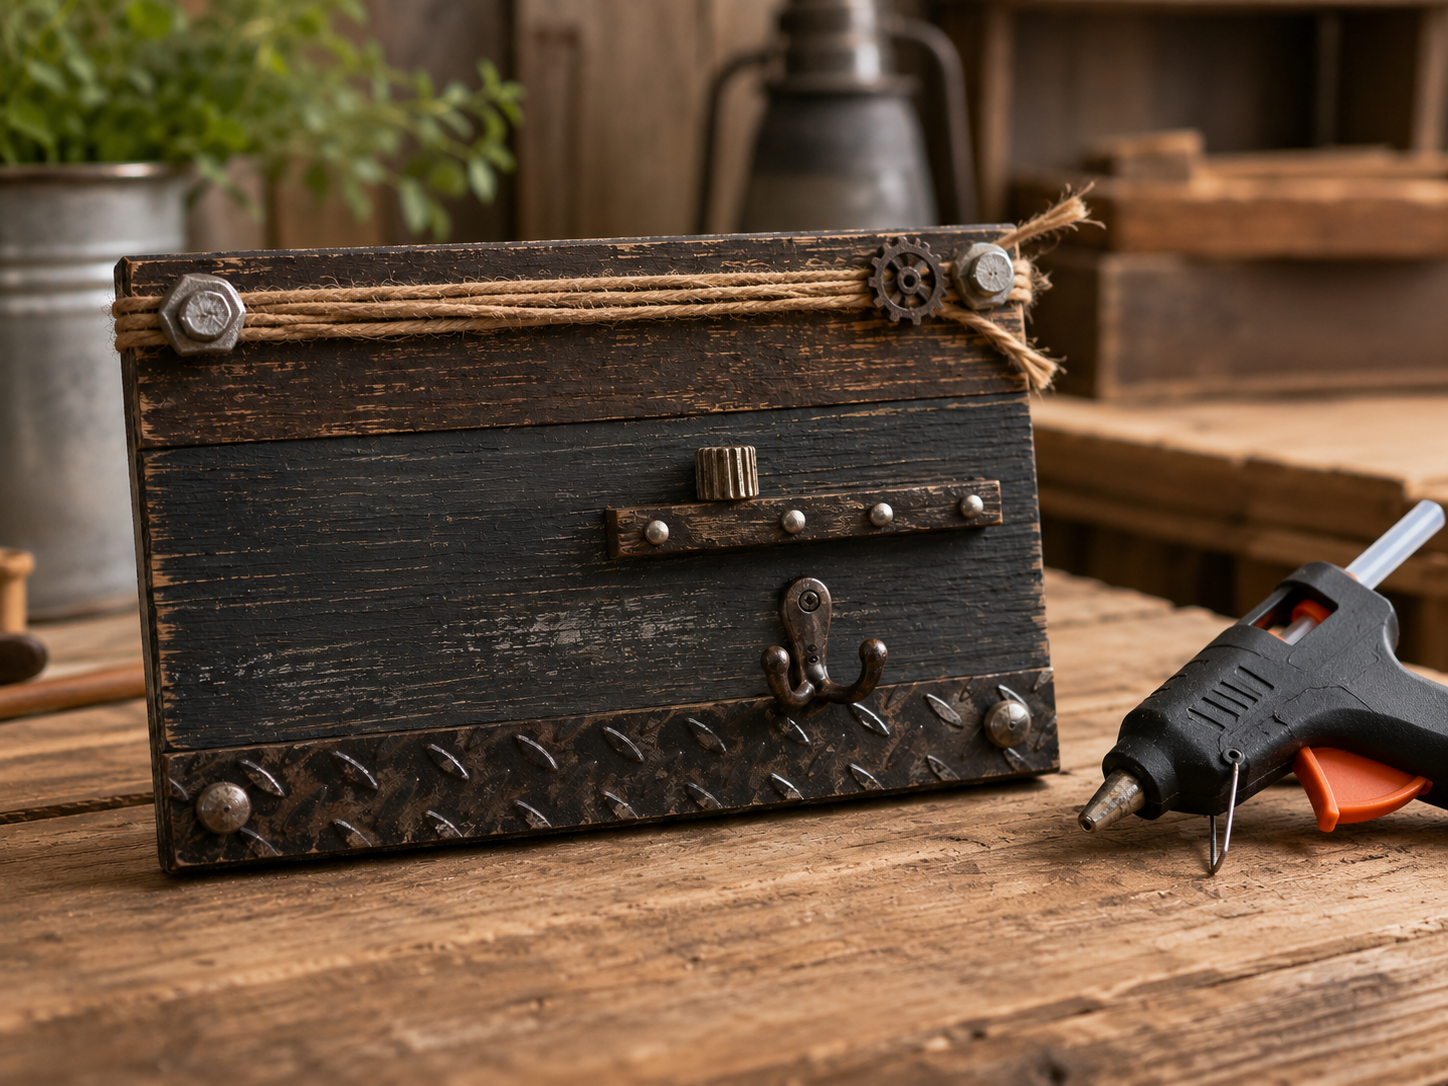
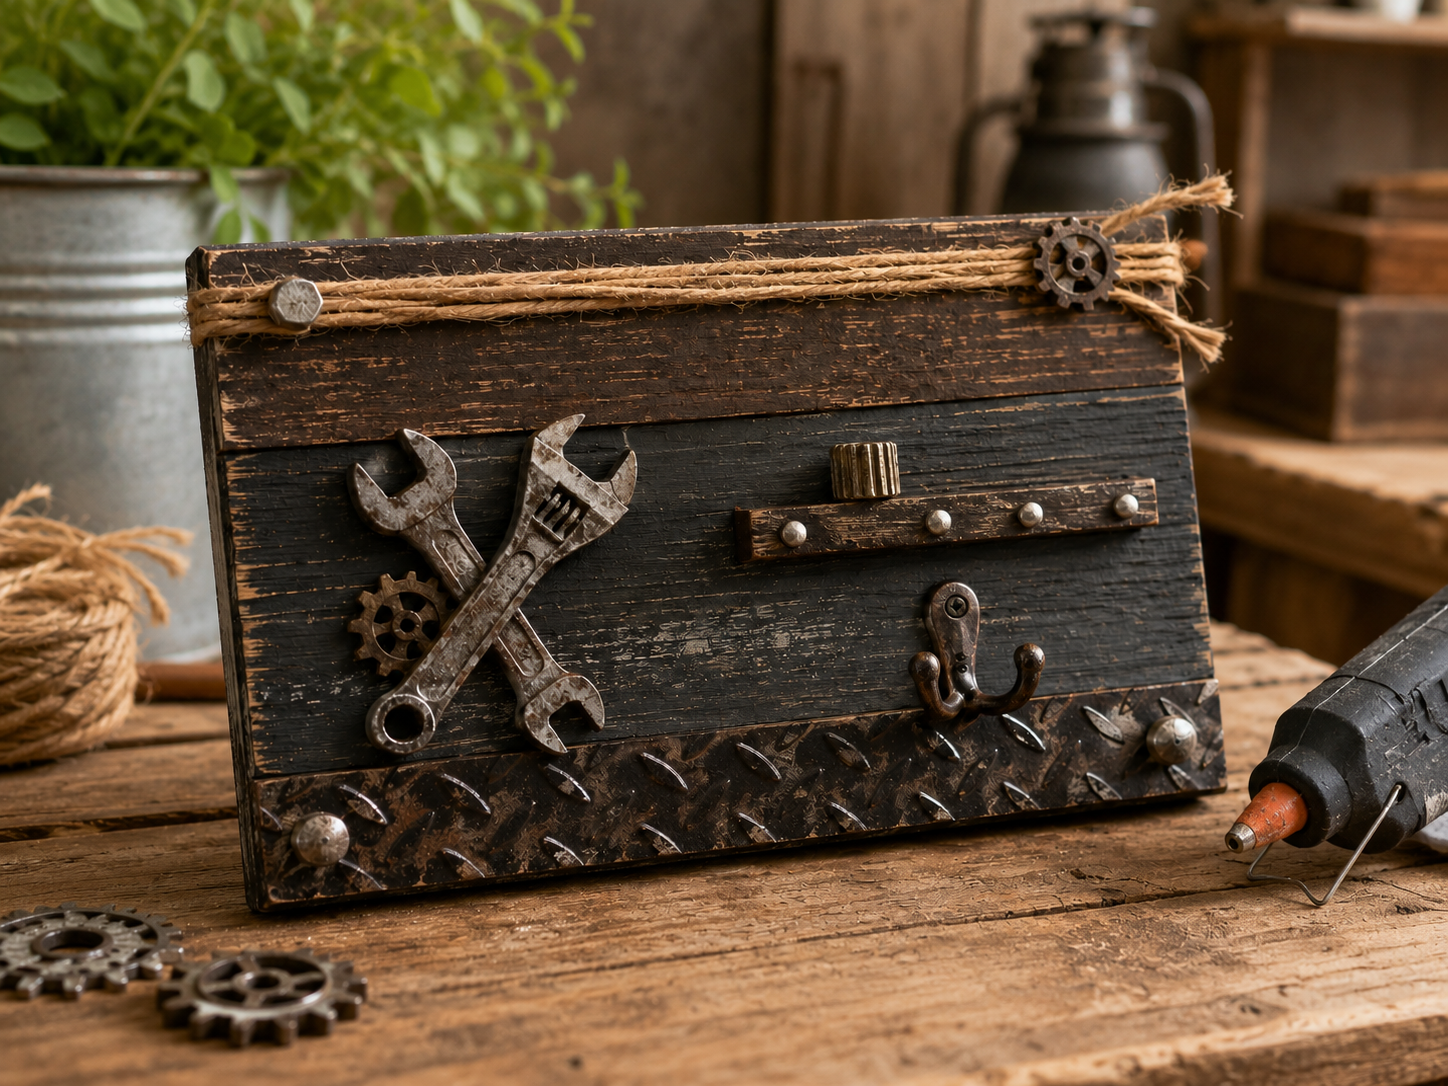
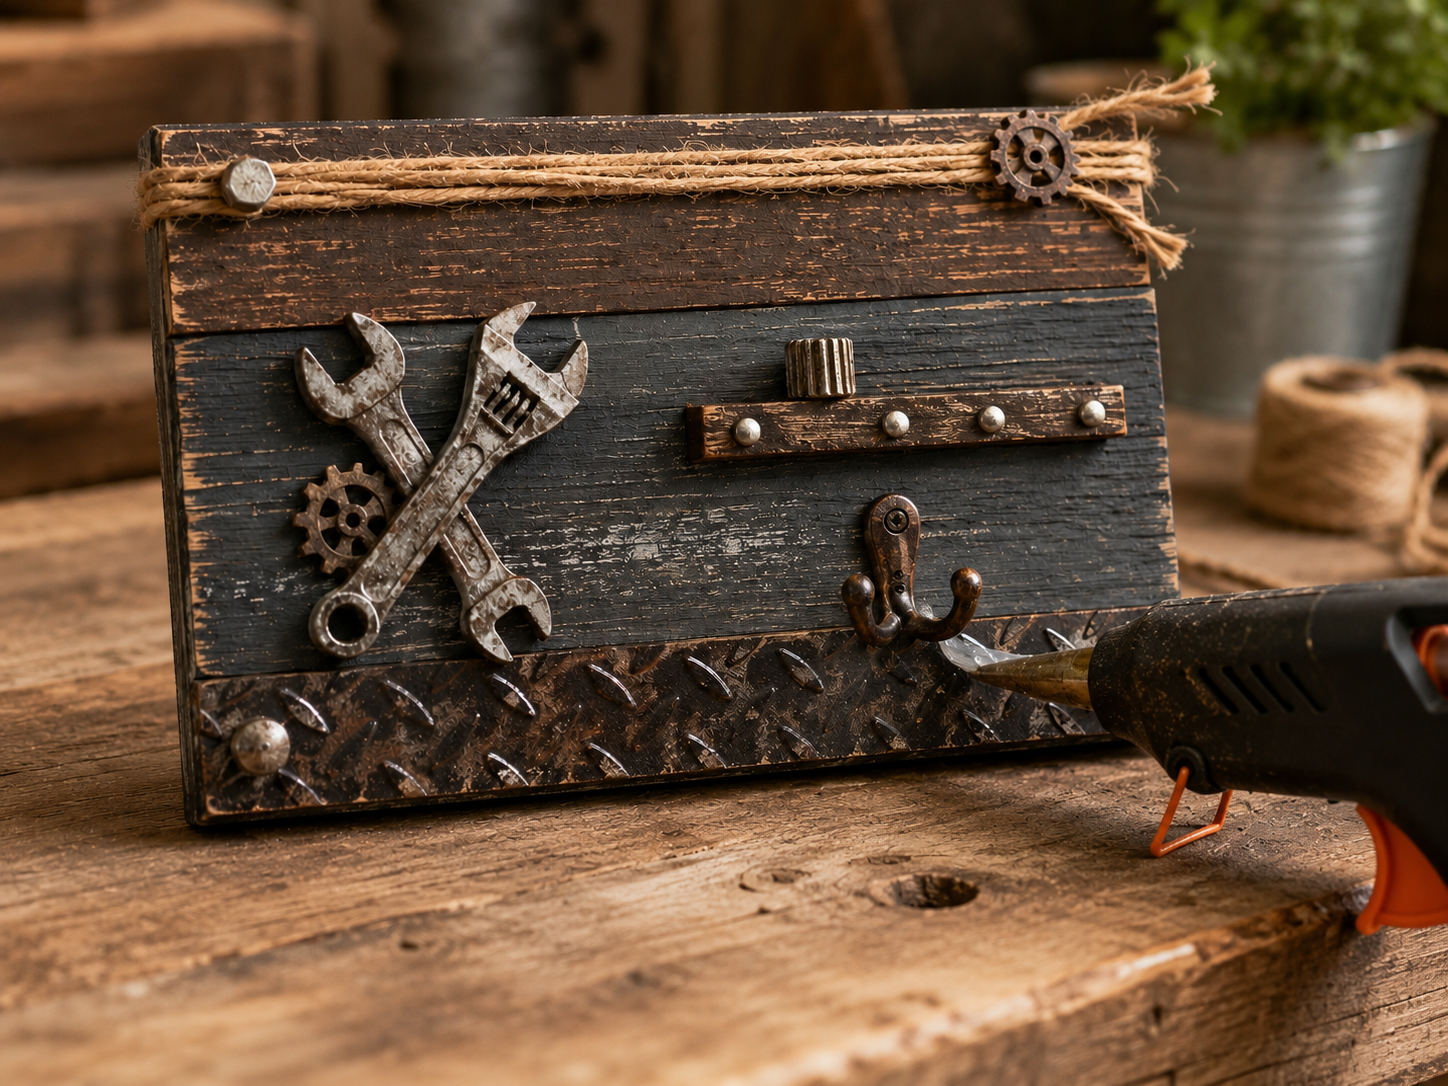
Step 6: Arrange & Glue Mini Tools
Carefully arrange your mini tool shapes (like the crossed wrenches) and gear accents onto the plaque, creating a balanced and visually appealing composition. Once you’re happy with the layout, apply hot glue to the back of each piece and firmly press them into position, holding each until the glue cools and sets.
💡 Pro Tip: Before gluing, experiment with different arrangements for your tools and gears. Take a photo of your preferred layout as a reference. Use just enough hot glue to secure the pieces without it oozing out, especially for smaller items. Work one piece at a time to ensure proper placement and adhesion.
📱 Free to Download
Join 50,000+ crafters already using Craftino
Browse 85+ Farmhouse / Rustic ideas and thousands more in the app
✓ Save crafts & browse fully offline
✓ Download printable PDF guides for every project
✓ Step-by-step photo tutorials, nothing left out
✓ 1,000+ craft projects with new ones added every week
Step 7: Install the Utility Hook
For the final touch, firmly attach the small utility hook or peg to the plaque. Position it centrally below the small faux metal strip with pegs, or in an area that complements your tool arrangement. Apply a generous amount of hot glue to the base of the hook and hold it in place until the glue completely hardens, ensuring it’s secure and ready for use.
💡 Pro Tip: For items that might hold weight, like a hook, ensure a robust amount of hot glue is used and that it makes full contact with the surface. If available, a strong quick-drying adhesive specifically for metal-to-wood would provide even greater durability. Allow ample curing time before hanging anything from the hook.
Your Rustic Dad’s Garage Sign is Ready!
Look at that, you did it! Your Dad’s Garage Rustic Mini Sign turned out so perfect and adds just the right touch of Farmhouse / Rustic charm. Pop it in his garage, on his workbench, or even a cozy shelf. I’d love to see how yours turned out, so please share your photos with me!
📱 Free to Download
Join 50,000+ crafters already using Craftino
Browse 51+ Farmhouse / Rustic ideas and thousands more in the app
✓ Save crafts & browse fully offline
✓ Download printable PDF guides for every project
✓ Step-by-step photo tutorials, nothing left out
✓ 1,000+ craft projects with new ones added every week
Frequently Asked Questions
How much does a DIY Dad’s Garage Rustic Mini Sign cost to make?
You can make this Dad’s Garage Rustic Mini Sign for about $3-5, mainly using Dollar Tree supplies. The most expensive items are usually the wood blank and a bottle of craft paint.
How long does it take to make this Farmhouse / Rustic sign, and is it beginner-friendly?
This DIY Farmhouse / Rustic sign takes about 20-30 minutes to complete, not including paint drying time. Yes, it’s very beginner-friendly with simple steps and basic materials.
What type of paint works best for a Dollar Tree rustic sign project?
Acrylic craft paint works perfectly for this Dollar Tree rustic sign project. You’ll only need about 1-2 ounces of white or black paint for the base and lettering.
Is the Dad’s Garage Rustic Mini Sign a good Father’s Day gift?
Absolutely! This Dad’s Garage Rustic Mini Sign makes a wonderful, thoughtful Father’s Day gift that’s personalized and budget-friendly. It’s also great for birthdays or just because.
Can I customize my DIY Dad’s Garage sign, or use different phrases?
Yes, you can totally customize your DIY Dad’s Garage sign! Instead of ‘Dad’s Garage,’ try ‘Grandpa’s Workshop’ or ‘The Man Cave’ using a stencil or freehand lettering. You only need a small wood blank, about 5×7 inches.
What Dollar Tree supplies should I look for to make this Dad’s Garage sign?
At Dollar Tree, look for a small wood blank (like a plaque or cutting board), acrylic craft paint in black and white, paintbrushes, and maybe some twine or ribbon for hanging. You’ll typically find a 5×7 inch wood blank in the craft aisle.
Check out the official Dollar Tree store for more holiday crafts & supplies here.
Leave a Reply