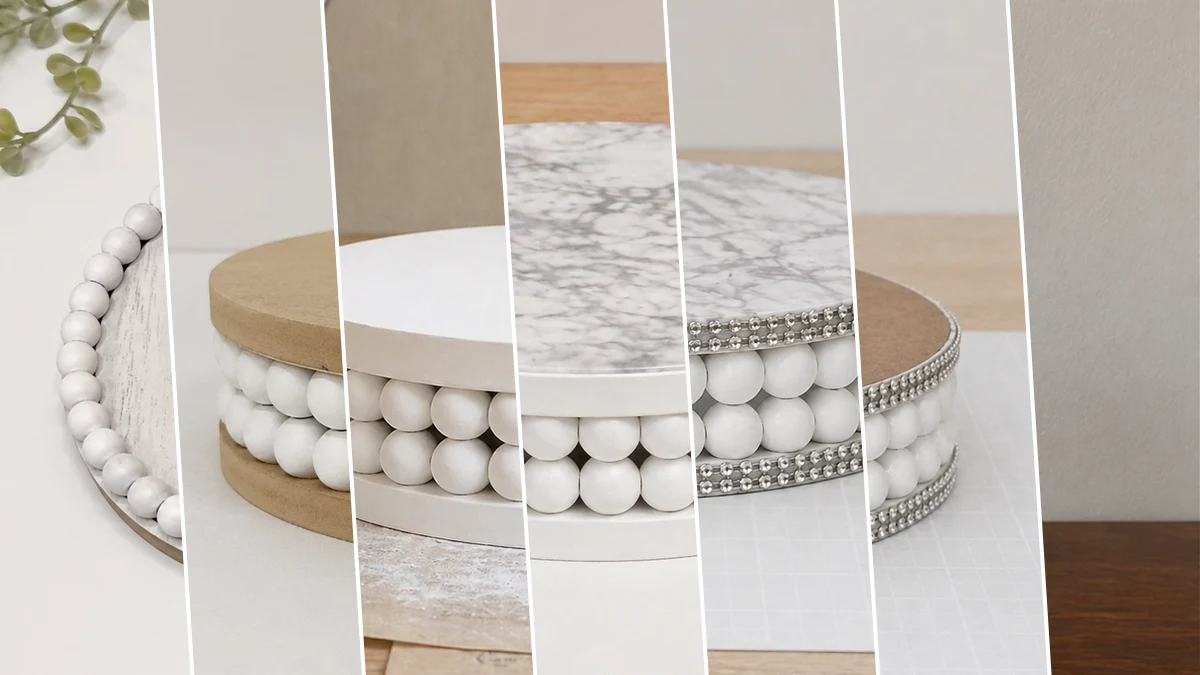
Okay, so who else walks into Dollar Tree just for one thing and leaves with a whole basket of goodies you didn’t even know you needed? Yeah, me too! That’s exactly how I ended up making this super cute Dollar Tree Glam Marble Pedestal Tray. I just grabbed a few simple things and boom, a fancy looking tray that nobody would guess cost just a few bucks!
See also: Dollar Tree Wood Crafts Round Wood Tray
Theme: Wedding & Party
Materials Needed
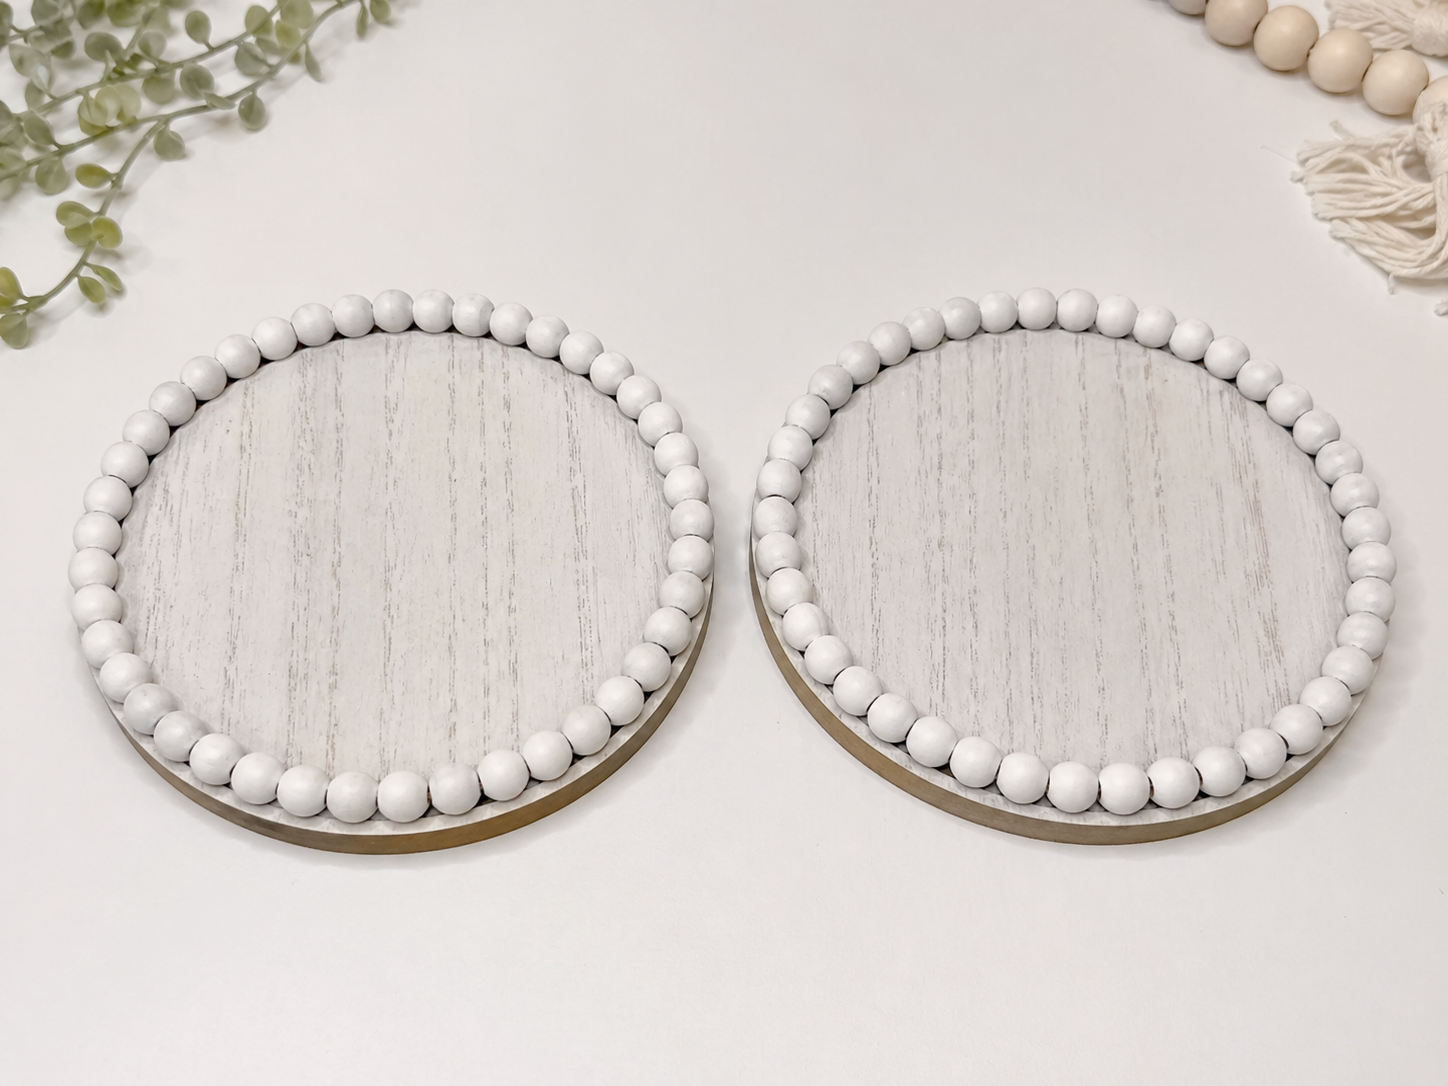
- Round Wooden Bead Trays (2)
- White Paint (Acrylic or Spray)
- Faux Marble Adhesive Paper
- Silver Rhinestone Trim
- Clear Glass Candlestick/Pedestal
- Strong Craft Glue (e.g., E6000)
📋 Love staying organized while crafting? Check out our printable planners & craft designs at CraftersDT on Etsy and use code CRAFT20 for 20% off your entire order!
Why This Craft Works
This little beauty is perfect for adding a touch of elegance to any special occasion, especially if you’re planning for a Wedding & Party theme. Imagine it holding dainty cupcakes at a bridal shower, small party favors at a baby shower, or even just as a pretty centerpiece on your kitchen island for a fancy brunch. It really dresses up any space without breaking the bank.
📱 Free to Download
Join 50,000+ crafters already using Craftino
Browse 66+ Wedding & Party ideas and thousands more in the app
✓ Save crafts & browse fully offline
✓ Download printable PDF guides for every project
✓ Step-by-step photo tutorials, nothing left out
✓ 1,000+ craft projects with new ones added every week

And let’s talk about the cost, because that’s my favorite part! You can whip up this whole project for under $5. Seriously, almost everything you need comes right from Dollar Tree, like those cute little glass candle holders and plates. It’s truly a budget-friendly craft that looks way more expensive than it is.
As for how hard it is, I’d say this is an Easy peasy lemon squeezy craft, perfect for beginners or even for a fun afternoon with older kids. It only takes about 20-30 minutes to put together, not counting drying time. So, if you need a last-minute gift or some quick Home Decor, this Dollar Tree Glam Marble Pedestal Tray is absolutely perfect.
Step-by-Step Instructions for Dollar Tree Glam Marble Pedestal Tray
Ready to get crafting? This Dollar Tree Glam Marble Pedestal Tray is so much fun to make, and I promise you’ll be amazed at how quickly it comes together! When I made mine, it took me less than 30 minutes for the main steps, and then it was just waiting for the glue to dry. It’s a great project if you’re new to DIY or just want something quick and satisfying to do today.
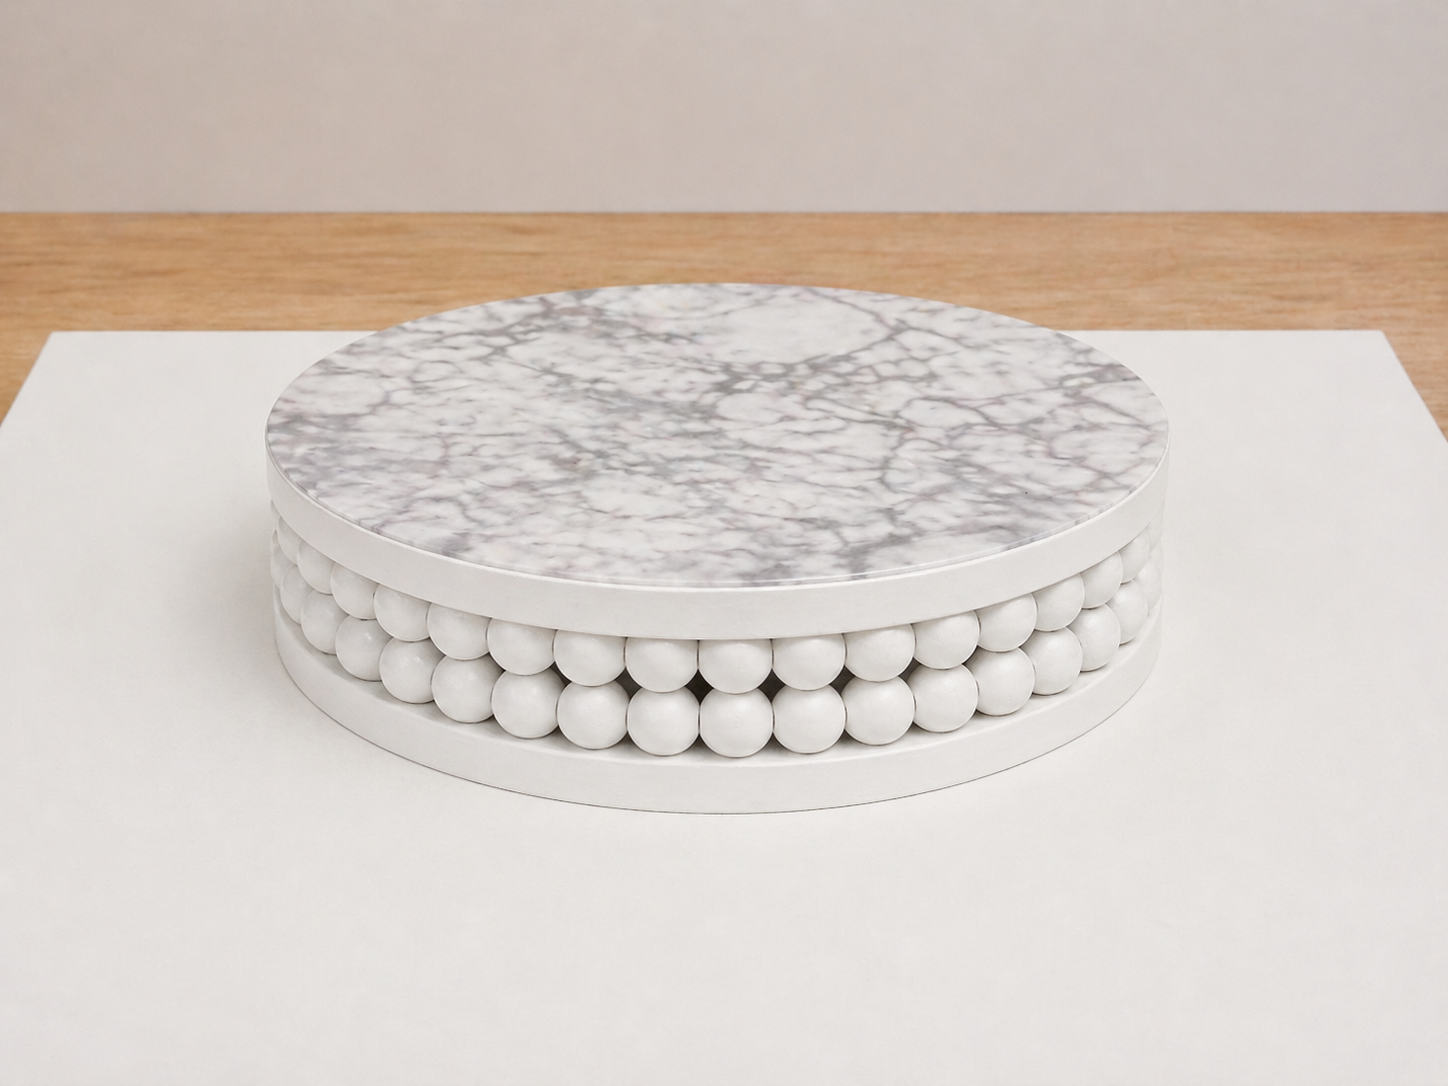
Step 1: Prepare Wooden Trays
Begin by thoroughly cleaning both round wooden bead trays. Use a damp cloth to wipe away any dust, dirt, or residue. Carefully remove any price tags or adhesive stickers, as these can interfere with paint adhesion. Place both trays on your craft surface and visually inspect them to ensure they are identical in size and shape, allowing for a seamless stacked appearance. This preparation ensures a smooth surface for subsequent steps.
💡 Pro Tip: Ensuring your trays are perfectly clean and free of any debris is crucial for paint adhesion and a professional finish. Take extra time on this step to avoid future peeling or bumpy textures.
Step 2: Stack and Glue Trays
Carefully align one tray directly on top of the other, making sure the edges and bead details line up perfectly. Apply a generous, even layer of strong craft glue (like E6000 for maximum hold) or hot glue (for quicker adhesion) to the top surface of the bottom tray. Be mindful to avoid the very outer edge where the glue might squeeze out. Gently press the second tray on top, taking care to align all edges precisely. Hold firmly for a minute or two to allow initial bonding, or use small clamps if available for consistent pressure. Allow the glue to dry completely according to the manufacturer’s instructions before proceeding.
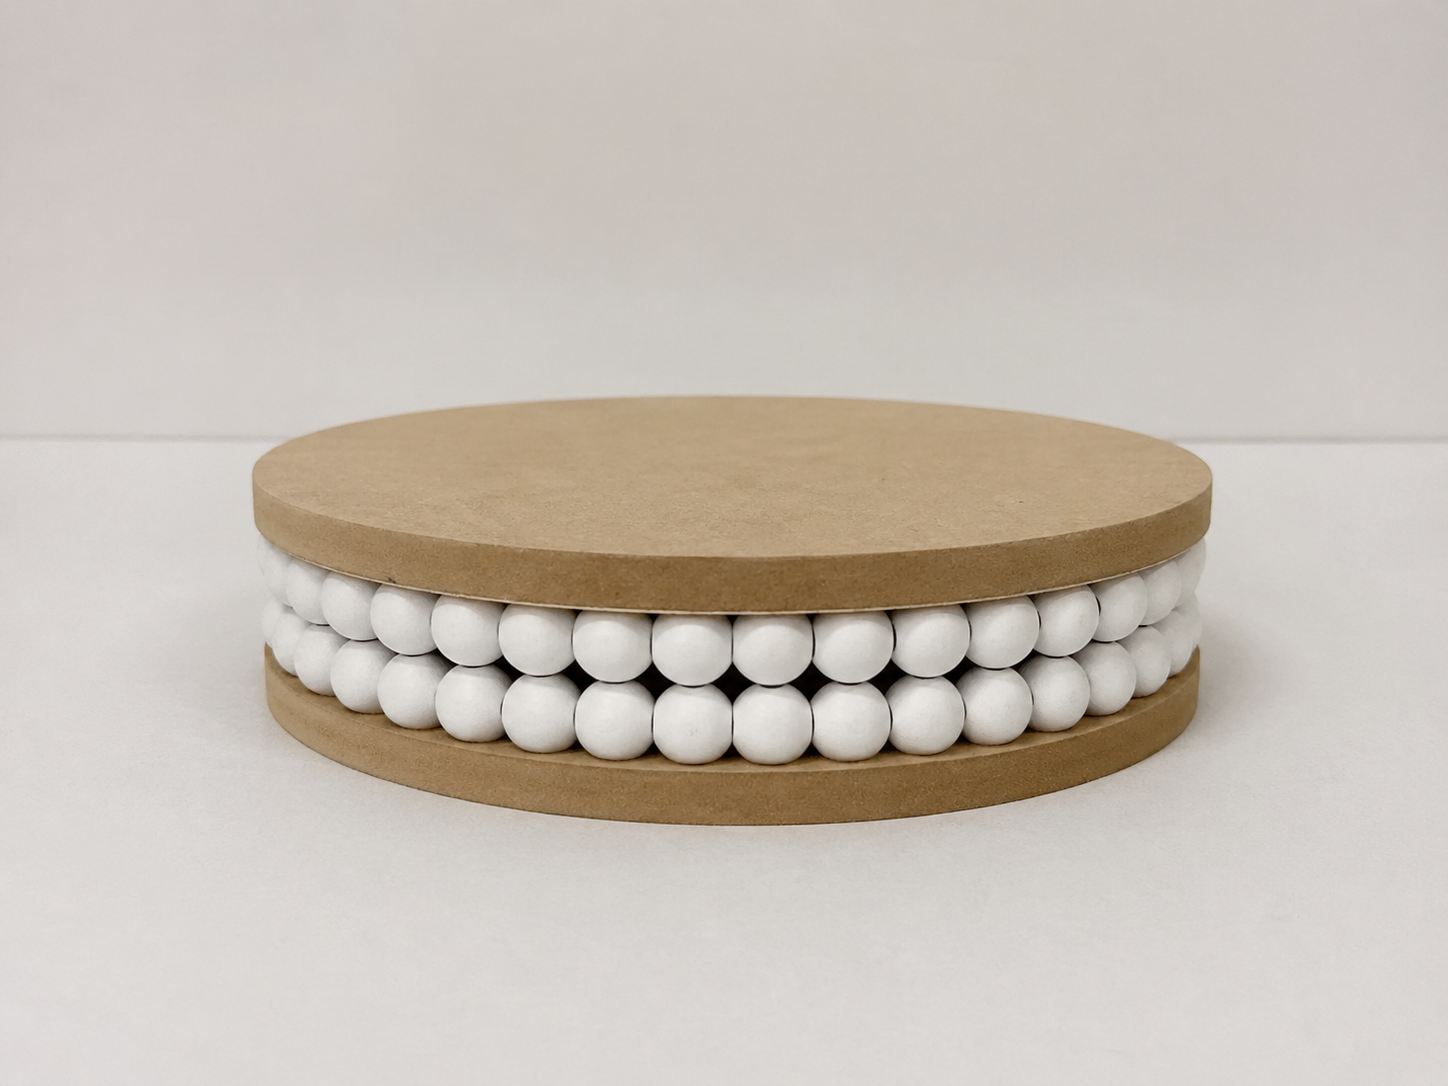
💡 Pro Tip: For the strongest bond, apply a thin, even layer of E6000, ensuring coverage without excessive overflow. If using hot glue, work quickly and in sections. Proper alignment is key here, as any misalignment will be very noticeable in the finished piece.
🗓️ Keep all your craft projects on track! Explore our printable planners & templates at CraftersDT on Etsy and use code CRAFT20 for 20% off!
Step 3: Paint Base White
Once the glue is completely dry (allow at least 24 hours for E6000), prepare to paint your stacked tray. If using white spray paint, work in a well-ventilated area or outdoors. Apply multiple thin, even coats, holding the can approximately 8-10 inches away, allowing each coat to dry to the touch before applying the next (typically 15-30 minutes). If using white acrylic paint and a brush, use a foam brush or soft bristle brush to cover all exposed wooden surfaces, including the beaded sides and the top surface. Ensure smooth, streak-free coverage, applying 2-3 coats as needed for full opacity. Allow adequate drying time between coats and for the final coat to fully cure.
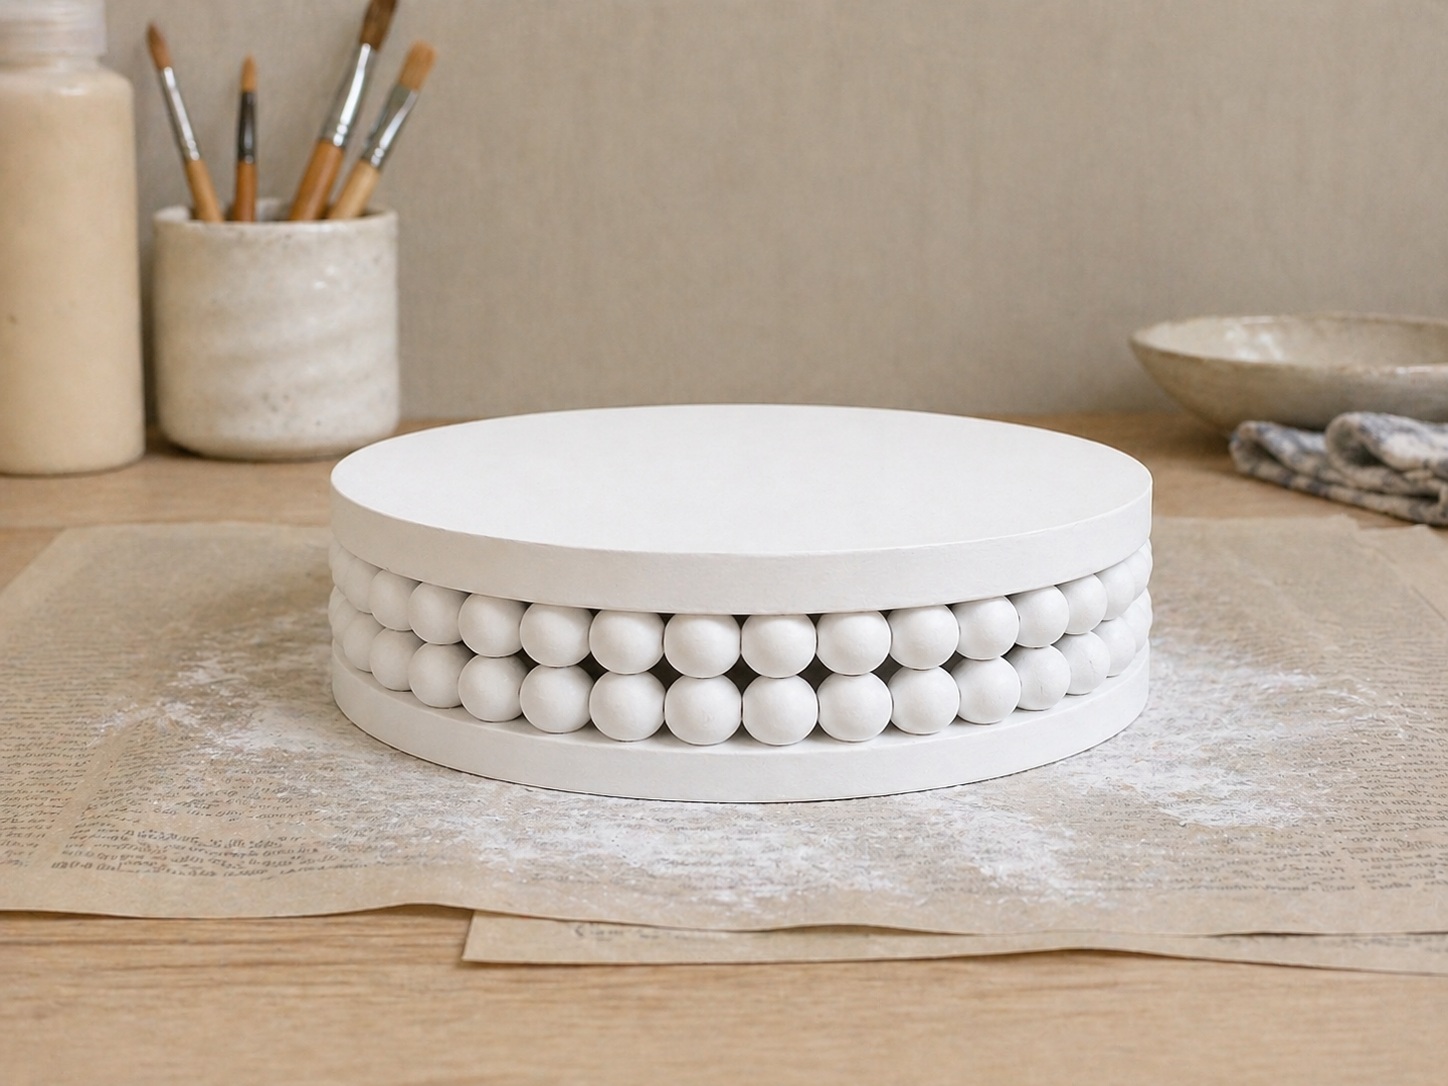
💡 Pro Tip: Achieve a professional, smooth finish by applying several thin coats of paint rather than one thick one. This prevents drips, streaks, and ensures the paint settles evenly into the bead crevices. If spray painting, rotate the tray slowly for even coverage and avoid pooling.
Step 4: Apply Marble Adhesive Top
Once the white paint is completely dry and cured, place the painted tray (top side up) onto the backing of your faux marble adhesive paper. Using a pencil, carefully trace the exact outline of the top of the tray. Cut out the traced circle using sharp scissors or a craft knife for a clean, precise edge – this is crucial for a seamless look. Slowly peel a small section of the backing paper from the adhesive marble, align it perfectly with one edge of the tray’s top surface, and gradually press it down, smoothing out any air bubbles as you go with a craft scraper, credit card, or your fingers. Work from the center outwards to push out air.
💡 Pro Tip: Accuracy in cutting your marble paper is paramount. A slightly smaller circle will leave a gap, while a slightly larger one will overhang. For a perfect fit, try cutting slightly inside your pencil line, then trimming a tiny bit at a time if needed. Smooth slowly to prevent trapping air bubbles.
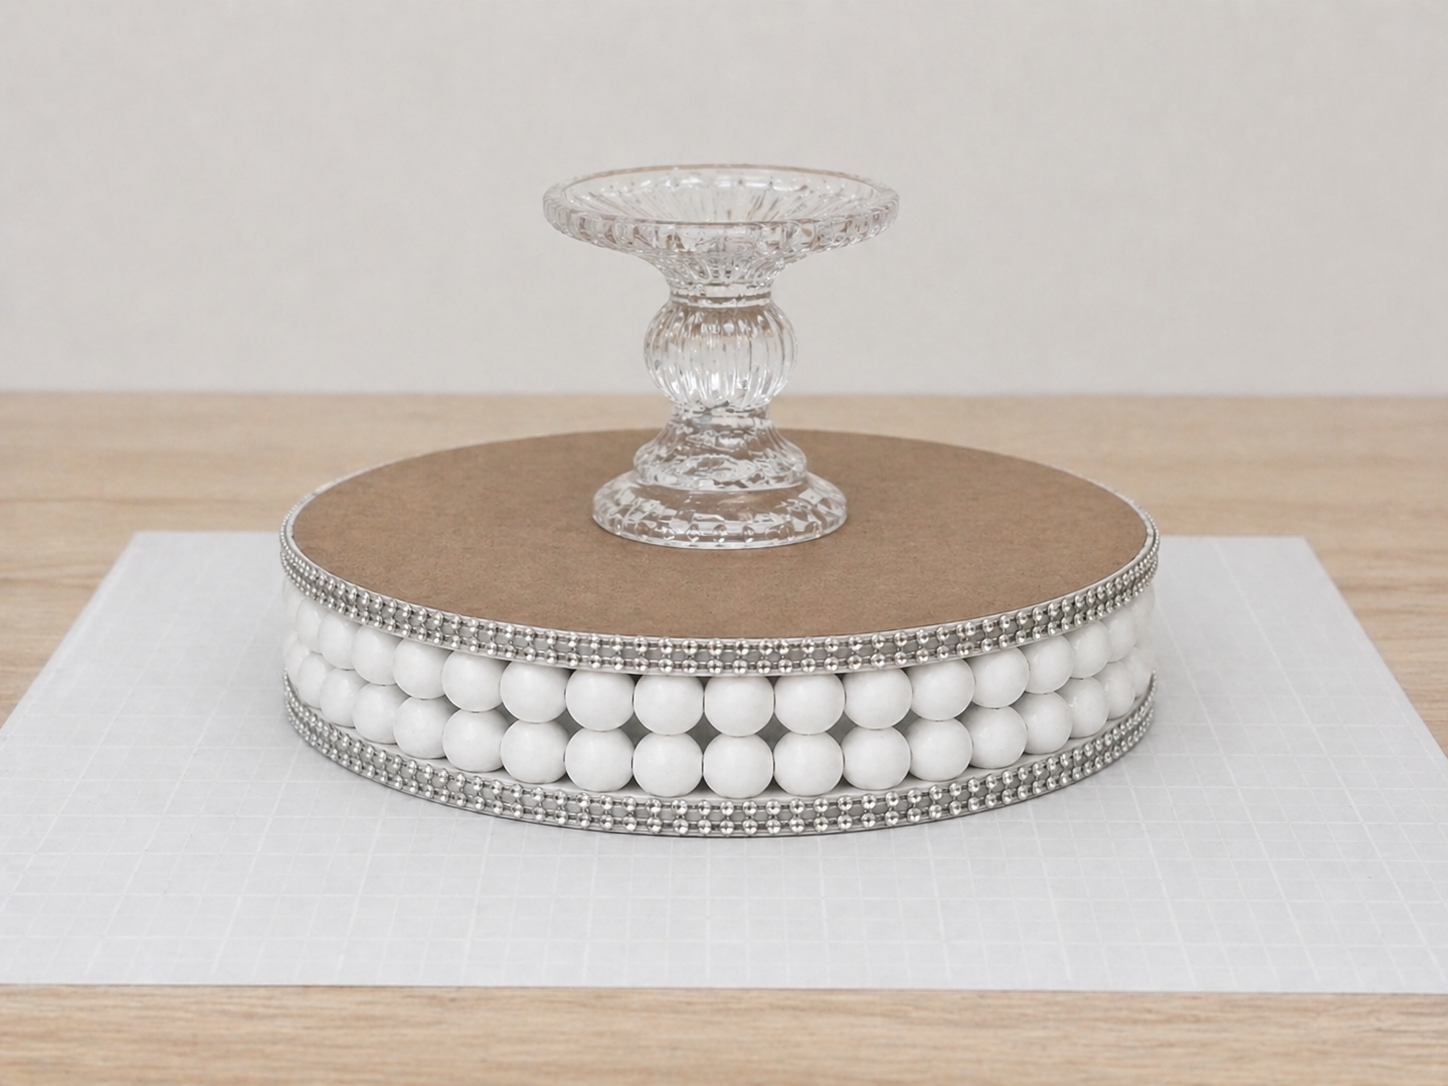
Step 5: Embellish with Rhinestone Trim
Measure the circumference of the top edge of your tray (where the marble paper meets the white painted side) and the bottom edge (the very bottom of the white beaded section). Cut two strips of silver rhinestone wrap or diamond mesh ribbon to these exact lengths. Apply a thin, continuous line of strong craft glue (like E6000) or hot glue (for faster drying) along the top edge, and carefully press one rhinestone strip into place, ensuring it’s flush and secure. Repeat this process for the bottom edge, making sure the rhinestone trim is positioned neatly against the very bottom of the white beaded section. Overlap the ends slightly for a seamless look.

💡 Pro Tip: To get an accurate measurement for your rhinestone trim, use a flexible measuring tape or a string and then measure the string against a ruler. When applying the glue, work in small sections (a few inches at a time) if using E6000, to prevent the glue from drying before you place the trim. Hot glue allows for immediate adhesion but less repositioning.
Step 6: Attach Glass Pedestal Base
Carefully turn the tray upside down, ensuring the marble top is protected from scratches on your work surface. Apply a generous amount of strong craft glue (E6000 is highly recommended for its superior adhesion to glass and wood, providing a durable bond) to the top rim of your clear glass candlestick holder or small glass vase. Carefully center the candlestick holder on the exact bottom center of the tray. Press firmly and hold it in place for a minute or two to allow the glue to begin setting. It’s crucial for the pedestal to be perfectly centered for stability and aesthetics. Allow ample time for the glue to fully cure, ideally 24-72 hours, before handling or placing any weight on the tray.
💡 Pro Tip: Centering your pedestal perfectly is vital for both aesthetics and stability. Use a ruler or eye-ball it from multiple angles before pressing down. For optimal strength, resist the urge to move or test the bond until the glue has fully cured; rushing this can weaken the connection.
📱 Free to Download
Join 50,000+ crafters already using Craftino
Browse 92+ Wedding & Party ideas and thousands more in the app
✓ Save crafts & browse fully offline
✓ Download printable PDF guides for every project
✓ Step-by-step photo tutorials, nothing left out
✓ 1,000+ craft projects with new ones added every week
Step 7: Style Your Pedestal Tray
Once all glue has completely dried and the pedestal is securely attached, carefully turn your elegant new riser tray upright. Place it on your desired display surface, such as a coffee table, dresser, vanity, or party table. For a sophisticated look as shown, arrange a small clear glass vase containing delicate pink faux flowers on one side of the marble top. On the other side, add a simple white candle, either a votive or pillar, to complete the sophisticated and glamorous display. Experiment with different arrangements to match your decor or occasion.
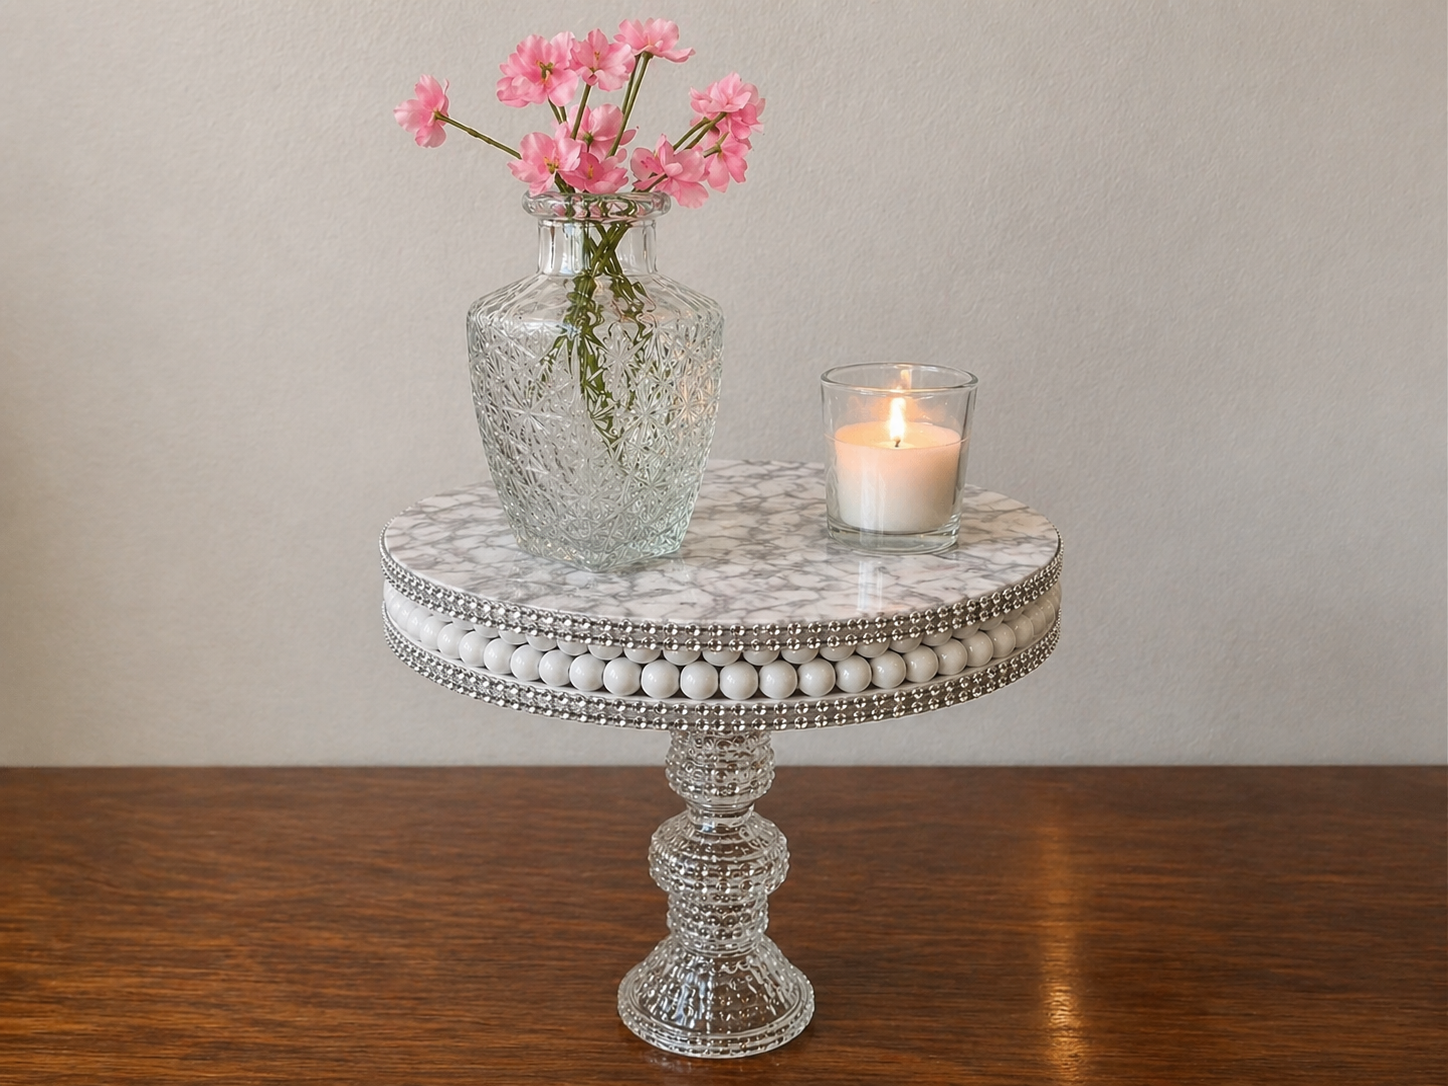
💡 Pro Tip: This versatile pedestal tray can be styled in many ways! Consider using it as a mini cupcake stand for a party, a perfume and jewelry organizer on a vanity, or a seasonal display for holidays. Change out the styling items to refresh your decor effortlessly.
Show Off Your Glam Pedestal Tray!
And just like that, you’ve got your very own gorgeous Dollar Tree Glam Marble Pedestal Tray! Isn’t it just darling? You can use it to display treats, perfumes, or even jewelry. Don’t forget to snap a pic and share your creation with me, I’d love to see what you made!
📱 Free to Download
Join 50,000+ crafters already using Craftino
Browse 86+ Wedding & Party ideas and thousands more in the app
✓ Save crafts & browse fully offline
✓ Download printable PDF guides for every project
✓ Step-by-step photo tutorials, nothing left out
✓ 1,000+ craft projects with new ones added every week
Frequently Asked Questions
What kind of glue should I use for a Dollar Tree Glam Marble Pedestal Tray?
For the best hold, you should use a strong clear adhesive like E6000 glue or Gorilla Glue Clear Grip. Apply a pea-sized amount to the rim of your candle holder for a secure bond.
How much does it cost to make a DIY Dollar Tree Pedestal Tray for Wedding & Party decor?
This DIY project costs about $3 to $4 in materials if you buy everything at Dollar Tree. You’ll need one glass plate and one glass candle holder, plus paint and glue you might already have.
How long does it take to create this Dollar Tree Glam Marble Pedestal Tray?
You can assemble the tray and paint the marble effect in about 20-30 minutes. The glue will need about 2-4 hours to set firmly, but for full cure, allow 24 hours before heavy use.
What Dollar Tree items do I need for this specific marble pedestal tray?
You will need one small glass plate (usually 6-8 inches across) and one glass candle holder (about 3-4 inches tall) from Dollar Tree to form the base and top of your pedestal.
Can I customize the marble look for my Wedding & Party theme?
Absolutely! You can customize the marble effect by using different colors of acrylic paint. For a classic look, use white, gray, and black. For a party, try adding a pop of metallic gold or silver paint with a soft brush.
Is the Dollar Tree Glam Marble Pedestal Tray durable enough for food at a party?
Yes, once the glue is fully cured (after 24 hours), the tray is quite sturdy for light items like cupcakes, cookies, or small party favors. Just make sure to hand wash it gently and avoid submerging it in water.
Explore more home decor & floral craft essentials at Dollar Tree.
Inspiration / Credit: April Pinchback
Leave a Reply