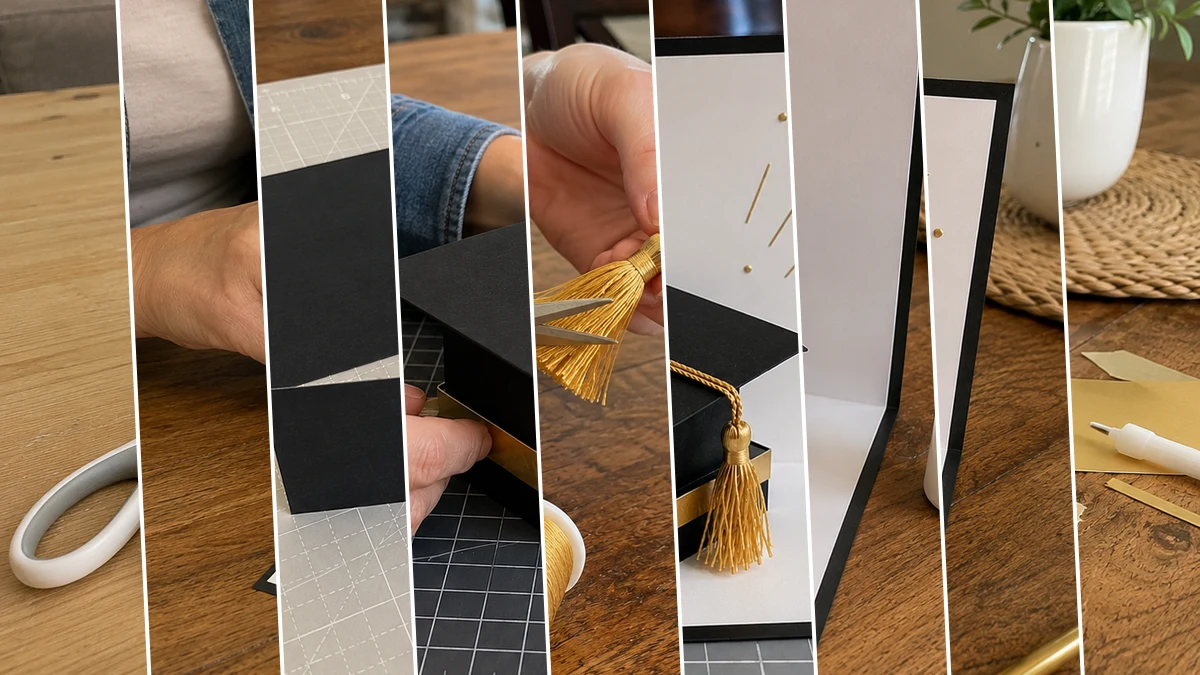
Oh my goodness, you guys! My best friend’s son is graduating this year, and I somehow forgot to grab a card. Instead of running to the store for a basic one, I decided to make this Graduation Card Craft: Pop-Up Cap DIY, and honestly, it turned out so much cuter than I expected. This handmade graduation card has a little 3D cap that pops up when you open it, which makes it feel more special than a regular store-bought card. If you need an easy graduation craft, a last-minute graduation card idea, or a simple DIY paper craft for a graduate, this one is such a fun project to try.
See also: Diy Dollar Tree Graduation Cap Flower Centerpiece
Theme: Wedding & Party
Materials Needed
- Assorted Cardstock (Black, White, Gold)
- Thick Black Cardstock or Foam Board
- Gold Embroidery Thread & Cord
- Gold Star Stickers/Cutouts
- Craft Adhesive (Glue, Double-Sided Tape)
- Basic Craft Tools (Scissors, Knife, Ruler, Scoring Tool)
📋 Love staying organized while crafting? Check out our printable planners & craft designs at CraftersDT on Etsy and use code CRAFT20 for 20% off your entire order!
Why This Craft Works
This Graduation Card Craft is perfect for almost any graduation celebration, whether you are making something for kindergarten, high school, college, or a family graduation party. I love that it feels personal without being too complicated. The black, white, and gold colors give it a classic graduation look, while the pop-up cap in the center makes the card feel like a small keepsake. When the graduate opens it and sees the cap standing up inside, it gives the card that fun little surprise moment.
📱 Free to Download
Join 50,000+ crafters already using Craftino
Browse 68+ Wedding & Party ideas and thousands more in the app
✓ Save crafts & browse fully offline
✓ Download printable PDF guides for every project
✓ Step-by-step photo tutorials, nothing left out
✓ 1,000+ craft projects with new ones added every week

It is also a budget-friendly graduation DIY, which is always a win for me. You can make this Pop-Up Cap DIY with simple supplies like cardstock, glue, scissors, gold paper, and a little thread for the tassel. If you already have some paper craft supplies at home, this project can cost just a few dollars. Dollar Tree is a great place to grab cardstock, glue sticks, stickers, and small embellishments without spending much.
The best part is that this graduation card craft looks more detailed than it actually is. The steps are simple once you understand the pop-up base: you make the card, create a small folded platform, build the little graduation cap, and glue it in place so it stands when the card opens. It took me about 20 to 30 minutes to make one, including cutting and decorating. It is a great graduation craft for beginners, busy moms, teachers, or anyone who wants to make a thoughtful handmade card without needing fancy tools.
Step-by-Step Instructions for Graduation Card Craft: Pop-Up Cap DIY
Alright, crafters, are you ready to make some magic? Seriously, you are going to love how quickly this Graduation Card Craft: Pop-Up Cap DIY comes together. It took me about 25 minutes from start to finish, and I was even watching my favorite show while I did it! This is perfect for beginners, or even for letting the older kids help out with the Paper Crafts part. Let’s get crafting!
Step 1: Prepare the Card Base
Start by cutting a piece of black cardstock to 10″ x 7″ for the outer card base. Score it precisely down the middle at the 5″ mark along the 10″ side. Fold it neatly to form a 5″ x 7″ folded card. Next, cut a piece of white cardstock to 9.5″ x 6.5″ for the inner card. Score this white piece in the middle at 4.75″ along the 9.5″ side. Apply craft glue or double-sided tape to the back of the white inner card and carefully center it inside the black card base, ensuring an even black border around all edges. Press firmly to secure.

💡 Pro Tip: To achieve crisp, professional folds, always score your cardstock first with a scoring tool and ruler. This prevents cracking and gives you a clean, straight fold. When gluing, use a thin, even layer of glue to avoid warping the paper.
Step 2: Create the Pop-Up Platform
With the card still lying flat, locate the center fold of the white inner card. Measure and mark two vertical slits, each about 1″ long and spaced approximately 1″ apart, centered along the fold line. Use a craft knife and ruler to carefully cut these two slits. Once cut, gently push the small rectangular section between the slits inward from the fold. When the card is opened to a 90-degree angle, this section should pop forward, creating a small, sturdy platform. Reinforce the new folds by creasing them with a bone folder.
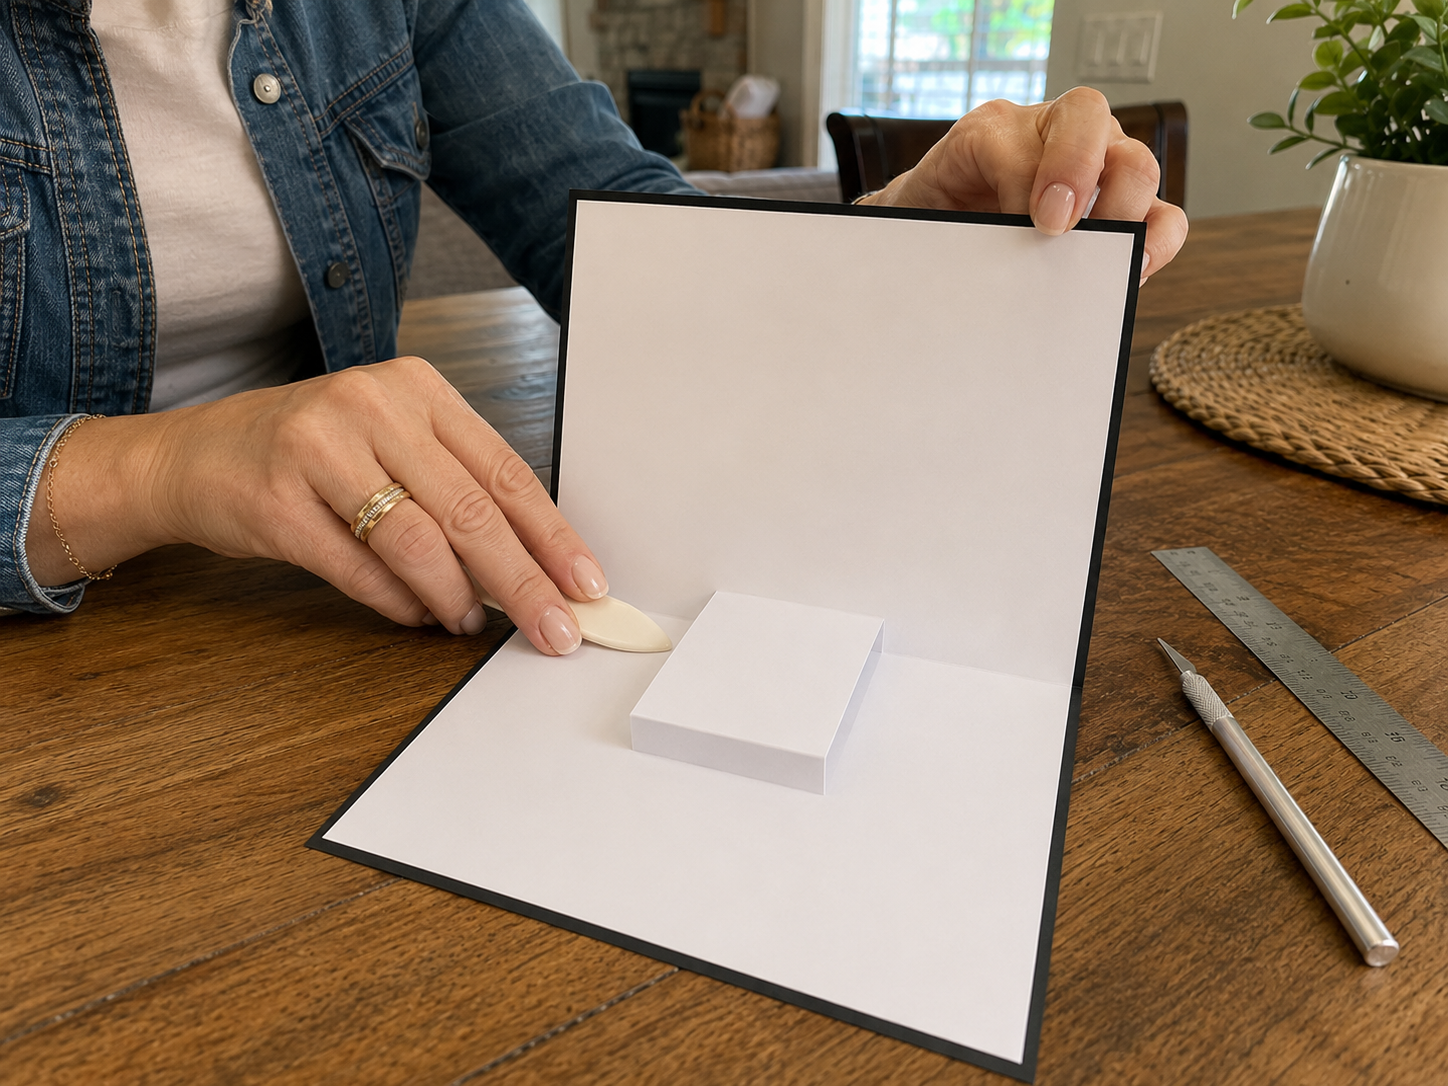
💡 Pro Tip: Always cut on a self-healing mat to protect your work surface and achieve cleaner cuts. For pop-up mechanisms, slightly over-creasing the new fold lines can help the platform stand more prominently and reliably.
🗓️ Keep all your craft projects on track! Explore our printable planners & templates at CraftersDT on Etsy and use code CRAFT20 for 20% off!
Step 3: Construct the 3D Cap Base
For the 3D graduation cap, cut a perfect black square (e.g., 2.5″ x 2.5″) from thick black cardstock or foam board for the top ‘board’ of the cap. For the base, cut a strip of black cardstock (e.g., 6″ x 1″ with extra for a glue tab). Score this strip at 1.5″ intervals along its length to create four equal sides and a small glue tab. Fold the scored strip into an open square column or box base. Apply glue to the tab and secure it to form a solid square prism (1.5″ x 1.5″ x 1″).
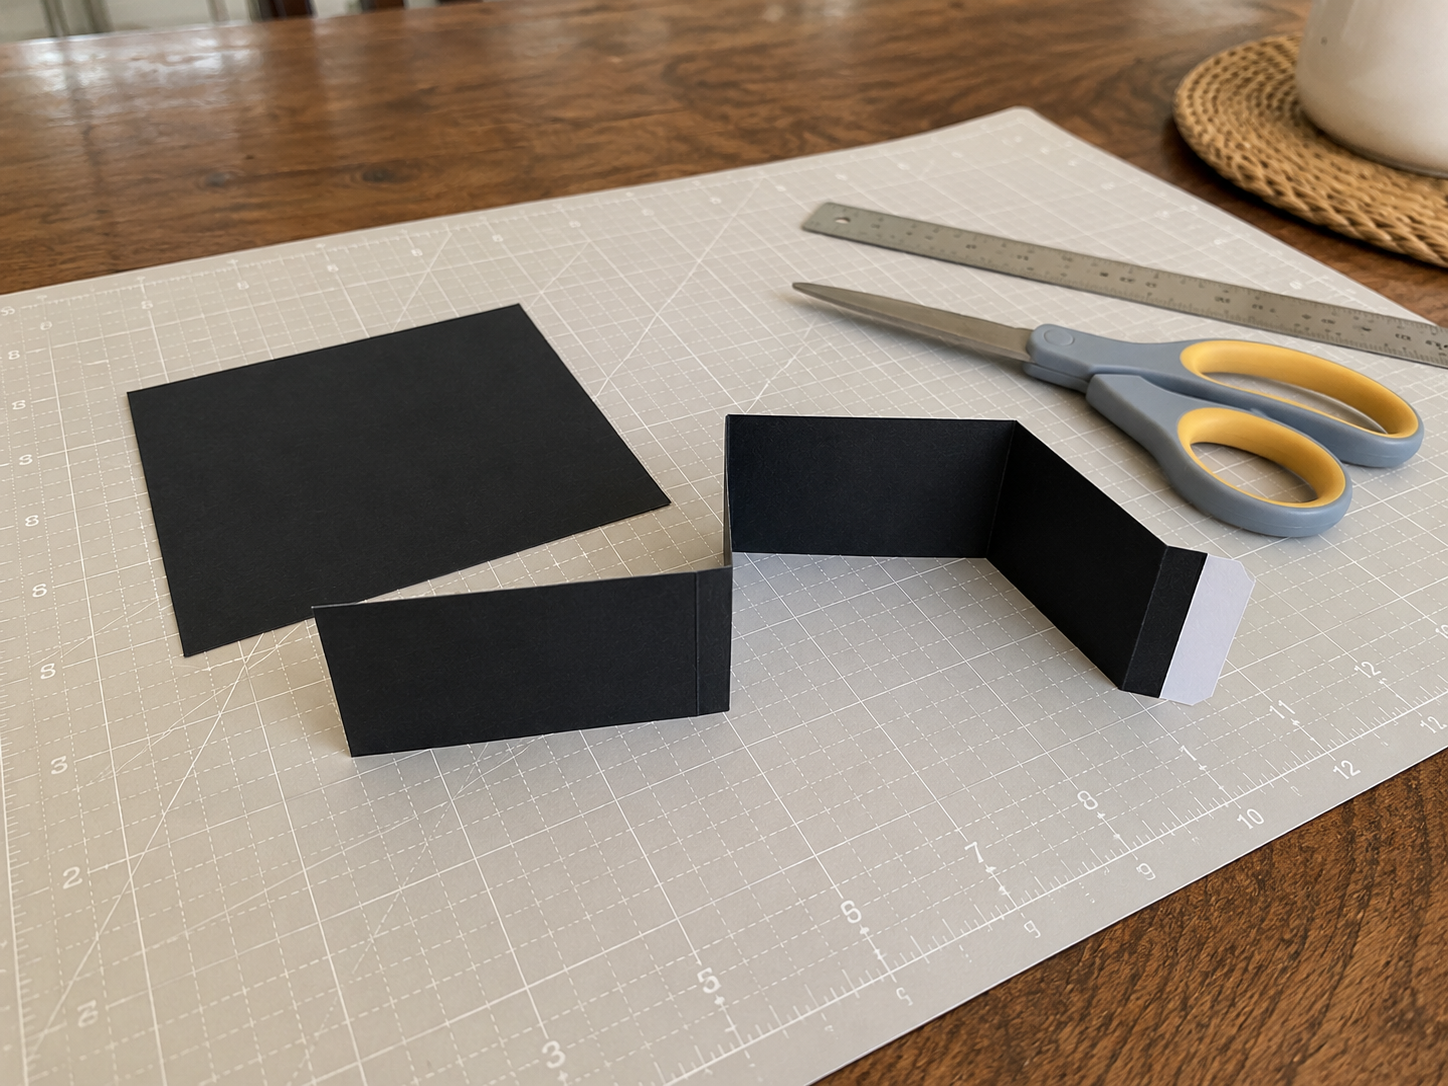
💡 Pro Tip: Using thick black cardstock or thin foam board for the cap top and base will give your cap a more substantial and realistic feel. Ensure your measurements are precise to get a perfectly square and stable cap.
Step 4: Assemble Cap & Add Gold Trim
Apply glue to the top edges of your black square column base and carefully center and attach the larger black square ‘board’ on top. Ensure it’s securely adhered and forms the distinct silhouette of a graduation cap. Next, cut a thin strip of gold cardstock (e.g., 0.25″ wide) long enough to wrap around the lower part of the cap base. Glue this gold band neatly around the base, creating an elegant decorative accent and finishing touch.
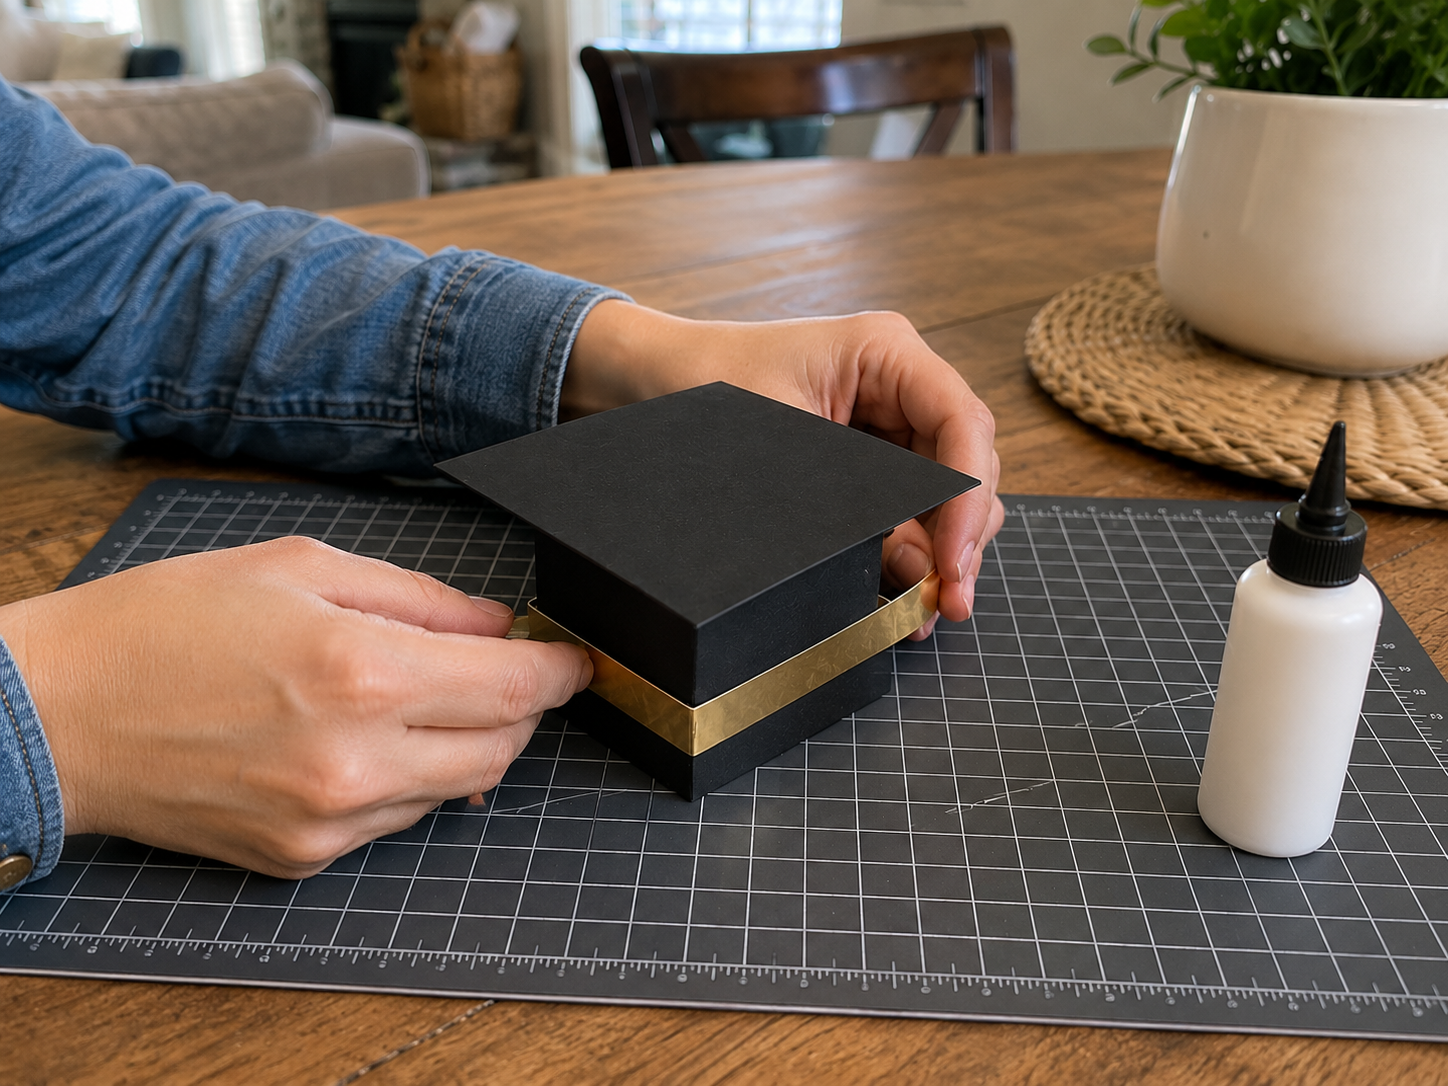
💡 Pro Tip: When attaching the cap board, hold it in place for a moment to allow the glue to set, ensuring it doesn’t shift. Using double-sided tape for the gold band can provide a cleaner, instant hold without the risk of wet glue showing through.
Step 5: Craft the Gold Tassel
To make the tassel, wrap gold embroidery thread approximately 30-40 times around two fingers (or a small piece of cardboard) to create a dense loop. Carefully slide the looped thread off your fingers. Take a separate 4-inch piece of gold thread and tie it tightly around one end of the loop to form the ‘neck’ of the tassel. Cut through all the loops at the opposite end to create the fringe. Attach a longer piece of gold cord (e.g., 6-8 inches) to the top of the tassel. Finally, glue a small gold circle or button to the end of the long cord where it will attach to the cap.
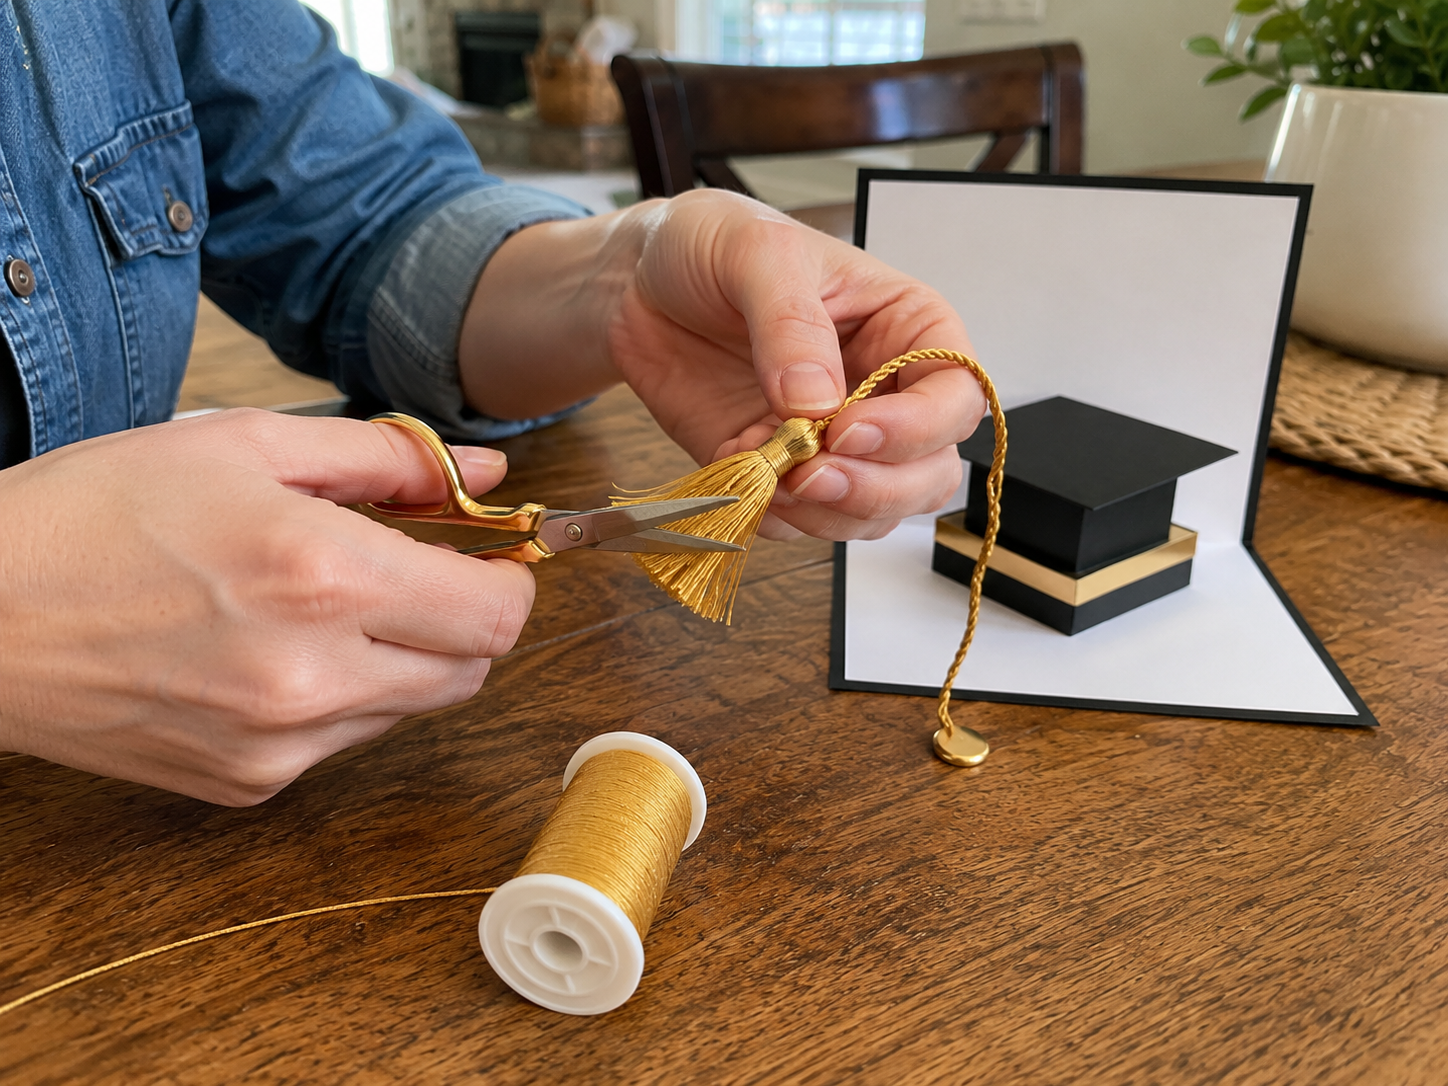
💡 Pro Tip: For a fuller tassel, wrap more thread. If your thread is thin, use multiple strands together. A tiny drop of clear craft glue on the knot at the tassel’s neck can prevent it from unraveling.
Step 6: Attach Tassel to Cap
Locate the exact center of the top black square of your 3D graduation cap. Apply a small dab of strong craft glue or hot glue to this spot. Carefully position and press the small gold circle/button (attached to the tassel cord) onto the glue. Hold it in place until secure. Once the button is firmly attached, gently arrange the gold cord and tassel so it drapes naturally over one side of the cap, mimicking a real graduation cap.
💡 Pro Tip: Using hot glue for this step provides a quicker, stronger bond for the tassel. Be careful not to use too much, as it can be messy. Ensure the tassel hangs aesthetically before the glue fully sets.
Step 7: Mount the Cap Pop-Up
Open your card to a 90-degree angle, making sure the pop-up platform is fully extended. Apply a generous amount of strong craft glue or hot glue to the top surface of the pop-up platform. Carefully center the base of the 3D graduation cap onto this glued platform. Press down firmly and hold for several seconds to allow the glue to set. Ensure the cap is standing upright and stable when the card is fully open.

💡 Pro Tip: Test the cap’s stability by gently closing and opening the card a few times once the glue has dried. If it feels wobbly, add more glue around the base of the cap for reinforcement.
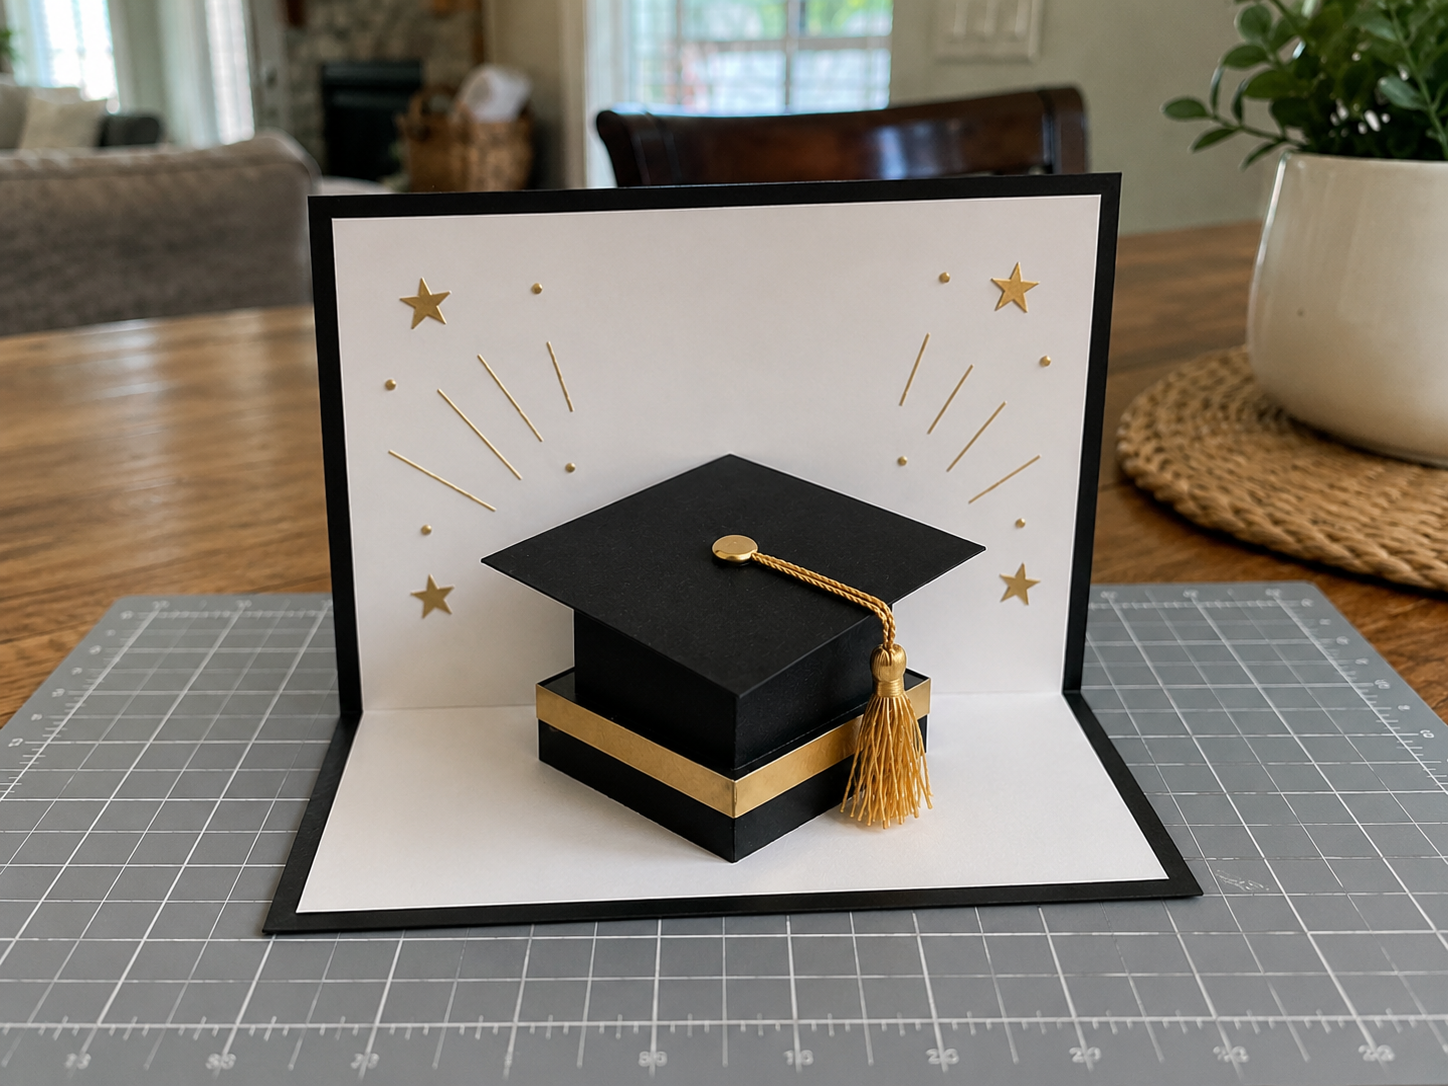
Step 8: Decorate the Card Interior
Now it’s time to add celebratory embellishments! Using small gold star stickers or cutouts, strategically place them on the upright back panel of the card, behind and around the pop-up cap. You can also add small gold dots or thin accent lines using a gold marker or by cutting thin strips of gold cardstock. Keep the design clean, elegant, and festive, ensuring it complements the black, white, and gold theme without overwhelming the cap.

💡 Pro Tip: For precise placement of small stickers or cutouts, use tweezers. If using a gold marker, practice on scrap paper first to ensure the lines are clean and consistent.
📱 Free to Download
Join 50,000+ crafters already using Craftino
Browse 36+ Wedding & Party ideas and thousands more in the app
✓ Save crafts & browse fully offline
✓ Download printable PDF guides for every project
✓ Step-by-step photo tutorials, nothing left out
✓ 1,000+ craft projects with new ones added every week
Step 9: Add the ‘Class of 2026’ Label
For the finishing touch, create the ‘Class of 2026’ label. Cut a black cardstock banner shape (e.g., 4″ x 1″), then a slightly smaller white cardstock rectangle (e.g., 3.75″ x 0.75″), and an even smaller gold cardstock rectangle (e.g., 3.5″ x 0.5″). Layer these pieces with craft glue, centering each one. You can handwrite ‘Class of 2026’ in black on the gold layer, print it, or cut it from gold foil paper. Glue the completed layered label onto the bottom flat panel of the card, directly in front of the pop-up cap, ensuring it’s centered and legible.
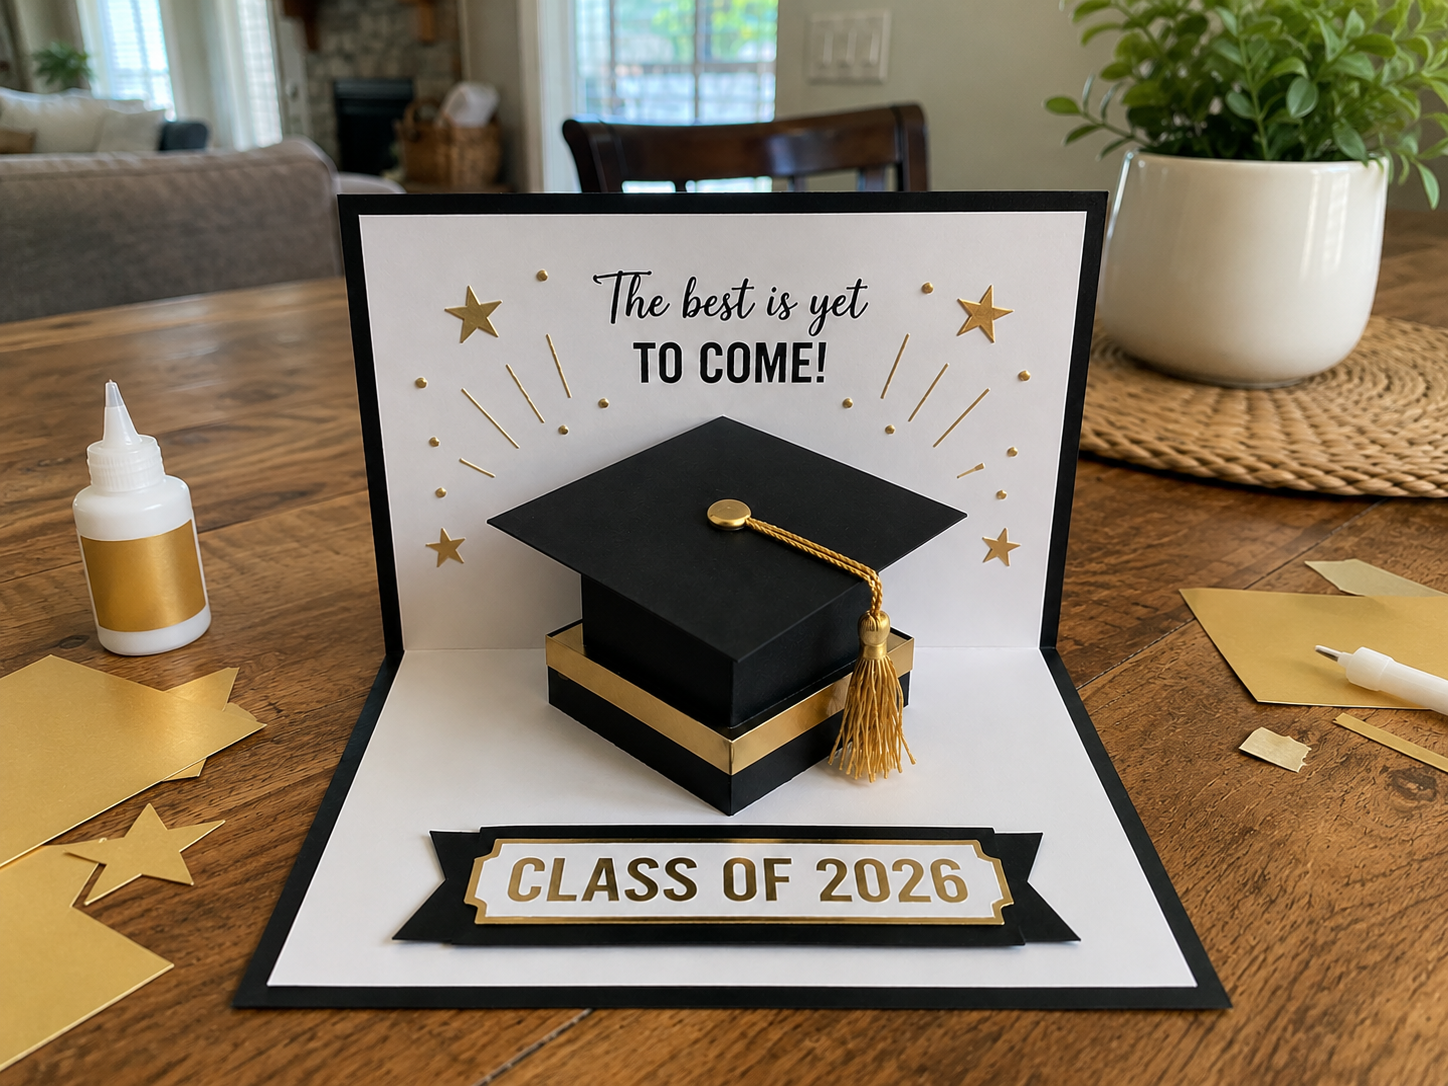
💡 Pro Tip: To make your label really pop, use a fine-tip black pen for crisp lettering or a cutting machine for a perfectly cut ‘Class of 2026’. Using foam dots for the label can add a subtle 3D effect.
Your Awesome DIY Graduation Card is Done!
Woohoo! Look at that adorable Pop-Up Cap DIY! Isn’t it just the cutest? You can write your special message inside, tuck in a gift card or some cash, and hand it right over to your graduate. Don’t forget to snap a picture and share your version, I’d love to see how you customized your Graduation Card Craft!
📱 Free to Download
Join 50,000+ crafters already using Craftino
Browse 44+ Wedding & Party ideas and thousands more in the app
✓ Save crafts & browse fully offline
✓ Download printable PDF guides for every project
✓ Step-by-step photo tutorials, nothing left out
✓ 1,000+ craft projects with new ones added every week
Frequently Asked Questions
How much does it cost to make this Graduation Card Craft: Pop-Up Cap DIY?
You can typically make this DIY Graduation Card Craft for under $5. Most of the supplies, like cardstock and glue, can be found at Dollar Tree for about $1 each.
What kind of paper works best for this Pop-Up Cap DIY card?
For the best results, use cardstock that is at least 65lb to 80lb weight. This gives the card and the pop-up cap enough stiffness to stand up well.
How long does it take to make one DIY Graduation Card Craft?
Once you have your supplies ready, it usually takes about 20-30 minutes to complete one Graduation Card Craft: Pop-Up Cap DIY from start to finish.
Can kids help make this Graduation Card Craft, or is it too hard?
Absolutely! Kids aged 8 and up can definitely help with this Paper Crafts project. They can assist with tracing, cutting (with supervision), and gluing the pieces together.
What are some ways to customize this Pop-Up Cap DIY for a Wedding & Party event?
You can easily customize it by using the graduate’s school colors for the cardstock, adding glitter or stickers, or even attaching a small wallet-sized photo of them to the cap.
Where can I find the supplies for this Graduation Card Craft: Pop-Up Cap DIY?
Most of the basic supplies like cardstock, scissors, and glue are readily available at Dollar Tree, Walmart, or any craft store in the Paper Crafts section.
Discover the newest Dollar Tree arrivals for your next craft project here.
Leave a Reply