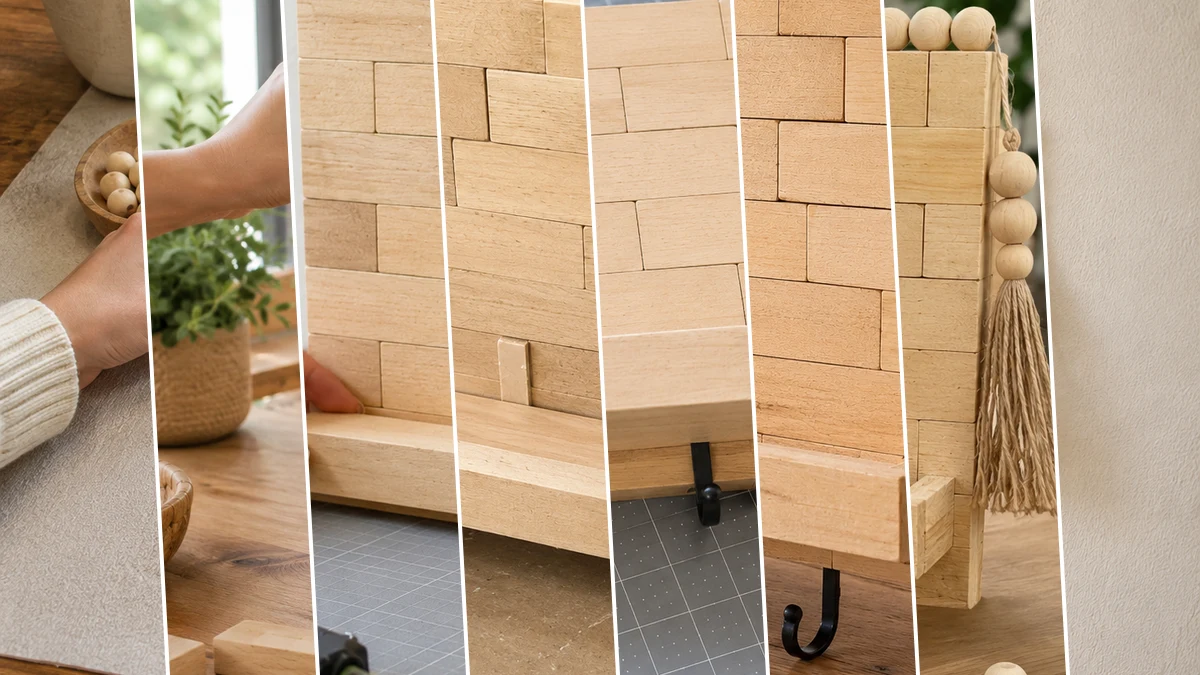
Okay, so my family is always asking, “Honey, where are my keys?” and honestly, it was starting to drive me a little crazy. That’s what inspired me to make this DIY Jenga Block Key Holder with Wooden Beads. It’s a simple Dollar Tree craft that keeps our entryway looking organized, cozy, and cute without spending much at all. I love that it works as both a practical key holder and a pretty farmhouse-style wall organizer.
See also: Dollar Tree Jenga Block Crafts
Theme: Farmhouse / Rustic
Materials Needed
- Tumbling Tower (Jenga-style) Wood Blocks
- Backing Board (e.g., thin craft wood, foam board, or sturdy cardboard)
- Adhesive (Hot Glue Gun & Glue Sticks, Wood Glue)
- Small Black Screw Hooks or Adhesive Hooks
- Natural Wooden Beads & Jute Twine
- Small Wood Craft Sticks (for reinforcement)
- Basic Craft Tools (Scissors, Ruler, Pencil)
- Optional: Wood Stain or Natural Wax
- Optional: Faux Greenery & Small Kraft Envelope
📋 Love staying organized while crafting? Check out our printable planners & craft designs at CraftersDT on Etsy and use code CRAFT20 for 20% off your entire order!
Why This Craft Works
This little project is such a sweet way to add a cozy farmhouse touch to your entryway. The Jenga-style wood blocks give it that handmade rustic look, while the wooden bead detail makes it feel a little more finished and decorative. It’s perfect for organizing keys near the front door, in a mudroom, or even in a kitchen command center.
📱 Free to Download
Join 50,000+ crafters already using Craftino
Browse 65+ Farmhouse / Rustic ideas and thousands more in the app
✓ Save crafts & browse fully offline
✓ Download printable PDF guides for every project
✓ Step-by-step photo tutorials, nothing left out
✓ 1,000+ craft projects with new ones added every week

The best part is that this DIY Jenga Block Key Holder with Wooden Beads is budget-friendly and easy to customize. Most of the supplies can be found at Dollar Tree, including the tumbling tower blocks, hooks, twine, and craft basics. You get a cute entryway organizer that looks like something from a boutique home decor shop, but for a tiny fraction of the price.
This is also a great beginner-friendly Dollar Tree DIY project. You don’t need fancy tools or woodworking skills, just a little glue, a few Jenga-style blocks, wooden beads, and some simple hooks. From start to finish, it’s a quick craft you can make in about 30 minutes, and it would also make a thoughtful handmade gift for someone who loves farmhouse decor.
Step-by-Step Instructions for DIY Jenga Block Key Holder with Wooden Beads
Alright crafters, are you ready to get started? This DIY Jenga Block Key Holder with Wooden Beads is seriously so fun and simple, you’re going to love it. It’s a quick project that anyone can do, even if you’re new to crafting, and it’ll add so much charm to your space. Let’s gather our Dollar Tree goodies and make something amazing!
Step 1: Prepare Backing Board & Blocks
Begin by selecting and cutting your backing material (thin craft wood, sturdy foam board, or thick cardboard) to your desired organizer dimensions. A recommended size is approximately 10-12 inches wide by 8-10 inches tall. Use a ruler and pencil to lightly mark reference lines on your backing for the first row of blocks to ensure a straight start. If you’d like to give your Jenga blocks a slightly darker or richer finish, apply a light wood stain or natural wax now, allowing them to dry completely according to the product’s instructions before proceeding.
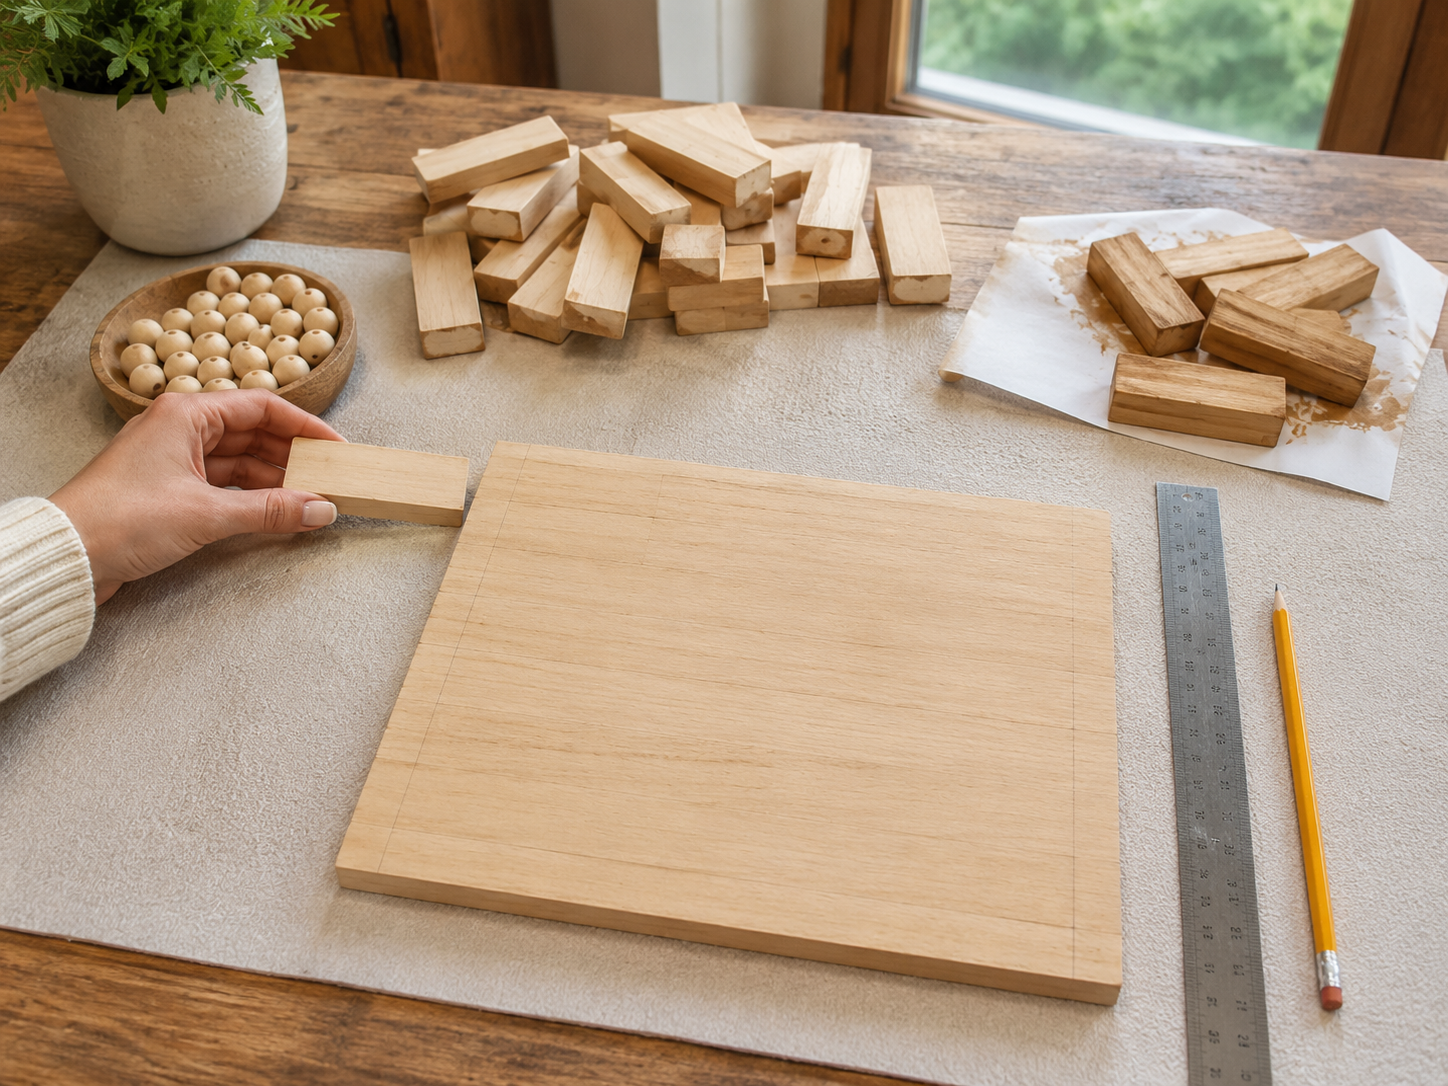
💡 Pro Tip: For the most durable organizer, especially if you plan to use screw-in hooks, a thin plywood or craft wood panel is ideal for the backing. When pre-staining, work in a well-ventilated area and apply thin, even coats to prevent blotchiness. Ensure all blocks are completely dry to avoid issues with glue adhesion.
Step 2: Assemble Back Panel Foundation
Starting from the bottom edge of your backing board, begin attaching your Jenga blocks to form the main back panel in a ‘brick’ style pattern. Apply a generous line of hot glue (or wood glue for a stronger, more permanent bond) to one long side of a block, then press it firmly onto the backing, aligning it with your pencil guideline. For subsequent rows, alternate the vertical seams of the blocks, staggering them to mimic a traditional brick wall and enhance the panel’s stability and visual appeal. Work upwards, ensuring each row is straight and the overall panel remains square.
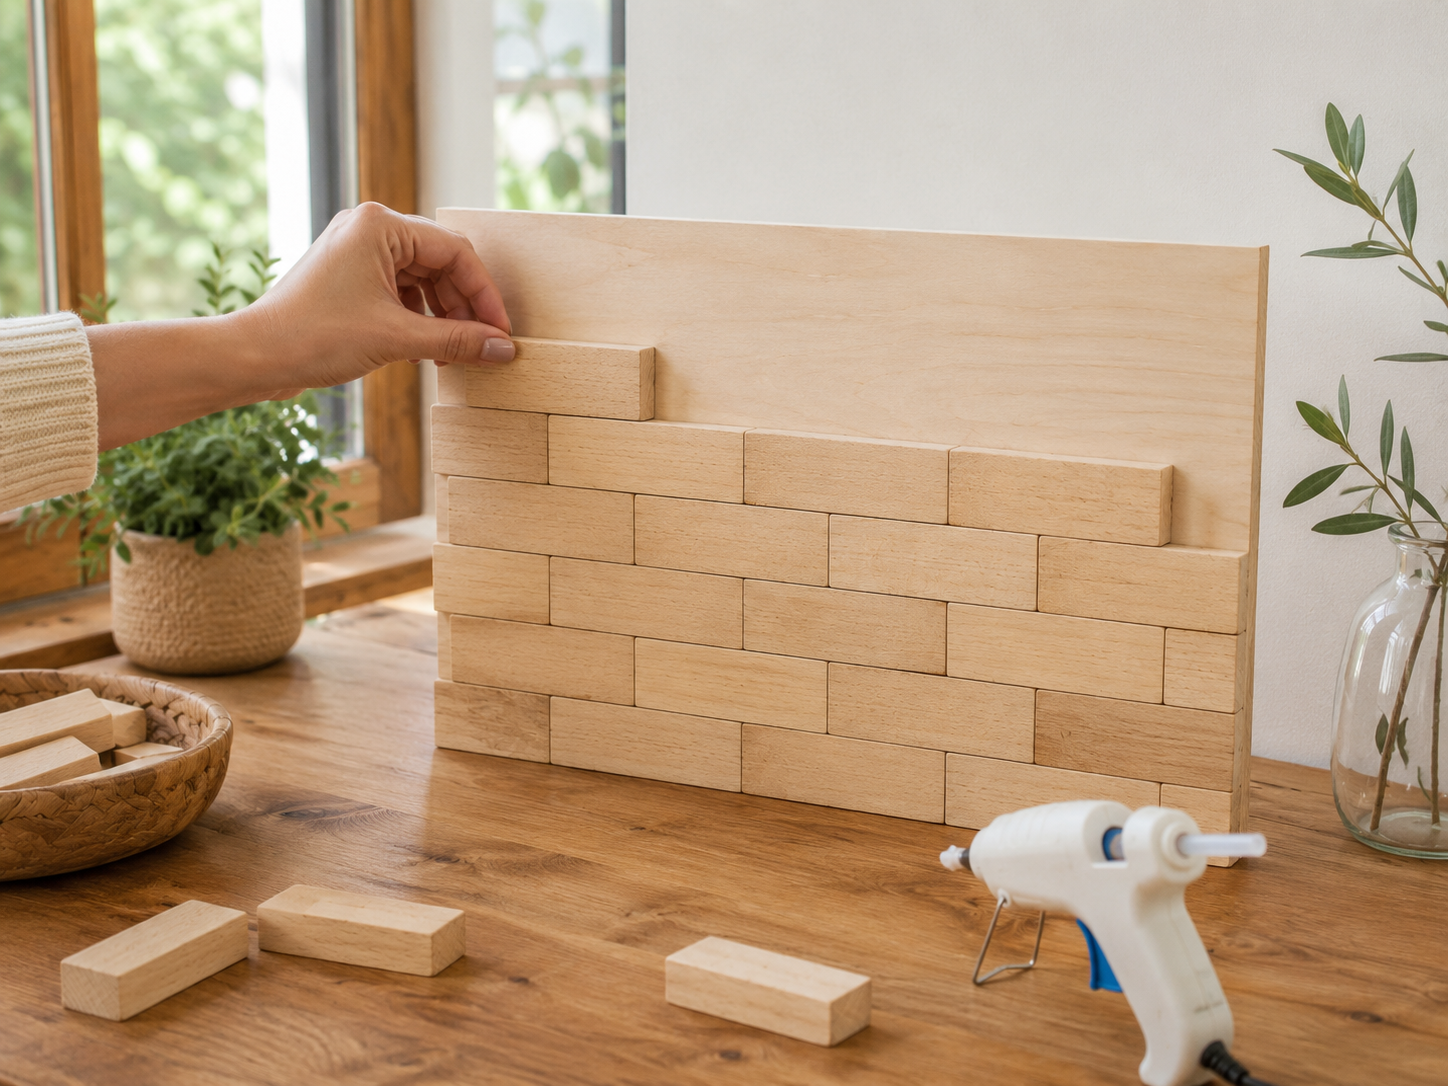
💡 Pro Tip: To maintain perfectly straight rows and even spacing, use a level or a straight edge (like another Jenga block) as a guide against the blocks you’ve already placed. If using wood glue, painter’s tape can be used to hold rows securely while the glue cures, especially for vertical sections.
🗓️ Keep all your craft projects on track! Explore our printable planners & templates at CraftersDT on Etsy and use code CRAFT20 for 20% off!
Step 3: Complete Back Panel & Shelf Base
Continue gluing Jenga blocks in the brick pattern until your back panel reaches the desired height for the organizer. Once the entire back panel is complete and firmly secured to the backing, you’ll begin constructing the shallow front shelf. Select two Jenga blocks and position them horizontally across the lower front of your newly completed Jenga block panel. These will serve as the base for your shelf. Apply glue to their back and bottom edges, then secure them firmly to the bottom edge of the back panel, ensuring they are perfectly level and centered.
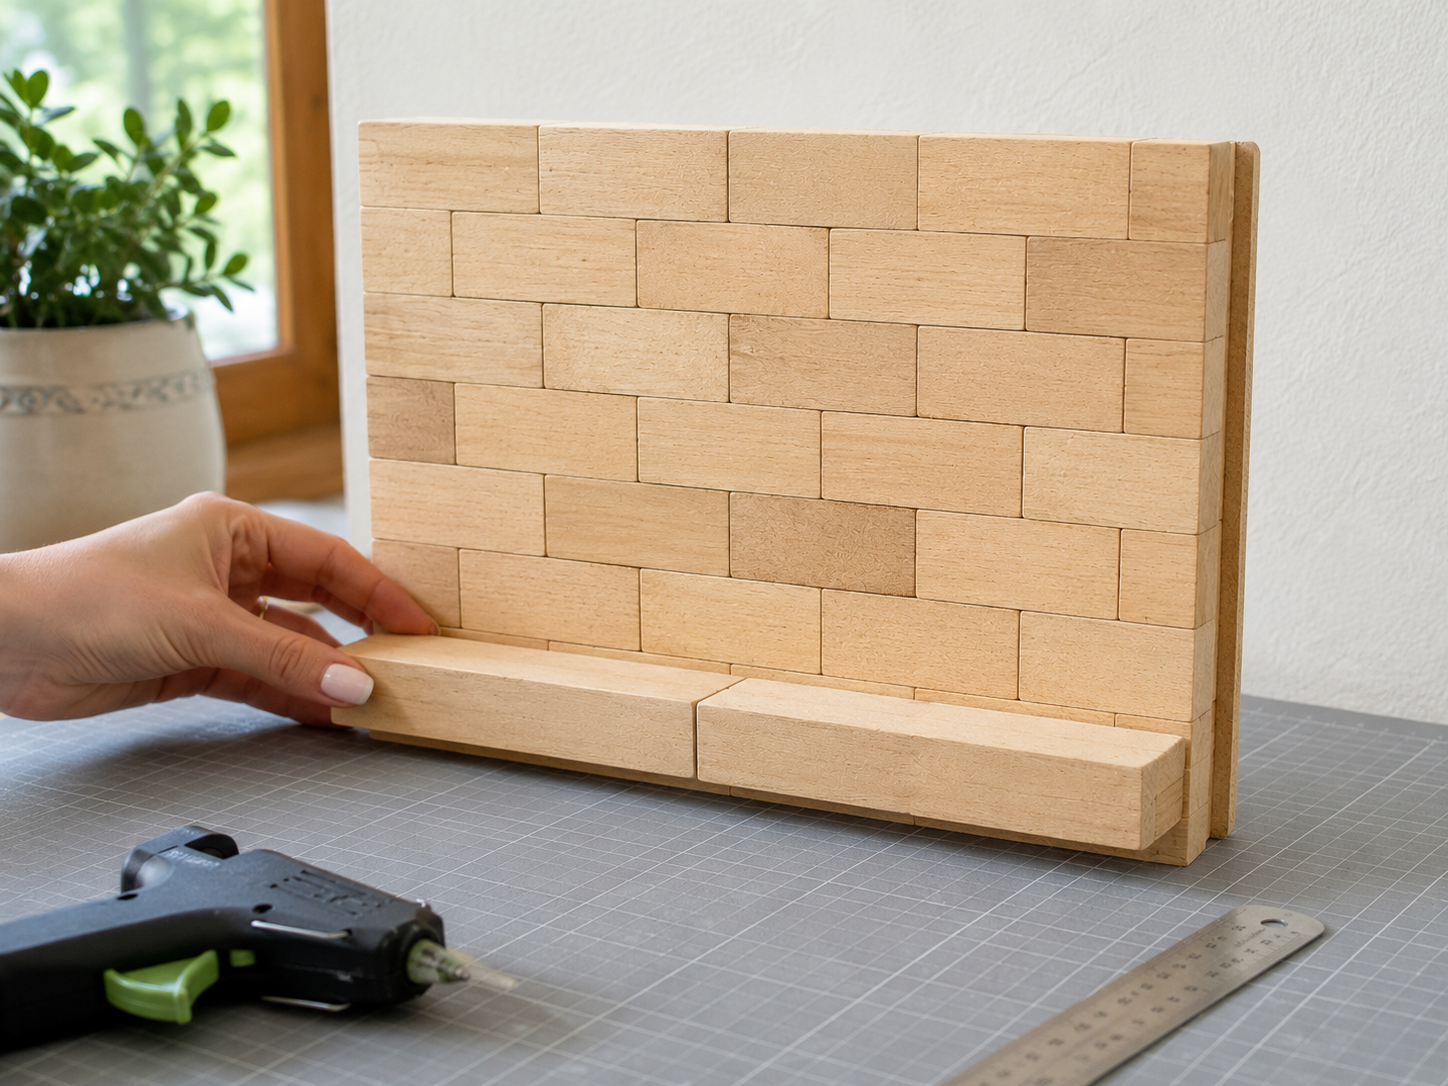
💡 Pro Tip: Before gluing the very last few rows of your back panel, it’s a good idea to hold up your shelf blocks to double-check their intended placement and ensure good alignment. For the shelf base, use a ruler to confirm the blocks are straight and parallel to the bottom edge of the organizer, as this sets the foundation for a professional-looking shelf.
Step 4: Build Shelf Lip & Reinforce
To create the front lip of the shallow shelf, stack and glue two more Jenga blocks horizontally on top of the two base blocks you just placed. These should be flush with the front edge, forming a small, contained ledge perfect for holding items. For crucial extra stability and to prevent the shelf from bowing or detaching over time, cut small wood craft sticks (or a thin strip of foam board) to fit snugly in the gap behind the shelf, between the back panel and the newly formed shelf lip. Apply glue to these reinforcement pieces and secure them firmly in place.
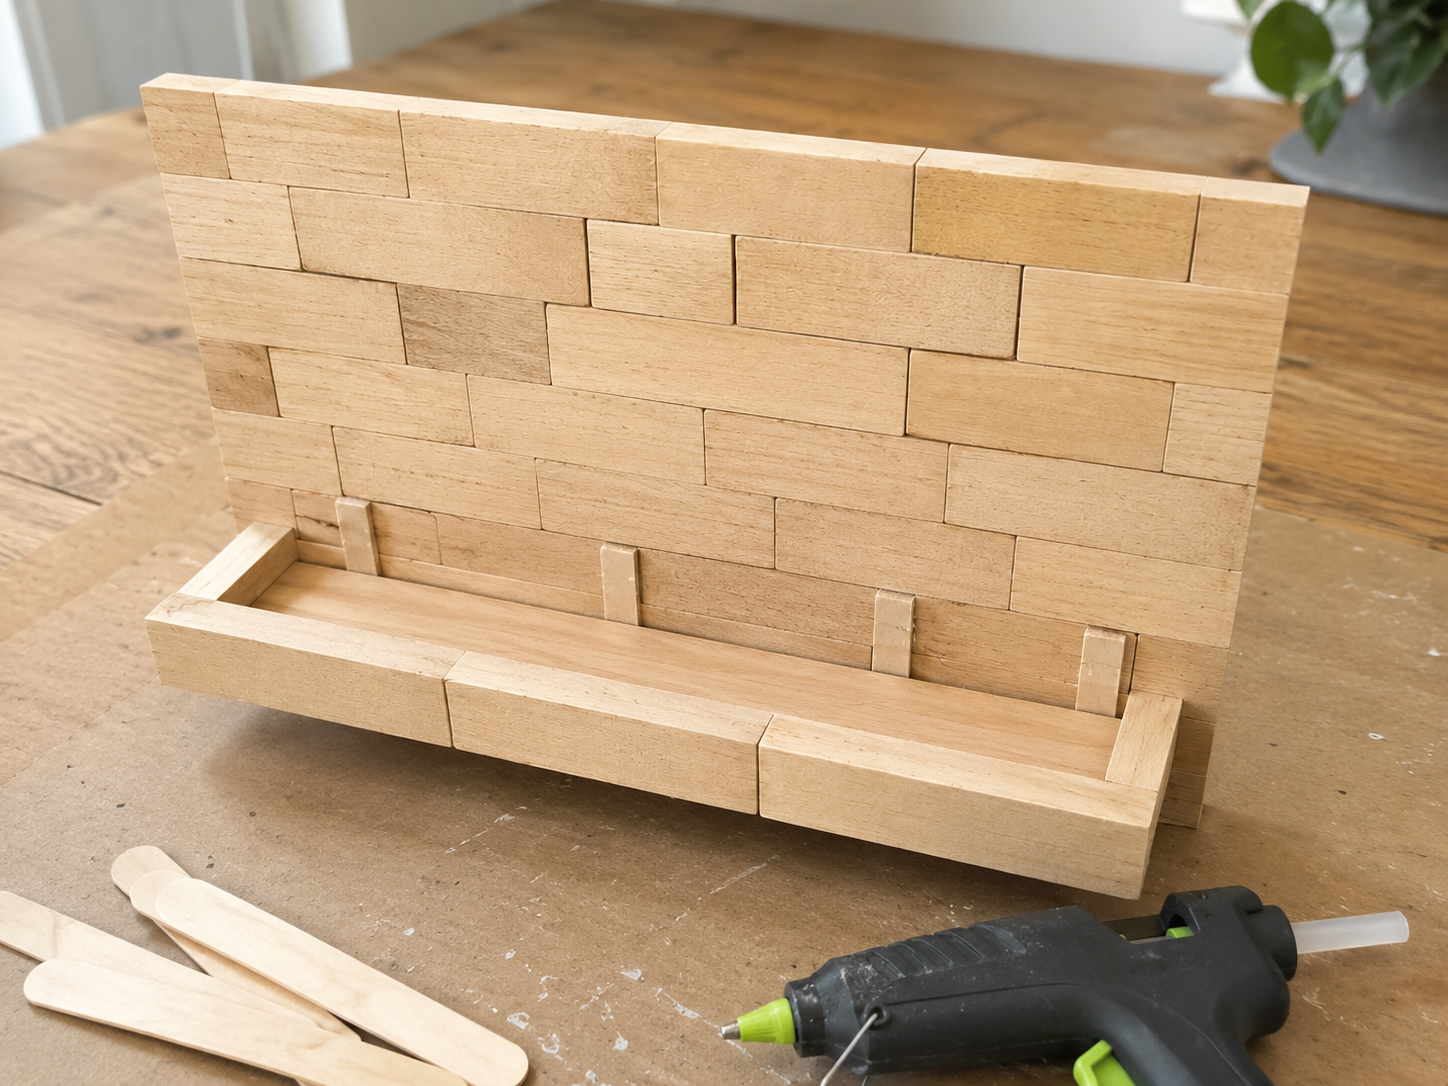
💡 Pro Tip: When gluing the shelf lip, apply adhesive to both the top surface of the base blocks and the back edge of the lip blocks for maximum grip. For the reinforcement, wood glue offers the strongest bond with craft sticks; hold them in place firmly until set. This reinforcement step is vital for the shelf’s durability, especially if it will support heavier items or endure regular use.
Step 5: Attach Key Hooks Securely
Now, add the practical element for your keys. Carefully attach three or four small black screw hooks (or strong adhesive hooks) underneath the bottom edge of your Jenga block organizer, below the shelf. If using screw hooks, it’s highly recommended to pre-drill small pilot holes using a drill bit slightly smaller than your screw’s core to prevent the Jenga blocks from splitting. Space the hooks evenly for a balanced and functional layout. If opting for adhesive hooks, ensure the surface is clean and dry before applying, then press firmly for the recommended duration.
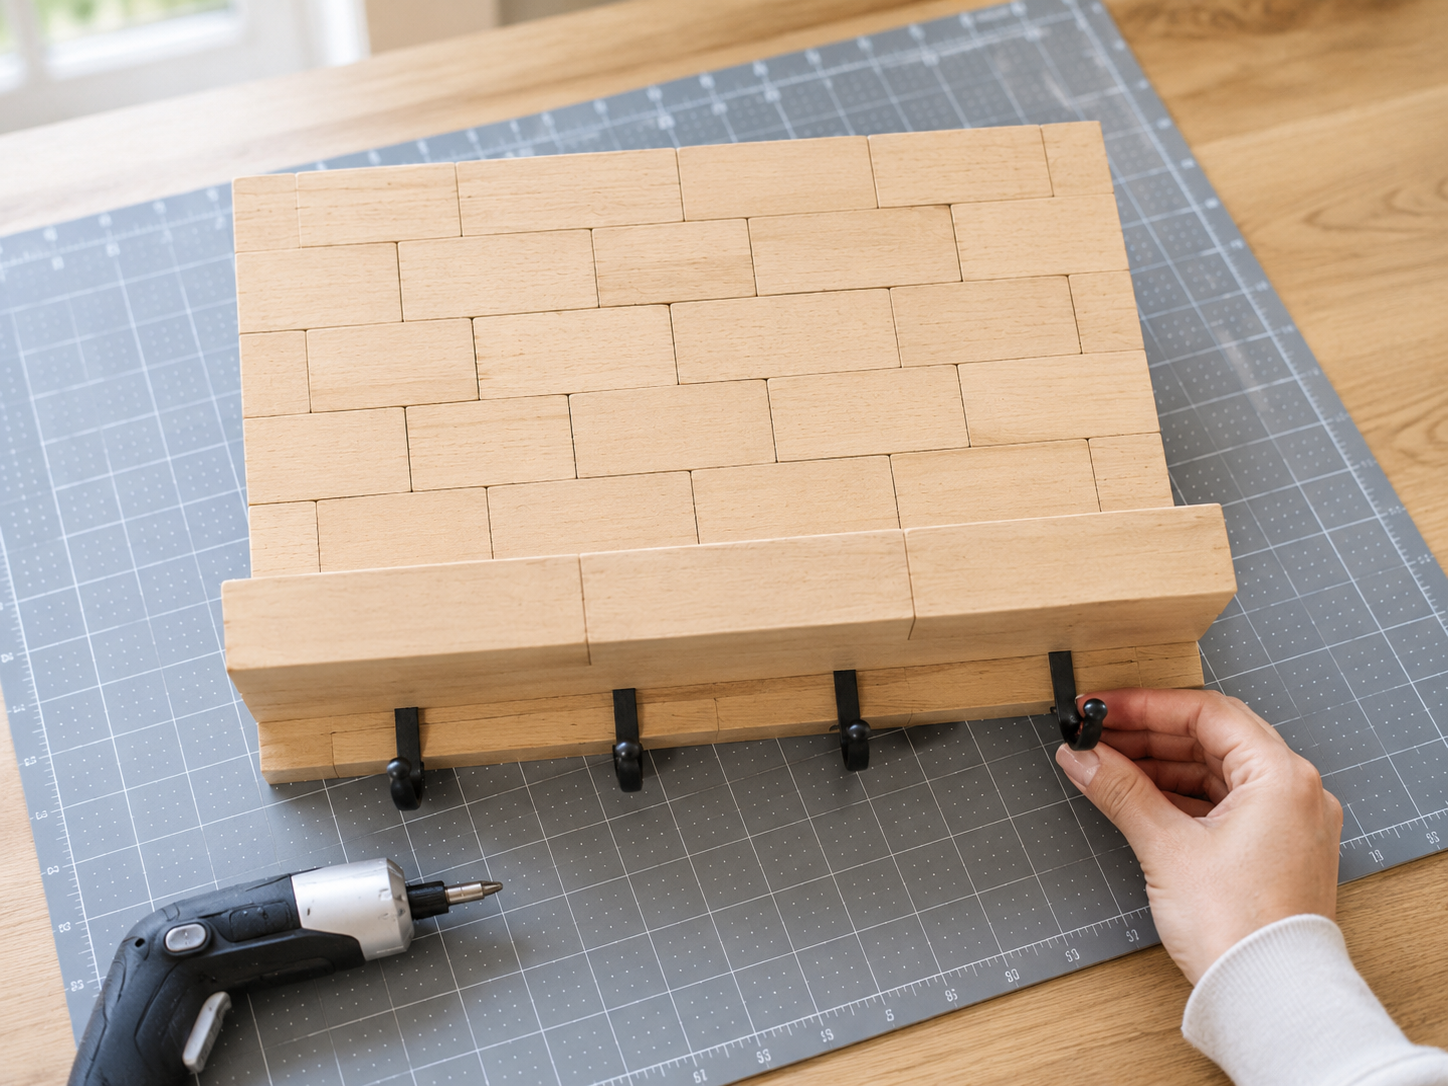
💡 Pro Tip: Before drilling or adhering, mark your desired hook positions with a pencil to ensure even spacing. For screw hooks, don’t over-tighten, as this can still split the wood. For adhesive hooks, allow the adhesive to fully cure (usually 24 hours) before hanging any weight, to guarantee maximum hold.
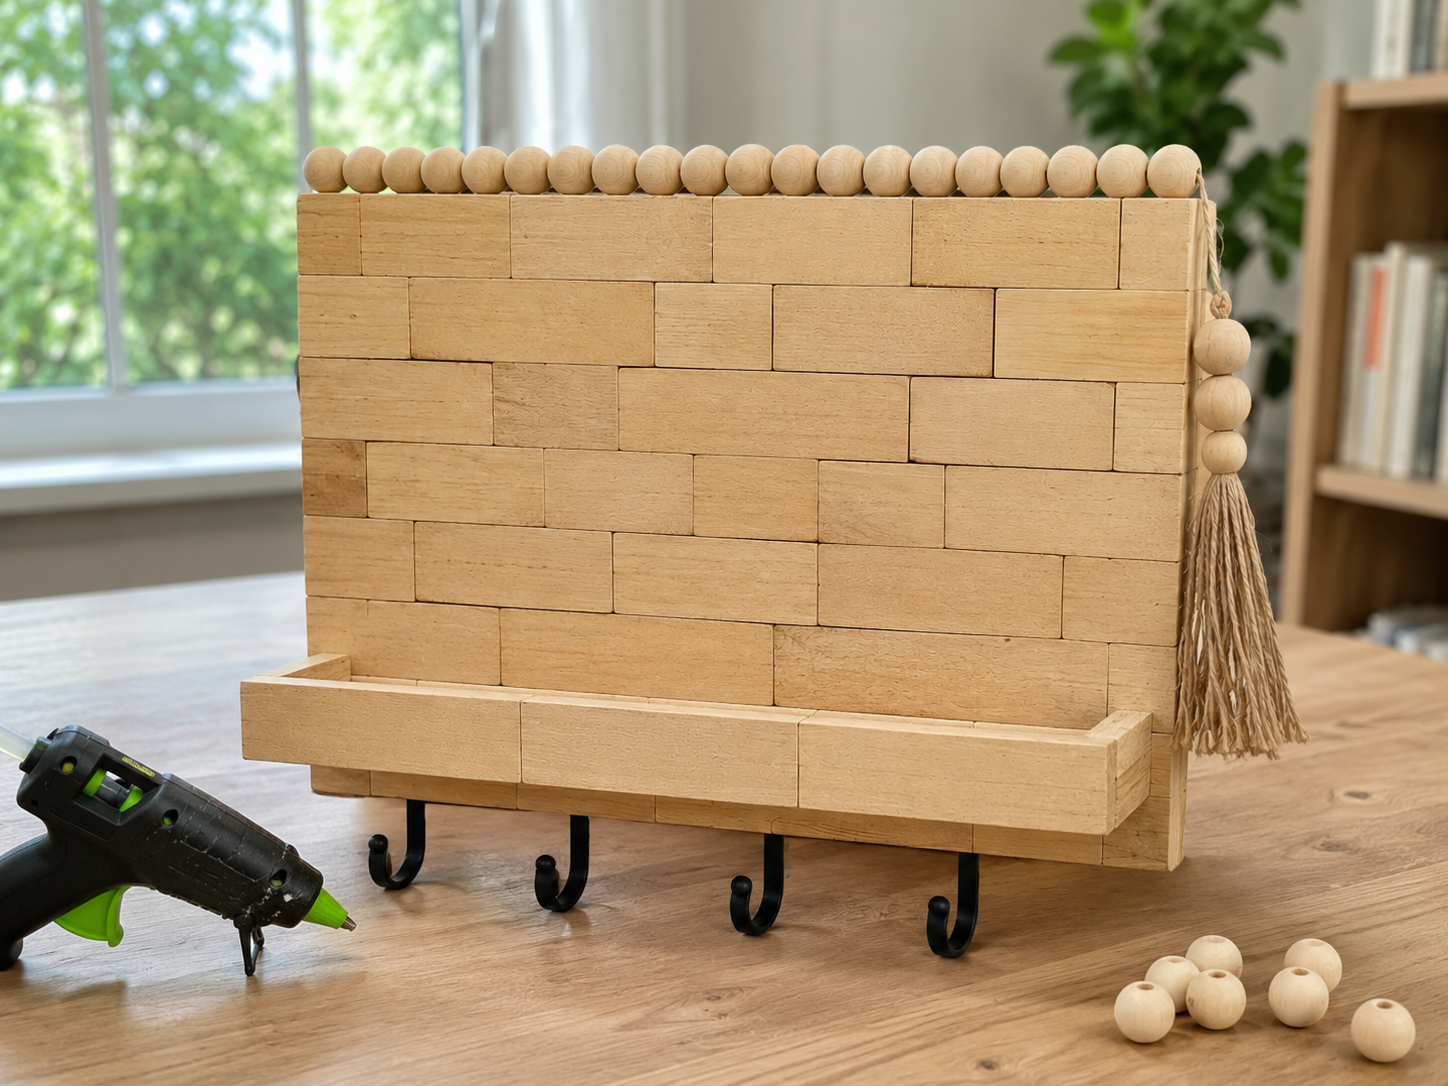
Step 6: Craft & Attach Bead Tassel
To add a charming boho farmhouse detail, create a wooden bead tassel. Cut a length of jute twine (approximately 18-24 inches). String 3-5 natural wooden beads onto the twine. At the bottom, form a rustic tassel by wrapping jute twine densely around your fingers or a small piece of cardboard, then tie it securely to the beaded string. Trim the tassel ends to an even length. Attach the top loop of your beaded string to one side of the organizer, either by securely gluing it directly to a Jenga block on the side or by tying it around a block for a slightly looser hang.

💡 Pro Tip: For a fuller tassel, wrap the jute twine around your fingers 20-30 times before tying. A small dab of hot glue at the top of the tassel, where it’s secured to the beaded string, will prevent any unraveling. When attaching to the organizer, consider gluing a small loop of twine directly to the side for a clean finish, rather than wrapping it around a visible block.
Step 7: Add Top Bead Trim
To complete the decorative styling of your organizer, glue a row of natural wooden beads along the very top edge of your Jenga block back panel. You can space them slightly apart or place them directly touching, depending on the look you prefer. Apply hot glue to the back of each bead and firmly press it into place, ensuring it aligns neatly with the top edge of the panel. This adds a finished, polished look to the top of your organizer.
💡 Pro Tip: For perfectly aligned beads, draw a light pencil line along the top edge of the Jenga panel as a guiding reference before gluing. Start from one end and work your way across, holding each bead in place for a few seconds until the hot glue cools and sets, preventing any shifting.
📱 Free to Download
Join 50,000+ crafters already using Craftino
Browse 93+ Farmhouse / Rustic ideas and thousands more in the app
✓ Save crafts & browse fully offline
✓ Download printable PDF guides for every project
✓ Step-by-step photo tutorials, nothing left out
✓ 1,000+ craft projects with new ones added every week
Step 8: Optional Styling & Display
Your Dollar Tree Jenga Block Entryway Organizer is now complete! For an optional mail holder section, you can attach a small kraft envelope or a mini paper pocket to the front of the Jenga panel using a dab of hot glue. Finally, mount your organizer securely near your entryway. Style it by tucking faux eucalyptus stems into the shelf, hanging your keys and sunglasses from the hooks, and placing small envelopes or notes in the optional pocket. This showcases its full functionality and adds a welcoming, organized touch to your home.
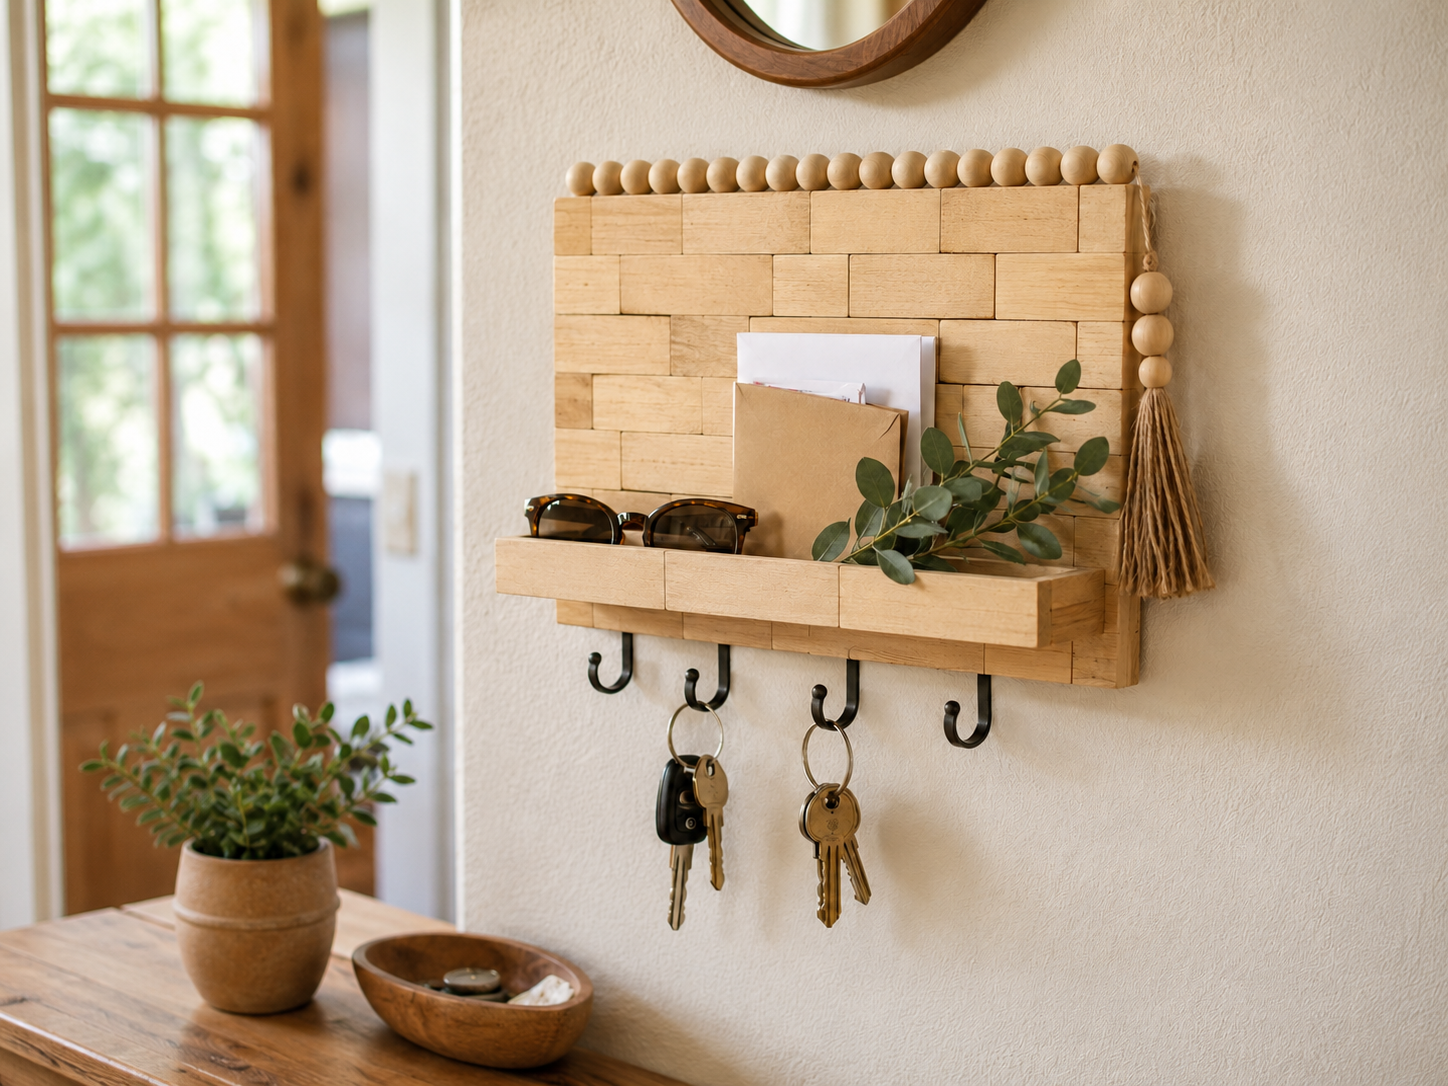
💡 Pro Tip: To hang your organizer, attach D-ring hangers or sawtooth hangers to the back of your backing board. If using a foam board backing, sturdy Command Strips are an excellent damage-free alternative. Consider swapping out faux greenery seasonally to refresh your entryway decor!
Your Farmhouse Key Holder Dreams Come True!
Look at that, you did it! Your new DIY Jenga Block Key Holder with Wooden Beads is ready to bring some charm and organization to your home. Hang it up in your entryway or kitchen, or wrap it up for a thoughtful gift. Don’t forget to tag me on social media when you show off your version!
📱 Free to Download
Join 50,000+ crafters already using Craftino
Browse 79+ Farmhouse / Rustic ideas and thousands more in the app
✓ Save crafts & browse fully offline
✓ Download printable PDF guides for every project
✓ Step-by-step photo tutorials, nothing left out
✓ 1,000+ craft projects with new ones added every week
Frequently Asked Questions
How many Jenga blocks do I need for this DIY key holder?
You’ll need about 18-20 Jenga-style blocks, which usually comes from one Dollar Tree Tumbling Tower game.
What’s the best glue to use for a DIY Jenga Block Key Holder?
A strong craft glue like E6000 or Gorilla Glue will give you the best hold for your Jenga blocks and wooden beads. Let it dry for at least 24 hours.
How much does it cost to make this Farmhouse / Rustic key holder?
This project is super budget-friendly and costs about $3 to $5, since most of the supplies are from Dollar Tree.
What kind of paint works best for the wooden beads and blocks?
Acrylic craft paint works perfectly for both the Jenga blocks and wooden beads. I usually use white or a light gray for that classic Farmhouse / Rustic look.
Can I customize my DIY Jenga Block Key Holder with Wooden Beads?
Absolutely! You can use different paint colors, stain the blocks, or even add a small faux greenery accent for extra personalization.
How long does it take to make this DIY Jenga Block Key Holder?
This is a quick craft! You can usually assemble and paint your key holder in about 20-30 minutes, not including glue drying time.
Get inspired with daily seasonal ideas on the Dollar Tree Craft Blog.
Leave a Reply