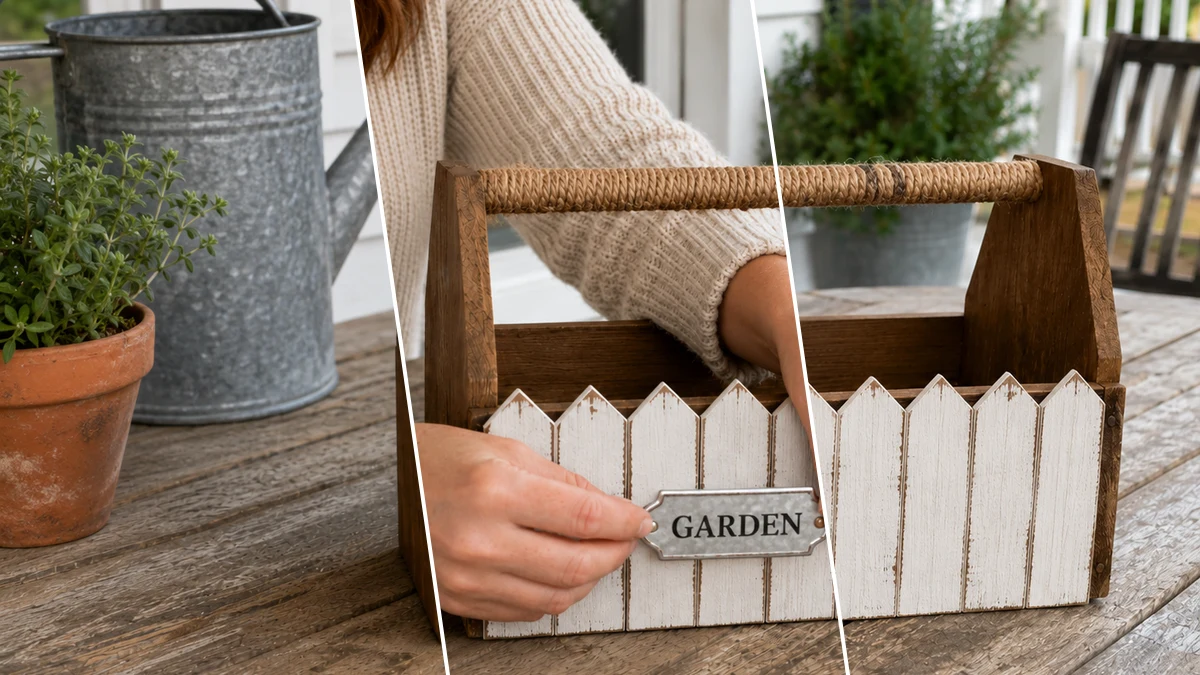
Okay, so my garden tools were just… everywhere. Seriously, I’d trip over a hand trowel or lose my clippers in the dirt almost daily. I finally said enough is enough! That’s how this super cute Rustic Farmhouse Garden Tool Caddy came to life, and honestly, my potting shed has never looked so good.
Theme: Farmhouse / Rustic
Materials Needed
- Wooden craft caddy or craft wood panels
- Jumbo craft sticks
- Wooden dowel or thick craft stick
- Jute rope and twine
- White/cream and brown acrylic paint/wood stain
- Hot glue gun and glue sticks
- Craft moss
- Mini terracotta pots & seed packets
- Small garden accents (trowel, plant markers, label)
Why This Craft Works
This little caddy is perfect for keeping all your smaller garden tools tidy, whether you use it on your potting bench, right by the back door, or even as a cute centerpiece on your outdoor dining table for a casual Farmhouse / Rustic vibe. It’s also a fantastic, thoughtful gift for any plant-loving mom, grandma, or friend. Imagine filling it with seed packets and a new pair of gardening gloves, so sweet!
What I love most about this project is how budget-friendly it is. Most of the supplies came straight from my favorite place, Dollar Tree! The whole thing ran me about $11-14 total, which is just amazing for something that looks this good and is so useful. You really can’t beat that price for a custom Organizing & Storage solution.
And don’t even get me started on how easy it is! This is definitely an easy-level craft, perfect for beginners or even crafting with older kids. From start to finish, it took me about 30-45 minutes, not counting drying time, which is just enough time for a quick, satisfying DIY project on a Sunday afternoon.
Step-by-Step Instructions for Rustic Farmhouse Garden Tool Caddy
Ready to get those garden tools organized? This Rustic Farmhouse Garden Tool Caddy is seriously so much fun to make and it’s easier than you think. You’ll be amazed at what you can whip up in just 30-45 minutes. Grab your supplies and let’s make something beautiful for your home or a sweet gift for a friend!
Step 1: Prepare Wooden Caddy Base
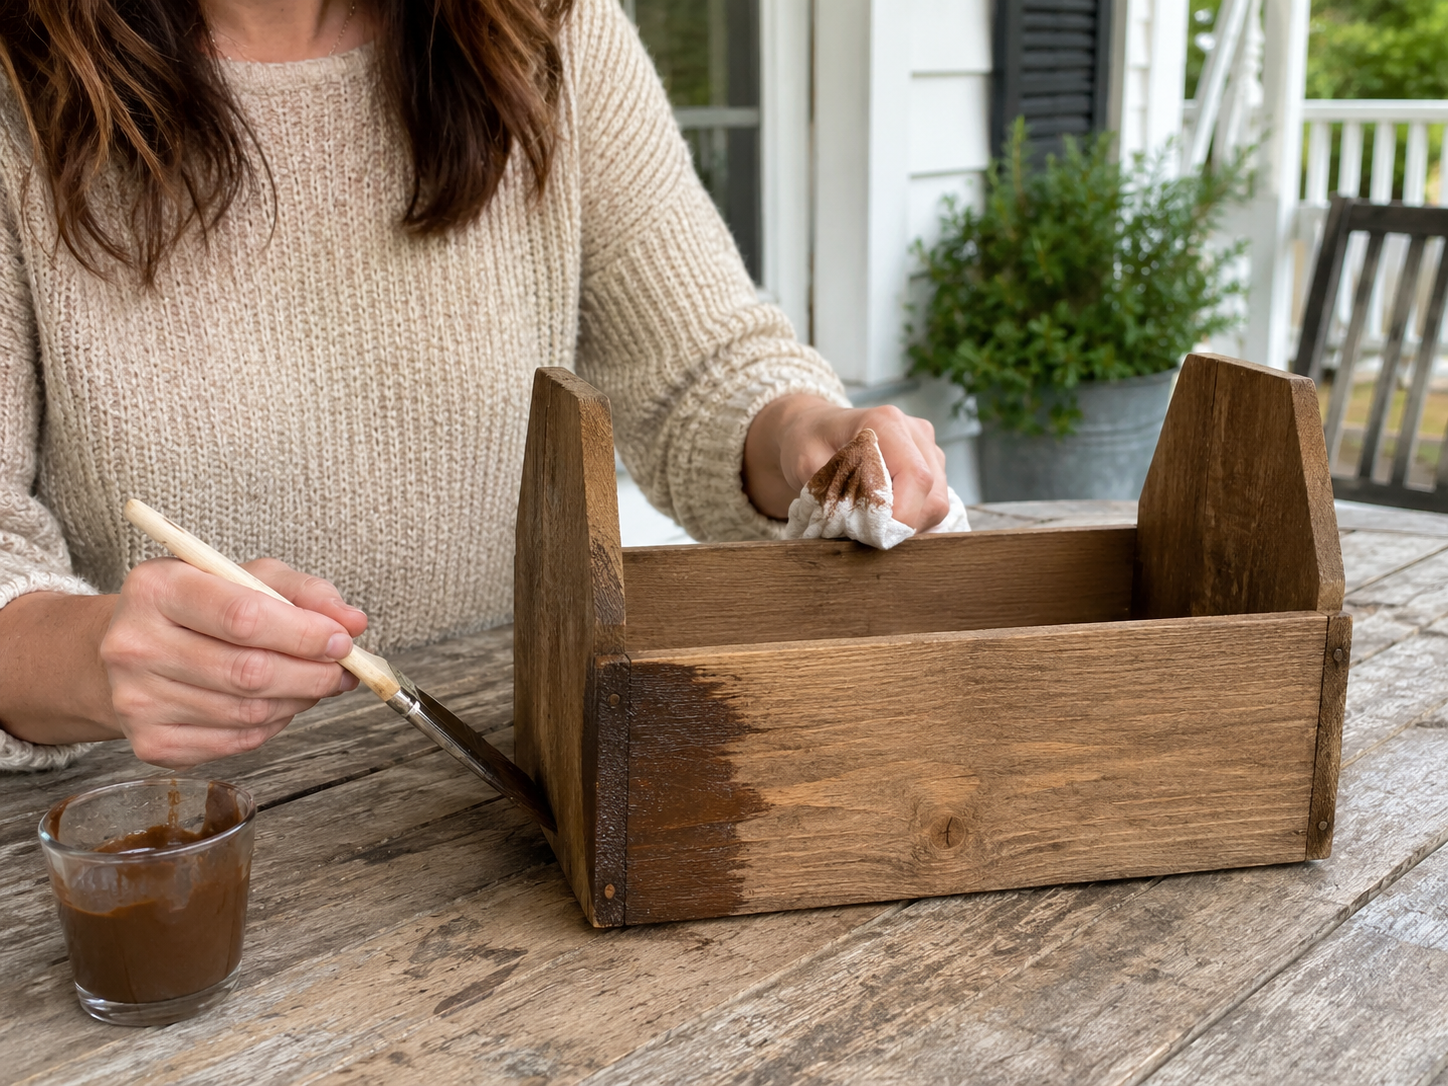
Start with a pre-made small wooden crate or wood box. If building from scratch, assemble a simple open-top caddy using thin craft wood panels, ensuring it has a rectangular base and two solid side panels. Once your base is ready, apply a light coat of brown acrylic paint or wood stain. Use a brush to apply, then immediately wipe off the excess with a clean cloth to achieve a soft, rustic, weathered finish rather than a dark, solid stain. Allow to dry completely.
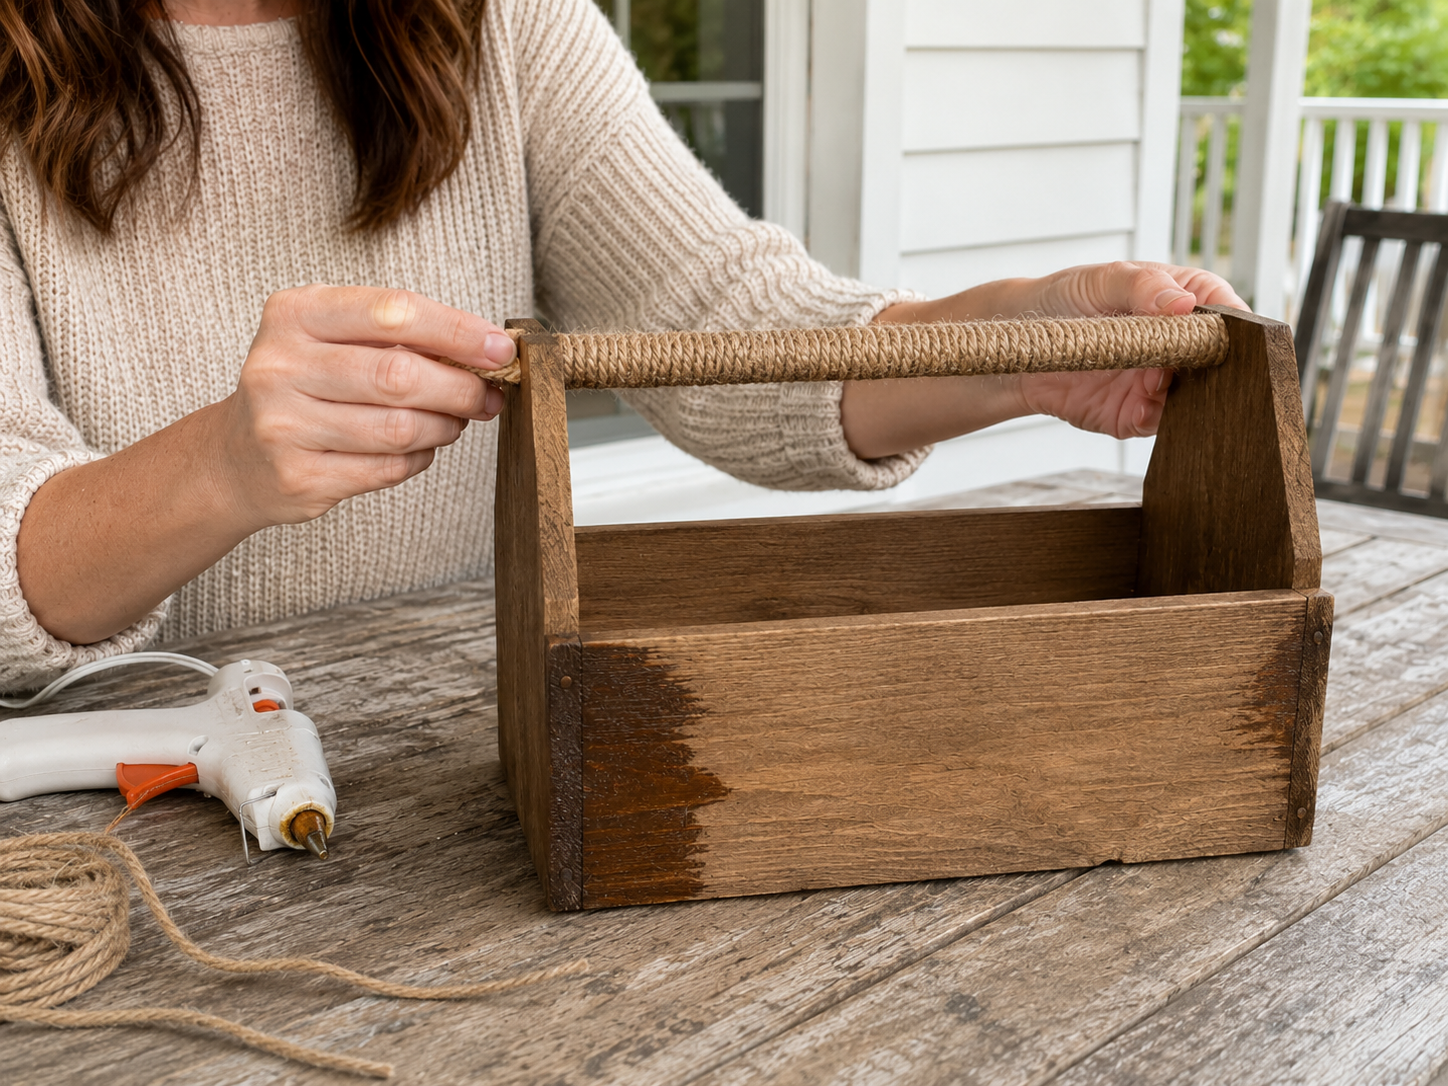
Step 2: Attach Jute-Wrapped Handle
Measure and cut a wooden dowel or a sturdy craft stick to fit snugly across the top opening between the two side panels of your caddy. Next, take your jute rope and begin tightly wrapping it around the dowel, starting and ending with a dab of hot glue to secure the ends. Ensure the rope is wrapped evenly and without gaps. Once the dowel is fully wrapped, use generous amounts of hot glue to firmly attach the ends of the jute-wrapped handle to the inside top edges of the caddy’s side panels, forming a sturdy tote-style handle.
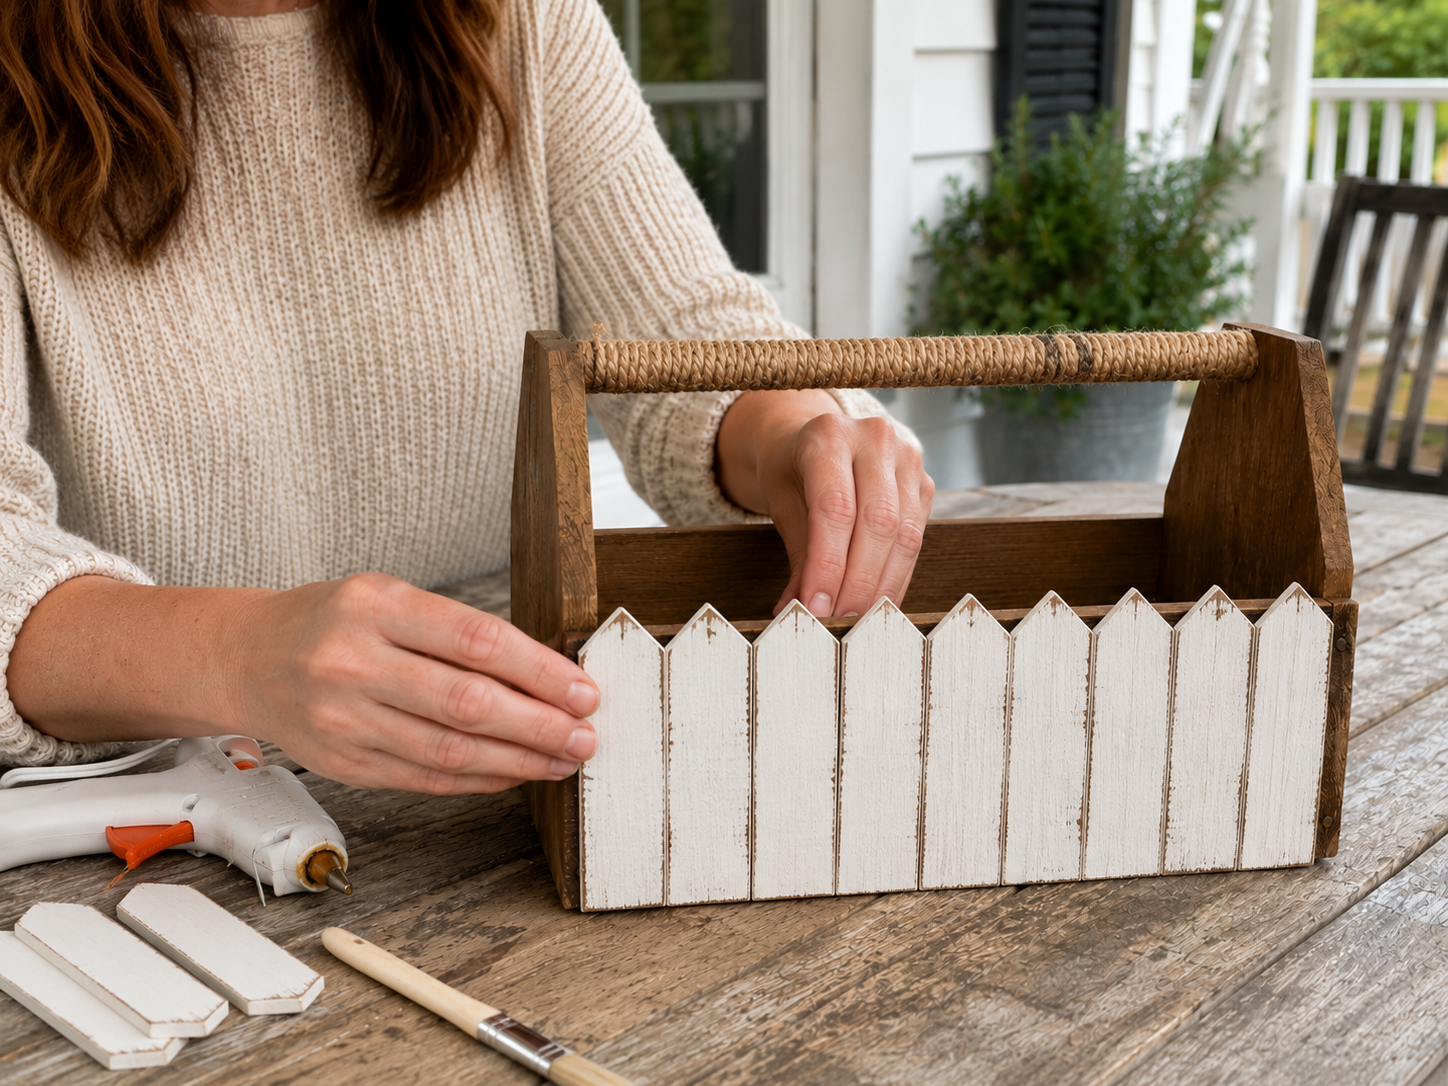
Step 3: Craft Picket Fence Front
Take jumbo craft sticks and cut one end of each stick into a pointed ‘picket fence’ shape. You’ll need enough sticks to span the front width of your caddy. Paint these craft sticks white or cream using acrylic paint. Once dry, lightly distress the edges by dry-brushing a small amount of brown paint or gently sanding them with fine-grit sandpaper for a weathered, rustic look. Finally, hot glue the distressed picket fence pieces side by side across the entire front of the caddy, ensuring they are evenly spaced and aligned.
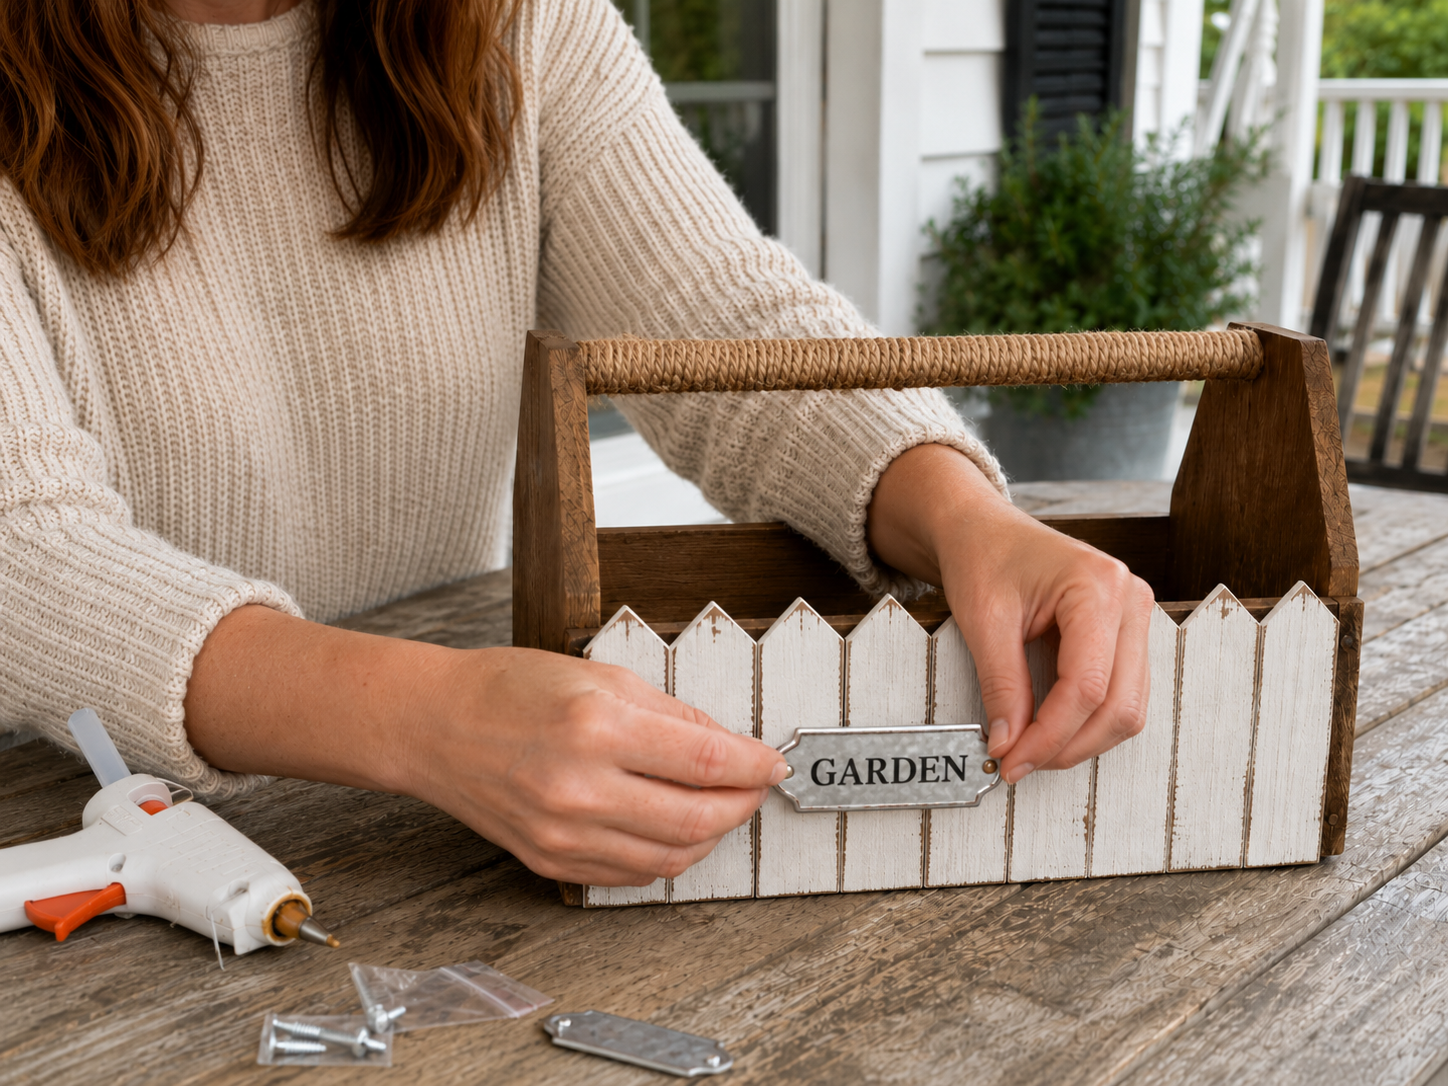
Step 4: Affix GARDEN Label
Prepare your ‘GARDEN’ label. You can use a small metal galvanized-style label, or create your own by cutting an oval or rectangular plaque shape from foam board or thick cardstock, painting it silver, and then adding the word ‘GARDEN’ with a black marker or paint pen. The letters should be dark and clear for a farmhouse sign aesthetic. Once your label is ready, center it horizontally and vertically on the white picket fence front of the caddy and secure it firmly with hot glue.
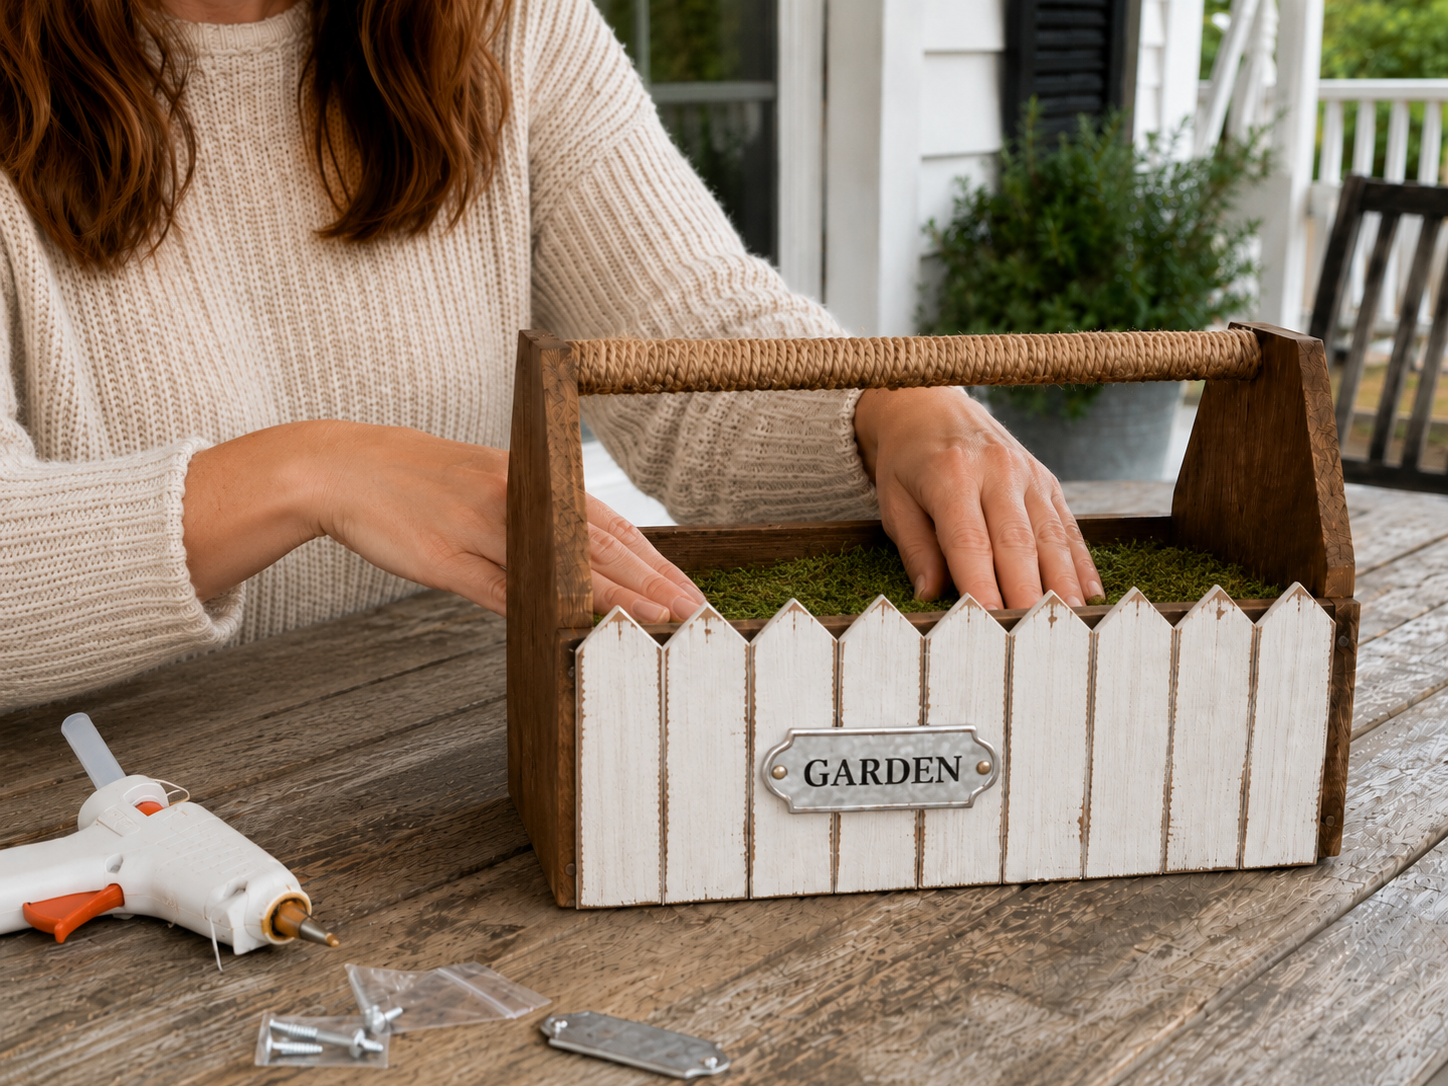
Step 5: Create Moss Interior Base
Open your bag of craft moss and carefully place a thin, even layer across the bottom of the caddy’s interior. The moss should cover the entire base, providing a soft, natural, garden-like texture. You can use small dabs of hot glue to secure the moss in place, especially around the edges, to prevent it from shifting or spilling out when items are placed inside.
📱 Craftino App
Make more crafts like this
1,000+ Farmhouse / Rustic ideas with photo guides & Pro Tips
✓ Step-by-step photo tutorials, nothing left out
✓ Pro Tips for every step
✓ Save crafts & browse fully offline
✓ New ideas added every week

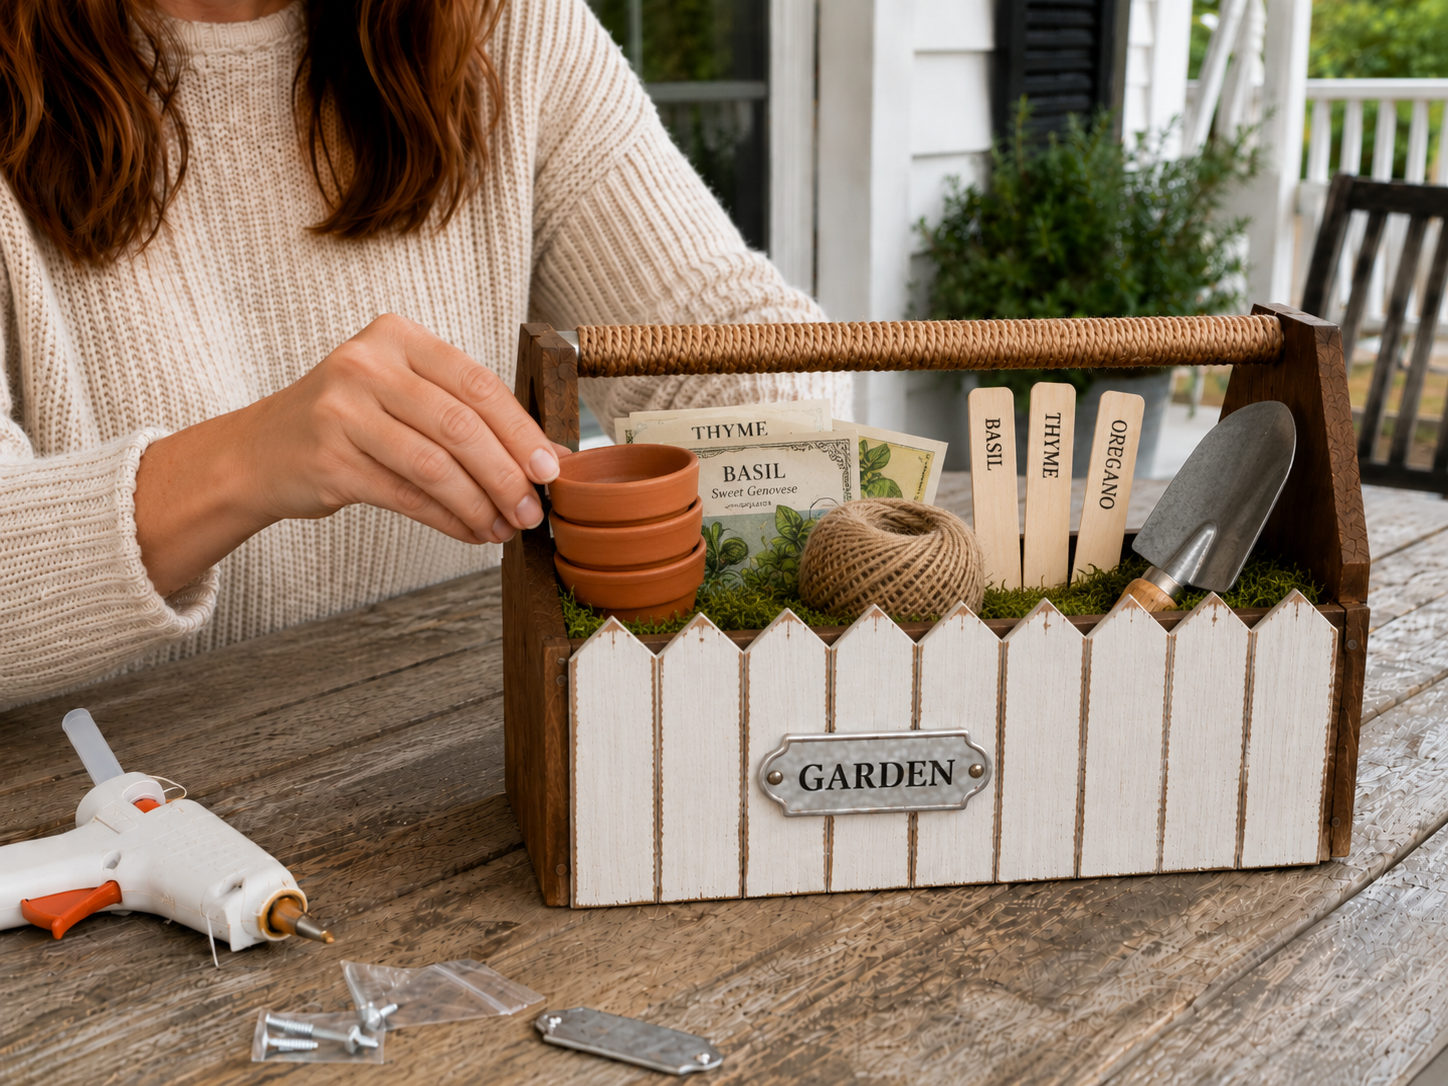
Step 6: Arrange Garden Accents
Now comes the fun part of styling your caddy! Carefully arrange your mini terracotta pots, seed packets, jute twine ball, mini garden trowel or craft shovel, and wooden plant marker sticks. Stack the terracotta pots artfully on one side. Tuck seed packets towards the back. Place the jute twine ball centrally. Angle the small garden trowel naturally on the other side. Write simple, clear herb names like “BASIL,” “THYME,” and “OREGANO” on the wooden plant markers with a black marker and stand them upright behind the other items. Arrange everything to look full and inviting, but not overcrowded or chaotic.
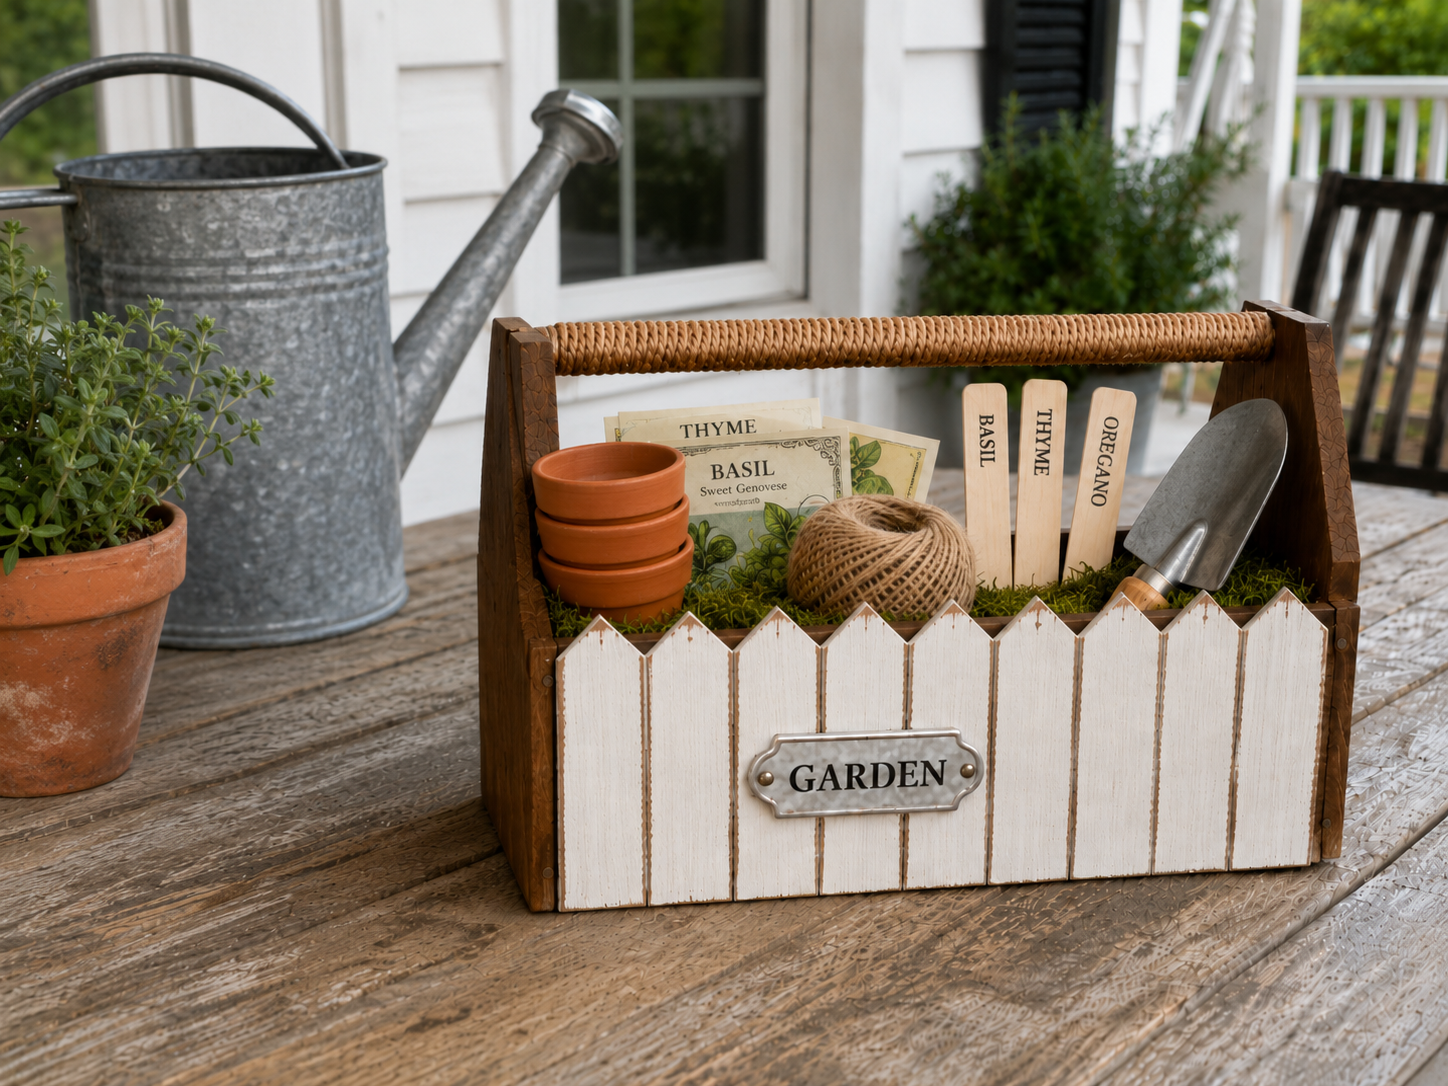
Step 7: Display Your Garden Caddy
Your Rustic Farmhouse Garden Tool Caddy is complete! Find the perfect spot to display your charming new creation. It will look wonderful on a weathered wooden porch table, a functional potting bench, a rustic garden shelf, or as a welcoming accent in an entryway. For the best visual appeal, place it in a simple setting, perhaps with a decorative watering can, a few potted herbs, or against a neutral outdoor backdrop like wooden siding. The caddy should be the clear focal point, embodying a handmade, useful, and Pinterest-worthy aesthetic.
See also: Rustic Farmhouse Kitchen Organizer Caddy Dollar Tree Diy
📋 Love staying organized while crafting? Check out our printable planners & craft designs at CraftersDT on Etsy and use code CRAFT20 for 20% off your entire order!
Your Super Cute Rustic Farmhouse Garden Tool Caddy Is Ready!
Woohoo, you did it! Your new Rustic Farmhouse Garden Tool Caddy looks absolutely amazing, right? Fill it up with all your favorite gardening essentials or use it to display some fresh flowers on your porch. Don’t forget to snap a pic and share your version with me, I love seeing your creations!
📱 Craftino App
Make more crafts like this
1,000+ Farmhouse / Rustic ideas with photo guides & Pro Tips
✓ Step-by-step photo tutorials, nothing left out
✓ Pro Tips for every step
✓ Save crafts & browse fully offline
✓ New ideas added every week
Frequently Asked Questions
What is the total cost to make the Rustic Farmhouse Garden Tool Caddy?
The total cost to make the Rustic Farmhouse Garden Tool Caddy is typically around $11-14. This budget-friendly project uses mostly supplies found at Dollar Tree, making it an affordable DIY for anyone.
How long does it take to complete the DIY Rustic Farmhouse Garden Tool Caddy?
It takes approximately 30-45 minutes to complete the DIY Rustic Farmhouse Garden Tool Caddy. This quick crafting time does not include any necessary paint or glue drying periods.
Is this a beginner-friendly project for Farmhouse / Rustic decor?
Yes, this Rustic Farmhouse Garden Tool Caddy is an easy-level craft, perfect for beginners. The steps are straightforward and don’t require any advanced crafting skills, making it accessible for all skill levels.
What specific type of glue works best for this Dollar Tree craft?
For best results with your Dollar Tree Rustic Farmhouse Garden Tool Caddy, a strong craft glue like E6000 or a hot glue gun with high-temp glue sticks works well. E6000 offers a stronger, more permanent bond, while hot glue provides instant adhesion.
Can I customize the colors of my Rustic Farmhouse Garden Tool Caddy?
Absolutely, you can customize the colors of your Rustic Farmhouse Garden Tool Caddy with any acrylic paint. For a classic Farmhouse / Rustic look, consider white, cream, light grey, or a distressed wood stain, but feel free to choose colors that match your personal style.
Where can I buy the supplies for this budget-friendly Organizing & Storage project?
Most of the supplies for this budget-friendly Organizing & Storage project can be purchased at Dollar Tree. For items like specific paints or brushes, you might also check local craft stores like Hobby Lobby or Walmart.
Is the Rustic Farmhouse Garden Tool Caddy suitable as a gift?
Yes, the Rustic Farmhouse Garden Tool Caddy makes an excellent and thoughtful gift, especially for occasions like Mother’s Day, birthdays, or as a housewarming present. You can fill it with small gardening tools, seed packets, or even fresh flowers for a personal touch.
How many wooden craft sticks are needed for the Rustic Farmhouse Garden Tool Caddy?
You will need approximately 24-30 standard wooden craft sticks to construct the sides and dividers of the Rustic Farmhouse Garden Tool Caddy. Dollar Tree often sells large packs of these for just $1.25.
What are some common mistakes to avoid when making a DIY tool caddy?
A common mistake to avoid when making a DIY tool caddy is not allowing adequate drying time for paint or glue, which can lead to a messy or unstable finished product. Always ensure surfaces are clean before gluing, and apply glue evenly for a secure bond.
Can this Rustic Farmhouse Garden Tool Caddy be used outdoors?
The Rustic Farmhouse Garden Tool Caddy is best suited for indoor or covered outdoor use to ensure durability. If you plan to use it outside, apply a clear, outdoor-safe sealant or varnish to protect the wood and paint from moisture and weather elements.
Leave a Reply