My kitchen counter was looking a little chaotic, you know? I wanted something cute and functional to hold all those little things that just pile up. So, I grabbed some goodies from Dollar Tree and whipped up this adorable Rustic Farmhouse Kitchen Organizer Caddy (Dollar Tree DIY) that I just know you’re gonna love! It’s super practical and looks amazing.
See also: Diy Farmhouse Kitchen Canister Upcycling Your Old Jars
Theme: Farmhouse / Rustic
Materials Needed
- Rectangular Tray Base (Wood-look tray or foam board)
- Two Tin Cans or Metal Pencil Holders
- Small Rectangular Box (Cardboard/Mini Crate)
- Jute Rope (various thicknesses if preferred)
- Natural Wooden Beads (small and medium)
- White Chalk Paint & Brown Acrylic Paint
- Hot Glue Gun & Glue Sticks
- Scissors & Sandpaper
- Faux Wood Contact Paper (optional, for cardboard base)
- Small Wooden Flower Embellishment (optional)
📋 Love staying organized while crafting? Check out our printable planners & craft designs at CraftersDT on Etsy and use code CRAFT20 for 20% off your entire order!
Why This Craft Works
This little caddy is just perfect for so many spots in your home! I made mine specifically for our farmhouse kitchen counter. It’s ideal for holding everyday essentials like salt and pepper shakers, napkins, or even your cooking utensils by the stove. You could also use it to wrangle mail on your entryway table or keep craft supplies tidy in your creative space. It really helps bring that cozy Farmhouse / Rustic vibe to any room.
📱 Free to Download
Join 50,000+ crafters already using Craftino
Browse 83+ Farmhouse / Rustic ideas and thousands more in the app
✓ Save crafts & browse fully offline
✓ Download printable PDF guides for every project
✓ Step-by-step photo tutorials, nothing left out
✓ 1,000+ craft projects with new ones added every week

One of the best parts about this project is how budget-friendly it is. You can make this entire Rustic Farmhouse Kitchen Organizer Caddy (Dollar Tree DIY) for well under $5! Seriously, all the main supplies like the wood boxes, paint, and embellishments came straight from my favorite store, Dollar Tree. It’s such a steal for something that looks this good.
You are going to be amazed at how easy this project is. I’d say it’s definitely an Easy difficulty level, perfect for even beginner crafters or a fun afternoon activity with the kids. From start to finish, this caddy only took me about 25 minutes to put together, not counting drying time for the paint. It’s perfect if you need a quick home decor update or a thoughtful last-minute gift.
Step-by-Step Instructions for Rustic Farmhouse Kitchen Organizer Caddy (Dollar Tree DIY)
Alright, my fellow crafters, are you ready to get started on this super fun project? I promise you, making this Rustic Farmhouse Kitchen Organizer Caddy is way easier than it looks and so satisfying. You’ll be amazed at how quickly you can create something so useful for your home. It’s a fantastic project for beginners and even big kids who want to try their hand at a cute DIY. Let’s grab our Dollar Tree goodies and make some magic!
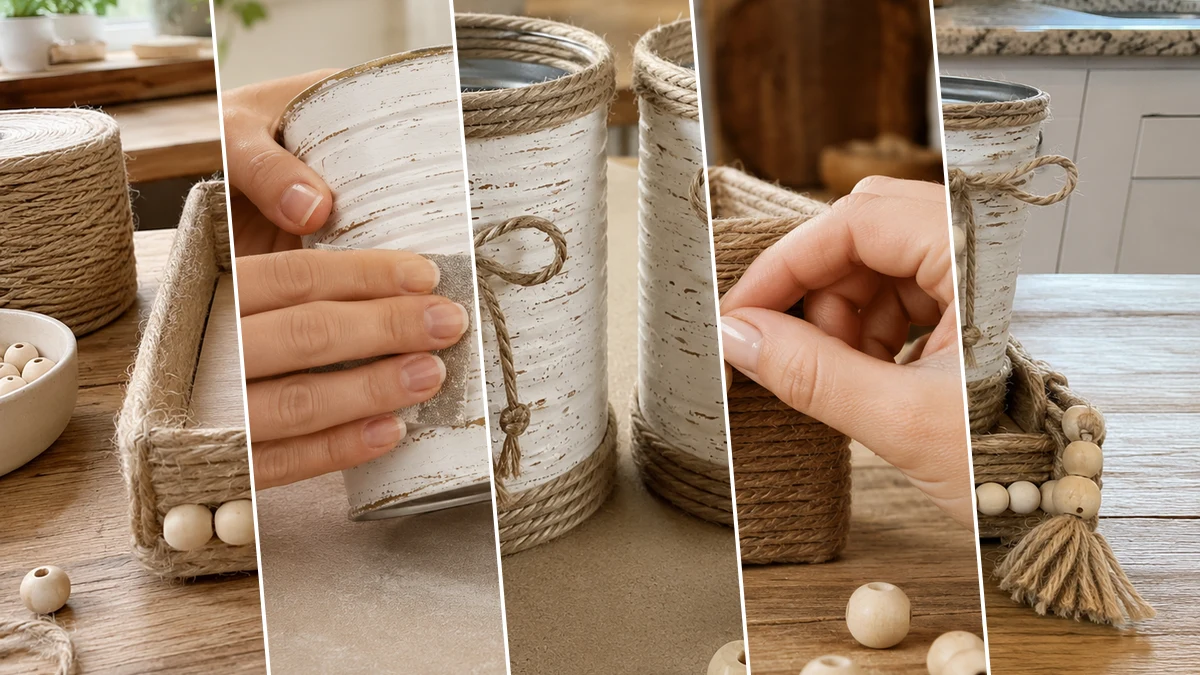
Step 1: Prepare & Decorate the Tray Base
Start by preparing your tray base. If using a Dollar Tree wood-look tray, simply clean it thoroughly. If you’re using a shallow cardboard or foam board base, meticulously wrap it with faux wood contact paper, ensuring all edges are neatly folded and secured for a rustic wood grain effect. Next, apply hot glue along the outer vertical walls of the tray in sections, tightly wrapping jute rope around the entire perimeter. Ensure consistent coverage by overlapping slightly. Finally, glue a single row of natural wooden beads across the front edge of the tray, creating a charming farmhouse border.
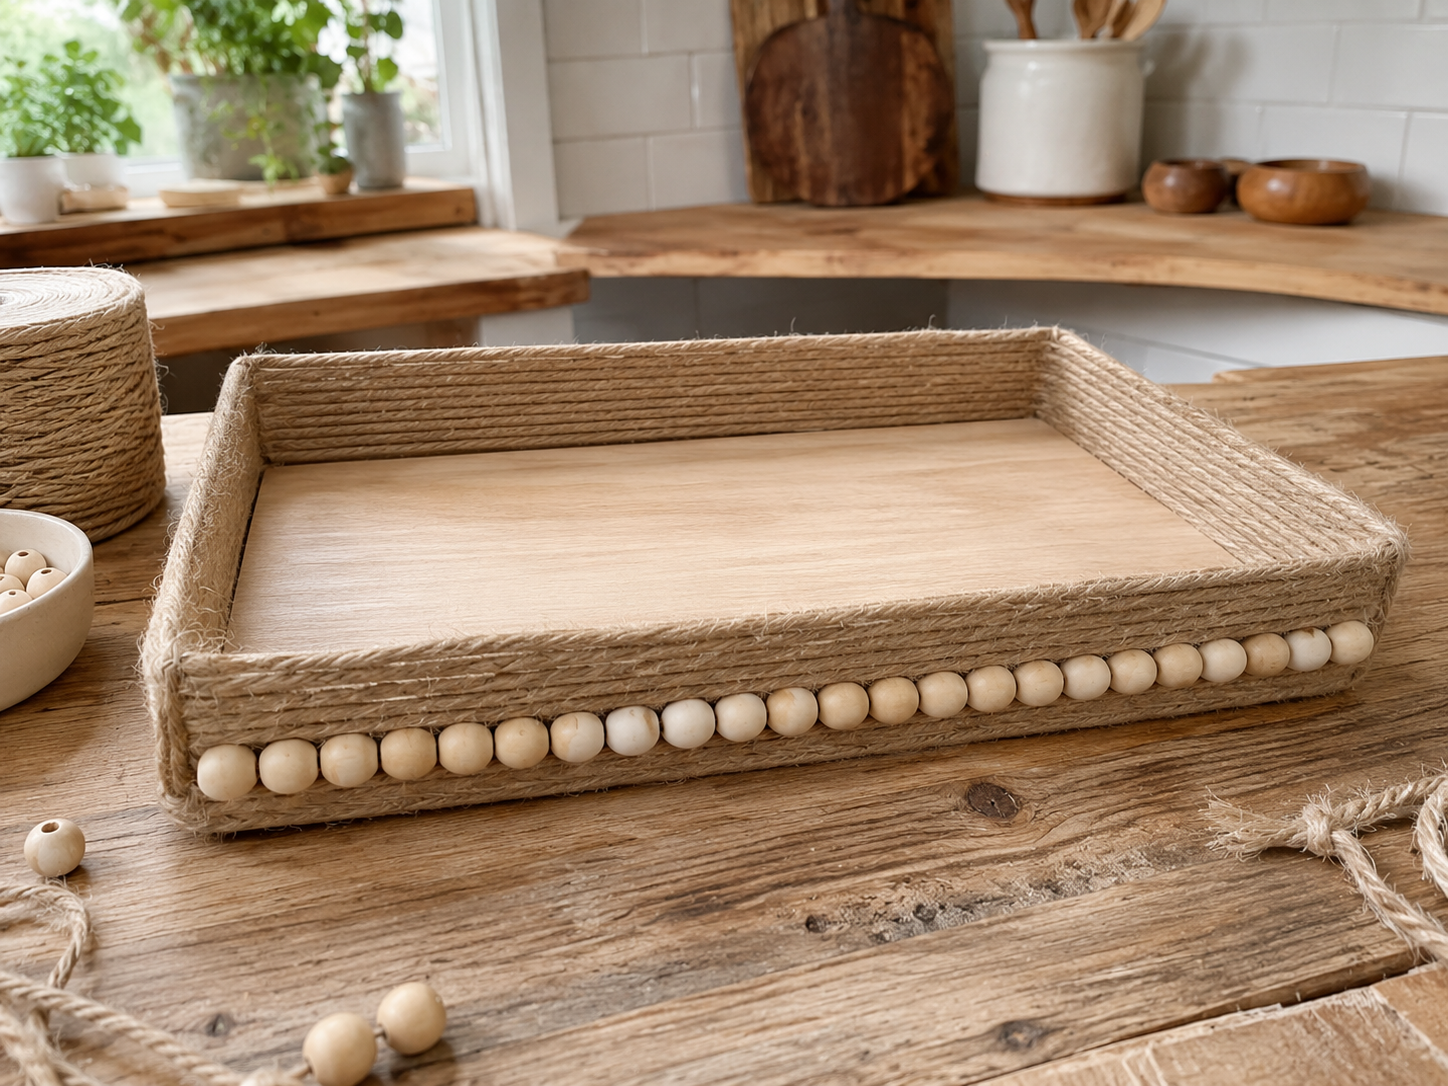
💡 Pro Tip: When wrapping jute rope, apply hot glue in small 2-3 inch sections to prevent it from drying too quickly. This allows you to pull the rope taut for a neat, seamless wrap. For the bead border, dry-fit the beads first to ensure even spacing before gluing them down.
Step 2: Paint & Distress Utensil Cans
Thoroughly clean and dry your two tin cans or metal pencil holders to ensure paint adhesion. Apply two thin, even coats of white chalk paint to the entire exterior of each can, allowing adequate drying time between coats (refer to paint instructions for specific times, typically 20-30 minutes). Once the paint is completely dry and cured, lightly distress the cans. You can achieve this by gently rubbing fine-grit sandpaper on raised areas and edges to subtly expose the metal underneath, or by using a dry-brushing technique with a tiny amount of brown acrylic paint for a weathered, rustic appearance.
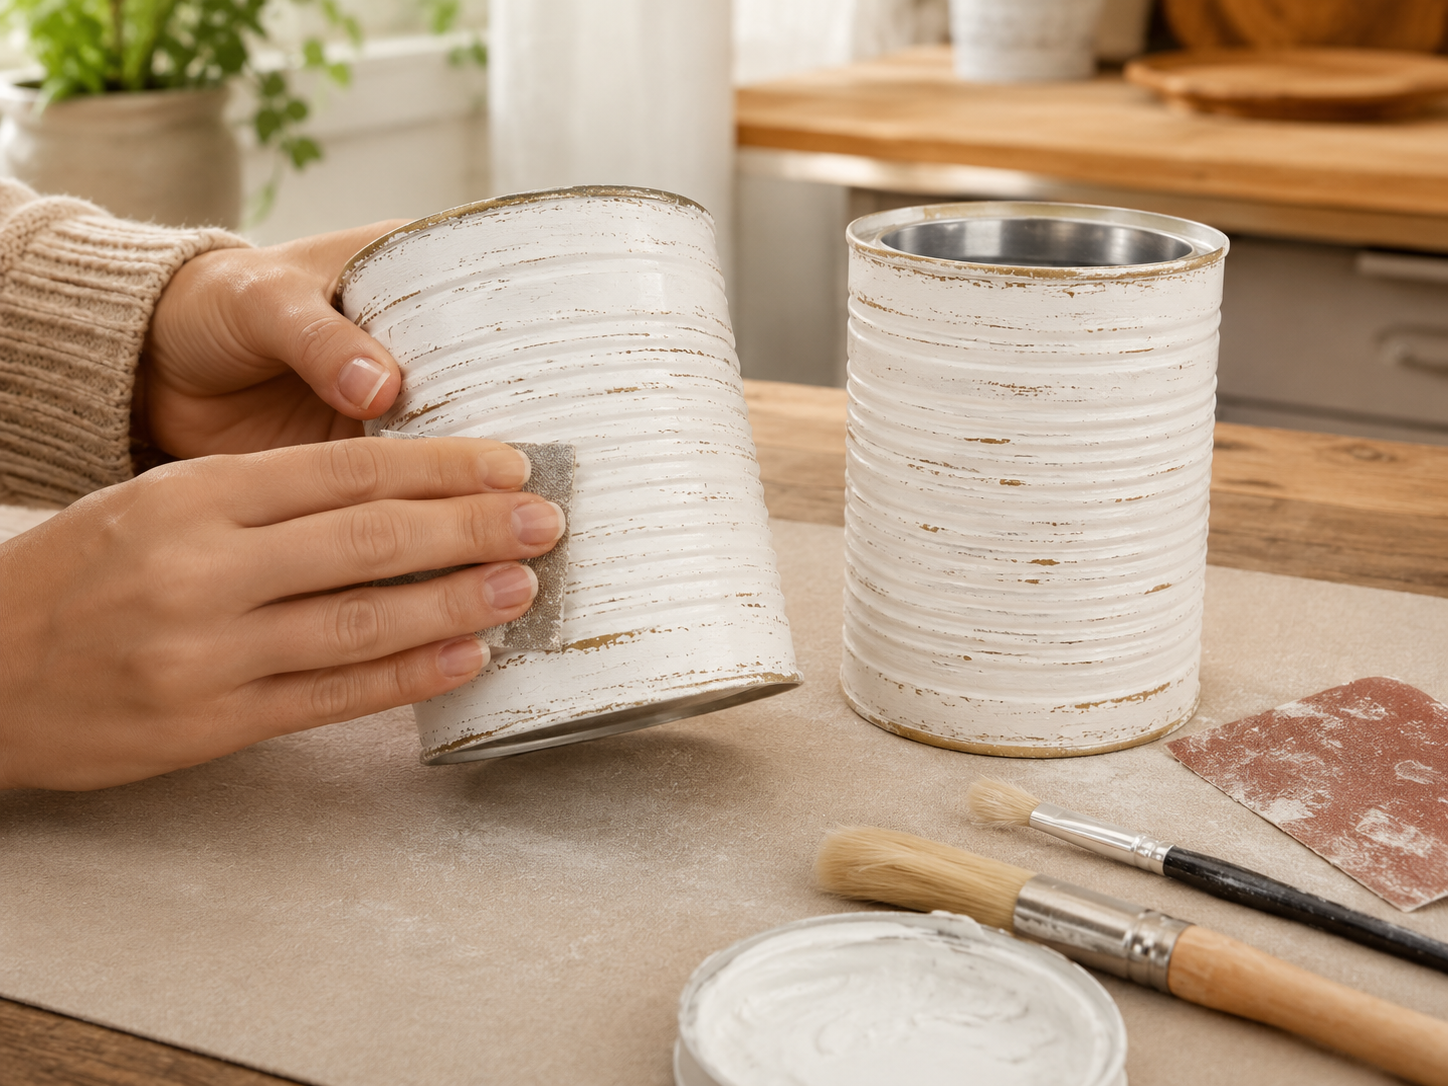
💡 Pro Tip: For an authentic distressed look, concentrate your distressing efforts on areas that would naturally show wear, like the rims, seams, and any textured details. When dry-brushing with brown paint, offload almost all paint from your brush onto a paper towel before lightly dragging the brush over the white surface. This prevents an overly painted or muddy look.
🗓️ Keep all your craft projects on track! Explore our printable planners & templates at CraftersDT on Etsy and use code CRAFT20 for 20% off!
Step 3: Embellish Utensil Cans
Cut two lengths of jute rope and carefully hot glue one strand around the top rim and another around the bottom base of each painted can, ensuring they are straight and firmly adhered. Next, cut shorter lengths of jute rope and tie a small, neat bow for the front of each can. For the bead tassels, string 3-4 wooden beads onto a short piece of jute, tie a secure knot above and below the beads, and then fray the ends of the jute below the beads to create a tassel effect. Attach these finished bead tassels to the center of each jute bow with a small dab of hot glue, ensuring they hang nicely.
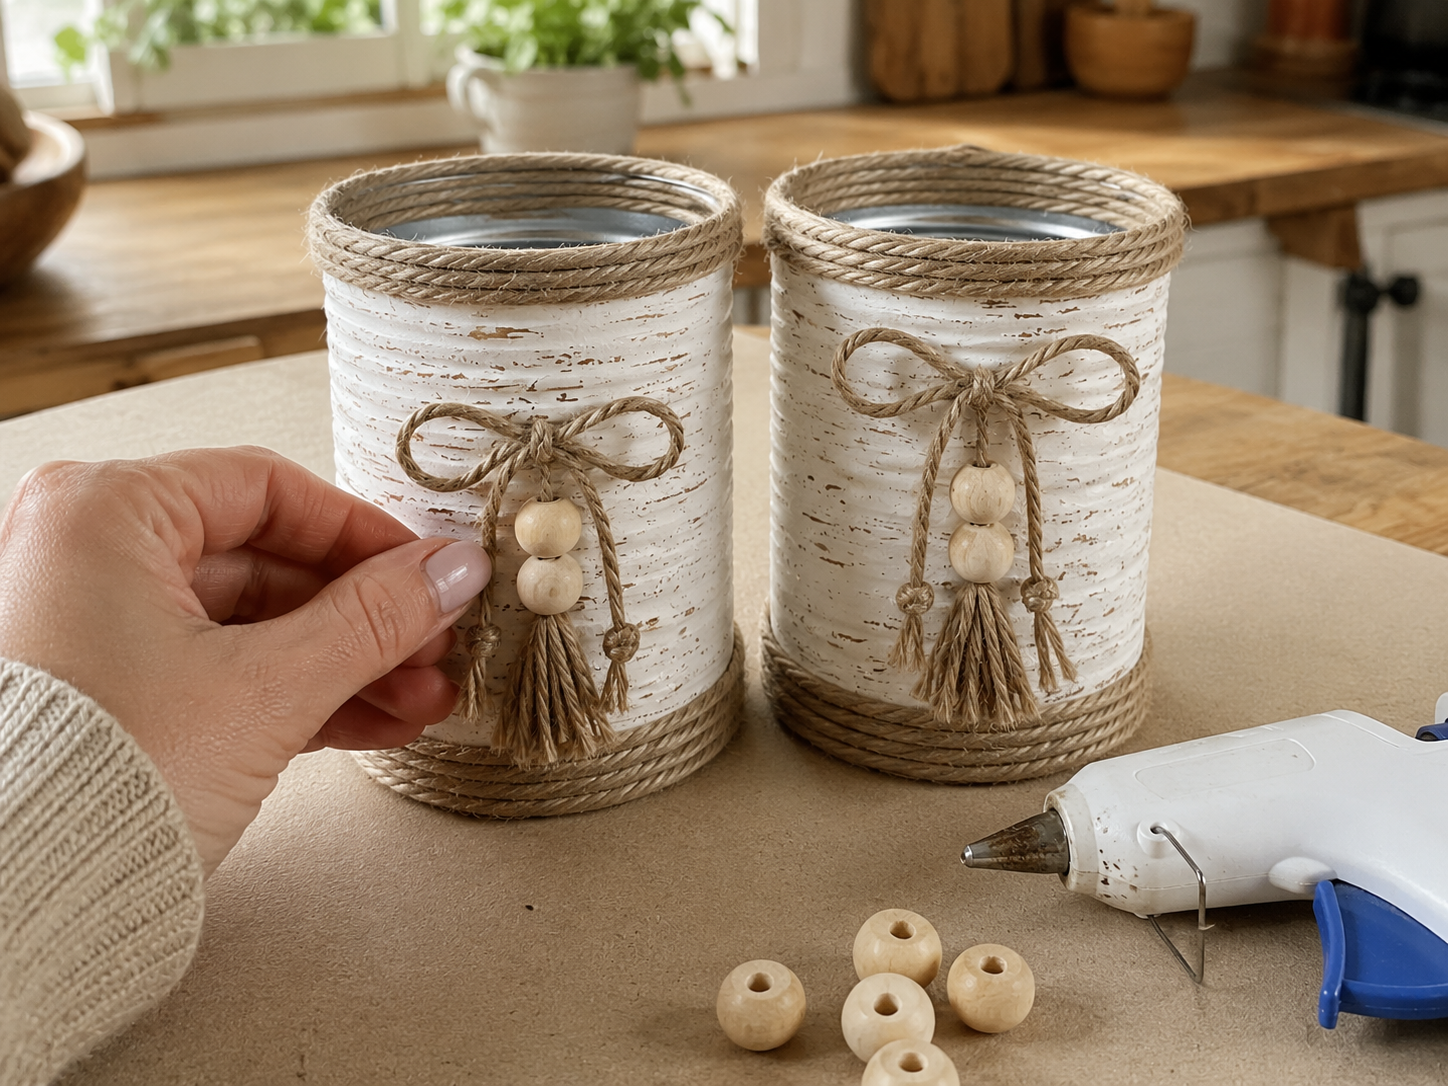
💡 Pro Tip: To make uniform tassels, wrap the jute rope around your fingers a consistent number of times (e.g., 5-6 times) before cutting the loops. Use a fine-tooth comb or needle to gently separate the jute strands for a fuller, softer tassel. Ensure your bows are symmetrical before gluing.
Step 4: Craft Jute Napkin Holder
Take your small rectangular cardboard box, mini wood crate, or foam board box, ensuring it’s appropriately sized to hold napkins upright. Starting from one end, apply hot glue in small sections and tightly wrap jute rope around the entire exterior of the box. Work meticulously to ensure there are no gaps between the rope strands and that the coverage is even and secure, creating a fully woven-like appearance. Once the entire box is covered, glue a small wooden bead flower embellishment or a decorative bead accent securely to the center of the front panel, adding a charming boutique touch.
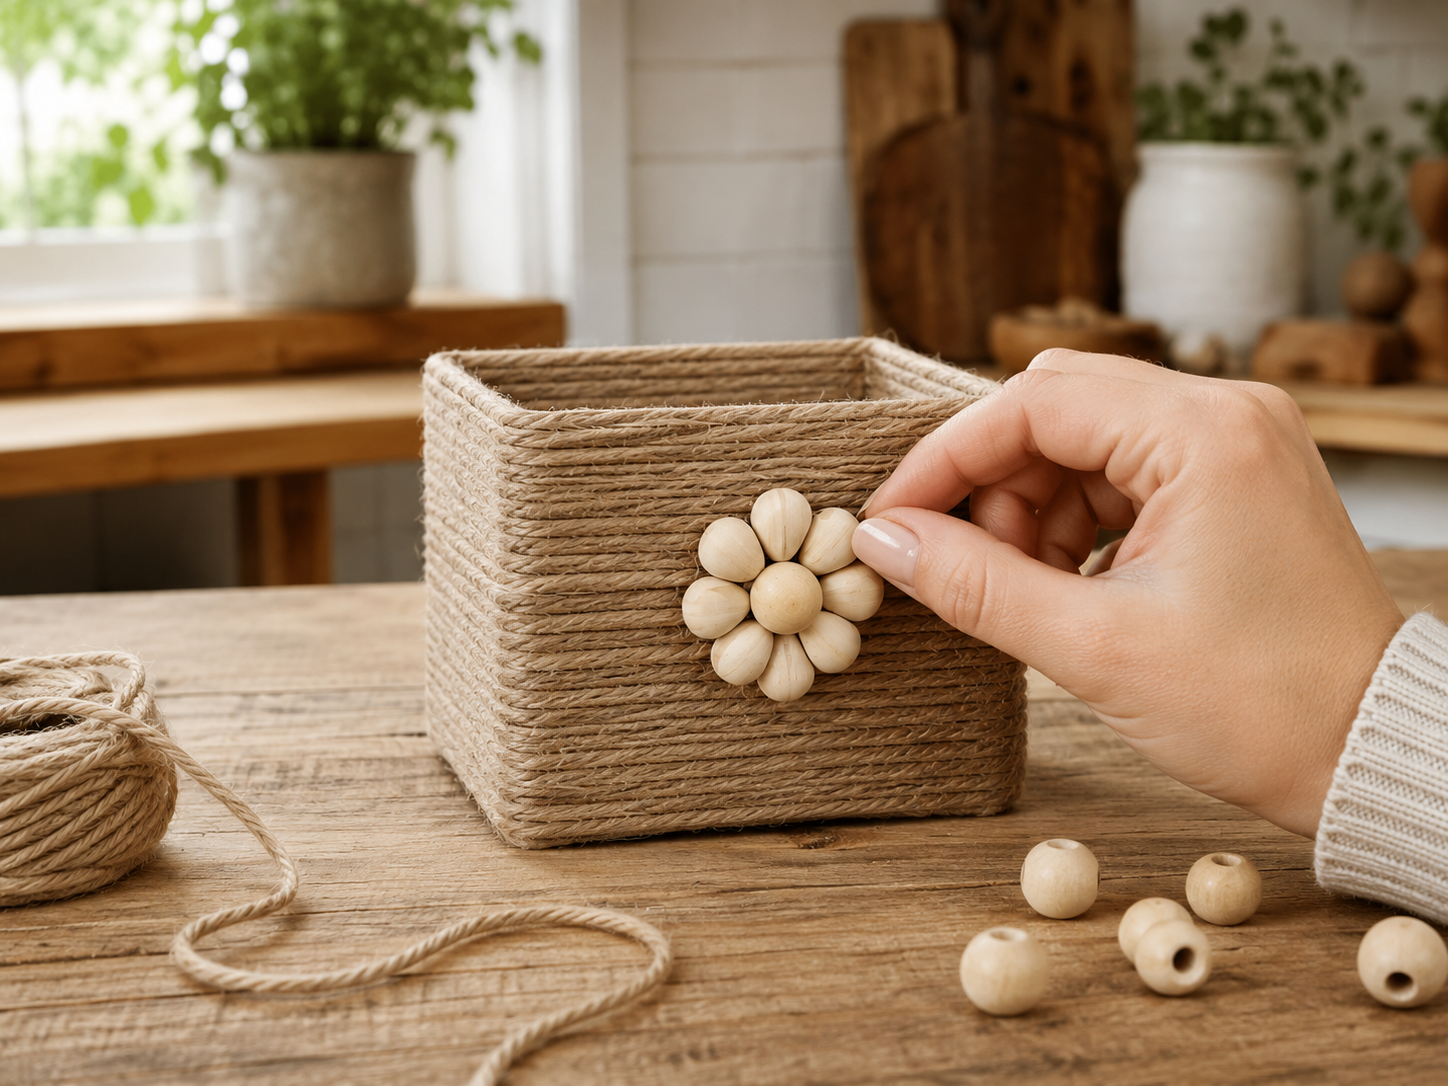
💡 Pro Tip: For a truly polished look, ensure the jute rope is wrapped very tightly and consistently. Any loose spots will detract from the woven effect. If using a cardboard box, you might want to reinforce the inside corners with tape or extra glue for added durability before wrapping. Let the glue set fully before handling too much.
📱 Free to Download
Join 50,000+ crafters already using Craftino
Browse 45+ Farmhouse / Rustic ideas and thousands more in the app
✓ Save crafts & browse fully offline
✓ Download printable PDF guides for every project
✓ Step-by-step photo tutorials, nothing left out
✓ 1,000+ craft projects with new ones added every week
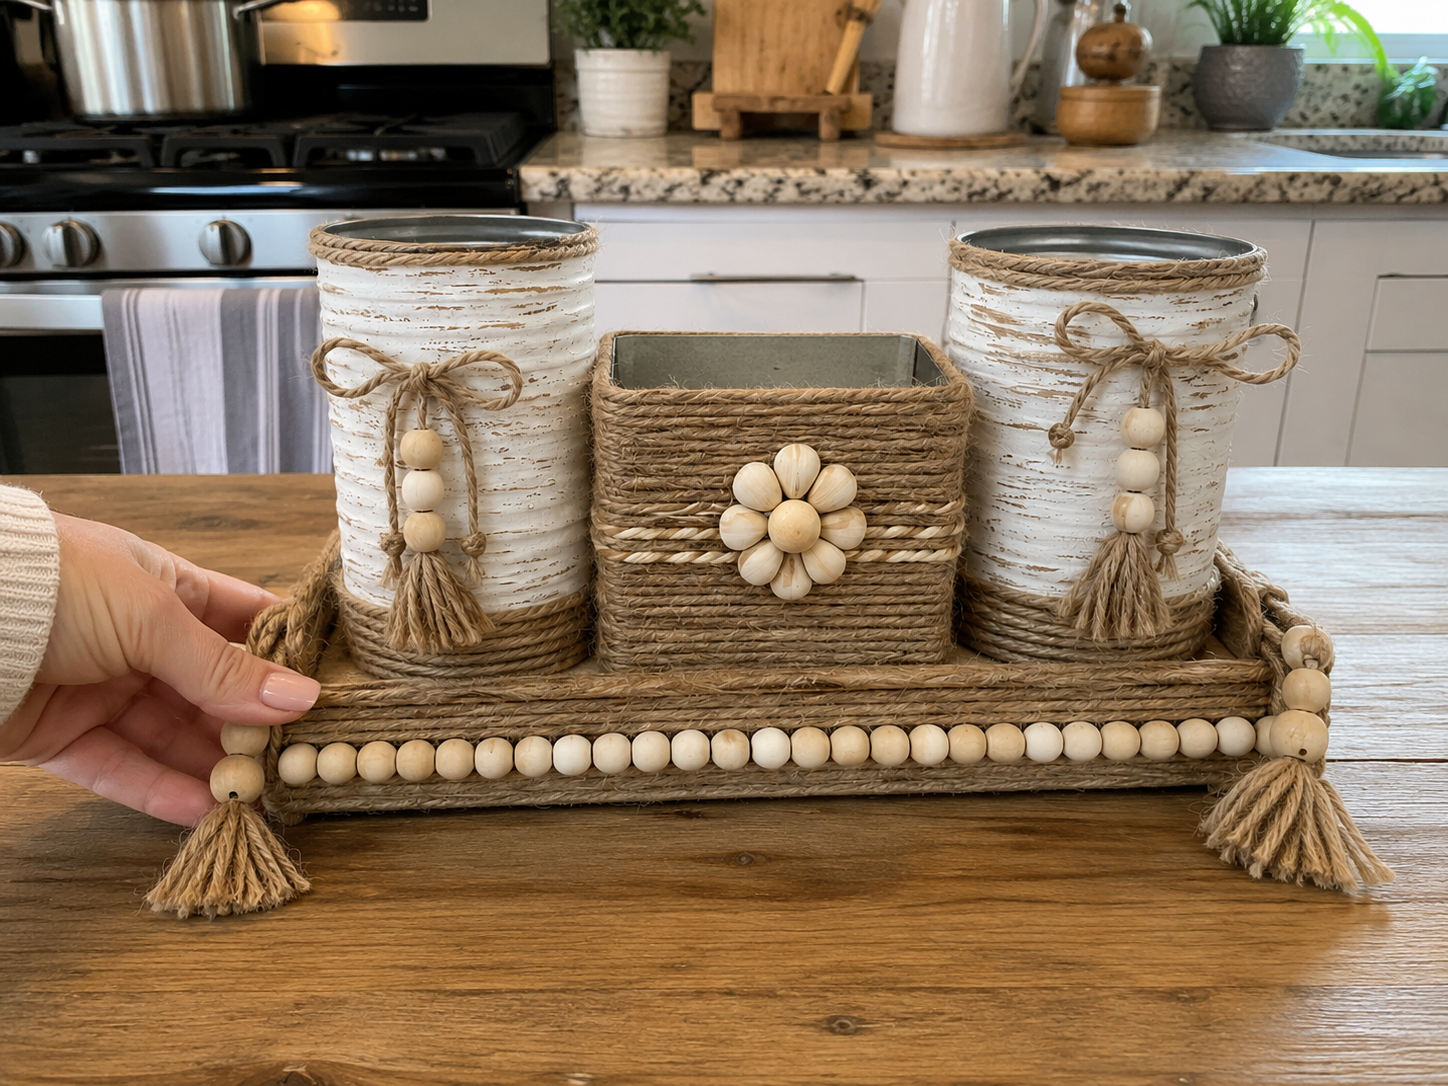
Step 5: Assemble the Caddy
Carefully arrange the three finished components on your decorated tray: one utensil cup on the left, the jute-wrapped napkin holder in the center, and the second utensil cup on the right. Ensure they are evenly spaced and perfectly aligned before applying glue. Once satisfied with the placement, apply a generous amount of hot glue to the entire bottom edge of each can and the napkin holder. Firmly press each piece onto the tray, holding it in place for several seconds until the glue sets. Repeat for all three components, ensuring they are securely attached and stable.
💡 Pro Tip: Always dry-fit all components onto the tray first without glue to finalize your arrangement and spacing. Use a ruler if precision is important to you. After gluing, give the entire caddy at least 30-60 minutes to completely set and cool before handling or filling with utensils and napkins. This ensures maximum stability and adhesion.
Farmhouse Organizer Caddy: Ready to Use!
Isn’t your new Rustic Farmhouse Kitchen Organizer Caddy just the cutest? It instantly adds that cozy Farmhouse / Rustic charm to your space and keeps things tidy. Display it proudly, or gift it to a friend, and don’t forget to show me your finished creation!
📱 Free to Download
Join 50,000+ crafters already using Craftino
Browse 26+ Farmhouse / Rustic ideas and thousands more in the app
✓ Save crafts & browse fully offline
✓ Download printable PDF guides for every project
✓ Step-by-step photo tutorials, nothing left out
✓ 1,000+ craft projects with new ones added every week
Frequently Asked Questions
What Dollar Tree items do I need for this Rustic Farmhouse Kitchen Organizer Caddy DIY?
You’ll primarily need three wooden craft boxes, one larger and two smaller, plus a wood plank or cutting board for the base. Don’t forget white chalk paint and some sandpaper.
How much does it cost to make the Rustic Farmhouse Kitchen Organizer Caddy (Dollar Tree DIY)?
This entire project costs about $4 to $6, depending on if you already have paint and glue at home. Each main Dollar Tree item is just $1.25.
What type of glue works best for a Dollar Tree Farmhouse / Rustic organizer caddy?
For a strong hold, I recommend using E6000 craft glue or a hot glue gun with strong adhesive sticks. Let the E6000 cure for at least 24 hours for maximum durability.
How long does it take to create this Farmhouse / Rustic Kitchen Organizer Caddy?
The active crafting time for this caddy is very quick, around 20-30 minutes. You will need to factor in about 1-2 hours of drying time for the paint and glue.
Can I customize my Rustic Farmhouse Kitchen Organizer Caddy?
Absolutely! You can paint it any color, add stencils for words like “Gather” or “Home”, or even attach small metal handles. Dollar Tree has a lot of little embellishments to choose from for under $2.
Is this Dollar Tree DIY caddy durable enough for daily kitchen use?
Yes, with proper gluing and sealing, your caddy will hold up well to daily use. For extra protection, apply 1-2 coats of a clear matte or satin sealant over the paint.
Read more official craft tips & tricks on the Dollar Tree Value Seekers Blog.
Leave a Reply