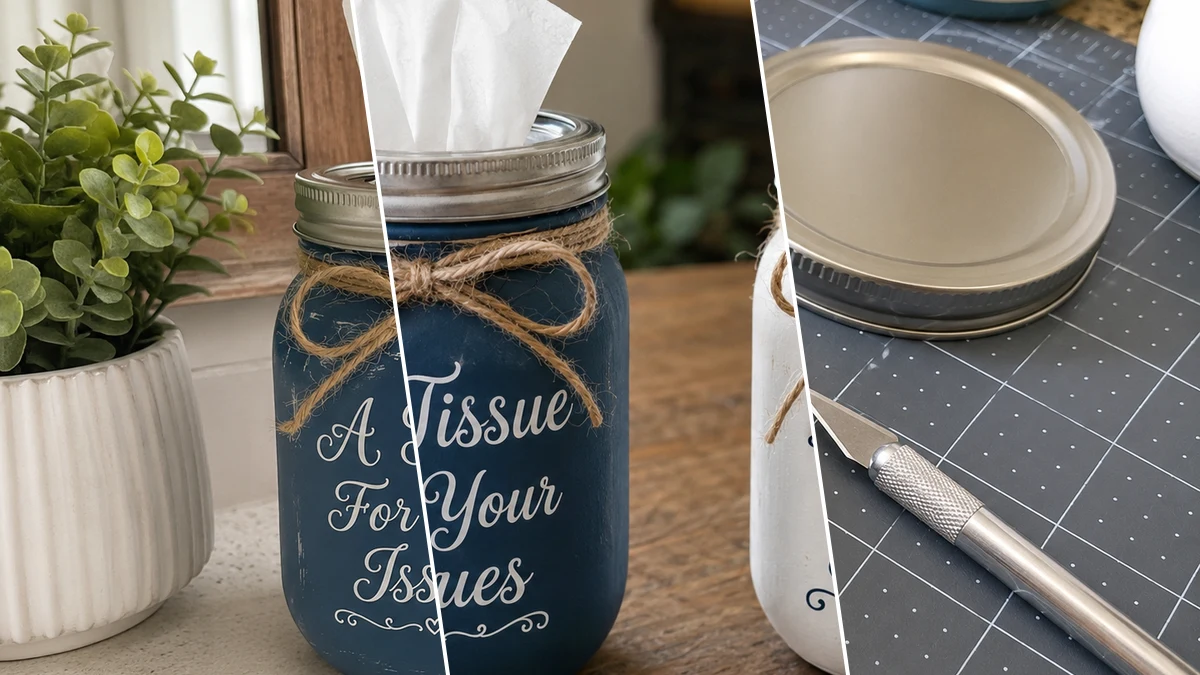
My kids always leave tissue boxes everywhere, and let’s be real, those cardboard boxes aren’t exactly the cutest for my farmhouse decor. So, I grabbed some Dollar Tree finds and whipped up these super sweet Cozy Farmhouse Mason Jar Tissue Holders. They’re so easy to make and add just the right touch of rustic charm to any room!
Theme: Farmhouse / Rustic
Materials Needed
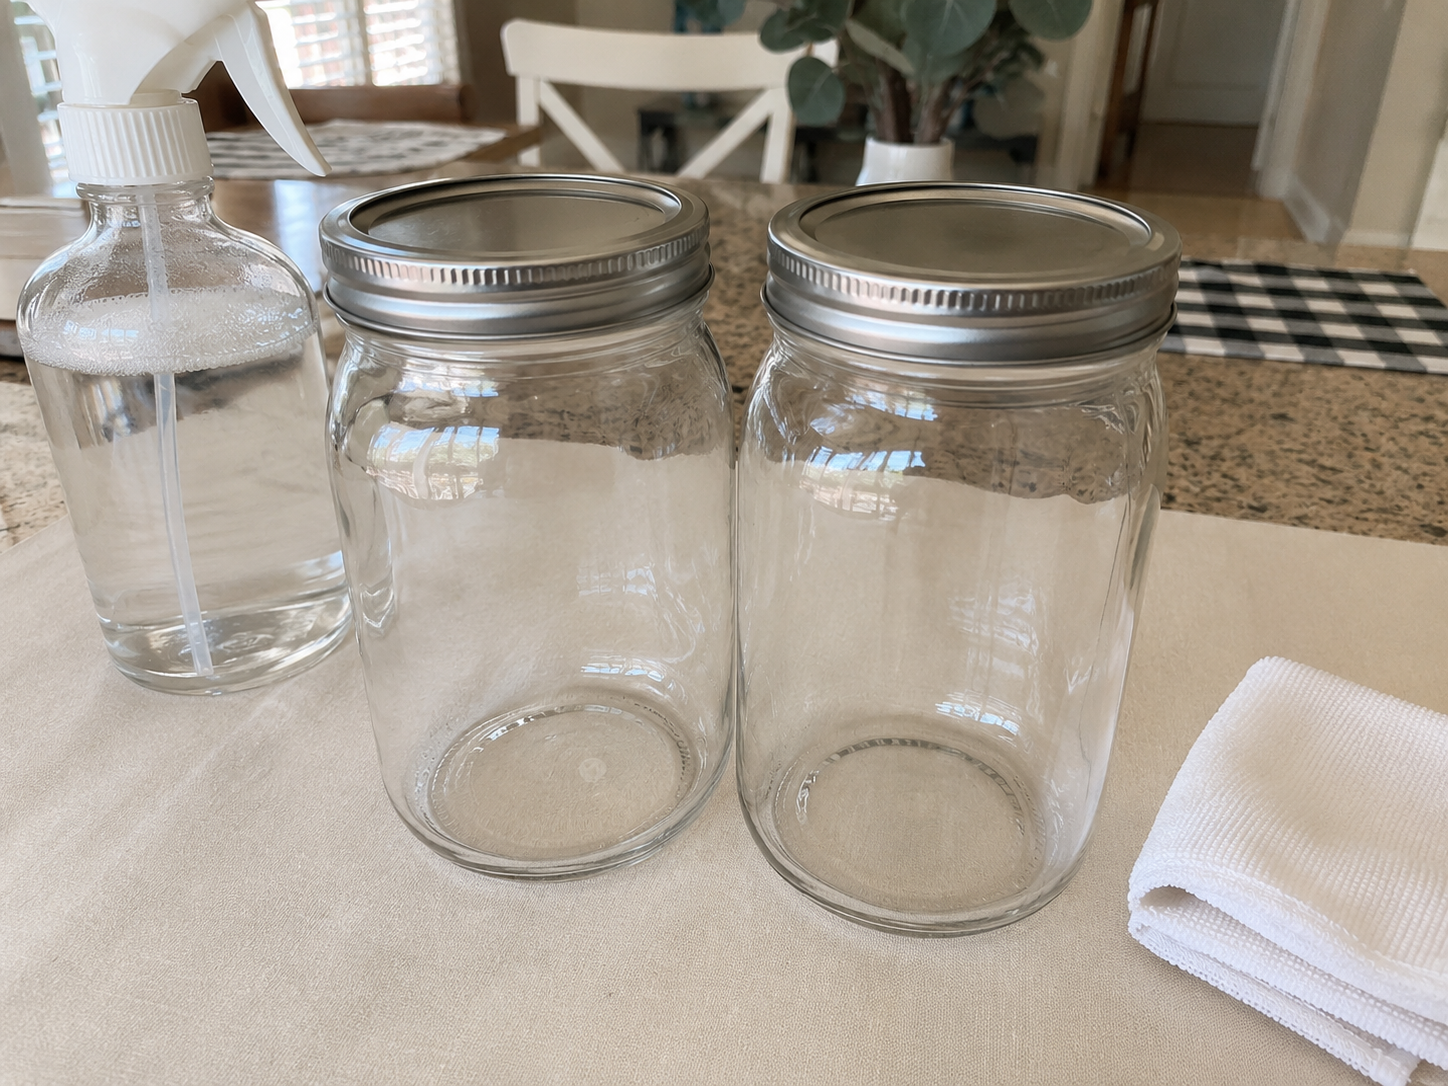
- Wide-Mouth Mason Jars (2 with lids and bands)
- Chalk or Acrylic Paint (white, navy blue)
- Facial Tissues (travel packs or folded standard tissues)
- Jute Twine
- Vinyl Lettering or Printable Sticker Labels
- Craft Knife & Scissors
- Sandpaper (fine-grit)
- Clear Sealer or Mod Podge (optional)
Why This Craft Works
These cute tissue holders are perfect for adding that special Farmhouse / Rustic touch all over your home. I love putting them in my living room, guest bathroom, or even on my nightstand to keep things neat and pretty. They also make an amazing hostess gift or a thoughtful present for a friend who loves that cozy, rustic style.
One of the best parts about this project is how budget-friendly it is. Using mostly Dollar Tree supplies, this whole craft ran me about $11-14 total. It’s truly amazing what you can create with just a few inexpensive items, and nobody would guess how little you spent!
You don’t need to be a crafting expert to make these, they’re super easy! From start to finish, the Cozy Farmhouse Mason Jar Tissue Holders took me about 40-60 minutes, including drying time. This project is absolutely perfect for beginners, a fun afternoon craft with older kids, or when you need a quick, thoughtful gift in a pinch.
Step-by-Step Instructions for Cozy Farmhouse Mason Jar Tissue Holders
Okay, crafters, are you ready to get started? This project is so much fun and goes quicker than you might think. You’re going to love making these Cozy Farmhouse Mason Jar Tissue Holders. It’s such a simple way to bring a little Farmhouse / Rustic charm into your home, and it’s a perfect beginner-friendly craft. Let’s grab our supplies and make some magic!
Step 1: Clean and Prep Jars
Thoroughly wash both wide-mouth mason jars with soap and water to remove any dust, grime, or manufacturing residues. Rinse them well and allow them to air dry completely, or use a clean lint-free cloth to speed up the process. A perfectly clean, dry surface ensures optimal paint adhesion.
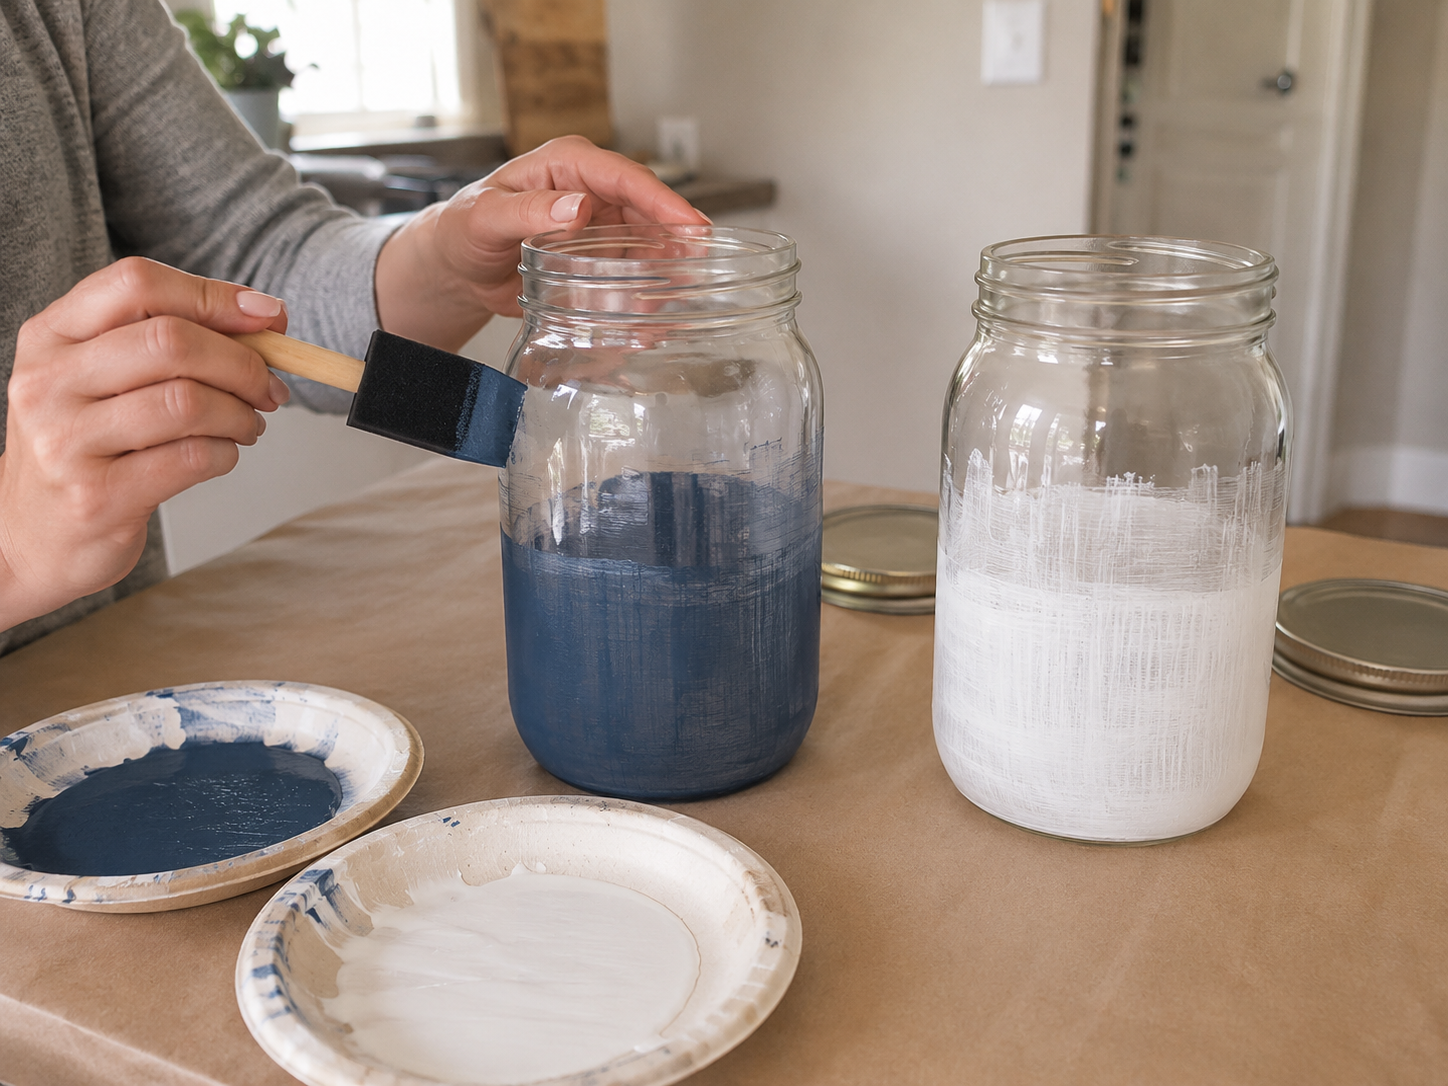
Step 2: Paint Base Coat
Choose a well-ventilated area for painting. Apply the first thin, even coat of paint to each jar. Use navy blue chalk or acrylic paint on one jar and warm white on the other. For best results on glass, use a foam brush or soft bristle brush for smooth coverage. Avoid applying thick coats, as they tend to drip and take longer to dry.
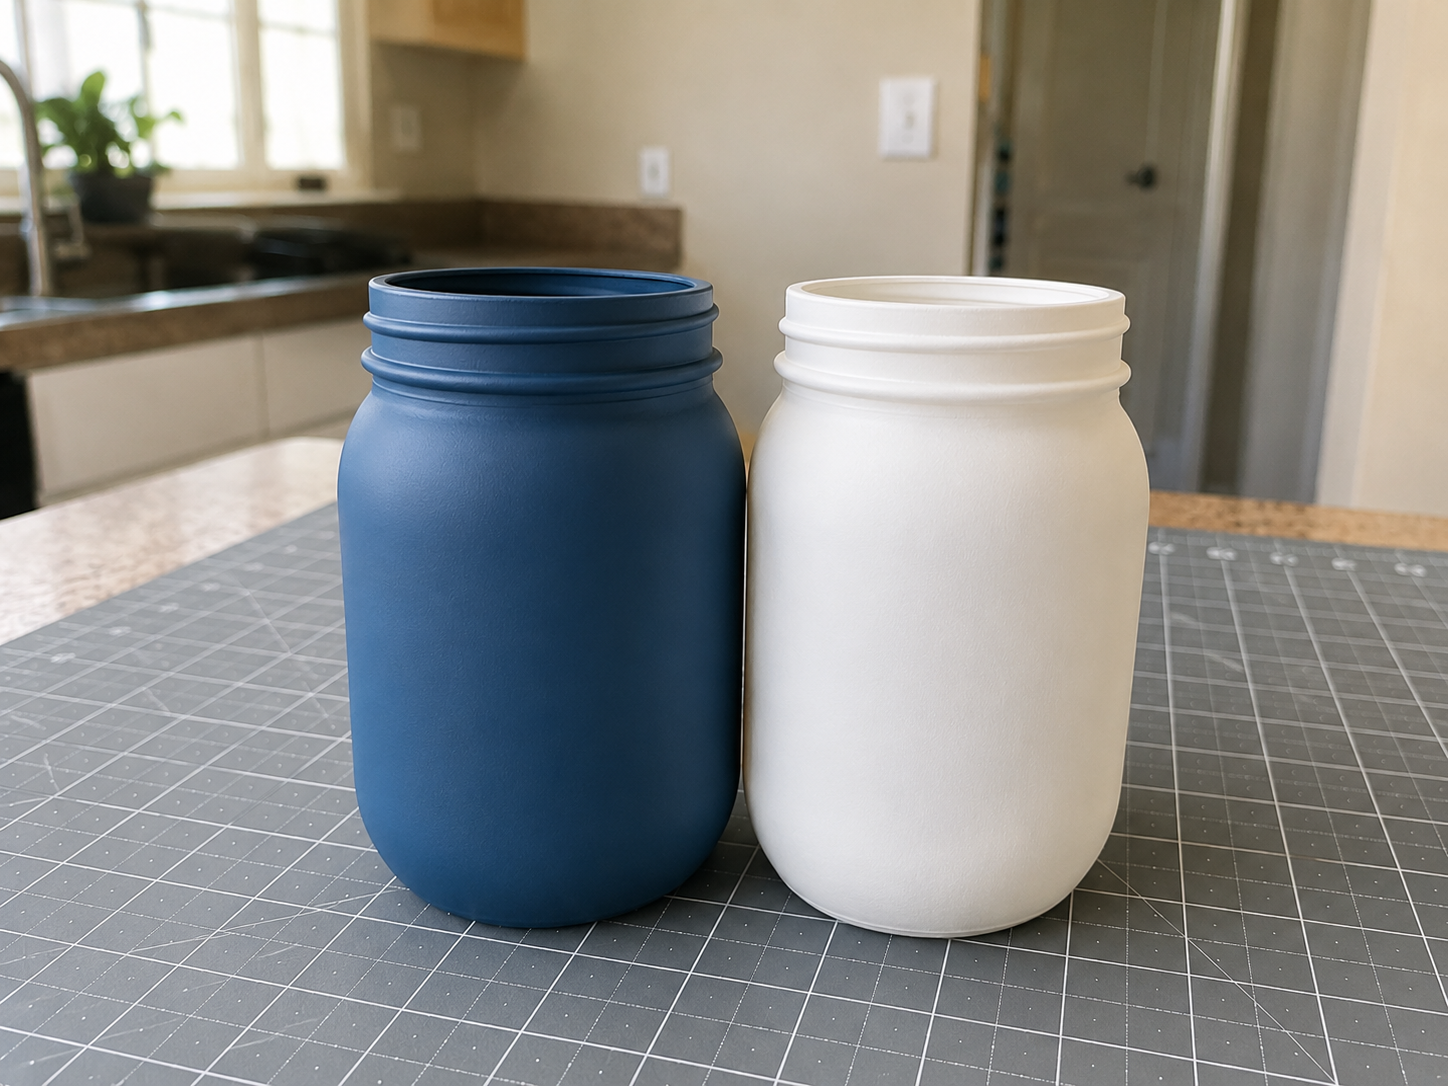
Step 3: Second Paint Coat
Allow the first coat to dry completely, which typically takes 20-30 minutes for most chalk or acrylic paints, or longer if humidity is high. Once the first coat is dry to the touch, apply a second thin, even coat of paint to both jars. This will build up the color and provide full, opaque coverage. Ensure there are no streaks or patchy areas for a professional-looking finish.
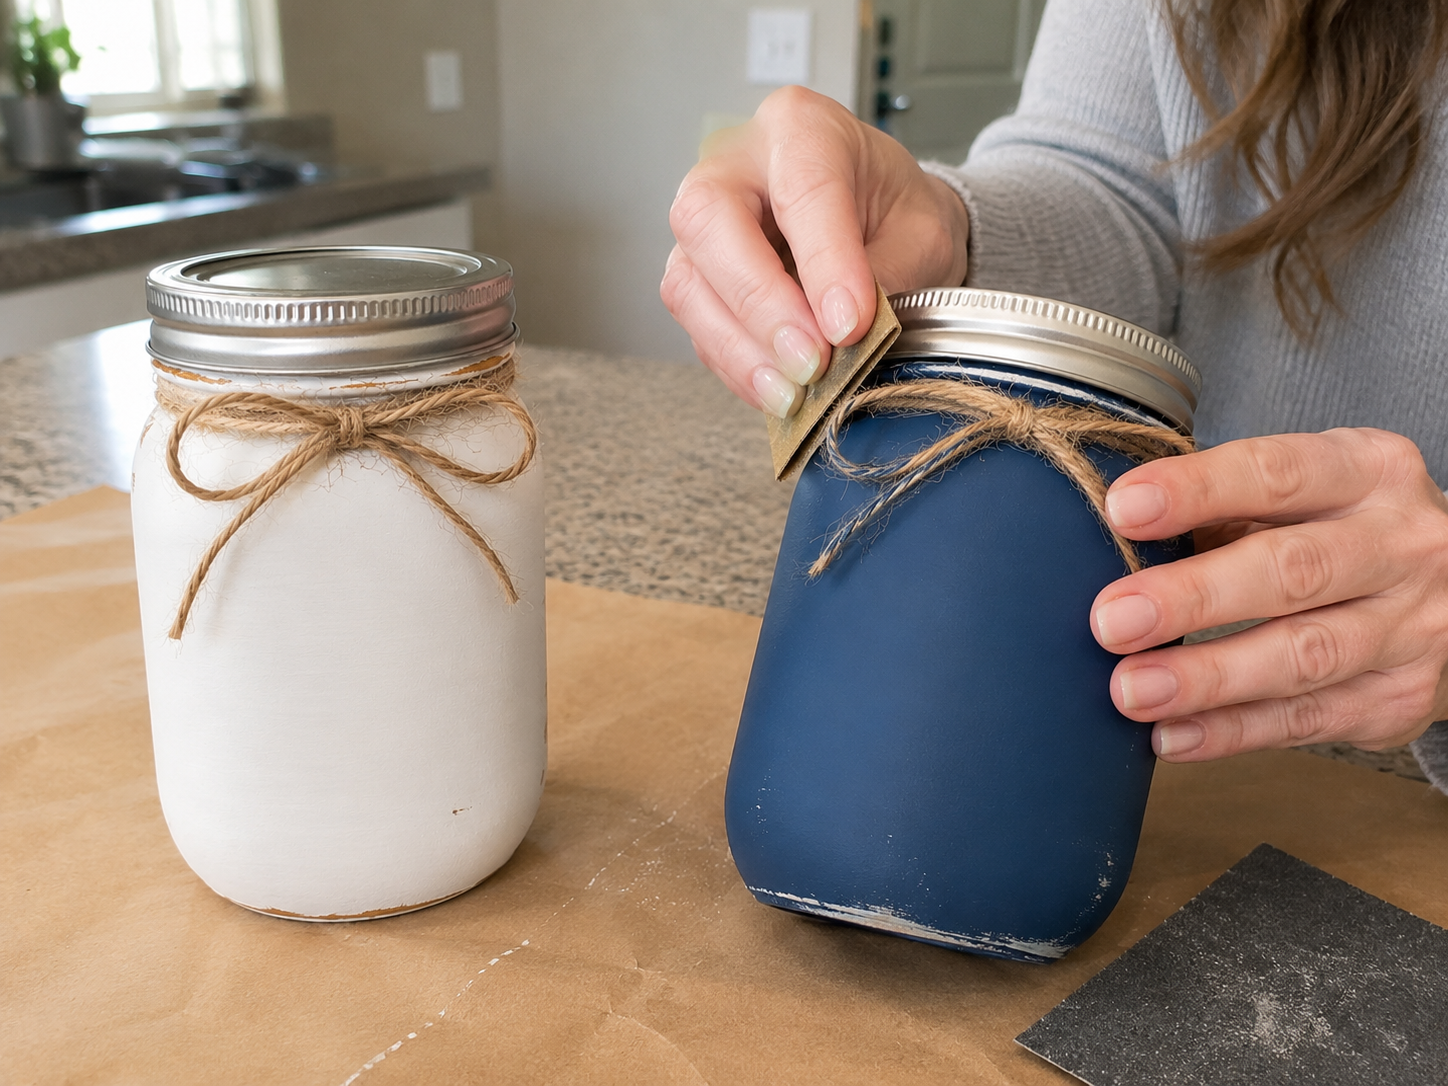
Step 4: Distress Jars (Optional)
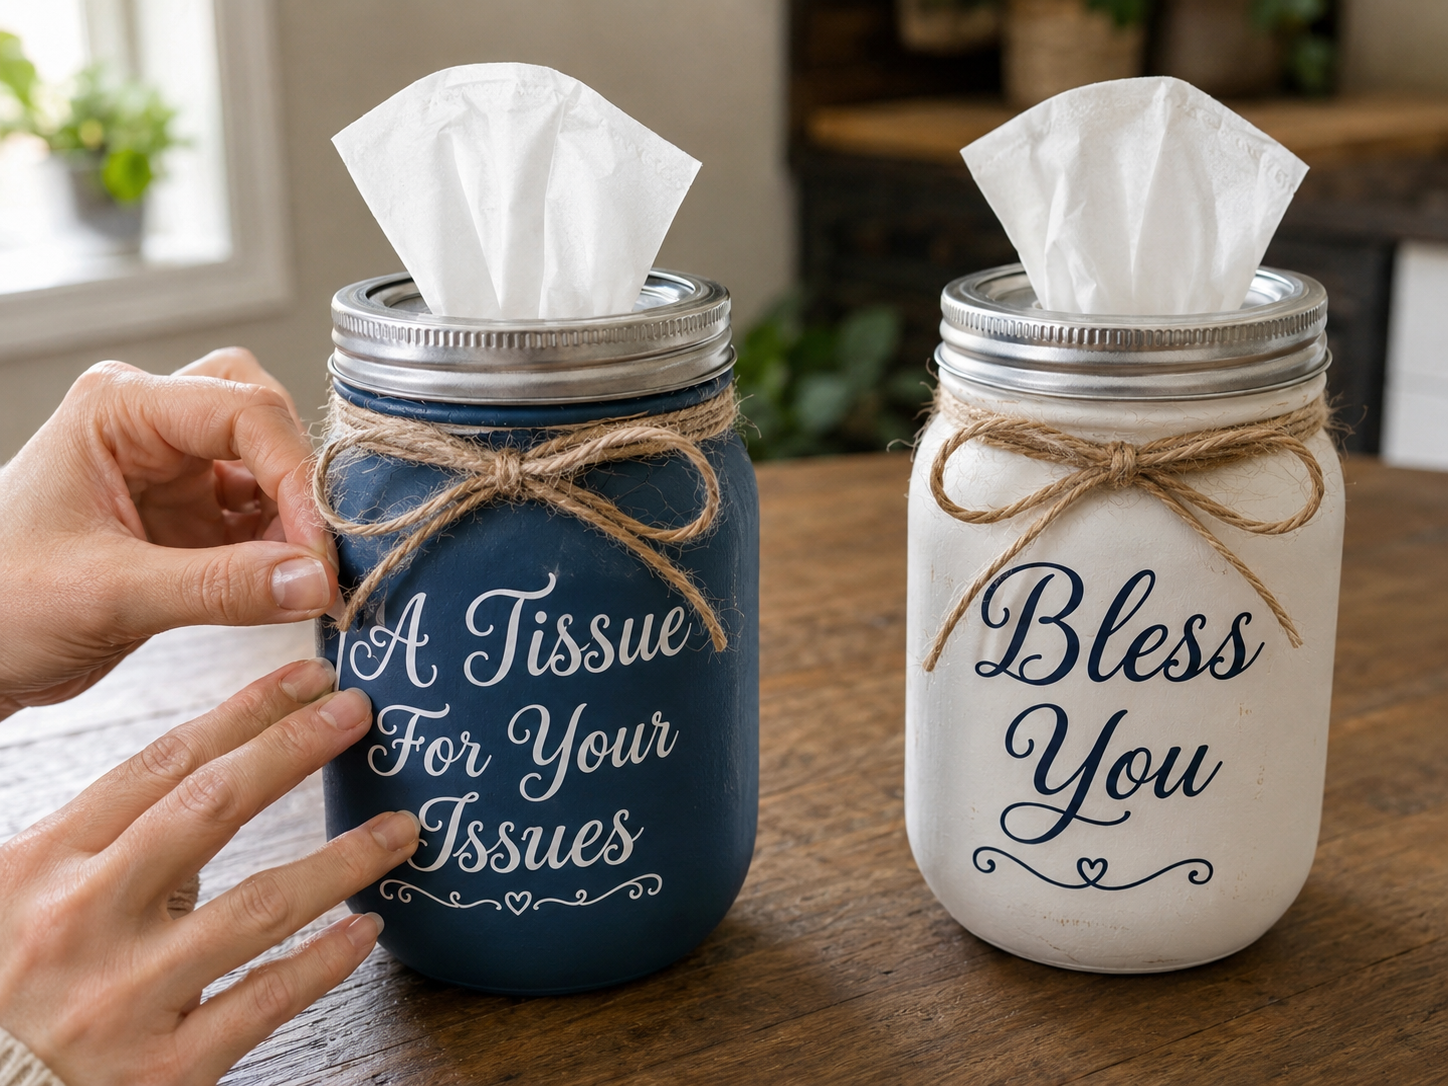
For a rustic farmhouse look, lightly distress the jars once the paint is fully cured (allow several hours or overnight for best results). Using fine-grit sandpaper (180-220 grit), gently rub over raised areas, edges, and around the lettering area to reveal hints of the glass underneath. This creates a beautifully aged effect. Wipe off any dust with a clean, dry cloth before proceeding.
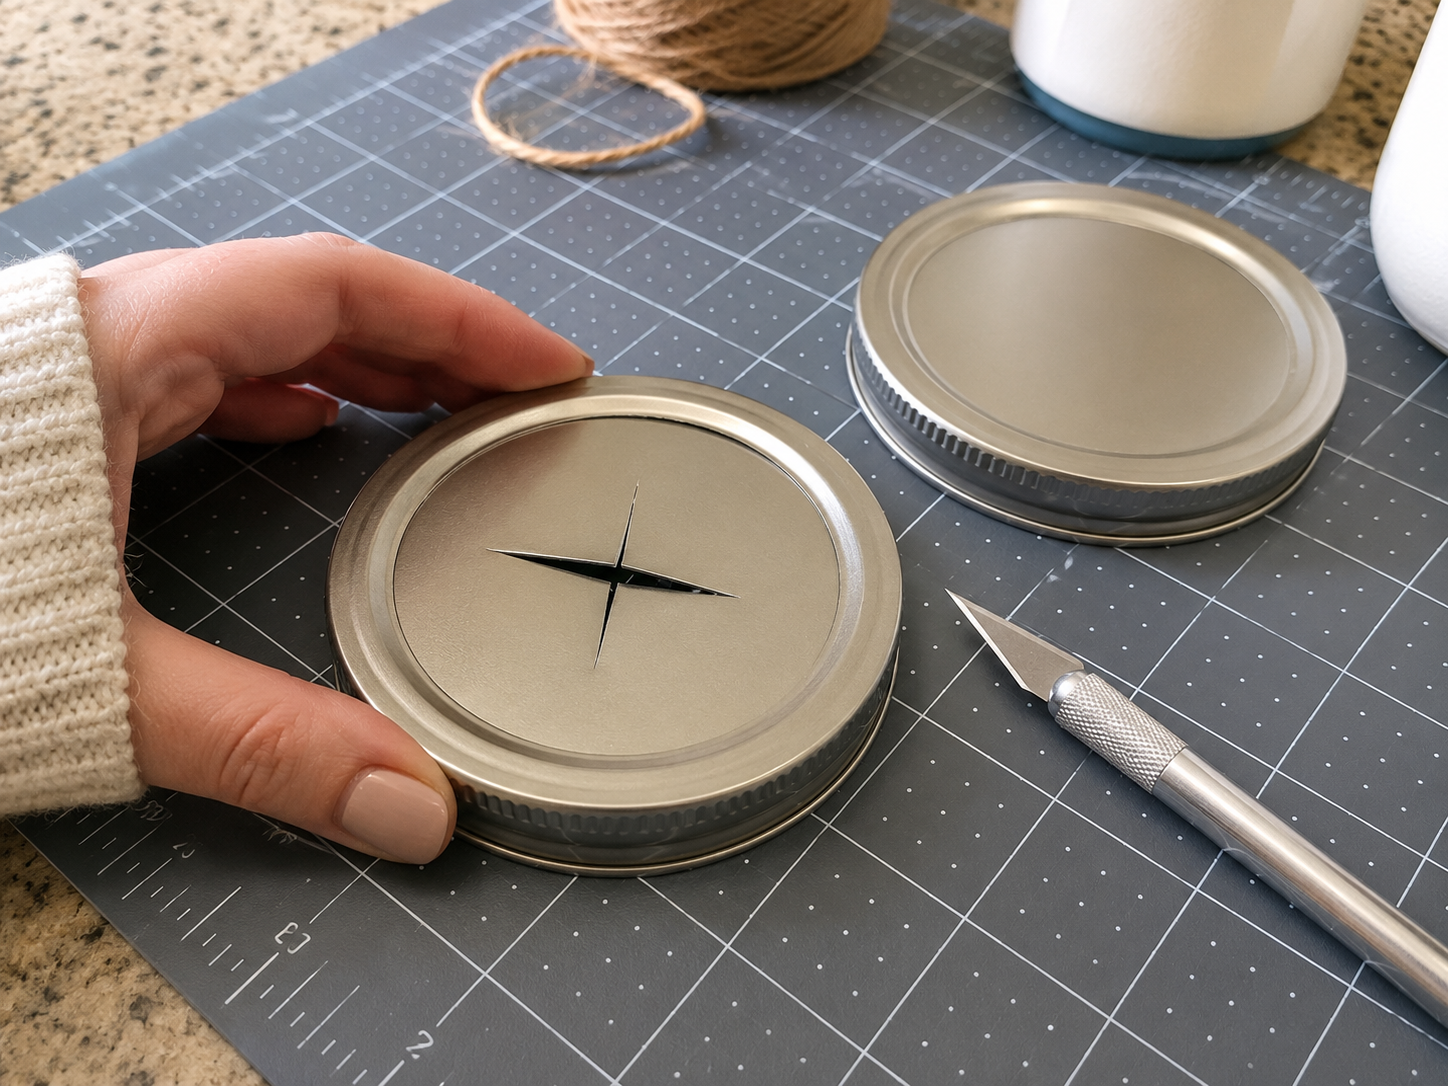
Step 5: Create Tissue Opening
Take the metal lid inserts (the flat discs) from both mason jars. Using a permanent marker, draw a narrow oval or cross-shaped slit in the center of each. Carefully cut along these lines using a sharp craft knife on a protected cutting mat. Alternatively, if you prefer not to cut the metal, you can cut a circle of cardstock to fit snugly inside the lid ring and cut the slit into that. Smooth any rough edges with sandpaper or file.
📱 Craftino App
Make more crafts like this
1,000+ Farmhouse / Rustic ideas with photo guides & Pro Tips
✓ Step-by-step photo tutorials, nothing left out
✓ Pro Tips for every step
✓ Save crafts & browse fully offline
✓ New ideas added every week

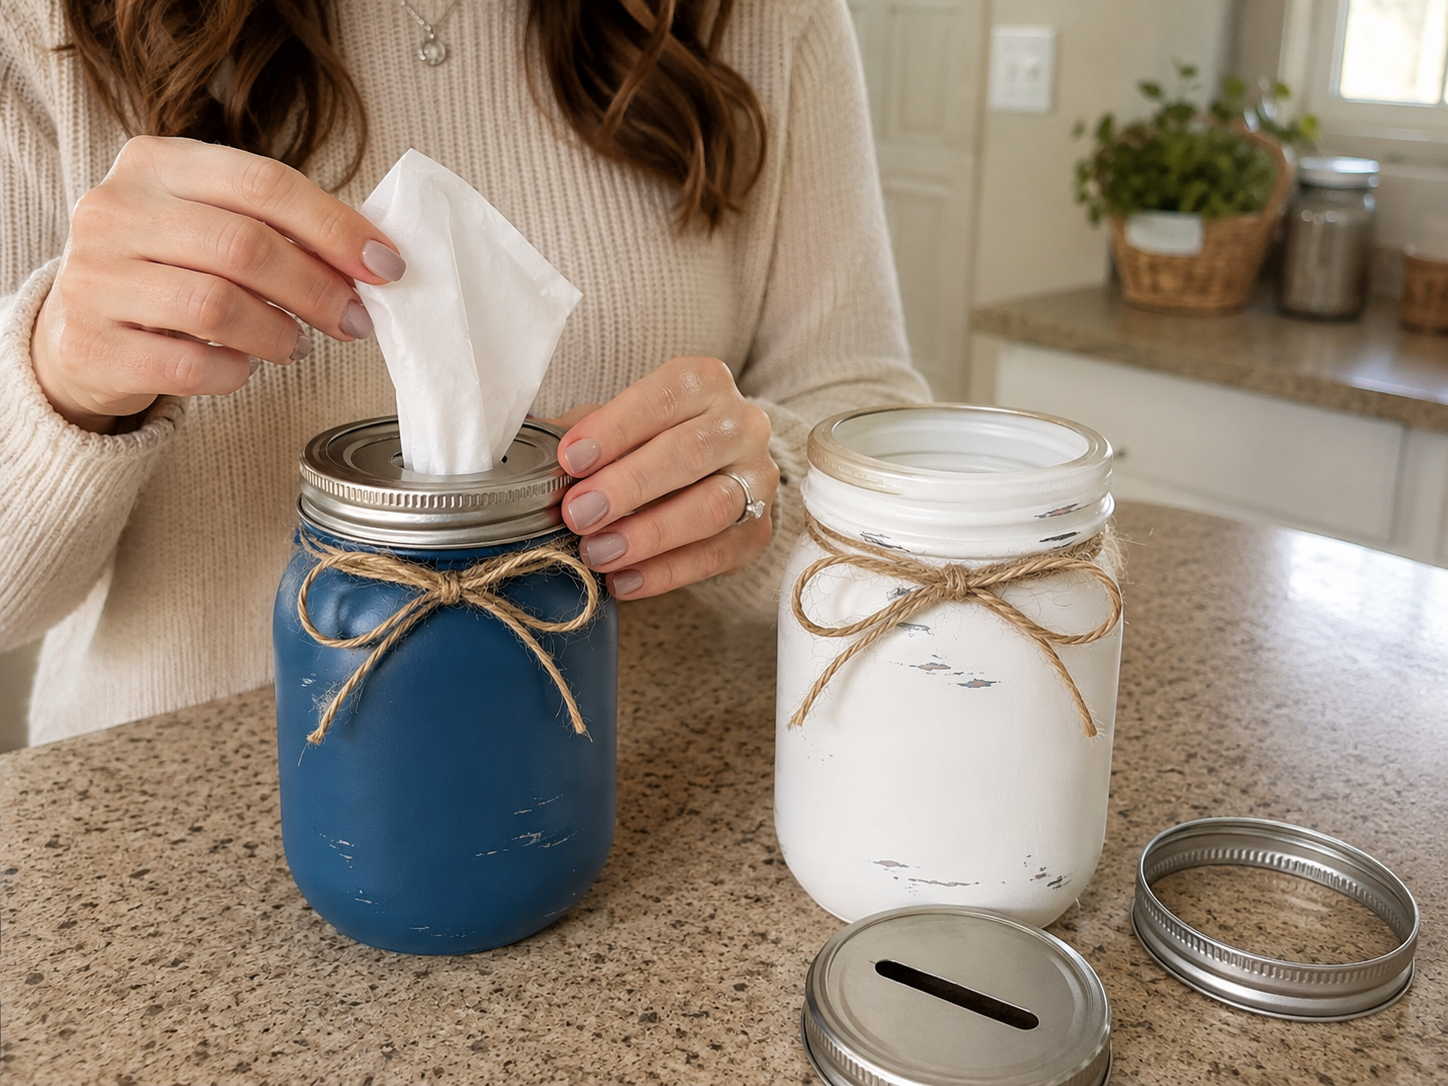
Step 6: Load Tissues
Open your package of facial tissues or fold a stack of standard tissues to fit loosely inside the mason jars. Place the stack into each jar. Take one tissue from the center or top of the stack and gently pull it up through the slit you cut in the lid insert. Once the first tissue is through, place the lid insert back into the metal band and screw it onto the jar, tightening securely.
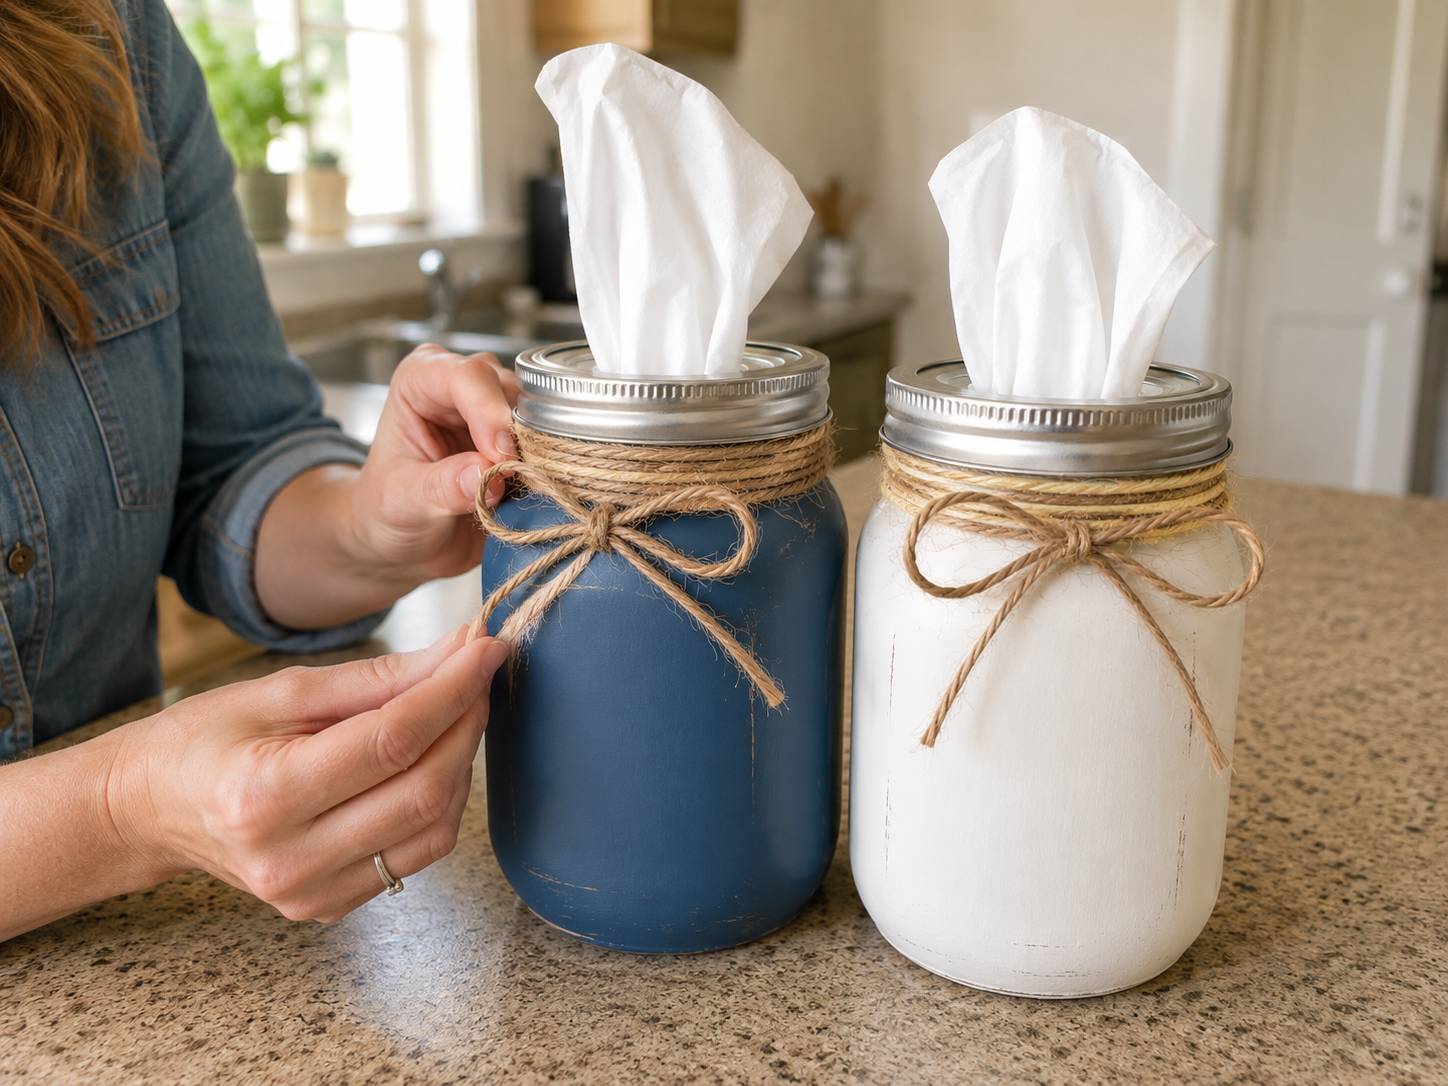
Step 7: Tie Rustic Bows
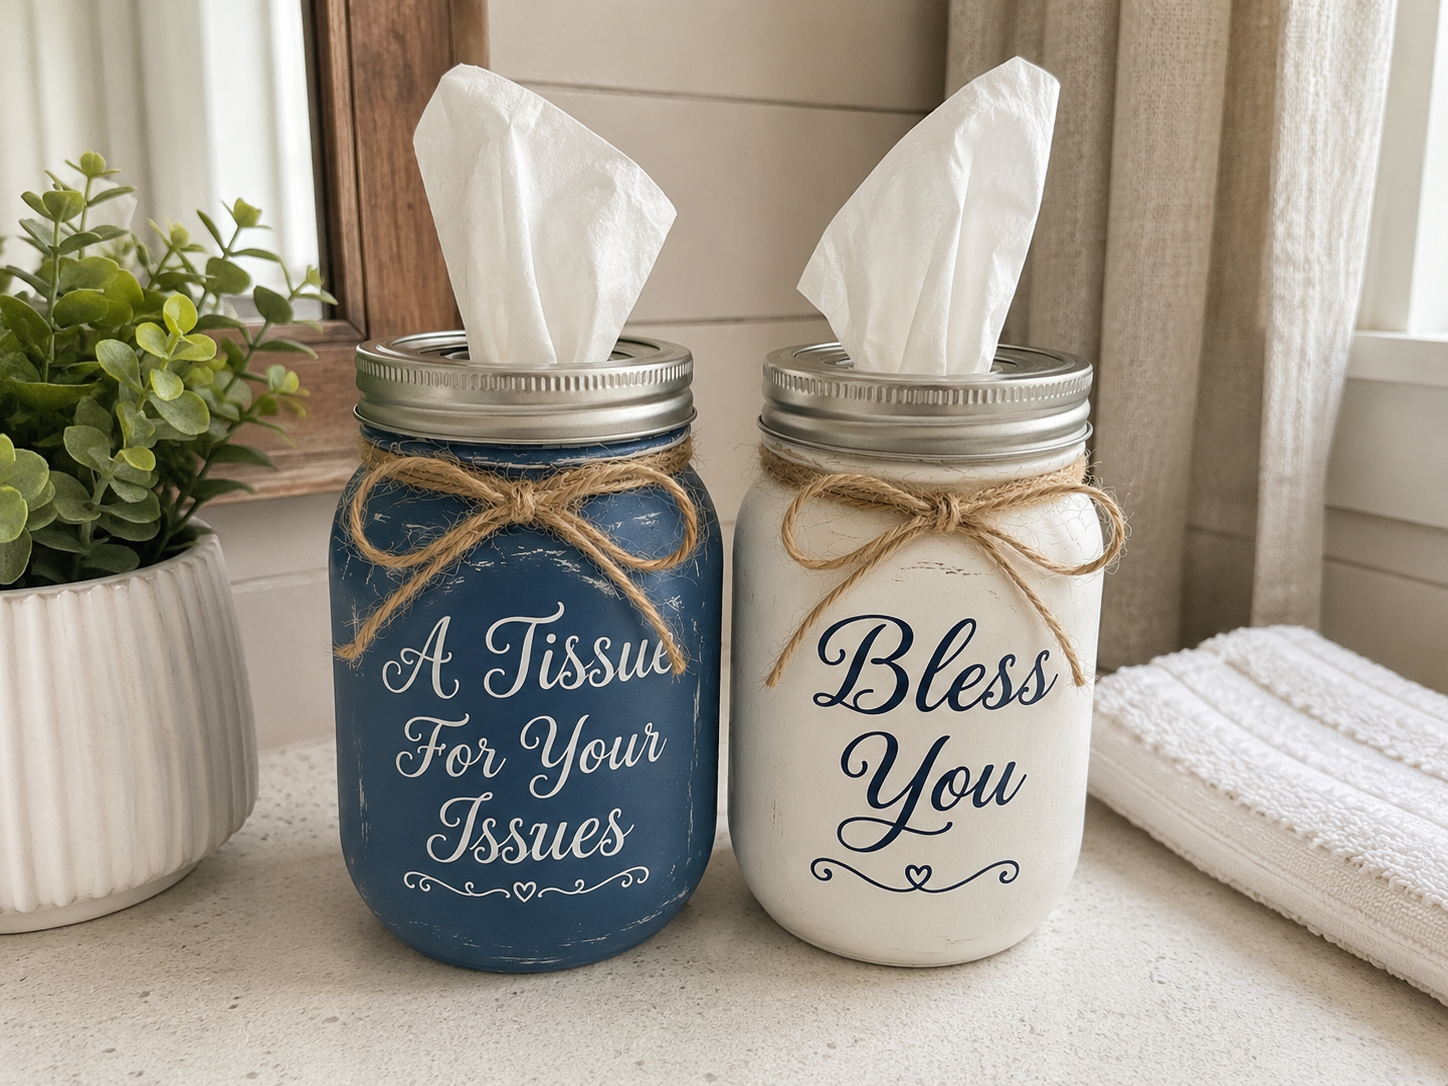
Take a length of jute twine (approximately 24-30 inches per jar for ample wrapping and tying). Wrap the twine several times around the neck of each mason jar, just under the lid band, creating a rustic texture. Bring the ends to the front and tie them into a simple, natural-looking bow. Trim any excess twine with scissors for a neat finish.
Step 8: Add Custom Lettering
Carefully apply your chosen vinyl lettering or printed sticker labels to the front of each jar. For the navy jar, apply “A Tissue For Your Issues” with the small heart/scroll embellishments. On the white jar, apply “Bless You” with similar embellishments. Ensure the lettering is straight and centered for a polished look. If hand-painting, use stencils or freehand the design with acrylic paint and a fine brush.
Step 9: Seal & Display
(Optional) To protect your paint and lettering, apply a thin coat of clear sealer (like Mod Podge Outdoor or a clear acrylic spray sealer) over the painted and lettered areas. Allow it to dry completely according to product instructions. Once dry, your cozy farmhouse tissue holders are ready to be displayed. Place them on a bathroom counter, kitchen, guest room, office desk, or bedside table for a charming and practical touch.
See also: Charming Farmhouse Blush Floral Jar For Mothers Day
📋 Love staying organized while crafting? Check out our printable planners & craft designs at CraftersDT on Etsy and use code CRAFT20 for 20% off your entire order!
Your Cozy Farmhouse Jar Tissue Holders Await!
And just like that, your adorable new Cozy Farmhouse Mason Jar Tissue Holders are all ready to go! Place them wherever you need a tissue and a touch of rustic charm. I just know they’ll bring a smile to your face. Don’t forget to share your creations with me, or try them in different colors for other seasons!
📱 Craftino App
Make more crafts like this
1,000+ Farmhouse / Rustic ideas with photo guides & Pro Tips
✓ Step-by-step photo tutorials, nothing left out
✓ Pro Tips for every step
✓ Save crafts & browse fully offline
✓ New ideas added every week
Frequently Asked Questions
What is the total cost to make Cozy Farmhouse Mason Jar Tissue Holders?
The total cost to make Cozy Farmhouse Mason Jar Tissue Holders is typically around $11-14, especially when sourcing most of your supplies from Dollar Tree or other discount stores.
How long does it take to complete the DIY Cozy Farmhouse Mason Jar Tissue Holders project?
Completing the DIY Cozy Farmhouse Mason Jar Tissue Holders project typically takes about 40-60 minutes from start to finish, including any necessary drying time for paint or glue.
Is this a beginner-friendly craft for making Farmhouse / Rustic tissue holders?
Yes, this is an incredibly beginner-friendly craft. The steps for making these Cozy Farmhouse Mason Jar Tissue Holders are straightforward and don’t require any advanced crafting skills, making it perfect for new crafters.
What kind of paint should I use for my Dollar Tree Cozy Farmhouse Mason Jar Tissue Holders?
For your Dollar Tree Cozy Farmhouse Mason Jar Tissue Holders, acrylic craft paint works best. It adheres well to glass, dries quickly, and is readily available in many colors at craft stores or even Dollar Tree.
Where can I buy the supplies for these budget-friendly Farmhouse / Rustic tissue holders?
You can find most of the supplies for these budget-friendly Farmhouse / Rustic tissue holders at Dollar Tree, including the mason jars, paint, and decorative elements. Larger craft stores like Hobby Lobby or Walmart also carry similar items if you need specific colors or brands.
Are the Cozy Farmhouse Mason Jar Tissue Holders suitable as a gift?
Yes, the Cozy Farmhouse Mason Jar Tissue Holders make a wonderful and thoughtful gift. They are perfect for housewarmings, Mother’s Day, birthdays, or just as a ‘thinking of you’ present for anyone who appreciates Farmhouse / Rustic home decor.
Can I customize my Cozy Farmhouse Mason Jar Tissue Holders with different colors or themes?
Absolutely, you can easily customize your Cozy Farmhouse Mason Jar Tissue Holders. Try using different paint colors, adding ribbons or twine in various shades, or even stenciling a word like ‘Home’ or a seasonal design to match your specific decor or holiday theme.
What is a common mistake to avoid when making these DIY Mason Jar Tissue Holders?
A common mistake to avoid when making these DIY Mason Jar Tissue Holders is applying paint too thickly in one go. Instead, apply several thin coats of paint, allowing each layer to dry fully for a smooth, even finish and to prevent streaks or drips.
How many mason jars do I need to make the Cozy Farmhouse Tissue Holders?
You will need one standard-sized mason jar for each Cozy Farmhouse Tissue Holder you plan to make. Quart-sized jars (32 oz) work best as they comfortably fit a standard tissue refill.
Are these Farmhouse / Rustic Mason Jar Tissue Holders durable for everyday use?
Yes, these Farmhouse / Rustic Mason Jar Tissue Holders are quite durable for everyday indoor use. Once the paint and sealant are fully cured, the jars are sturdy and can be gently wiped clean, providing long-lasting decorative appeal.
Shop farmhouse / rustic decor & supplies at Dollar Tree.
Inspiration / Credit: Theresa Furguile Anderson
Leave a Reply