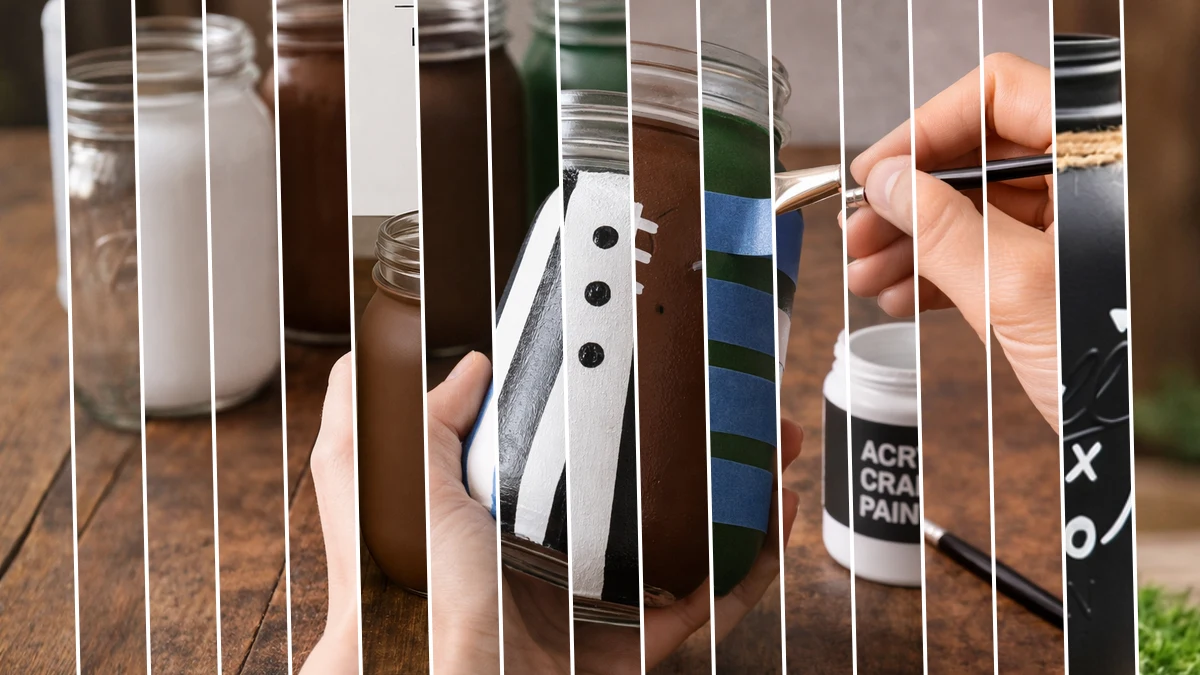
My husband is super into football season, and honestly, our living room needed a little something extra for game days. I was wandering through Dollar Tree the other day and just knew I could make some super cute DIY Football Game Day Mason Jar Decor for our snack table. These were so easy and really added that perfect touch!
See also: Diy Farmhouse Kitchen Canister Upcycling Your Old Jars
Theme: General / Everyday
Materials Needed
- 4 Standard Mason Jars (Quart Size Recommended)
- Acrylic Craft Paints (Black, White, Brown, Green)
- Painter’s Tape (various widths recommended)
- Assorted Paint Brushes (flat brush, fine-tip brush)
- Jute Twine
- Small Metal Whistle (optional)
- Rubbing Alcohol
- Paper Towels
- Pencil
- Ruler
📋 Love staying organized while crafting? Check out our printable planners & craft designs at CraftersDT on Etsy and use code CRAFT20 for 20% off your entire order!
Step-by-Step Instructions for DIY Football Game Day Mason Jar Decor
You are gonna love how simple these jars are to put together, I promise! Seriously, this Home Decor project took me less than 30 minutes from start to finish. It’s perfect for beginners, kids can totally help, and it’s such a fun way to add some General / Everyday cheer to your space. Get ready to grab your craft supplies and make some awesome decor!
📱 Free to Download
Craftino, The #1 Craft App
✓ Save crafts & browse fully offline
✓ Download printable PDF guides for every project
✓ Step-by-step photo tutorials, nothing left out
✓ 1,000+ craft projects with new ones added every week
Step 1: Prepare Mason Jar Surfaces
Take all four mason jars and clean their outer surfaces thoroughly. Dampen a paper towel with rubbing alcohol and wipe down each jar. This step is crucial for removing any oils, dirt, or residues that might prevent the paint from adhering properly to the glass.
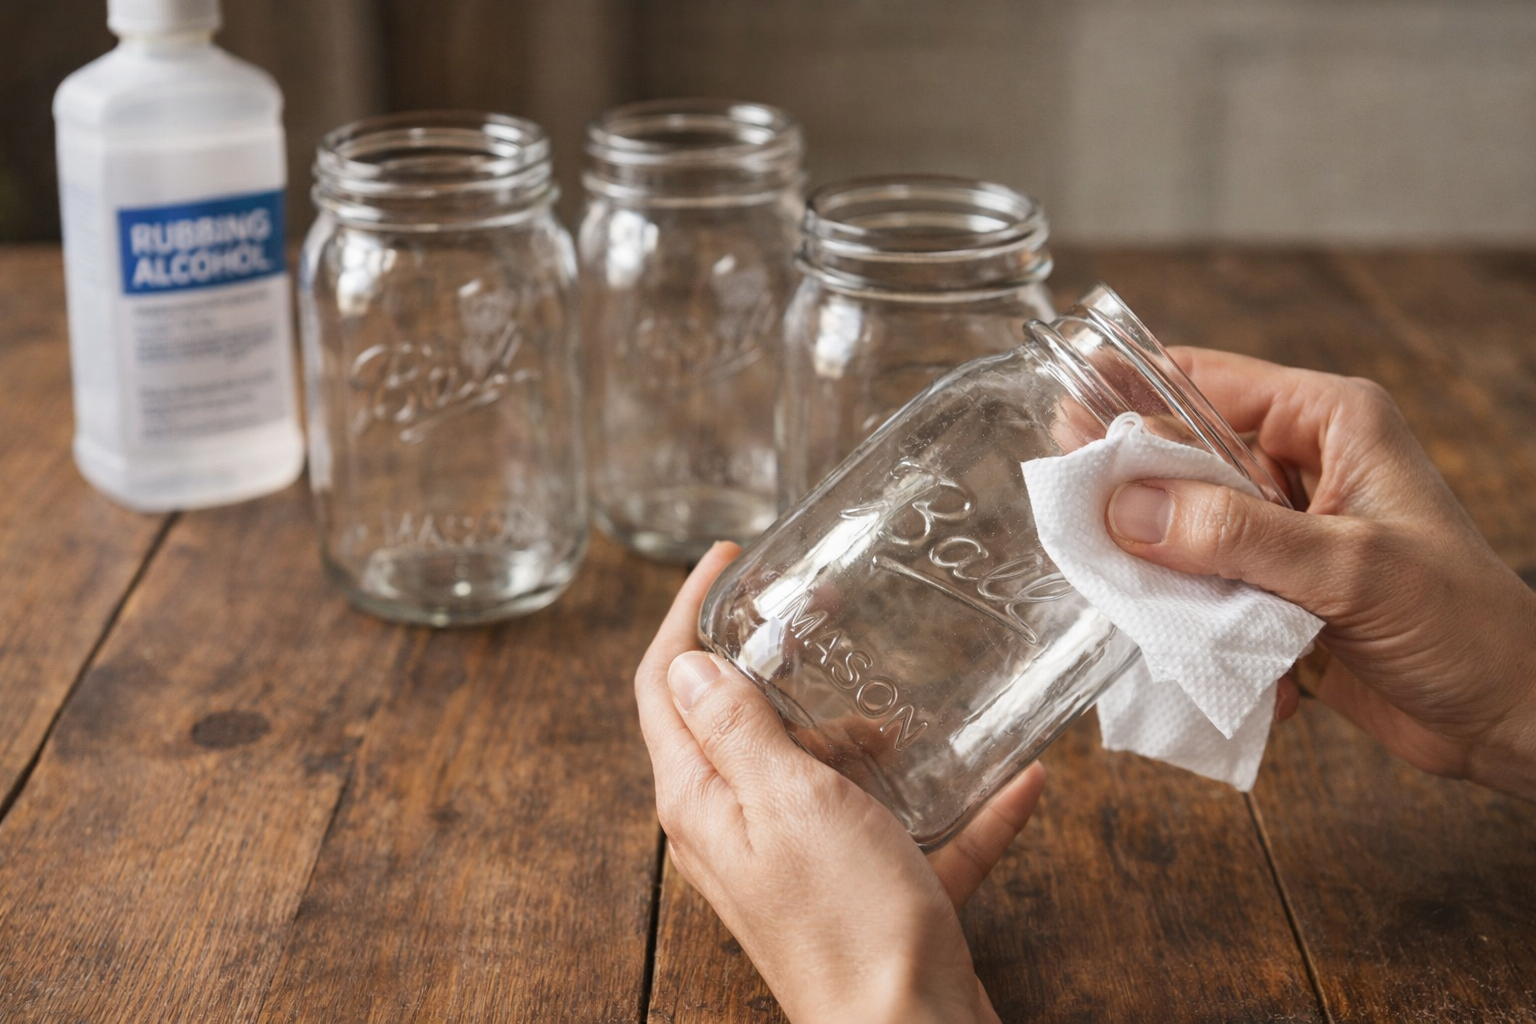
💡 Pro Tip: Always ensure the jars are completely dry after cleaning with alcohol before applying any paint. Even a slight bit of moisture can cause paint to bubble or peel later. Use a clean, dry paper towel to gently buff them dry for optimal paint adhesion.
Step 2: Apply Referee Jar Base Coat
Select one mason jar for the referee uniform design. Using a flat paint brush, apply an even base coat of white acrylic craft paint over the entire outer surface of this jar. Carefully avoid painting the very top rim where the lid screws on, as this area will be left clear.
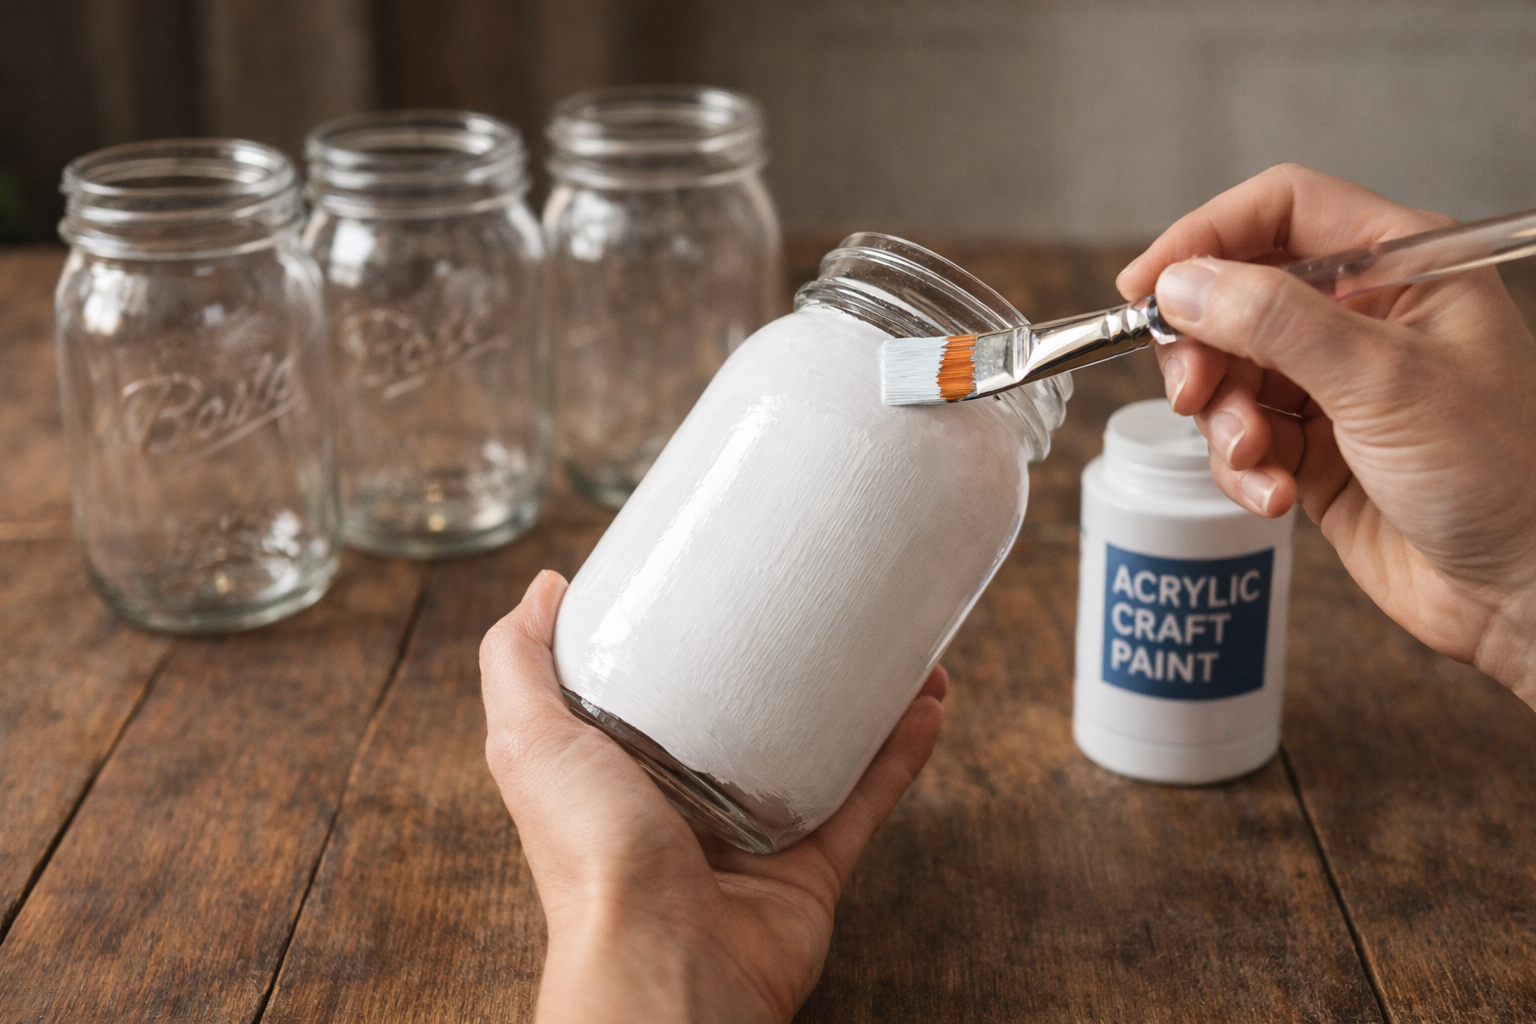
💡 Pro Tip: For the smoothest finish, apply paint in thin, even layers. Multiple thin coats will always give a more professional and opaque result than one thick coat, which can become streaky or uneven. Let each coat dry completely before adding the next.
🗓️ Keep all your craft projects on track! Explore our printable planners & templates at CraftersDT on Etsy and use code CRAFT20 for 20% off!
Step 3: Apply Football Jar Base Coat
Pick a second mason jar for the football design. With a flat paint brush, apply an even base coat of brown acrylic craft paint over the entire outer surface of this jar. Just like the previous jar, leave the screw top rim unpainted.
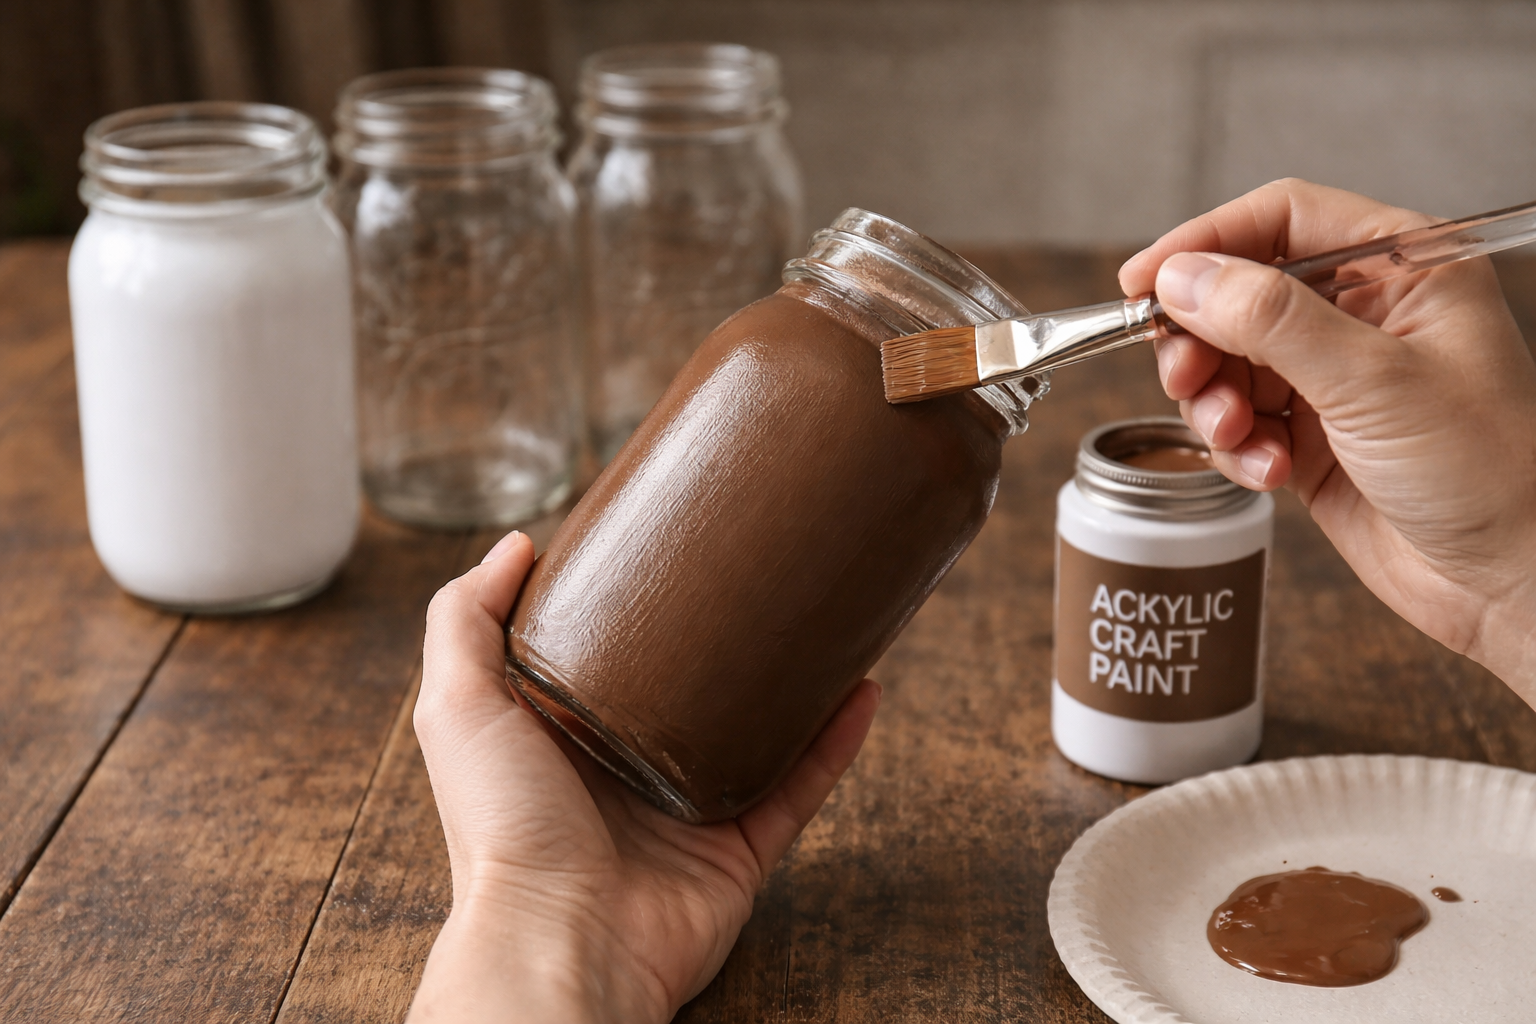
💡 Pro Tip: When painting round objects like jars, rotate the jar as you paint to maintain an even coat and prevent drips. Use consistent, overlapping brush strokes in one direction (e.g., vertical) for the best and most uniform coverage.
Step 4: Apply Football Field Jar Base Coat
Take a third mason jar for the football field design. Using a flat paint brush, apply an even base coat of green acrylic craft paint over the entire outer surface of the jar. Again, carefully avoid painting the screw top rim.
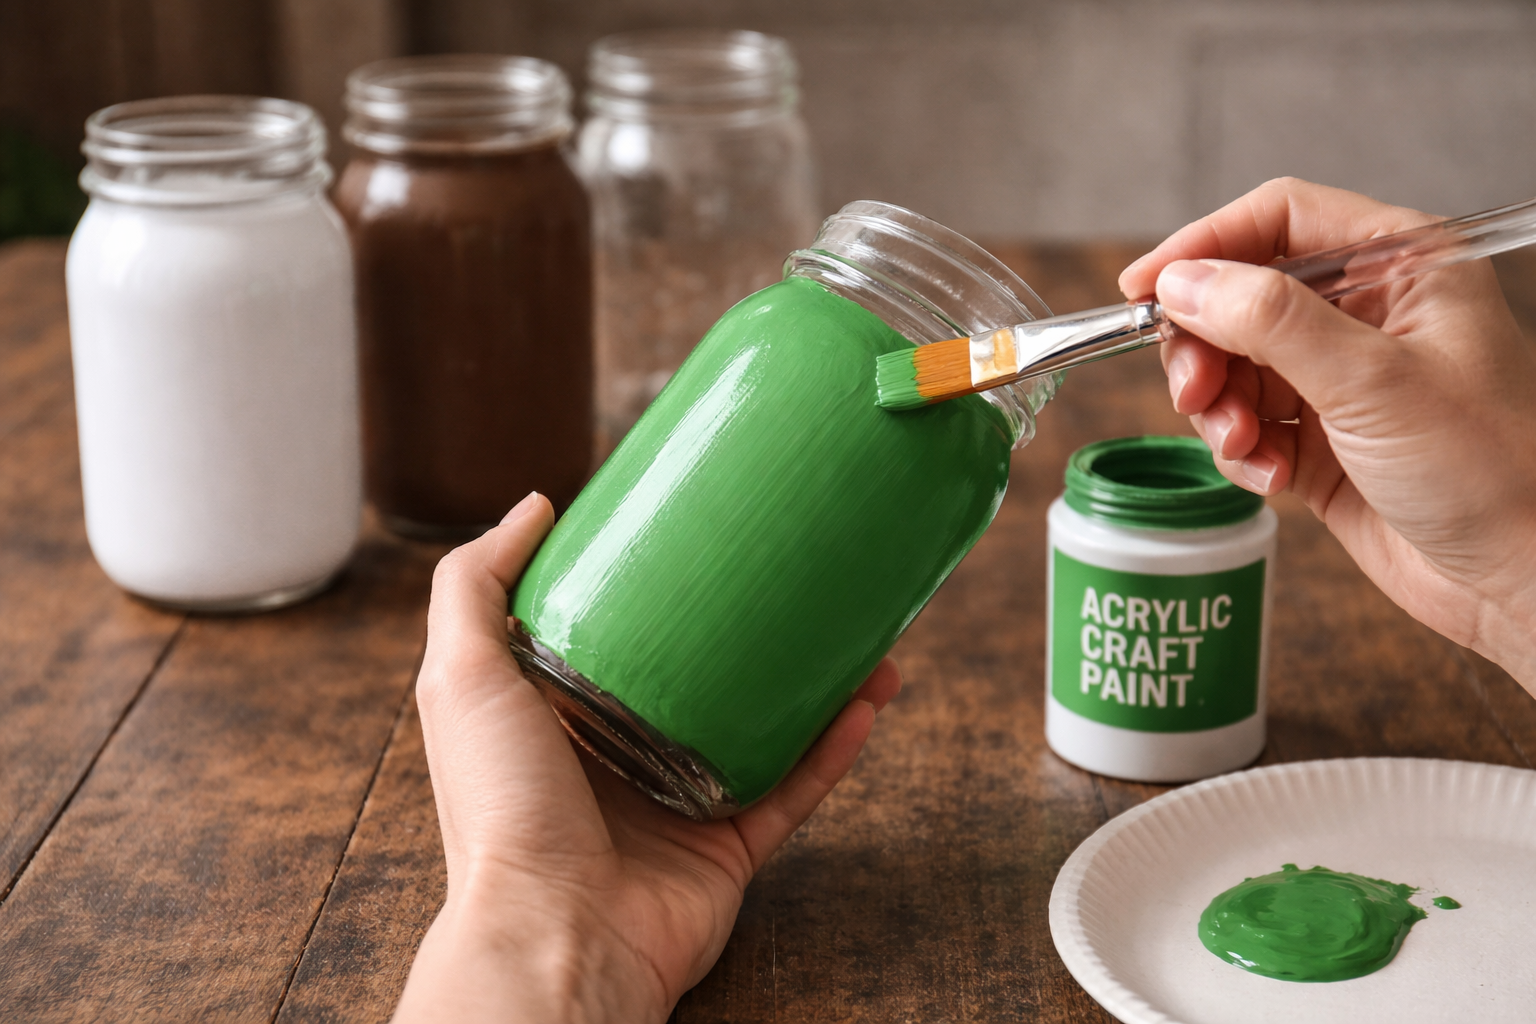
💡 Pro Tip: If the glass shows through after the first coat, resist the urge to apply more pressure or more paint immediately. Wait for the first coat to dry completely, then apply a second thin coat. Impatience leads to uneven texture and longer overall drying times.
Step 5: Apply Playbook Jar Base Coat
For the fourth and final mason jar, intended for the playbook design, apply an even base coat of black acrylic craft paint over its entire outer surface using a flat paint brush. Ensure the screw top rim remains clear.
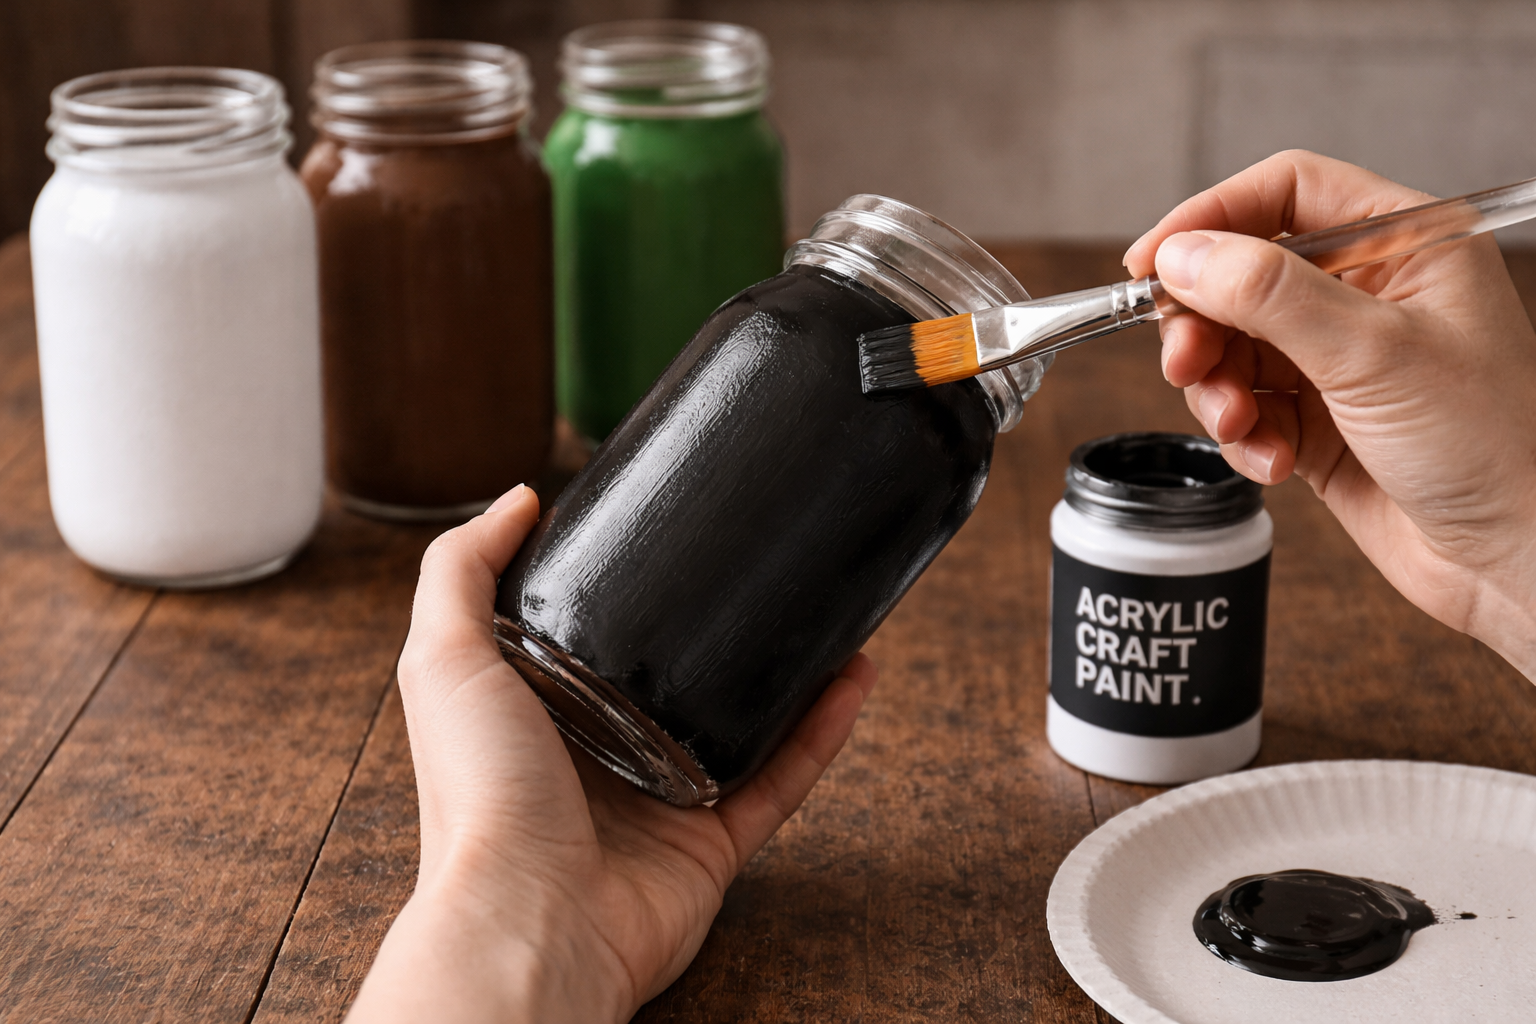
💡 Pro Tip: Black paint can sometimes take longer to dry completely or require more coats for full opacity compared to lighter colors. Ensure you’re working in a well-ventilated area and give it ample time to dry between coats for the best results.
Step 6: Allow All Base Coats to Dry
Place all four painted mason jars in a safe, undisturbed area and allow the base coats to dry completely. This typically takes 1-2 hours for acrylic paint, but always consult your specific paint’s instructions for exact drying times. Ensure they are dry to the touch before proceeding.
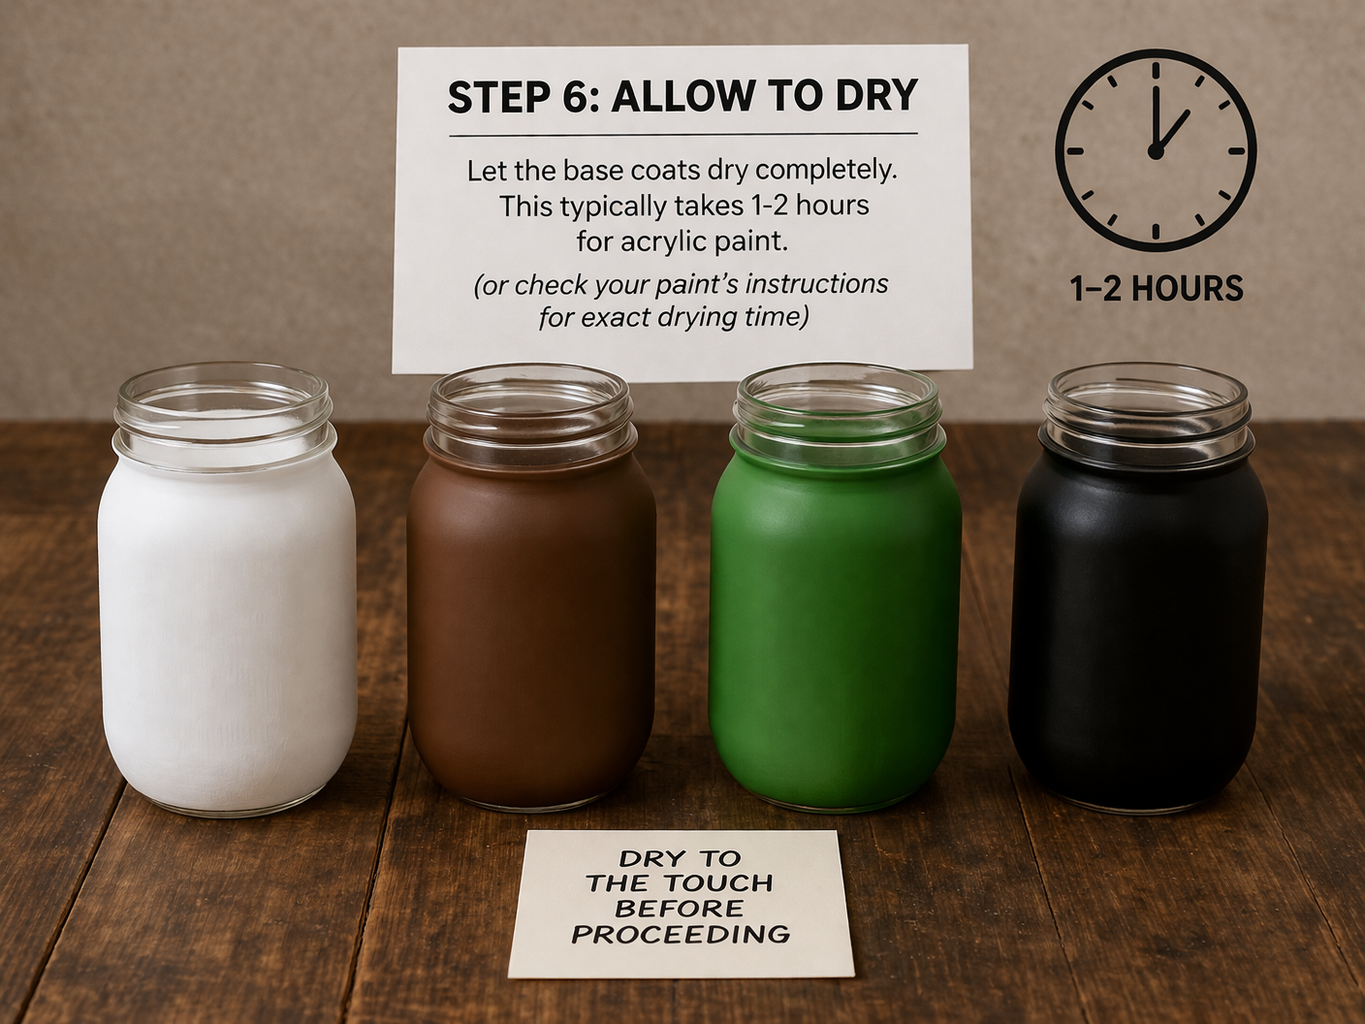
💡 Pro Tip: For faster drying, you can use a fan on a low setting, but avoid direct heat sources, which can cause paint to crack or bubble. If you plan to add a second coat, waiting at least 30 minutes to an hour between coats is generally recommended.
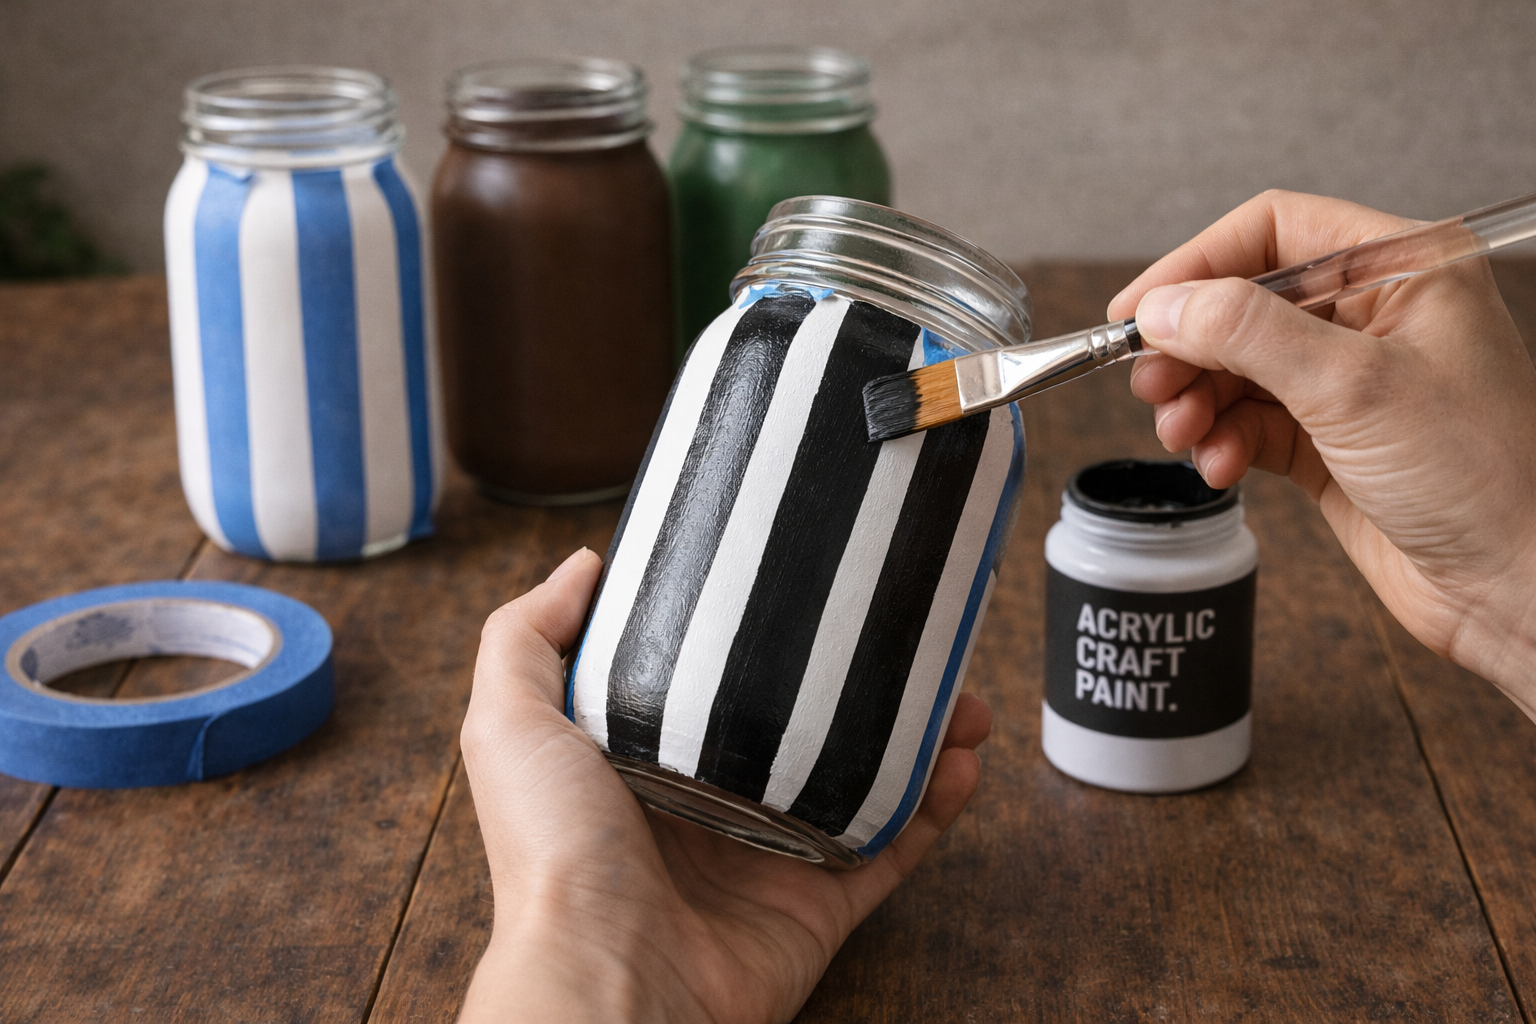
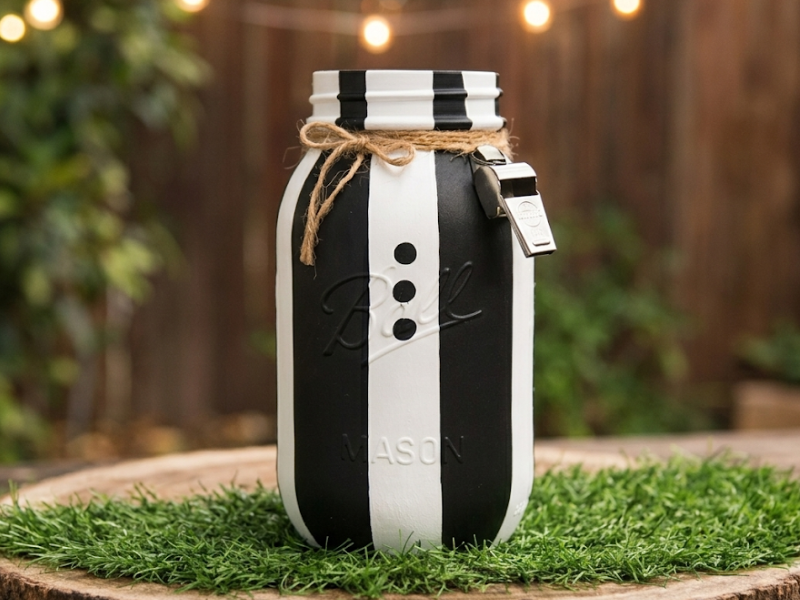
Step 7: Mask Referee Stripes
On the white-painted referee jar, use painter’s tape to mask off even vertical stripes. Start by placing a piece of tape, then leave a gap for the white stripe, then place another piece of tape for the black stripe, and repeat this pattern around the jar. Ensure the tape is firmly pressed down.
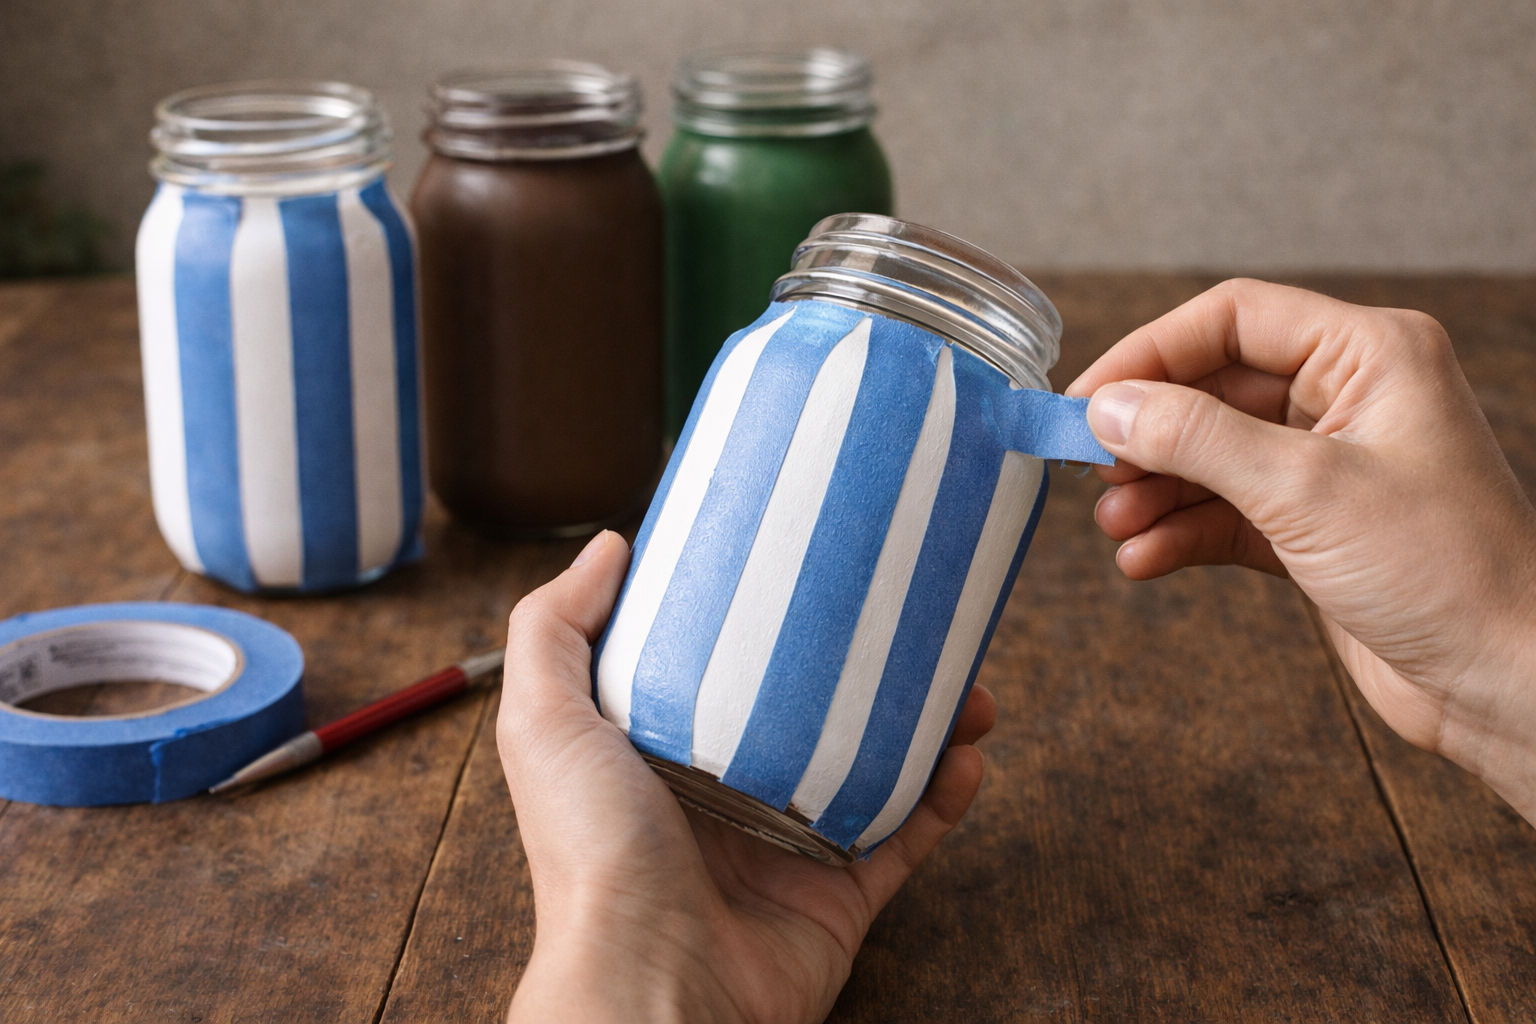
💡 Pro Tip: For perfectly crisp lines, press the edges of the painter’s tape down very firmly with your fingernail or a credit card. This crucial step prevents paint from bleeding underneath. Use a ruler to measure your gaps and tape widths for uniform stripe sizes.
Step 8: Paint Referee Black Stripes
Using black acrylic paint and a flat brush, carefully paint over the exposed white areas between the painter’s tape on the referee jar. Apply thin, even coats until the black is opaque. Let the paint dry for about 15-20 minutes until it’s tacky but not fully dry before removing the tape.
💡 Pro Tip: Remove painter’s tape while the paint is still slightly damp (but not wet or sticky) to prevent it from pulling up dried paint or leaving jagged edges. Pull the tape off slowly at a 45-degree angle, peeling it away from the freshly painted line.
Step 9: Add Referee Buttons
Once the black stripes are completely dry and the tape has been removed, use a fine-tip brush and black acrylic paint to carefully paint three small, evenly spaced black circles down the center of one of the white stripes on the referee jar, mimicking buttons.

💡 Pro Tip: Practice painting small circles on a piece of scrap paper first to get a feel for the brush and paint consistency. A steady hand is key here. You can lightly mark the button positions with a pencil before painting to ensure even spacing and alignment.
Step 10: Paint Football Laces
On the brown-painted football jar, use a fine-tip brush and white acrylic paint to paint two short, vertical parallel lines in the center of the jar. Then, paint four to five shorter horizontal lines crossing between them, evenly spaced, to create the distinct look of football laces.
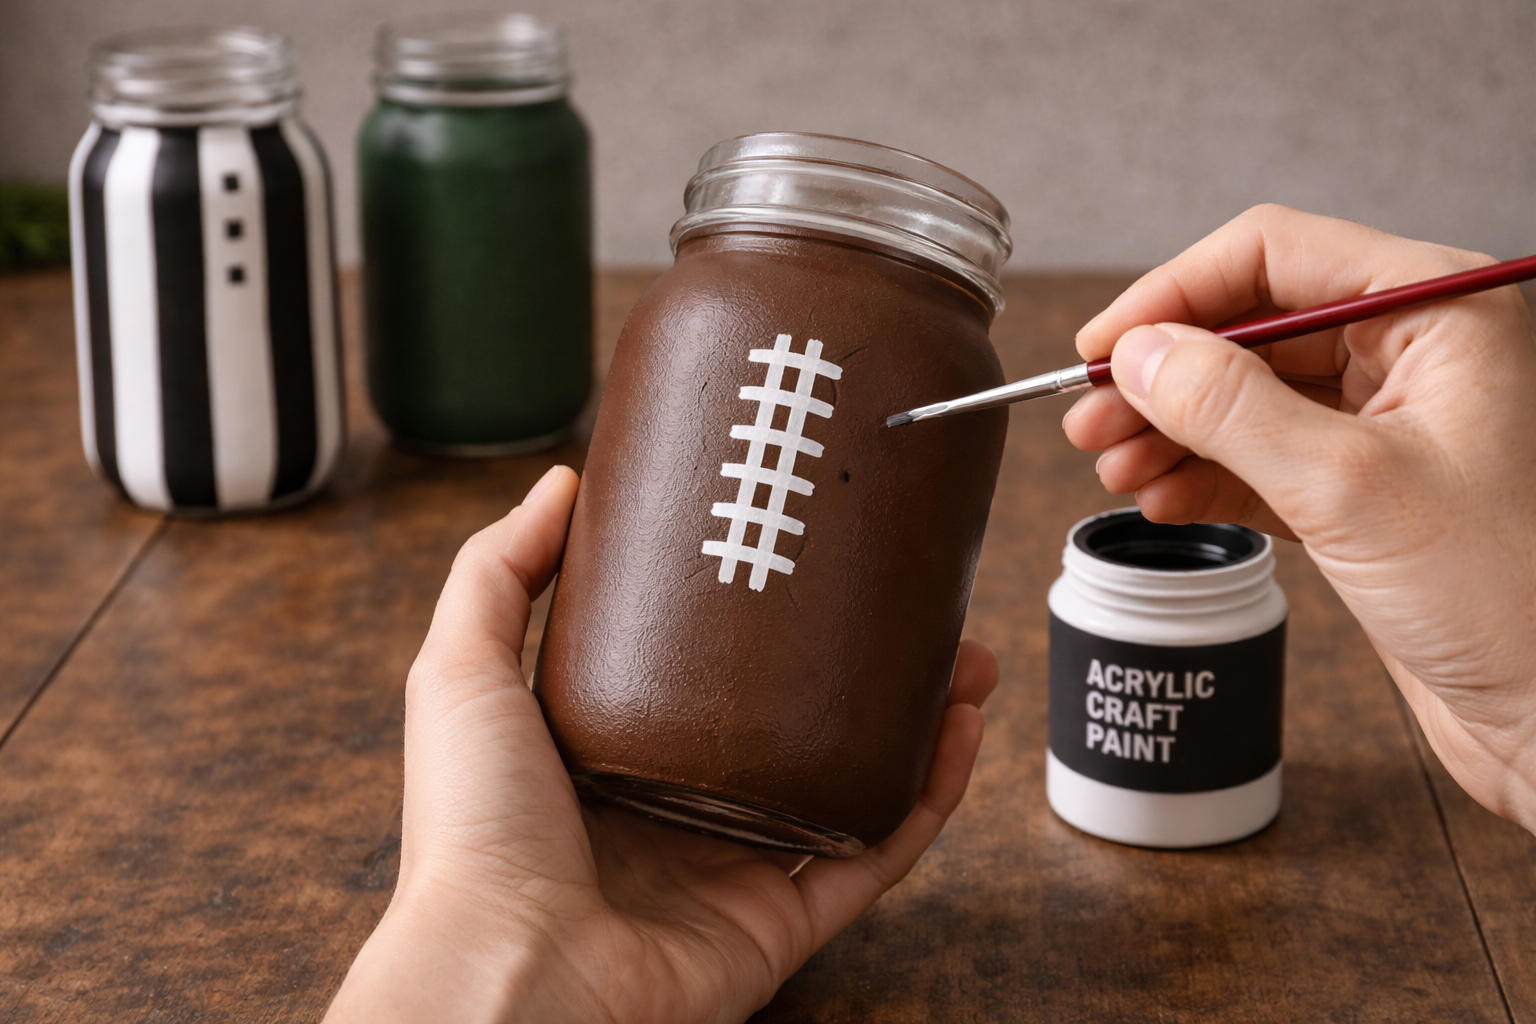
💡 Pro Tip: For perfectly straight lines, you can use a ruler and a pencil to lightly mark out your lines before painting with white. Ensure the lines are crisp and clear for a realistic football look; a second thin coat of white may be needed for full opacity.
Step 11: Mask Football Field Stripes
On the green-painted football field jar, use painter’s tape to mask off horizontal white stripes. Place two pieces of tape to create a narrow gap for each white stripe, repeating this pattern around the jar. Ensure these stripes are evenly spaced and parallel.
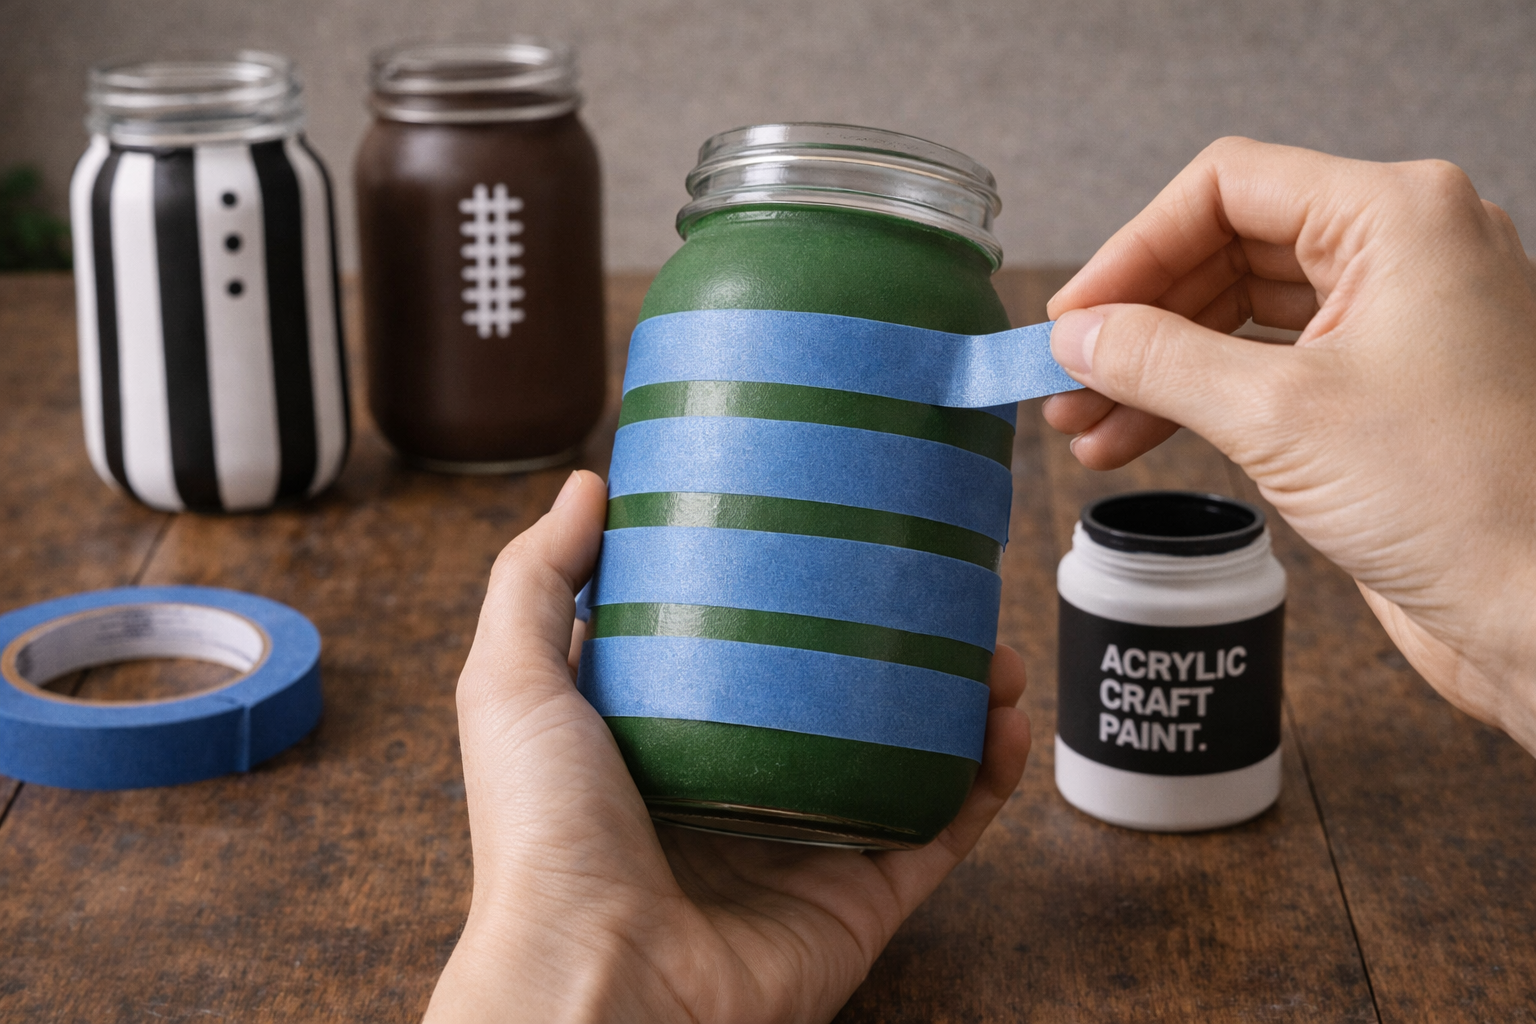
💡 Pro Tip: Consider the ‘Ball Mason’ logo embossed on the jar. You can either incorporate it into a stripe (painting over it) or carefully place your tape above and below it to preserve the raised text. Using different widths of tape can help create varied stripe thicknesses if desired.
Step 12: Paint Football Field Stripes
Using white acrylic paint and a flat brush, carefully paint over the exposed green areas between the painter’s tape on the football field jar. Apply thin, even coats until the white is opaque. Let the paint dry for about 15-20 minutes, then remove the tape slowly.
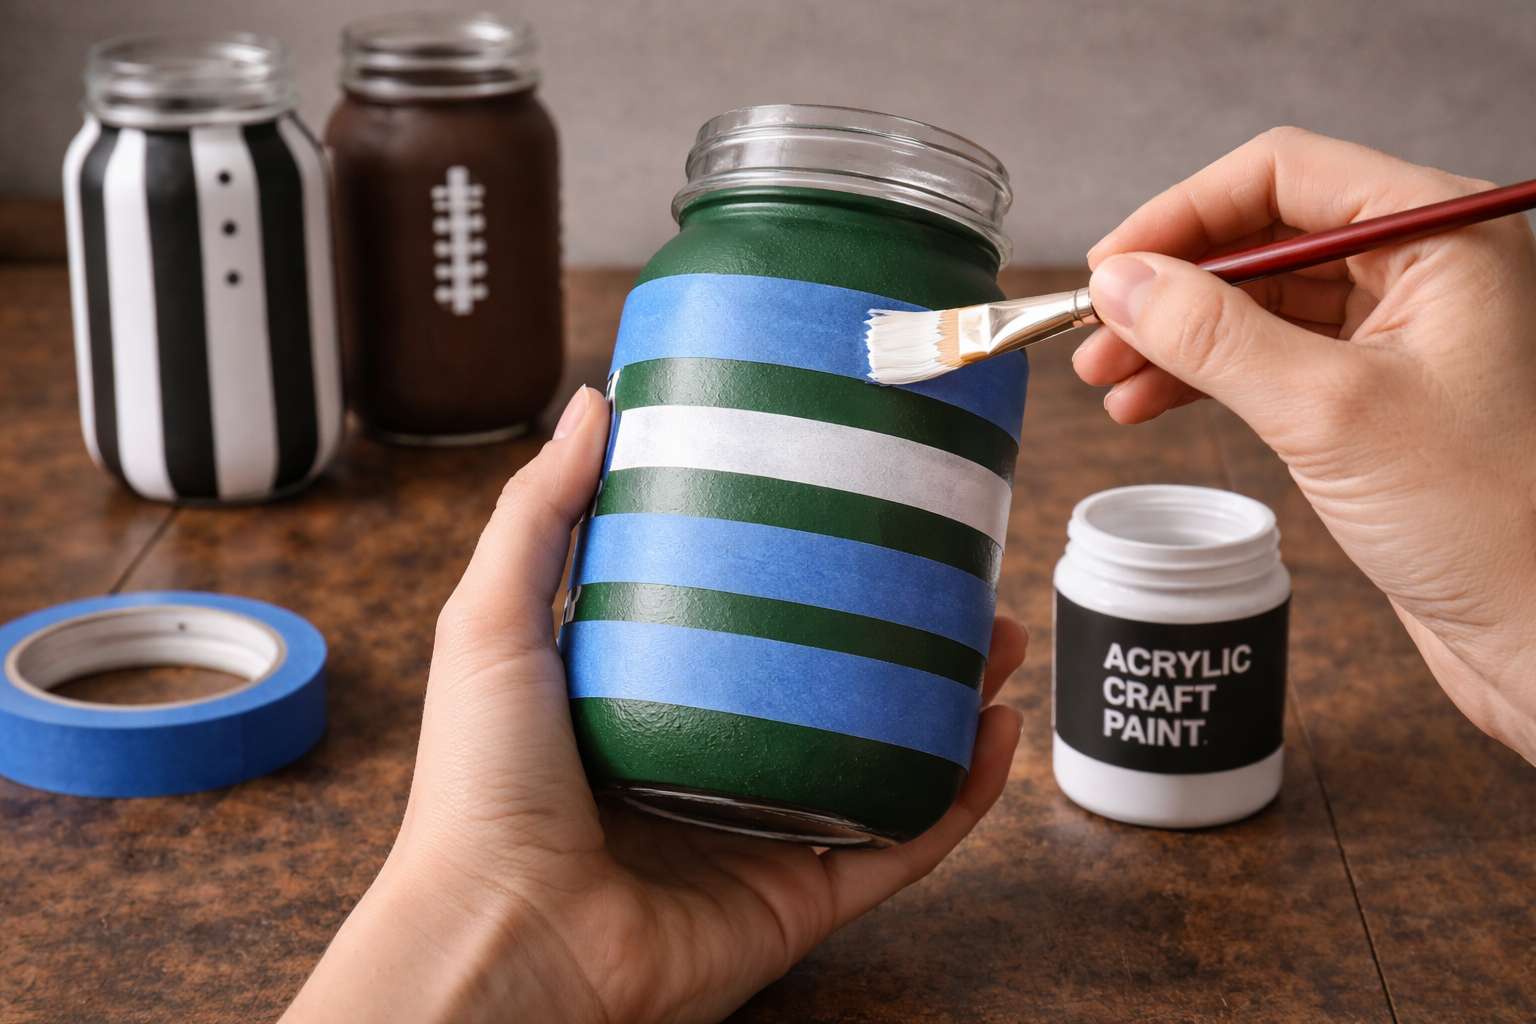
💡 Pro Tip: Just like with the referee stripes, removing the tape when the paint is still slightly damp prevents paint from peeling or creating harsh edges. If any white paint bleeds underneath, use a fine-tip brush with green paint to touch up the edges once dry.
Step 13: Add Football Field Yard Markers
Once the white stripes are completely dry and the tape is removed, use a fine-tip brush and white acrylic paint to add small vertical hash marks (yard lines) along the sides of the green sections, between the white stripes. Add a few small numbers (like ‘0’ or ’10’) near some of the hash marks.
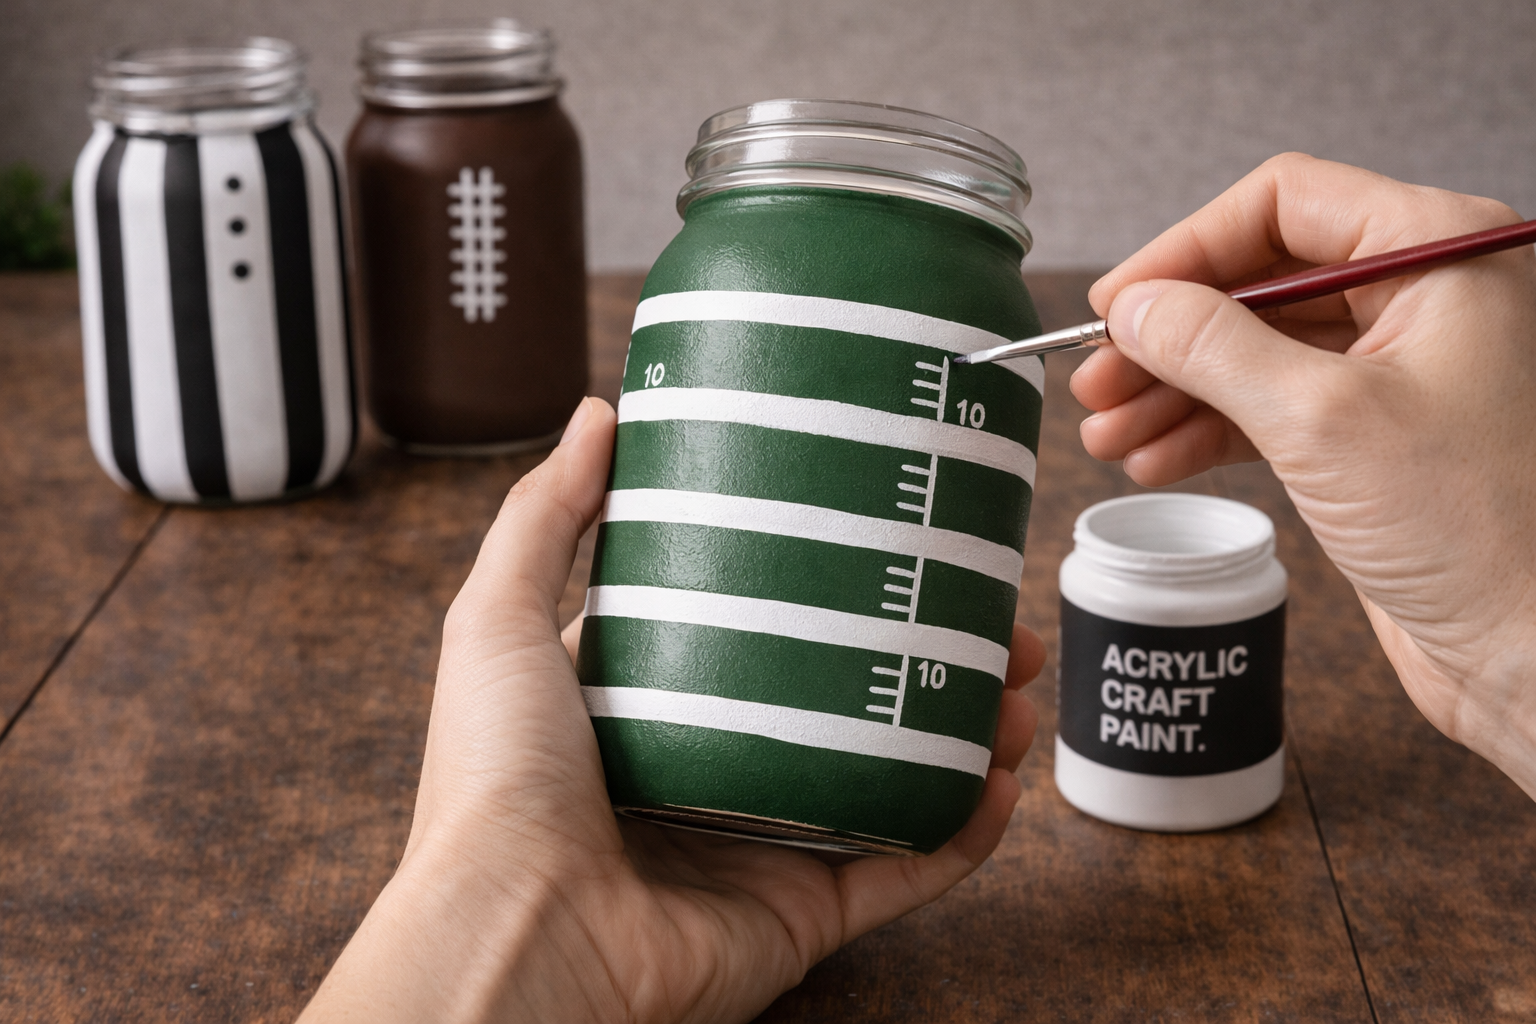
💡 Pro Tip: Keep the hash marks small and uniform for a realistic look. You can use a pencil to lightly sketch their positions and length before painting to ensure consistency in size and spacing across the jar.
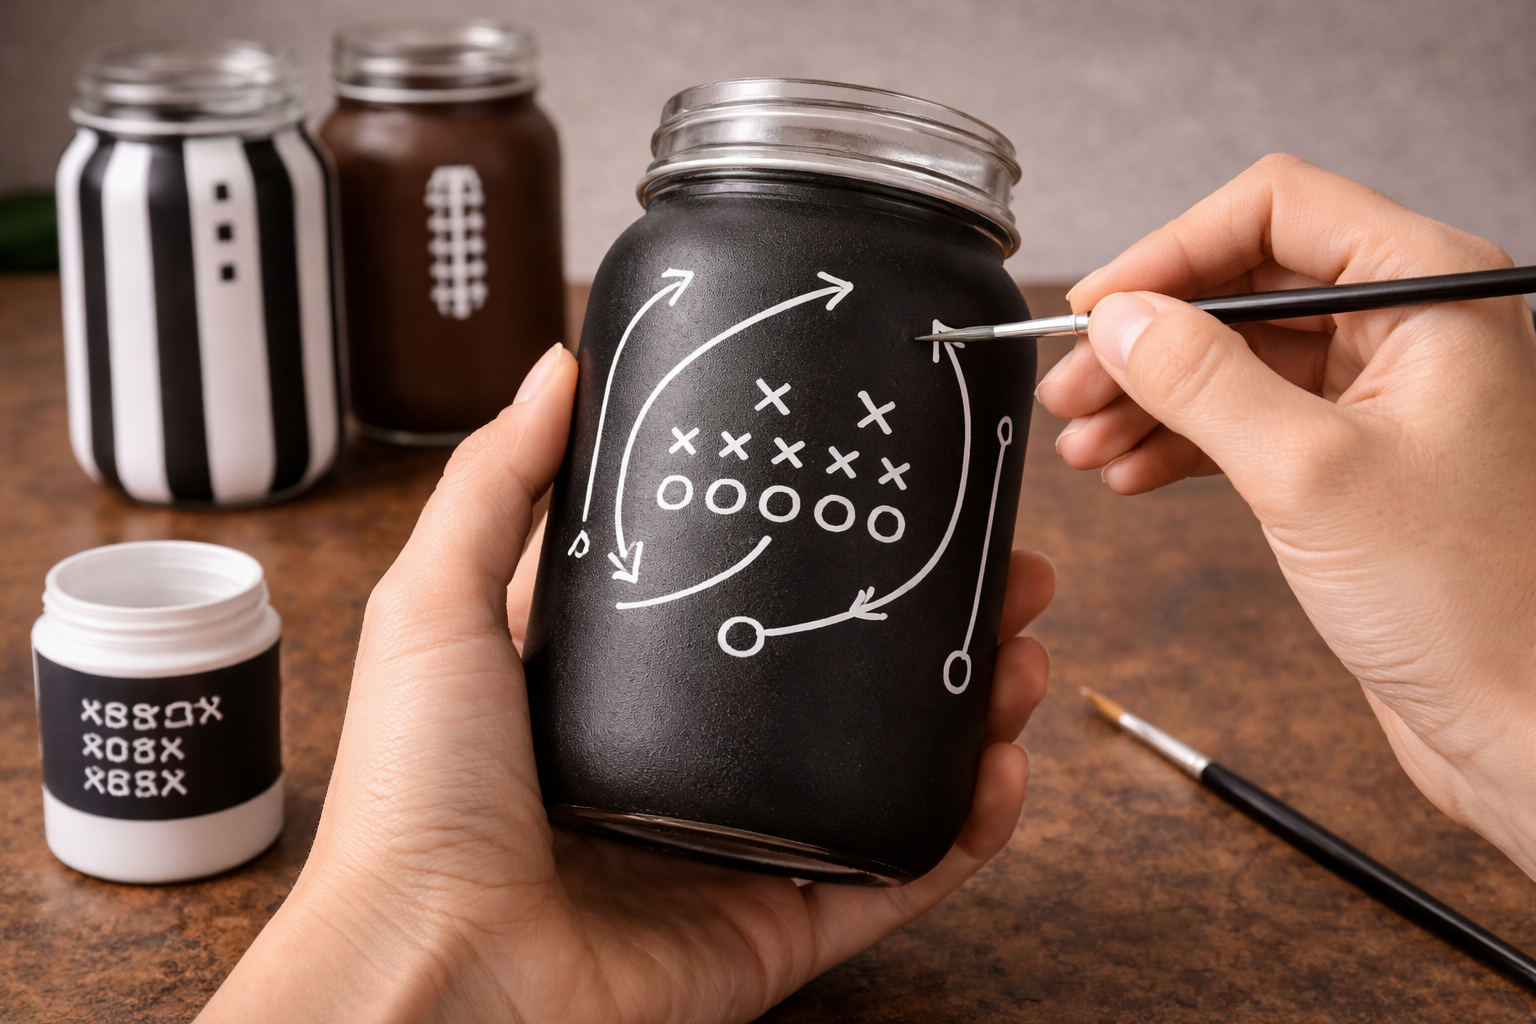
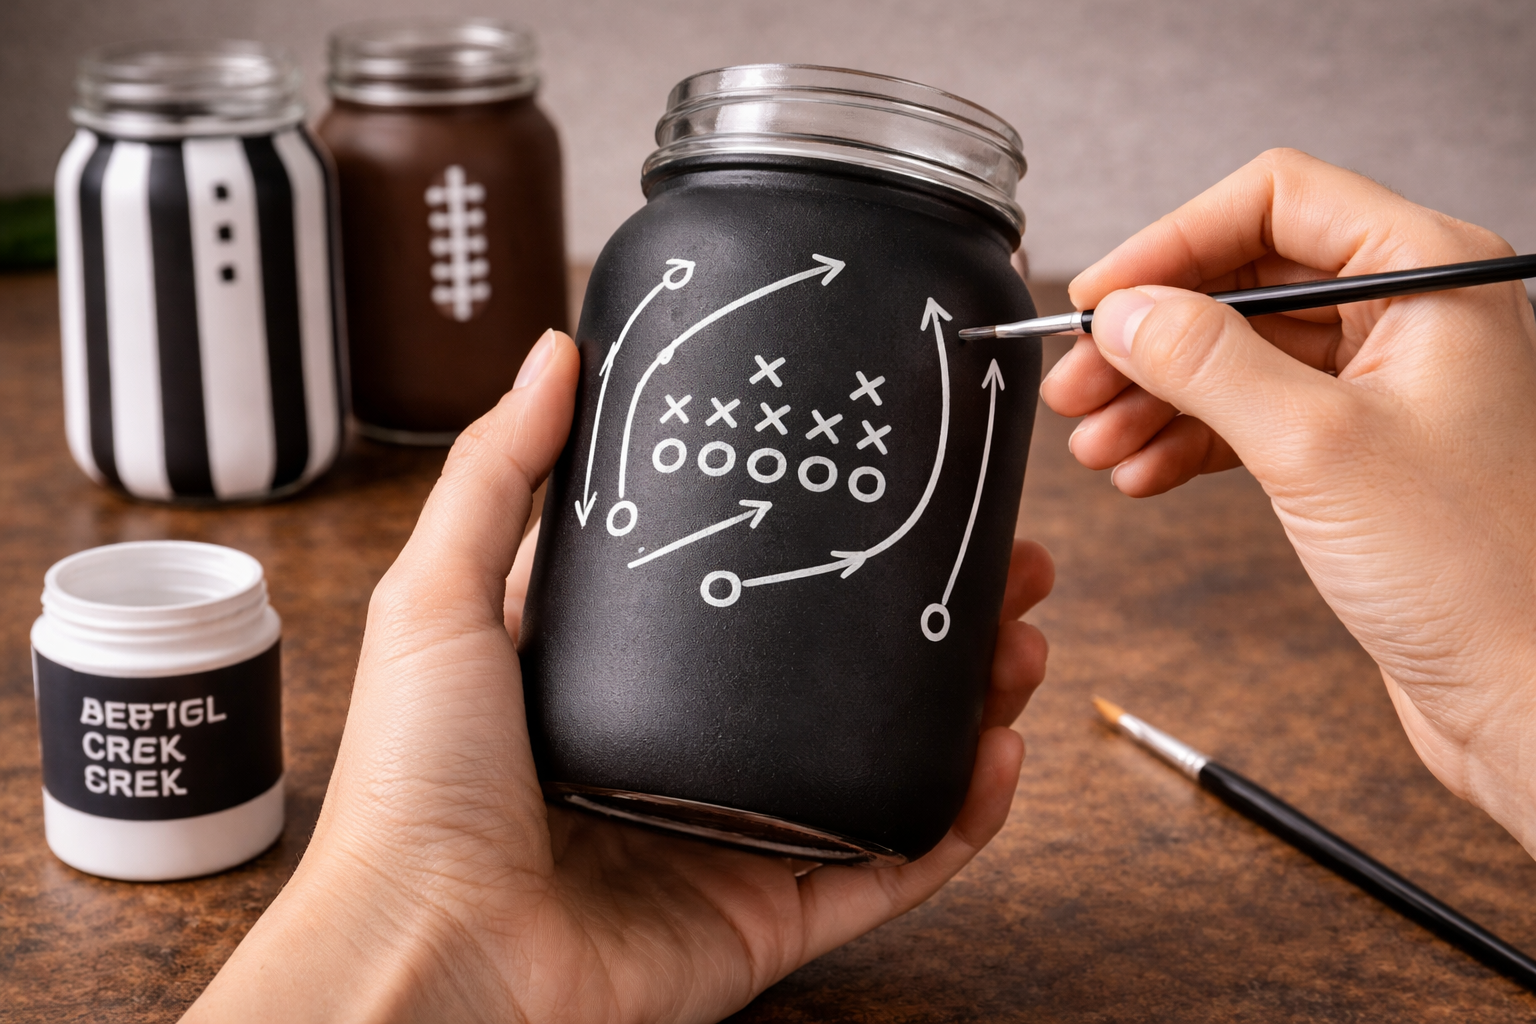
Step 14: Draw Playbook Lines
On the black-painted playbook jar, use a pencil to lightly sketch out a few curved and straight lines representing player movement or routes. Then, use a fine-tip brush and white acrylic paint to carefully trace over these pencil lines.
💡 Pro Tip: Keep the playbook design relatively simple and clear; it’s a visual representation, not an actual complex strategy. You can look up simple football playbook diagrams online for inspiration if you need ideas for lines and routes. Allow the lines to dry before adding Xs and Os.
Step 15: Add Playbook Xs and Os
Once the white lines on the playbook jar are dry, use the fine-tip brush and white acrylic paint to add small ‘X’s and ‘O’s strategically along the painted lines and at the ends of routes, representing players on the field.
💡 Pro Tip: Vary the size and placement of your Xs and Os to make the playbook look dynamic and interesting. You can also add small dots or arrows to indicate ball movement or direction if you wish to add more detail to your play.
Step 16: Attach Twine to Jars
Cut a length of jute twine for each jar, approximately 18-24 inches. Wrap the twine several times around the neck of each finished mason jar, just below the screw top rim. Tie a simple bow at the front of each jar.
💡 Pro Tip: The amount of twine you need depends on how many times you want to wrap it for thickness. A good rule of thumb is to wrap it 2-3 times before tying the bow. Trim any excess twine neatly for a clean finish.
Step 17: Attach Referee Whistle
For the referee jar, take the small metal whistle and thread a short piece of jute twine through its loop. Then, tie this piece of twine securely to the existing twine bow on the jar’s neck, allowing the whistle to hang decoratively at the front of the jar.
💡 Pro Tip: Ensure the knot holding the whistle is secure so it doesn’t fall off during display or handling. You can add a tiny dab of clear craft glue to the knot to reinforce it, but allow it to dry completely and discreetly before moving the jar.
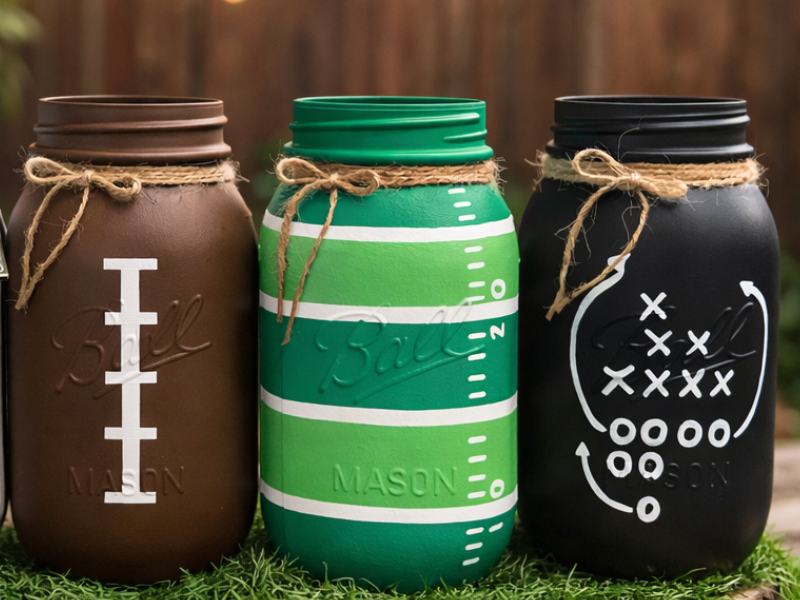
Touchdown! Your DIY Football Jars!
Aren’t these DIY Football Game Day Mason Jar Decor pieces just the cutest? They look amazing on our snack bar, holding little flags and even some candy. You can totally make these your own, maybe add your team colors, and don’t forget to share a pic with me!
📱 Free to Download
Craftino, The #1 Craft App
✓ Save crafts & browse fully offline
✓ Download printable PDF guides for every project
✓ Step-by-step photo tutorials, nothing left out
✓ 1,000+ craft projects with new ones added every week
Frequently Asked Questions
What kind of materials do I need for this Home Decor craft?
All you really need are some mason jars, craft paint in white and brown, a paint brush, and a little twine or ribbon to finish them off.
Is this DIY Football Game Day Mason Jar Decor project good for beginners?
Absolutely! This is one of the easiest General / Everyday crafts you can do, perfect for anyone just starting out or who wants a quick, fun project.
Can I make variations of these football mason jars?
For sure! Try painting them in your favorite team’s colors, adding glitter, or filling them with different game day treats or floral picks.
Read more official craft tips & tricks on the Dollar Tree Value Seekers Blog.
Inspiration / Credit: meredith haskew
Leave a Reply