Okay, so who else walks into Dollar Tree just for one thing and leaves with a cart full of goodies you didn’t know you needed? Guilty! That’s how I stumbled onto the idea for this absolutely adorable Enchanted Forest Crystal Cloche: A Dollar Tree DIY. My oldest daughter saw some fancy ones online, and I just knew we could make something similar for way less.
See also: Sparkling Dollar Tree Crystal Tree Of Life Suncatcher
Theme: Jar Crafts
Materials Needed
- Large Glass Cloche/Jar & Base (plaque/charger, optional riser)
- Assorted Mosses & Faux Greenery
- Clear Acrylic Crystal Gems
- Warm White Battery-Operated Fairy Lights
- Mini Mushroom Picks & Small Natural Accents (e.g., pinecones)
- Crafting Essentials (Hot glue gun & sticks, scissors, optional black acrylic paint)
📋 Love staying organized while crafting? Check out our printable planners & craft designs at CraftersDT on Etsy and use code CRAFT20 for 20% off your entire order!
Why This Craft Works
This little cloche is seriously versatile Home Decor. I love putting mine on a bedside table to catch the morning light, or sometimes it sits on a bookshelf in the living room for a touch of sparkle. It’s perfect for adding that sweet, whimsical vibe to a kid’s room or even as a centerpiece on a small coffee table. It’s truly one of those Jar Crafts that just fits anywhere.
📱 Free to Download
Join 50,000+ crafters already using Craftino
Browse 82+ Jar Crafts ideas and thousands more in the app
✓ Save crafts & browse fully offline
✓ Download printable PDF guides for every project
✓ Step-by-step photo tutorials, nothing left out
✓ 1,000+ craft projects with new ones added every week

The best part? This whole project cost me under $5! Yep, you heard that right. We’re talking just a few items from Dollar Tree, like a glass jar, some sparkly filler, and maybe a cute little figurine. Each item is just $1.25, so you can pick up about three to four things and have plenty left over to make more.
This is an super easy craft, I’d say perfect for beginners and even older kids who want to get creative. It comes together in about 15-20 minutes, maybe 30 if you’re really taking your time and enjoying the process. It’s great for a quick afternoon project or if you need a last-minute gift that looks way more expensive than it actually is.
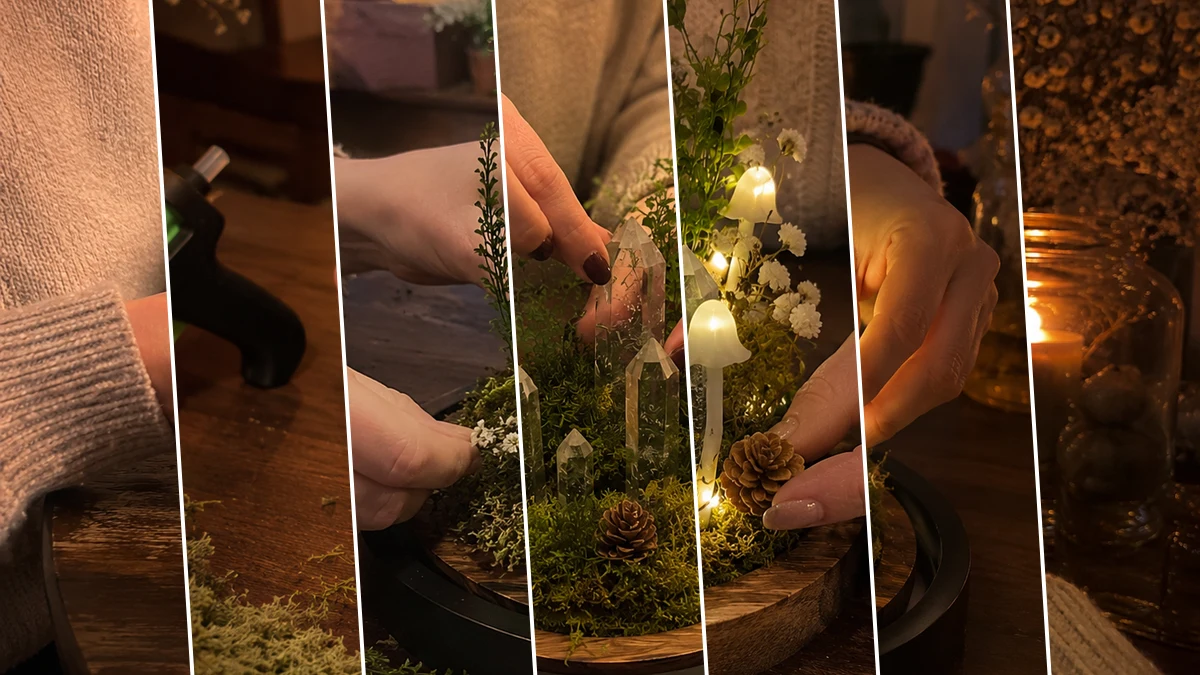
Step-by-Step Instructions for Enchanted Forest Crystal Cloche: A Dollar Tree DIY
Alright, my fellow crafters, are you ready to get your hands sparkly? You’re going to love how fast and fun this Jar Craft is. Seriously, I made mine during a commercial break, and it turned out so cute! Grab your Dollar Tree goodies, and let’s get this Enchanted Forest Crystal Cloche: A Dollar Tree DIY project started. You’ll be amazed at what you can create in just a few minutes!
Step 1: Prepare the Pedestal Base
Select your round plaque, charger, or plate to be the foundation. For added height and a more substantial look, hot glue a small candle holder, wood round, or riser piece underneath the center of your chosen base. If you desire a moodier, more upscale finish, paint the entire base or just its edges with black acrylic paint, allowing it to dry completely.
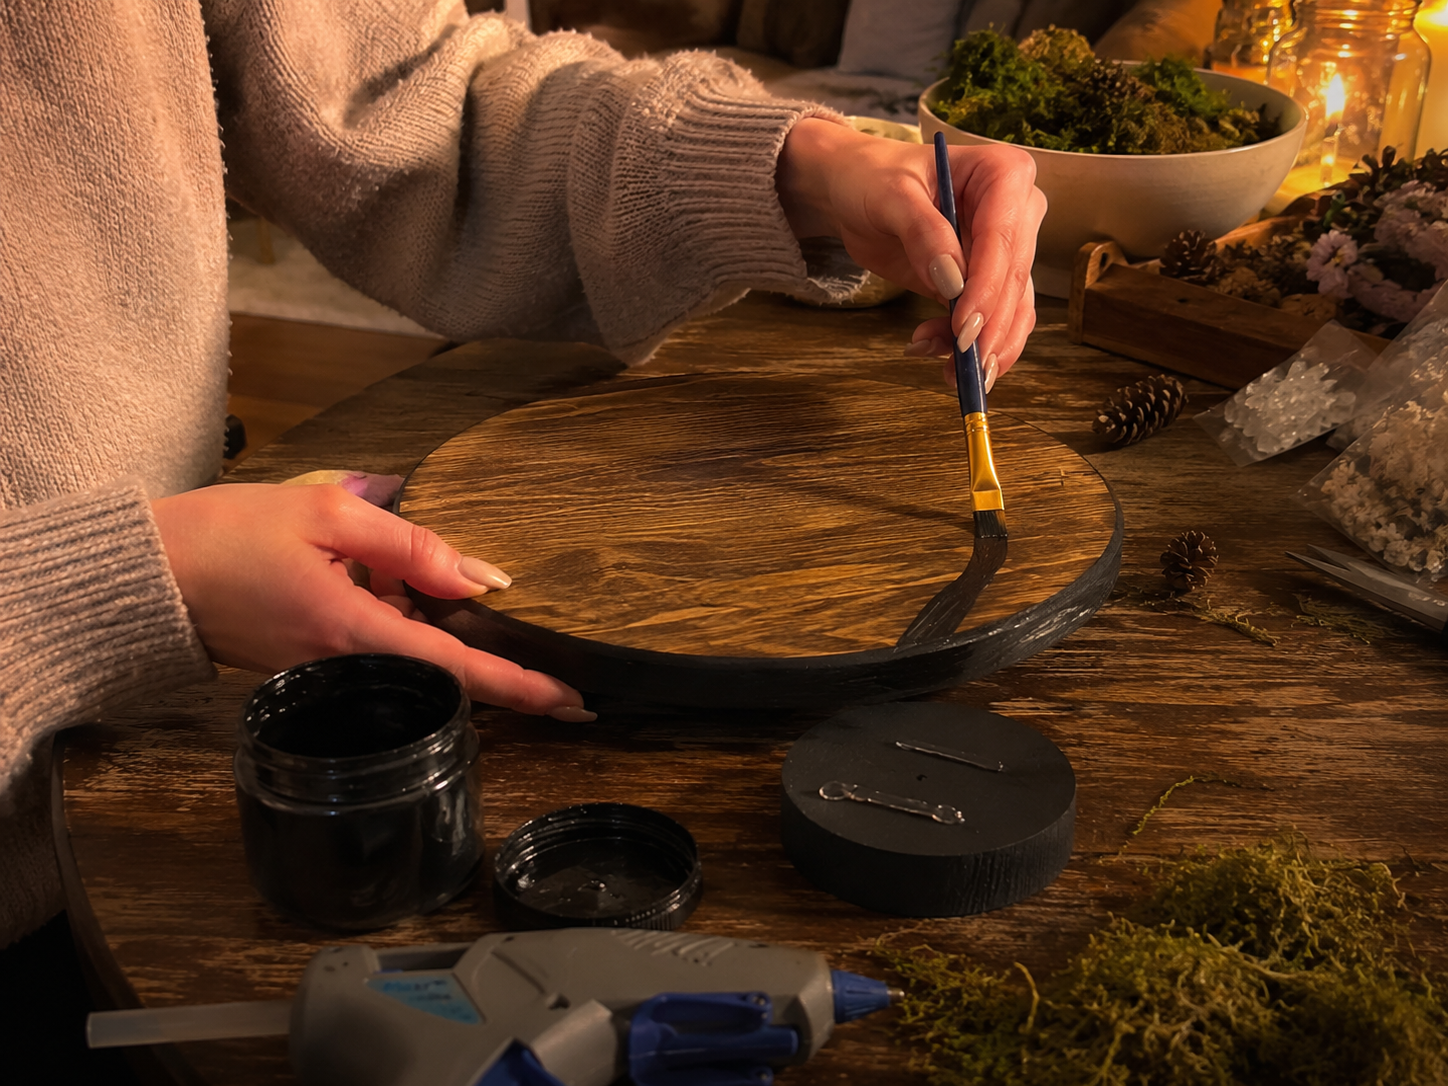
💡 Pro Tip: Using a matte black or dark charcoal paint for the base can instantly elevate the perceived value of your Dollar Tree materials. Ensure the paint is fully dry before moving on to prevent smudging and ensure moss adheres properly.
Step 2: Lay the Moss Foundation
Begin building your miniature forest floor by applying hot glue to the base and firmly pressing down layers of preserved moss and/or bagged floral moss. Vary the textures and colors of moss to create a more natural, organic look. Ensure good coverage, leaving no bare spots on the visible parts of the base.
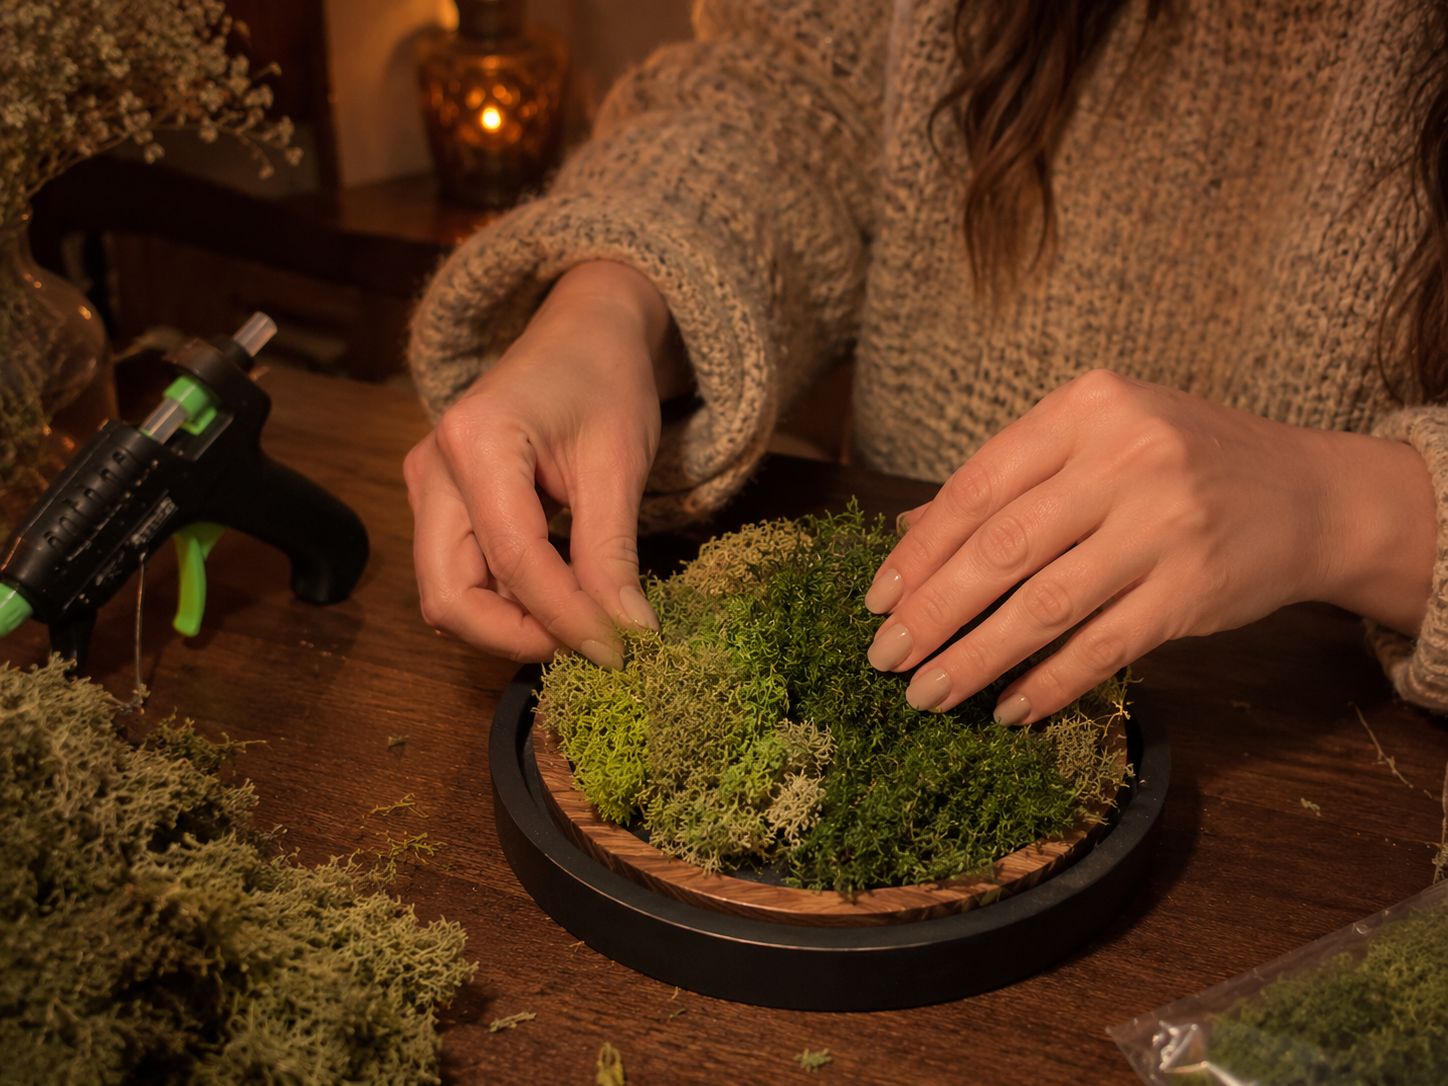
💡 Pro Tip: Create slight variations in height with the moss by layering more in some areas. This adds depth and makes the scene more realistic. Start with a thin layer of a darker, flatter moss, then add clumps of brighter, fluffier moss on top.
🗓️ Keep all your craft projects on track! Explore our printable planners & templates at CraftersDT on Etsy and use code CRAFT20 for 20% off!
Step 3: Introduce Woodland Greenery & Flowers
Carefully tuck and hot glue small faux greenery picks into the moss, distributing them to create a natural, growing effect. Position taller pieces towards the back and center to give a sense of depth. Next, add delicate white filler flowers, like baby’s breath, by gluing small clusters among the greenery and moss to simulate tiny woodland blooms.
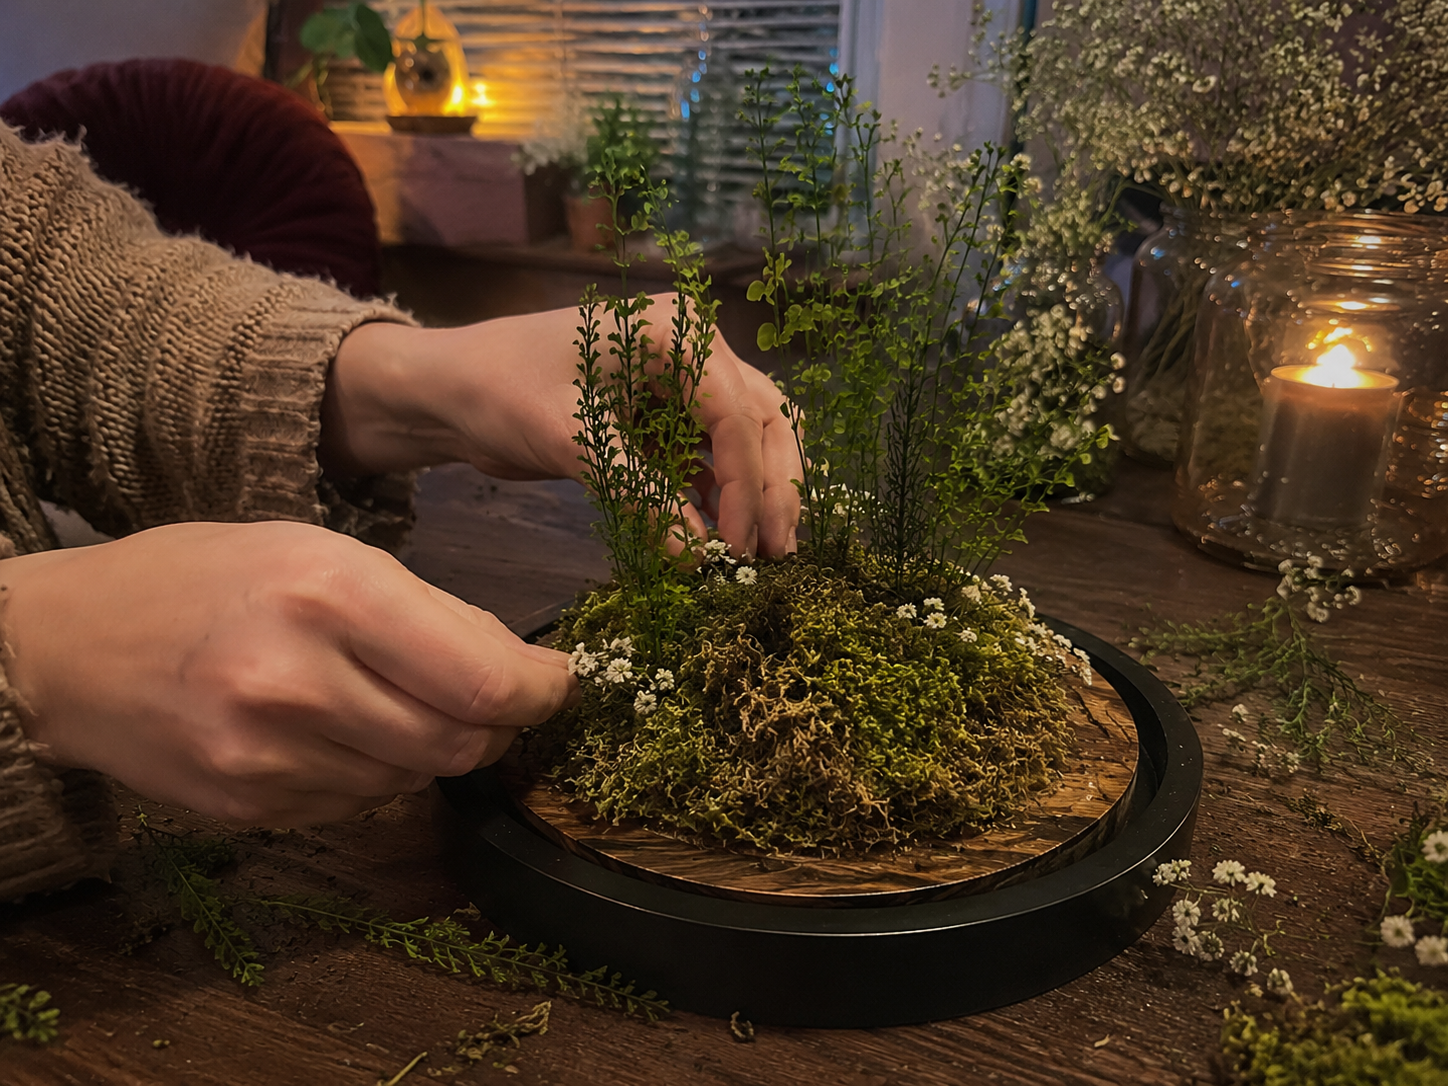
💡 Pro Tip: Before gluing, arrange your greenery and flowers loosely to plan your composition. This allows you to visualize the placement and balance. Use minimal hot glue on the stems to avoid making them look unnatural or clumped.
Step 4: Create the Glowing Crystal Cluster
Select your clear acrylic crystal gems and begin arranging them in the center of the scene. Vary their heights and angles, gluing them securely to the mossy base. Aim for an organic cluster formation rather than a uniform row, making them appear like natural crystals erupting from the forest floor. The goal is to create a focal point that will glow beautifully with the lights.
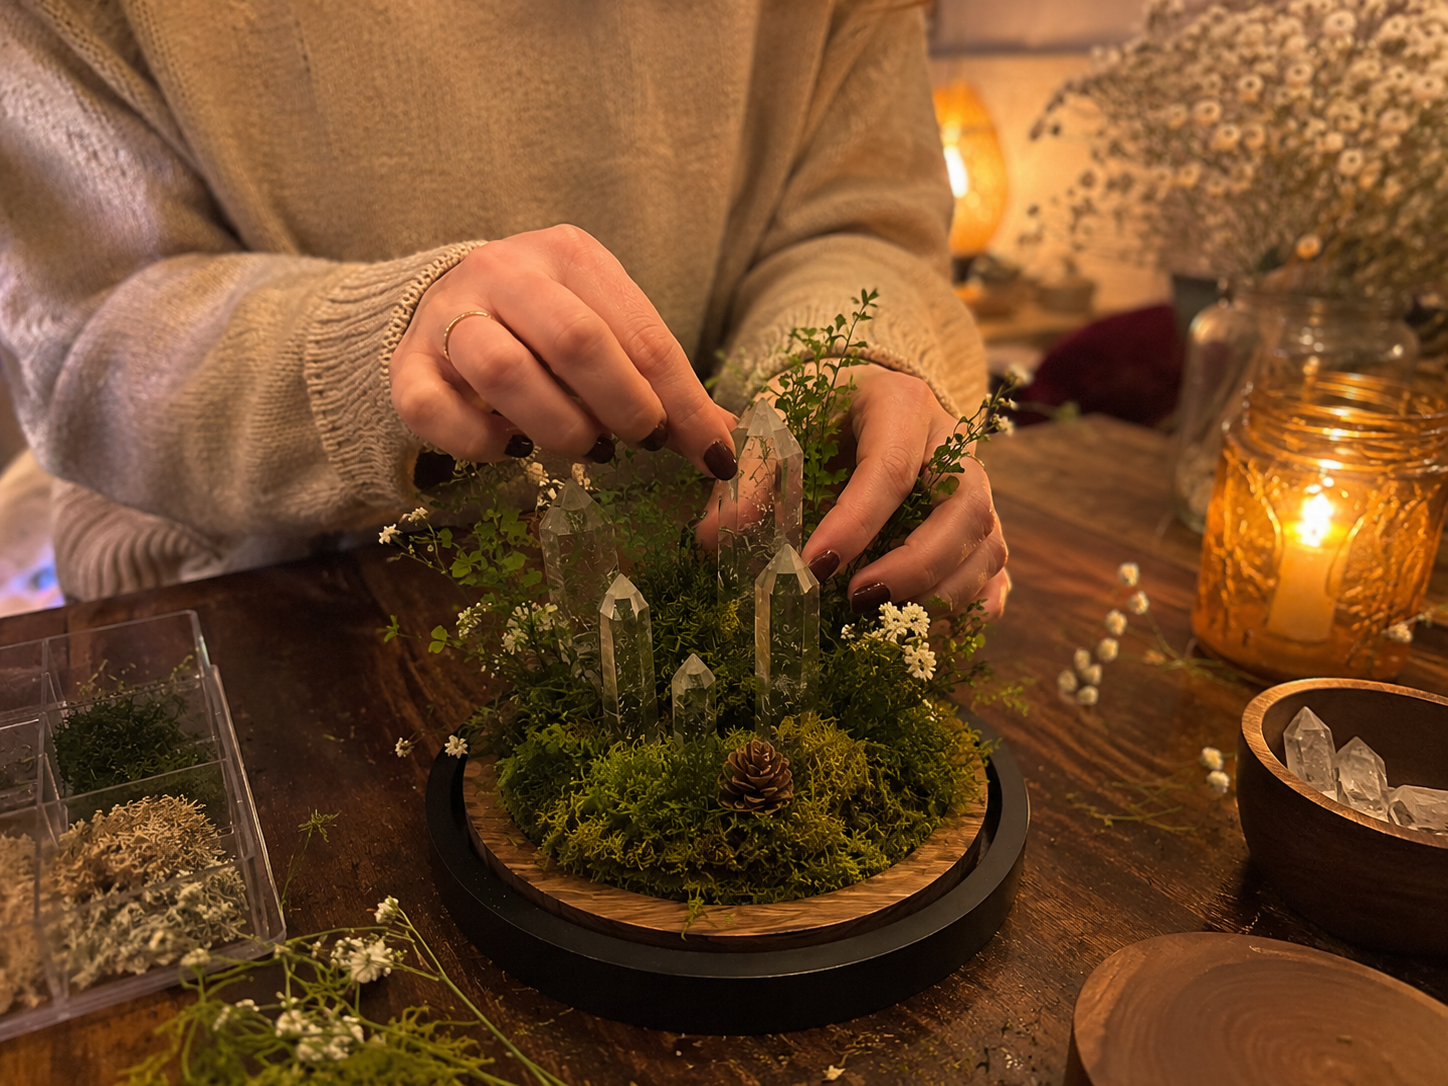
💡 Pro Tip: Use a dab of hot glue at the base of each crystal, holding it in place until the glue cools. For crystals with uneven bottoms, you might need a slightly larger glob of glue for stability. Practice dry-fitting them first to find the best arrangement.
Step 5: Nestle Mushrooms & Natural Accents
Place your mini mushroom picks or embellishments around the crystal cluster and among the moss. Hot glue them securely, ensuring they look like they’re growing naturally from the forest floor. Add a few tiny pinecones or other small natural accents (like small twigs or pebbles) to enhance the woodland authenticity.
💡 Pro Tip: Position mushrooms in small groups or varying heights to make them appear more organic. Consider the “line of sight” from different angles to ensure your arrangements look good from all sides once the cloche is in place.
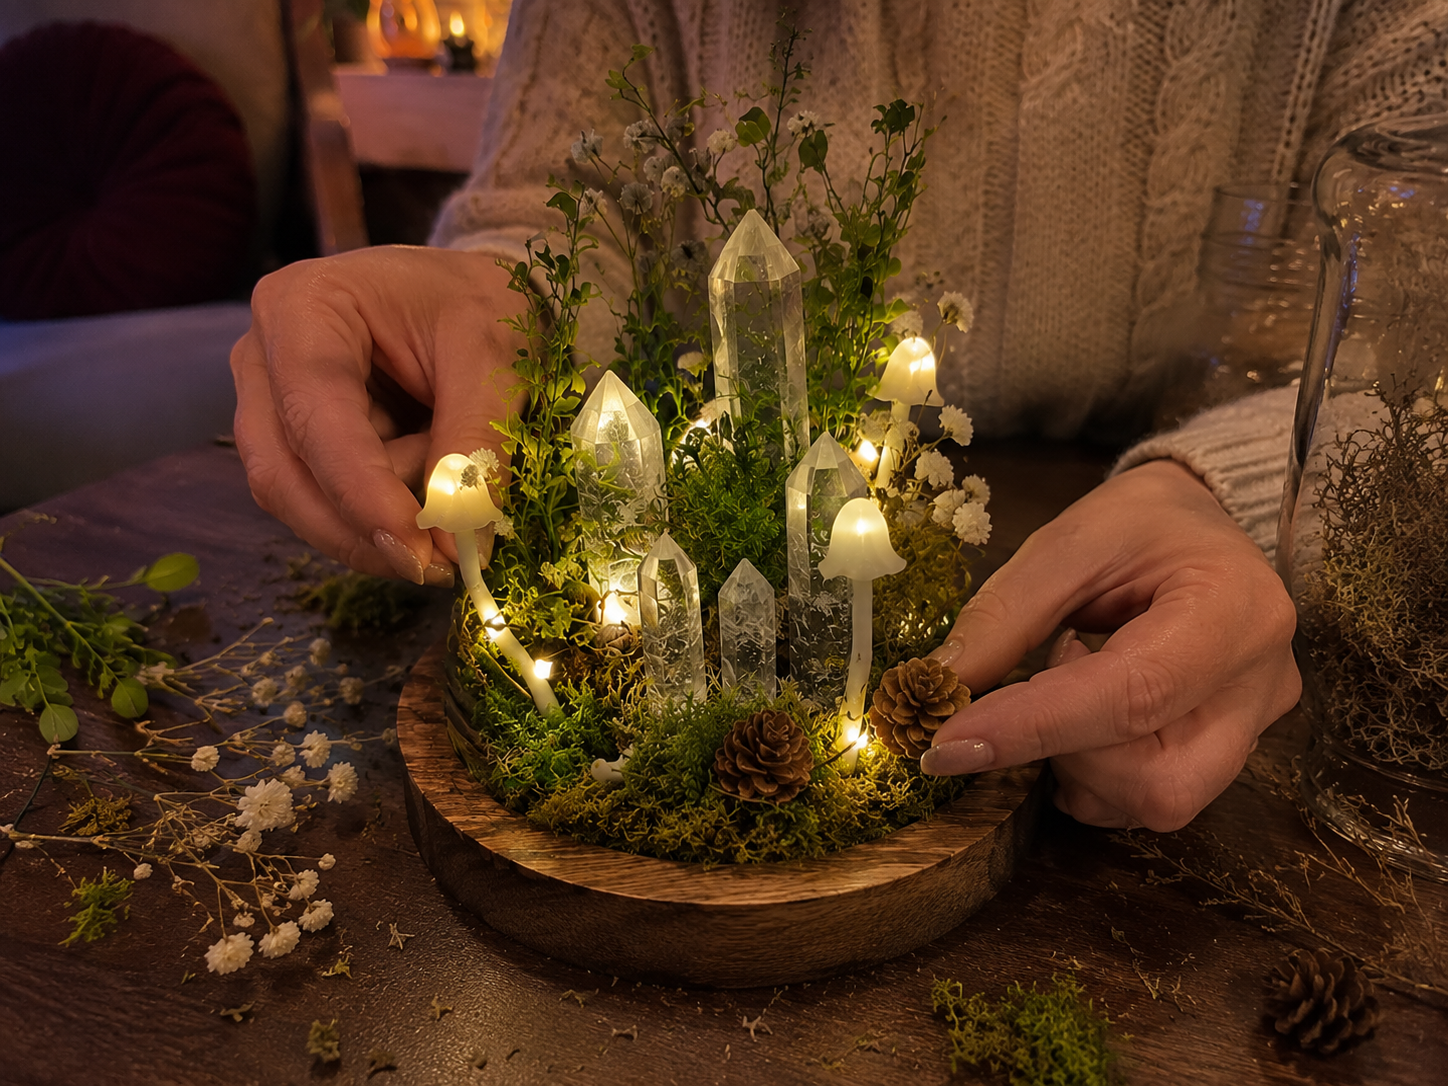
Step 6: Weave in the Fairy Lights
Carefully weave the warm white battery-operated fairy lights throughout the entire miniature landscape. Start by hiding the battery pack at the back of the arrangement, tucked behind a taller piece of greenery or under the base if possible. Distribute the lights evenly, ensuring some bulbs are nestled among the moss, others behind the crystal cluster to make them glow, and a few around the mushrooms.
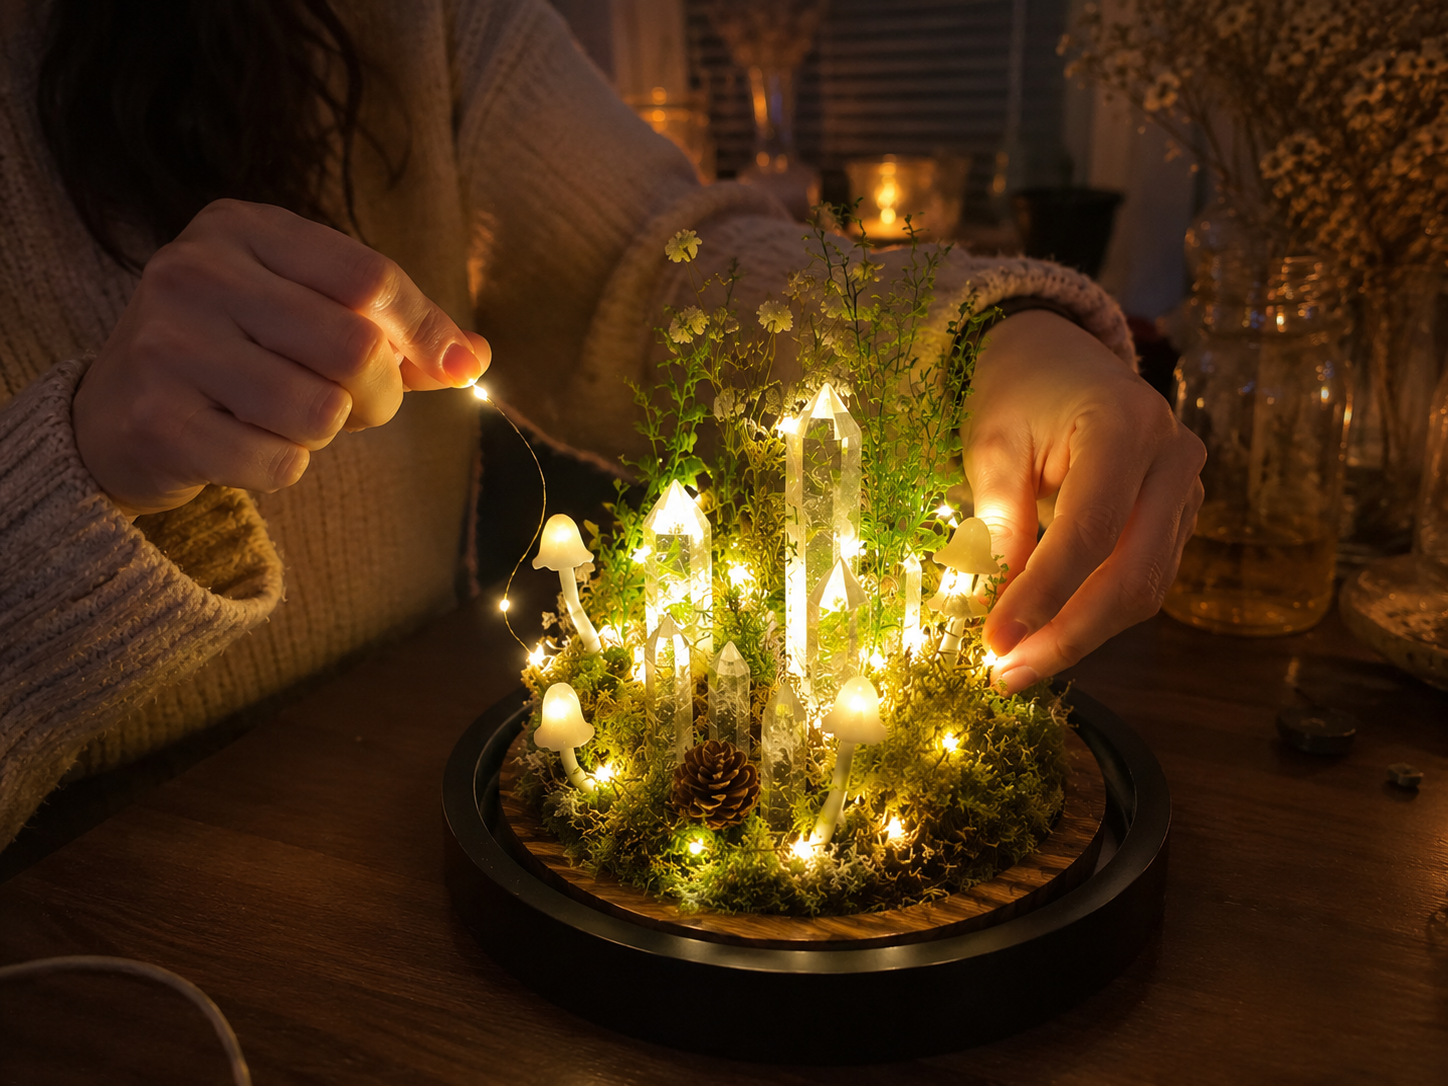
💡 Pro Tip: Turn on the fairy lights periodically as you weave them to check for even distribution and ensure all areas of your scene are illuminated. Secure the battery pack with a dab of hot glue or a piece of tape to keep it hidden and stable.
📱 Free to Download
Join 50,000+ crafters already using Craftino
Browse 39+ Jar Crafts ideas and thousands more in the app
✓ Save crafts & browse fully offline
✓ Download printable PDF guides for every project
✓ Step-by-step photo tutorials, nothing left out
✓ 1,000+ craft projects with new ones added every week
Step 7: Enclose with the Glass Cloche
Once all elements are in place and the lights are arranged, carefully place the large glass jar upside down over the entire mini landscape. Ensure that no elements are pressing against the glass, which could damage them or prevent the cloche from sitting flush on the base. Adjust any last-minute details before sealing the scene.
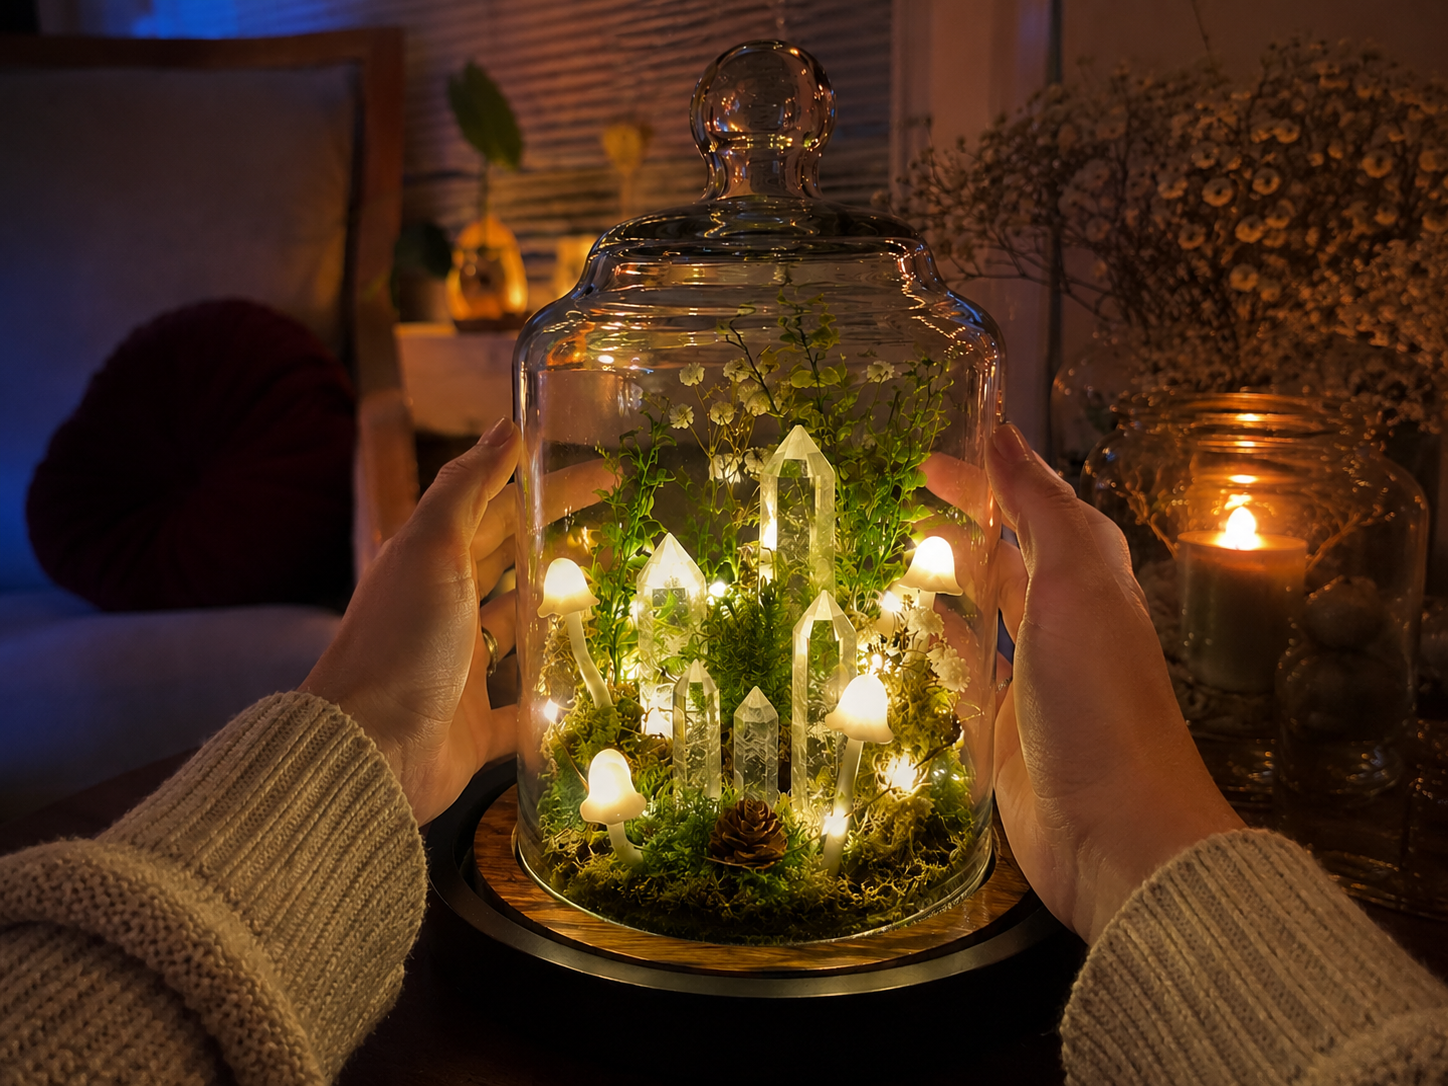
💡 Pro Tip: Before placing the cloche, give the base a gentle shake to ensure all elements are securely glued. If anything feels loose, re-glue it. Carefully lower the cloche straight down to avoid disturbing the arrangement.
Your Enchanted Forest Crystal Cloche Sparkles!
And there you have it, your very own magical Enchanted Forest Crystal Cloche! Isn’t it just the cutest little piece of Home Decor? Pop it on your mantel, a bookshelf, or even gift it to a friend who needs a little sparkle in their life. Don’t forget to tag me if you try this out, I’d love to see your unique versions!
📱 Free to Download
Join 50,000+ crafters already using Craftino
Browse 44+ Jar Crafts ideas and thousands more in the app
✓ Save crafts & browse fully offline
✓ Download printable PDF guides for every project
✓ Step-by-step photo tutorials, nothing left out
✓ 1,000+ craft projects with new ones added every week
Frequently Asked Questions
What Dollar Tree supplies do I need for the Enchanted Forest Crystal Cloche?
For this Jar Craft, you’ll need one glass jar with a lid (like a candy jar), one small bag of decorative filler (like clear gems or crushed glass), and one small decorative item (like a tiny fairy, mushroom, or bird figurine). You’ll also need hot glue.
How much does it cost to make this Enchanted Forest Crystal Cloche: A Dollar Tree DIY?
You can make this entire project for about $3.75 to $5.00, depending on if you use 3 or 4 Dollar Tree items at $1.25 each. It’s a super budget-friendly Home Decor piece.
How long does it take to assemble this Dollar Tree Jar Craft?
This is a quick and easy craft! You can typically assemble your Enchanted Forest Crystal Cloche in about 15-20 minutes, not including any drying time for the glue.
What kind of glue works best for this DIY Crystal Cloche?
Hot glue is perfect for this Jar Craft because it dries super fast and holds the small decorative items securely inside the glass jar. A small amount is all you need.
Is the Enchanted Forest Crystal Cloche suitable for gifting?
Absolutely! This makes a charming and thoughtful gift. It’s a unique piece of Home Decor that looks much more expensive than its $5 price tag, perfect for birthdays or just because.
Can I customize my Dollar Tree Enchanted Forest Crystal Cloche?
Yes, totally! Dollar Tree has tons of options. You can swap out the figurines for tiny animals, use different colored gems, or even add a small string of battery-operated fairy lights around the base for an extra magical touch.
Discover the newest Dollar Tree arrivals for your next craft project here.
Leave a Reply