Okay, so my friend Brenda came over last week and saw this super cute little caddy I made for my kitchen counter. She literally gasped! I told her all about my new Charming Farmhouse Caddy: Cutting Board & Crate DIY project, and she couldn’t believe how easy it was to create this Home Decor piece. Seriously, it’s one of my favorite Farmhouse / Rustic additions lately!
Theme: Farmhouse / Rustic
Materials Needed
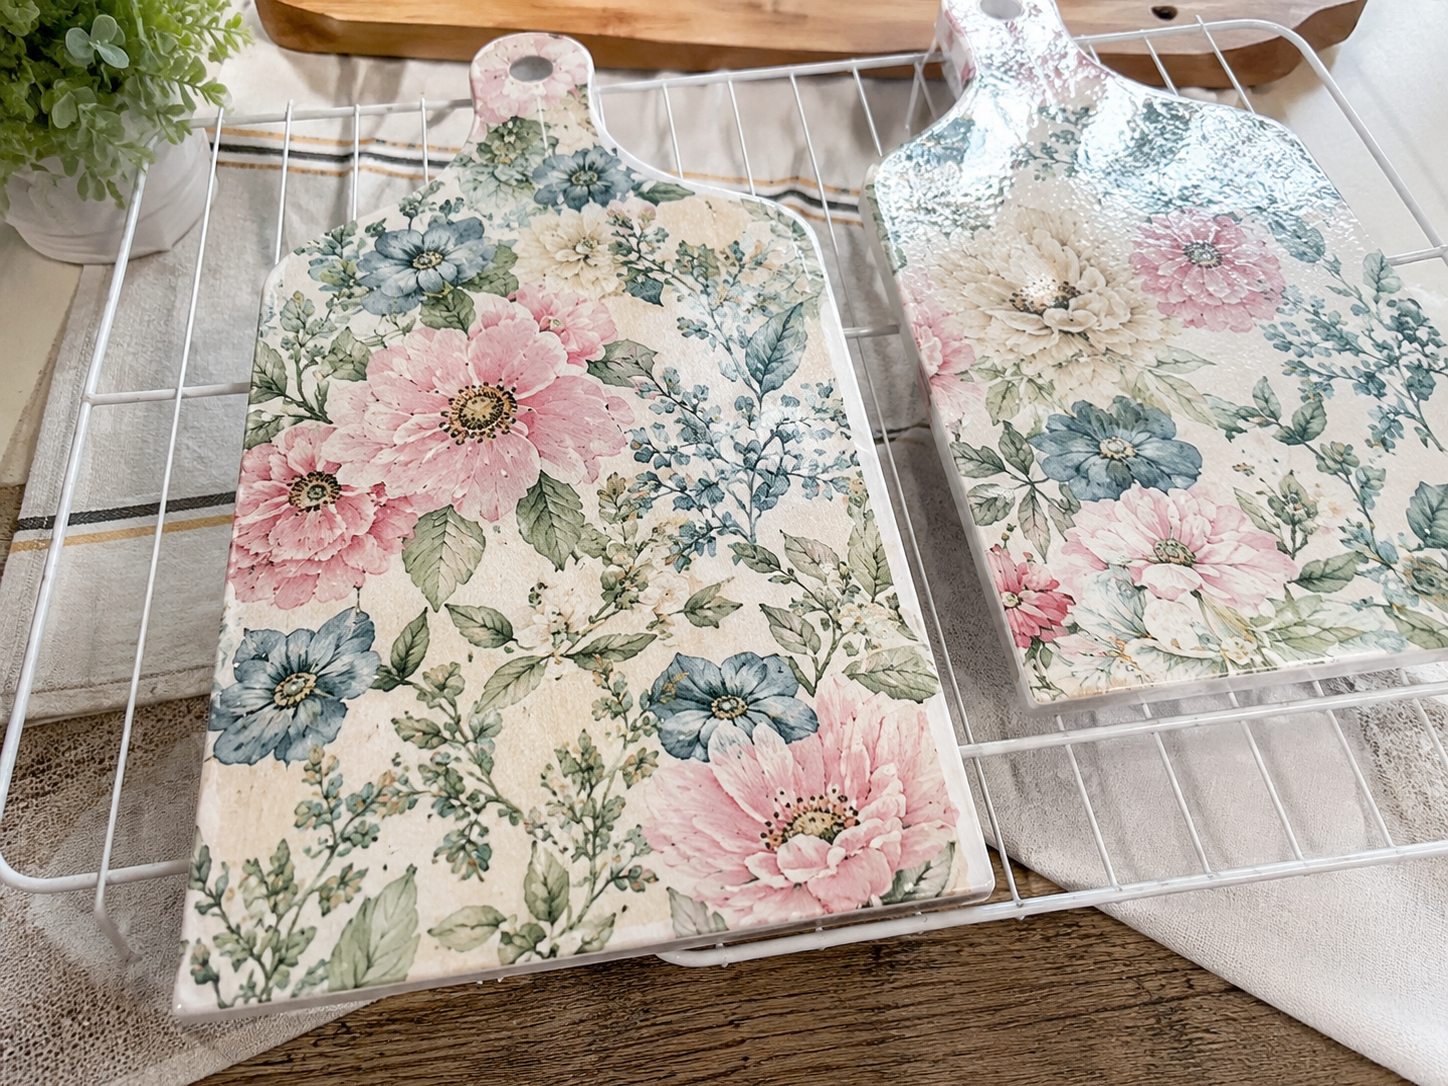
- Cutting Boards & Wooden Crate (2 plastic/wood-look cutting boards with handles, 1 small wooden crate)
- Floral Decoupage Supplies (Floral paper napkins/scrapbook paper, Mod Podge, foam brush)
- Craft Paint & Sandpaper (Chalk paint or acrylic paint in sage green, muted blue, or cream; fine-grit sandpaper)
- Jute Rope (Thick jute rope)
- Adhesives (Strong wood glue or hot glue gun with glue sticks)
- Styling Accents (Small clear mason jar, faux greenery or faux flowers)
Why This Craft Works
This little caddy is just perfect for so many spots in your home. I use mine in my farmhouse kitchen to hold little plants and my dish soap, but it would also be super cute for a Mother’s Day gift filled with goodies, or even on a bathroom counter for toiletries. It adds that perfect touch of Farmhouse / Rustic charm anywhere you put it.
And the best part? It’s totally budget-friendly! Thanks to my favorite store, Dollar Tree, this whole project ran me about $10-13 in supplies. You really can’t beat that for such a charming piece of Home Decor that looks way more expensive than it is.
Don’t let the ‘DIY’ scare you, because this is an Easy peasy craft. From start to finish, the Charming Farmhouse Caddy: Cutting Board & Crate DIY took me about 30-45 minutes to put together. It’s perfect for beginners, last-minute gifters, or anyone looking for a quick, satisfying craft project.
Step-by-Step Instructions for Charming Farmhouse Caddy: Cutting Board & Crate DIY
Alright, crafters, are you ready to get started on your own adorable Farmhouse / Rustic creation? You are going to love how quickly this Charming Farmhouse Caddy: Cutting Board & Crate DIY comes together. It’s truly one of those projects that gives you big results for minimal effort, and it’s perfect for a craft night with friends or even just a relaxing afternoon solo. Let’s make some magic!
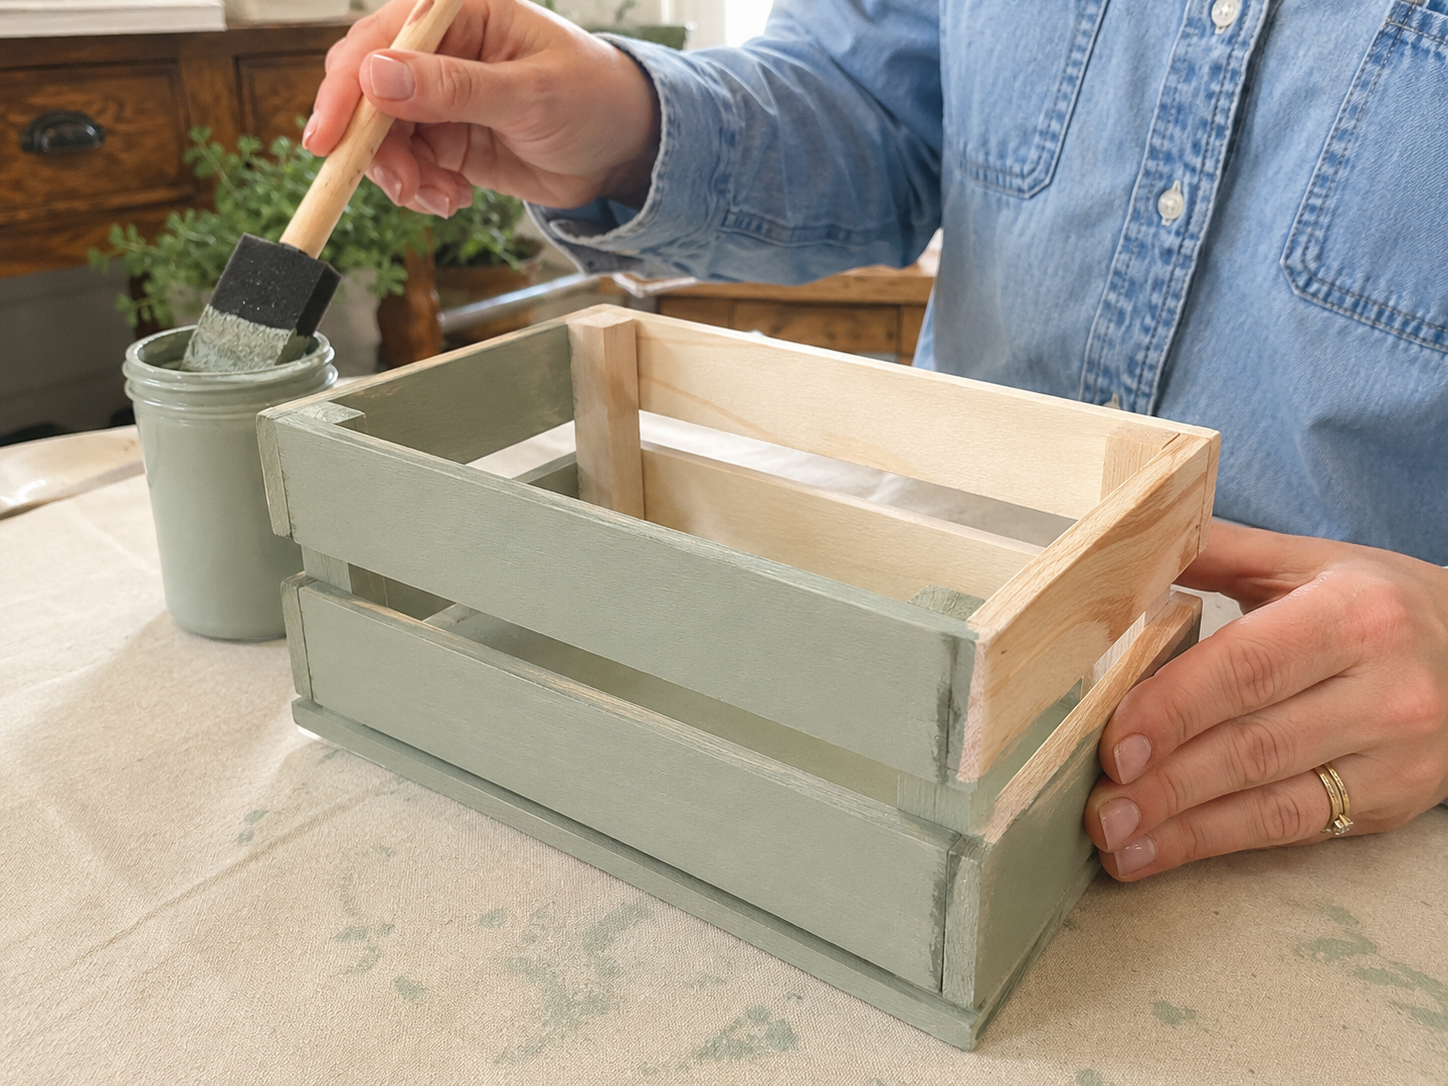
Step 1: Paint the Wooden Crate
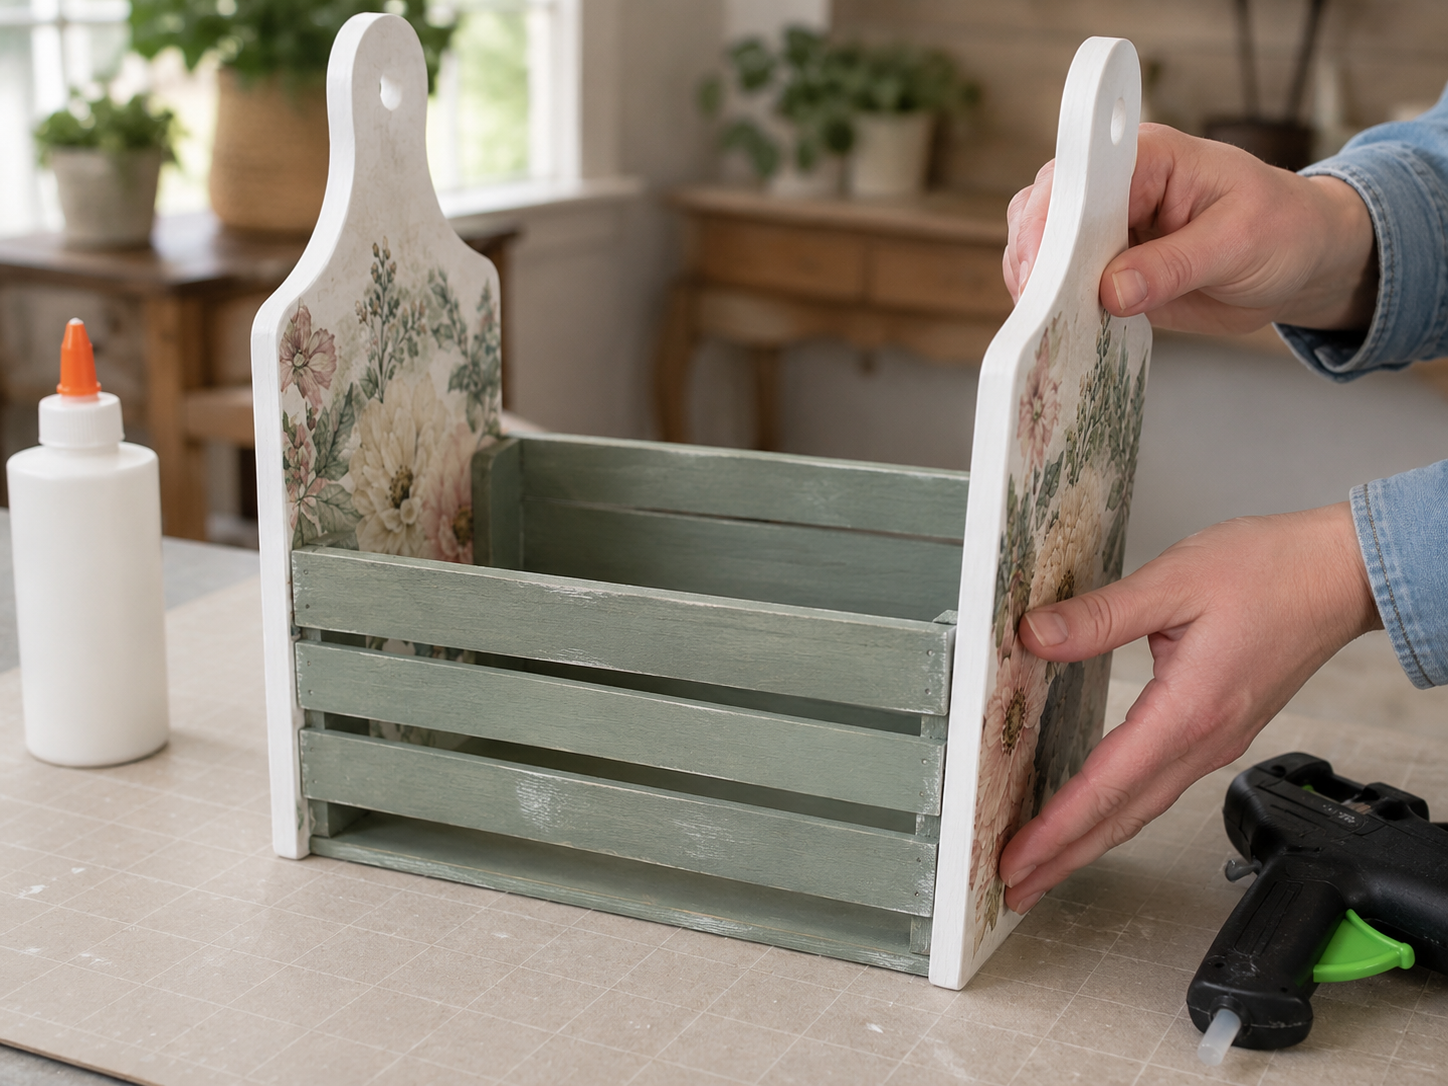
Begin by cleaning your small wooden crate to remove any dust or debris. Using a foam brush or paintbrush, apply a thin, even coat of chalk paint or acrylic paint in your chosen farmhouse color (soft sage green, muted blue, or warm cream) to the entire exterior of the crate. Allow the first coat to dry thoroughly before applying a second coat if needed, ensuring full coverage.
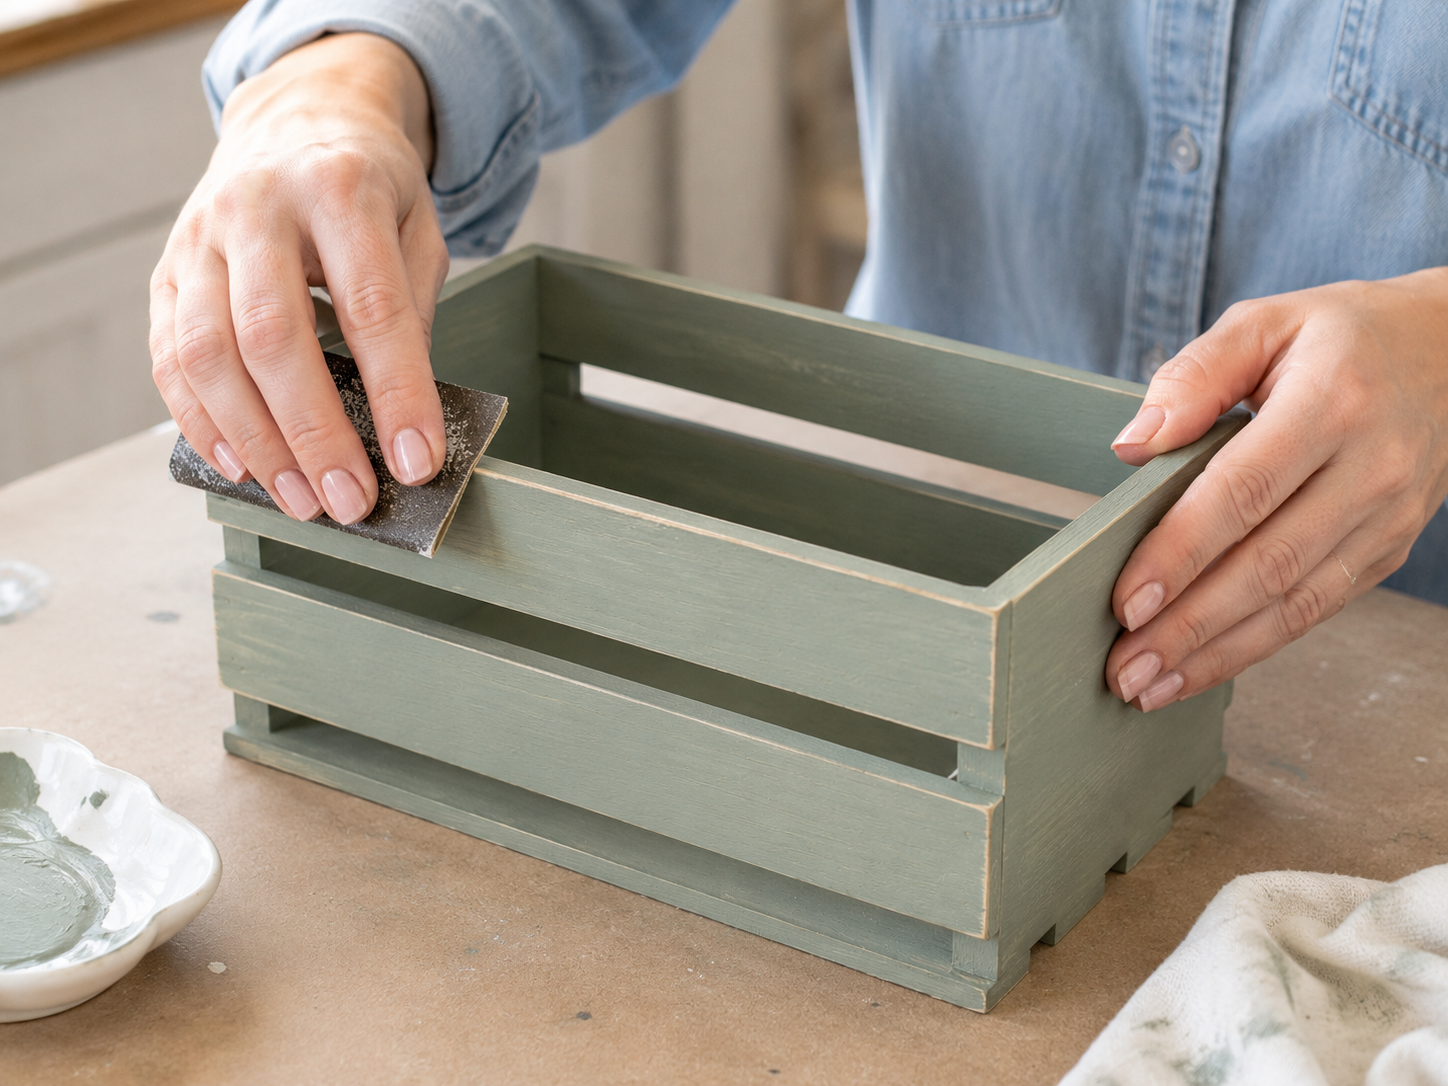
Step 2: Distress the Crate Edges
Once the paint on your wooden crate is completely dry, take a piece of fine-grit sandpaper. Lightly rub the sandpaper along the edges, corners, and any raised areas of the crate. This technique creates a worn, vintage look that is characteristic of farmhouse style, revealing hints of the natural wood underneath.
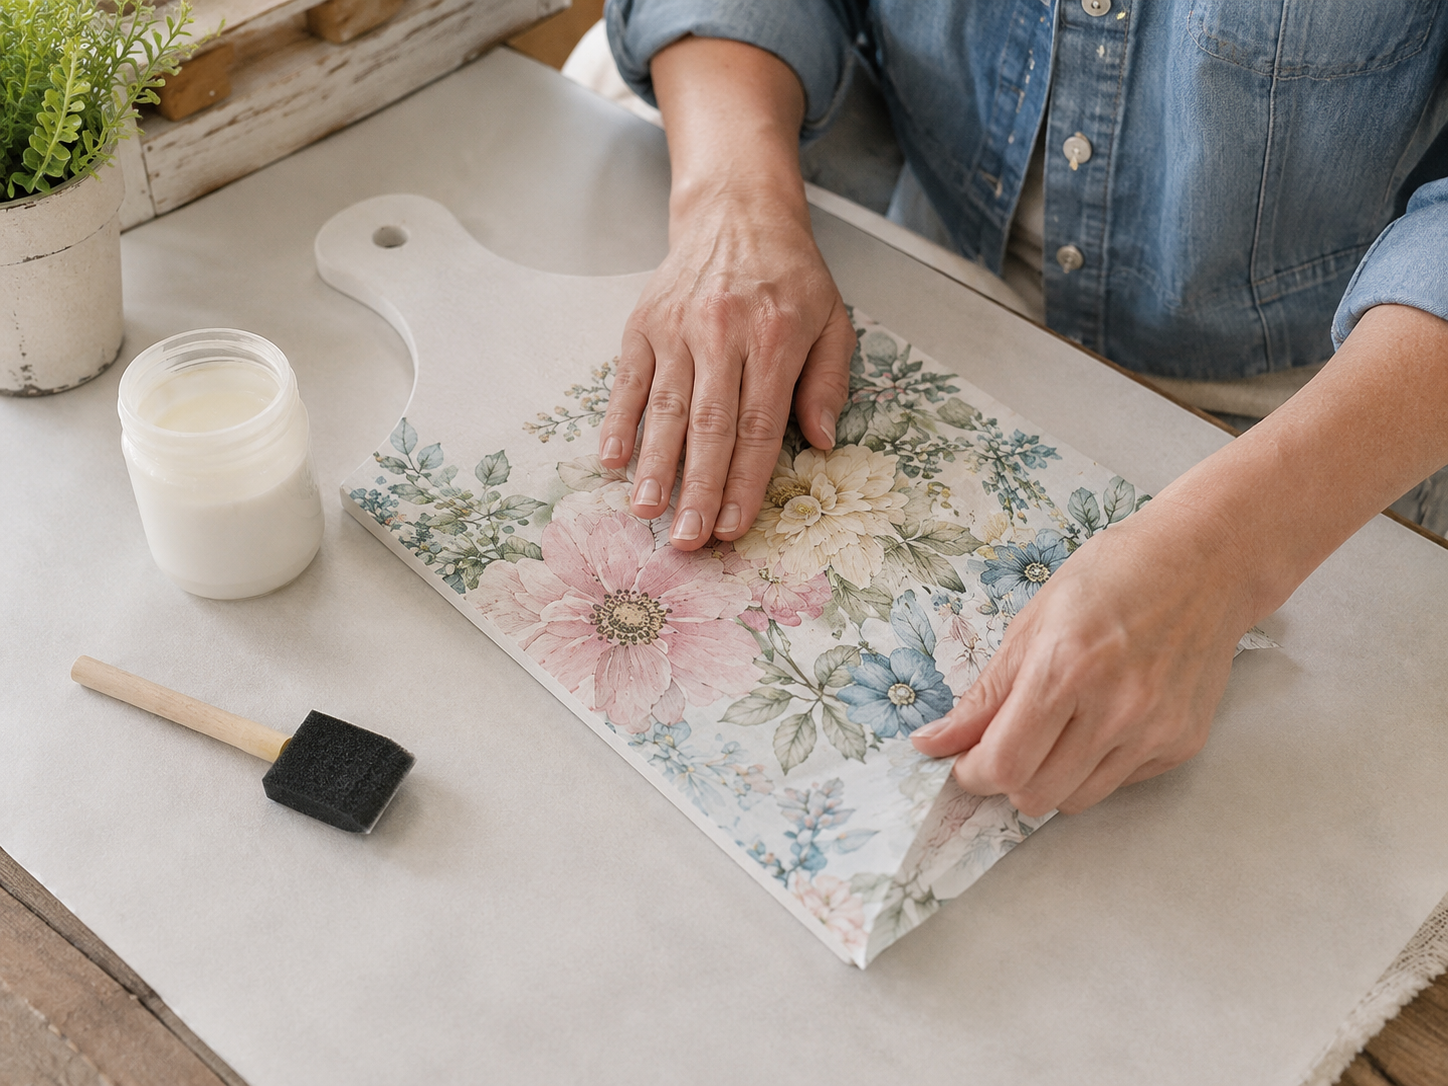
Step 3: Decoupage Cutting Boards
Select your floral paper napkins or scrapbook paper. Carefully cut out the desired floral patterns or a full panel to fit the outer face of each cutting board, ensuring they are slightly larger than the board. Apply a thin, even layer of Mod Podge to the outer face of one cutting board. Gently place your paper design onto the Mod Podge, smoothing it out from the center outwards with your fingers or a plastic scraper to remove any wrinkles or air bubbles.
Step 4: Seal Decoupage & Dry
After successfully applying the floral paper to both cutting boards and ensuring they are smooth, apply a thin, even top coat of Mod Podge over the entire decoupaged surface of each board. This seals and protects the paper. Allow both cutting boards to dry completely, which may take several hours. Ensure they are fully dry and no longer tacky before proceeding.
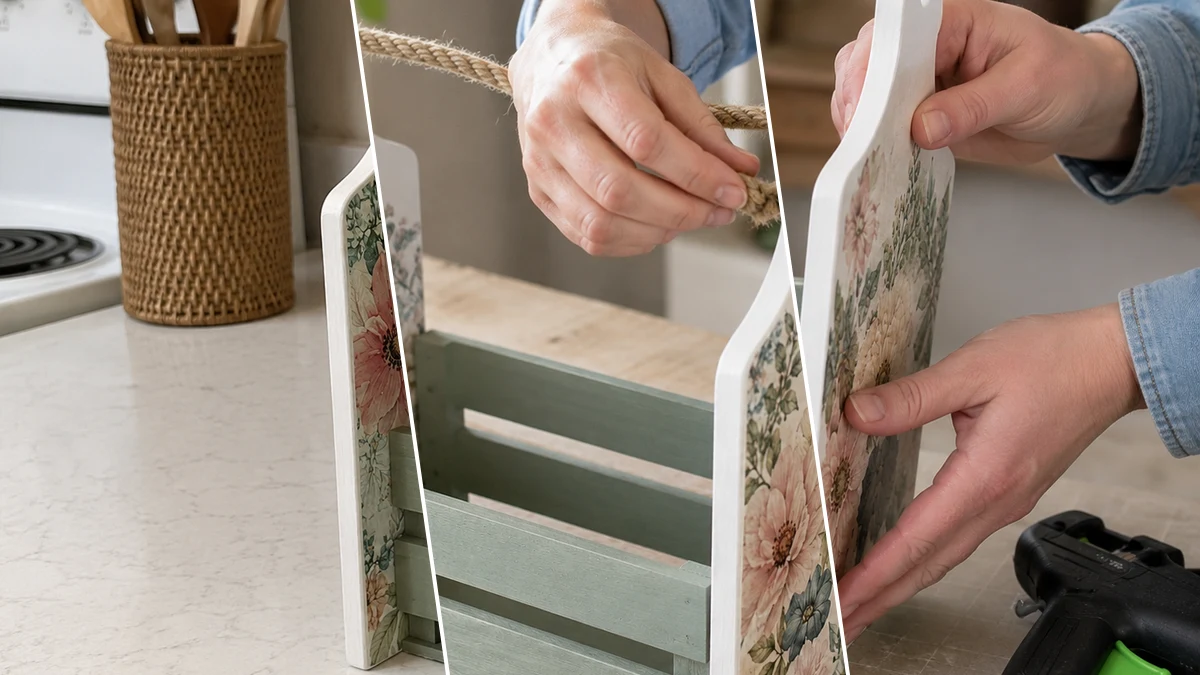
Step 5: Assemble the Caddy Base
Once both the painted crate and decoupaged cutting boards are completely dry, it’s time to assemble. Apply a strong wood glue or a generous amount of hot glue along one short vertical edge of the wooden crate. Carefully position one decoupaged cutting board against this glued edge, ensuring the handle hole is at the top and the board is flush with the bottom of the crate. Hold it firmly in place or use clamps/heavy objects to secure it while the glue sets. Repeat for the second cutting board on the opposite short side of the crate.
📱 Craftino App
Make more crafts like this
1,000+ Farmhouse / Rustic ideas with photo guides & Pro Tips
✓ Step-by-step photo tutorials, nothing left out
✓ Pro Tips for every step
✓ Save crafts & browse fully offline
✓ New ideas added every week

Step 6: Add the Jute Rope Handle
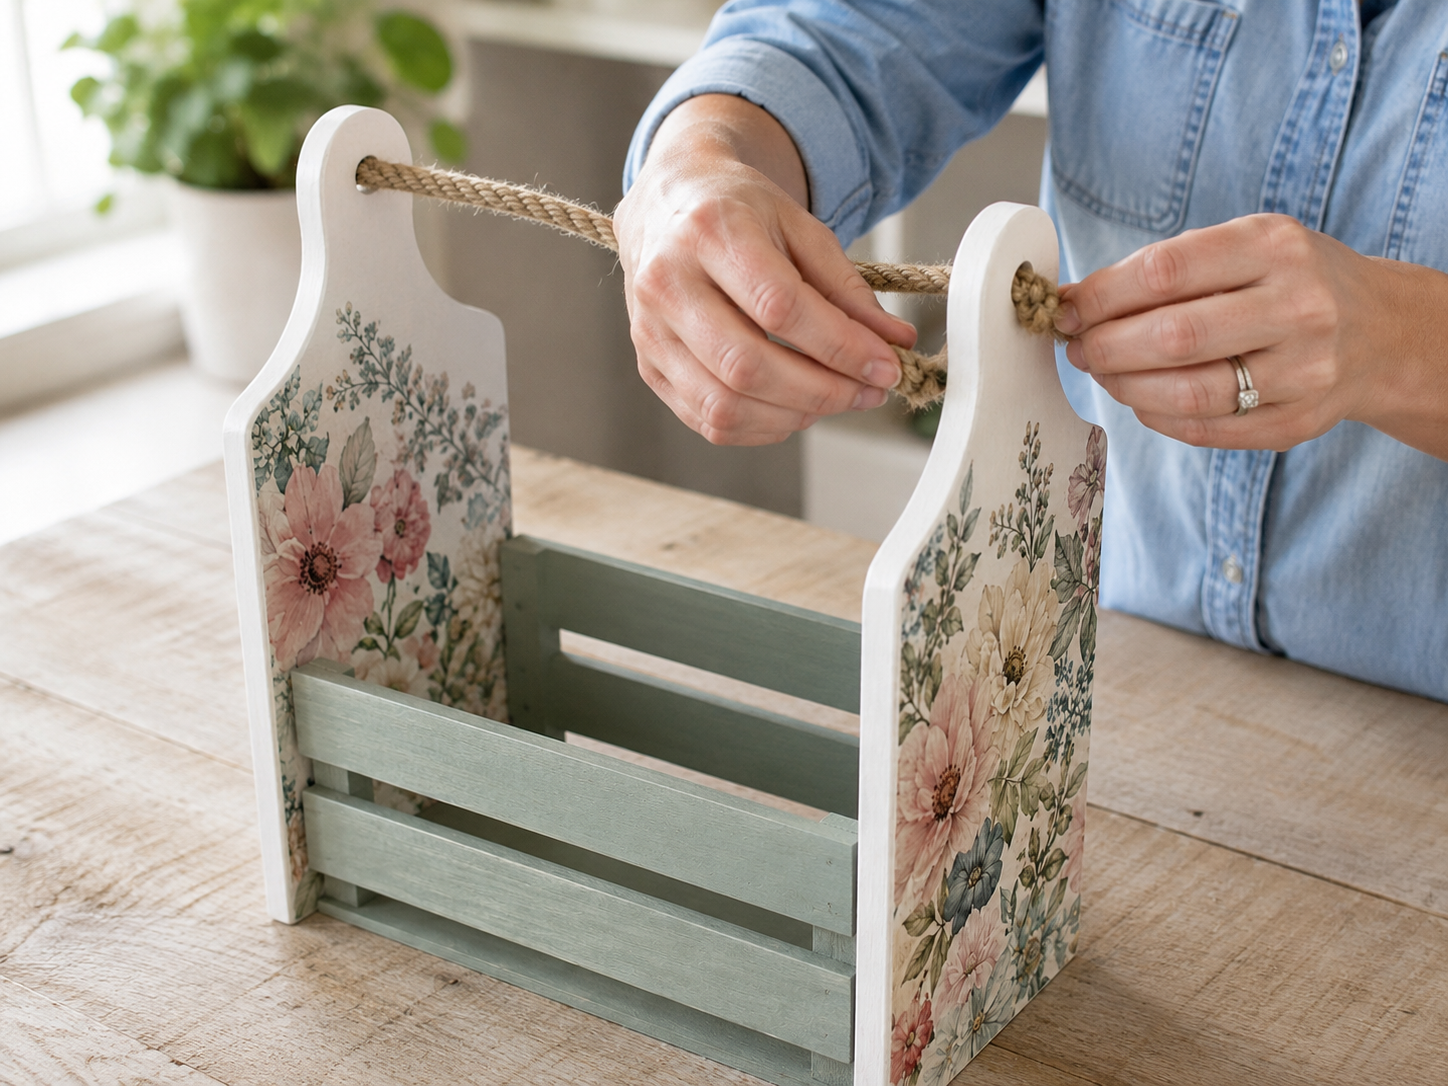
With the cutting boards securely attached to the crate, take your thick jute rope. Thread one end of the rope through the handle hole of one cutting board, pulling it through until you have enough length to create a comfortable handle. Thread the other end of the rope through the handle hole of the second cutting board. Adjust the rope length to your preference, then tie a sturdy knot on the outside of each handle hole, or secure the ends with hot glue inside the holes for a cleaner look.
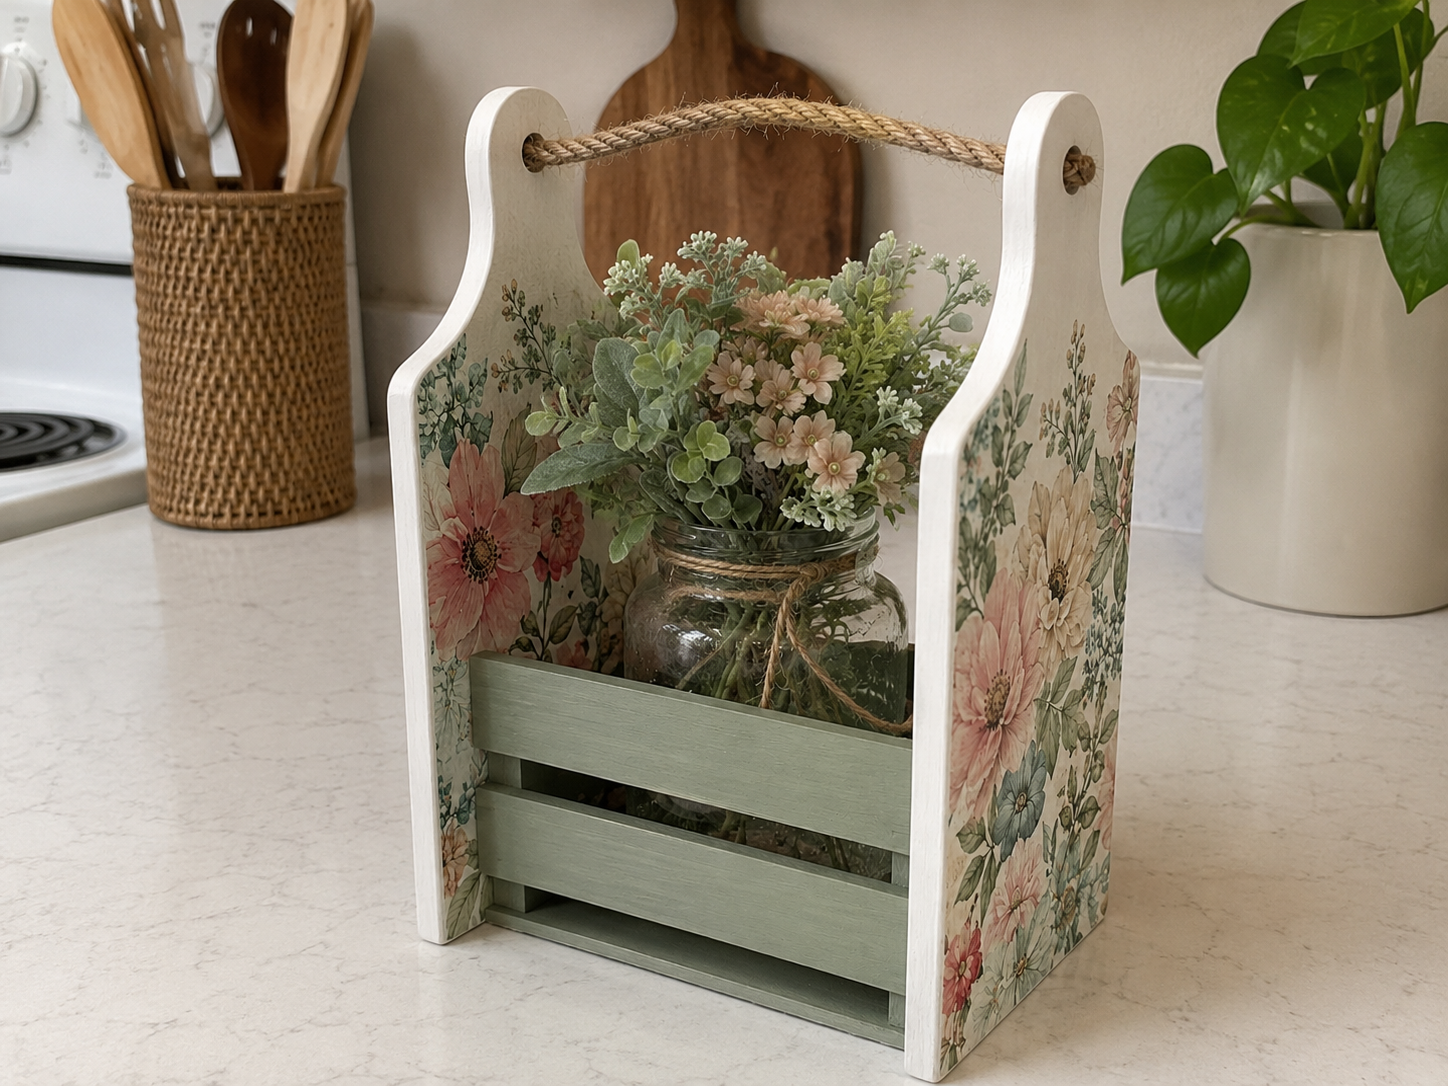
Step 7: Style Your Farmhouse Caddy
Your Dollar Tree Farmhouse Caddy is now complete! Place a small clear mason jar inside the wooden crate. Fill the mason jar with faux eucalyptus, soft pink flowers, cream florals, or seasonal greenery to complete the charming farmhouse look. Display your new caddy on a kitchen counter, shelf, or dining table to add a touch of rustic elegance to your home decor.
See also: Dollar Tree Cutting Board Crafts
📋 Love staying organized while crafting? Check out our printable planners & craft designs at CraftersDT on Etsy and use code CRAFT20 for 20% off your entire order!
Your Charming Farmhouse Caddy: Cutting Board & Crate DIY Awaits!
Seriously, doesn’t it just make your heart happy? My new farmhouse caddy looks so cute on my kitchen counter, holding all my little bits and bobs. Don’t forget to share your finished Charming Farmhouse Caddy: Cutting Board & Crate DIY with me on Instagram, I love seeing your creative twists!
📱 Craftino App
Make more crafts like this
1,000+ Farmhouse / Rustic ideas with photo guides & Pro Tips
✓ Step-by-step photo tutorials, nothing left out
✓ Pro Tips for every step
✓ Save crafts & browse fully offline
✓ New ideas added every week
Frequently Asked Questions
What is the total cost for the Charming Farmhouse Caddy: Cutting Board & Crate DIY?
The total cost for the Charming Farmhouse Caddy: Cutting Board & Crate DIY is typically around $10-13. This estimate is based on sourcing most of the six required materials from budget-friendly stores like Dollar Tree.
How long does it take to make the Charming Farmhouse Caddy: Cutting Board & Crate DIY?
You can complete the Charming Farmhouse Caddy: Cutting Board & Crate DIY in about 30-45 minutes. This timeframe includes assembly and drying for quick-setting glues, making it a perfect project for a busy afternoon.
Is the Charming Farmhouse Caddy: Cutting Board & Crate DIY suitable for beginners?
Yes, the Charming Farmhouse Caddy: Cutting Board & Crate DIY is an Easy skill level project, perfect for beginners. It involves simple gluing and optional painting, with no complex techniques required.
Where can I buy supplies for the Charming Farmhouse Caddy: Cutting Board & Crate DIY?
Most of the supplies for the Charming Farmhouse Caddy: Cutting Board & Crate DIY can be found at Dollar Tree. You can also check craft stores like Hobby Lobby or Walmart for similar items if your Dollar Tree stock is low.
Can I customize the colors of my Farmhouse / Rustic caddy?
Absolutely! You can customize the colors of your Farmhouse / Rustic caddy using acrylic craft paint. For example, painting the crate and cutting board white or a distressed gray will give it a unique look, or you can add a pop of color that matches your Home Decor.
What kind of glue works best for this Dollar Tree DIY project?
A strong craft adhesive like E6000 or Gorilla Glue Clear Grip works best for this Dollar Tree DIY project. These glues provide a durable bond, ensuring your Charming Farmhouse Caddy stays together securely.
Is the Charming Farmhouse Caddy: Cutting Board & Crate DIY a good gift idea?
Yes, the Charming Farmhouse Caddy: Cutting Board & Crate DIY makes an excellent gift, especially for Mother’s Day, housewarmings, or birthdays. You can fill it with small plants, bath bombs, or kitchen essentials to make it even more special.
How many cutting boards are needed for one Charming Farmhouse Caddy?
You will need one small wooden cutting board for each Charming Farmhouse Caddy: Cutting Board & Crate DIY project. Dollar Tree often sells these in their craft or kitchen aisle.
Can the Charming Farmhouse Caddy be used outdoors?
The Charming Farmhouse Caddy: Cutting Board & Crate DIY is primarily designed for indoor Home Decor. If you wish to use it outdoors, you would need to seal all wooden components with a weather-resistant outdoor sealant or clear coat to protect it from the elements.
What are some common mistakes to avoid when making this DIY craft?
To avoid common mistakes with this DIY craft, make sure to use enough glue on all contact points and allow adequate drying time, ideally 2-4 hours, before handling or adding heavy items. Also, ensure surfaces are clean before gluing for a strong bond.
Find more farmhouse / rustic craft ideas & supplies at Dollar Tree.
Leave a Reply