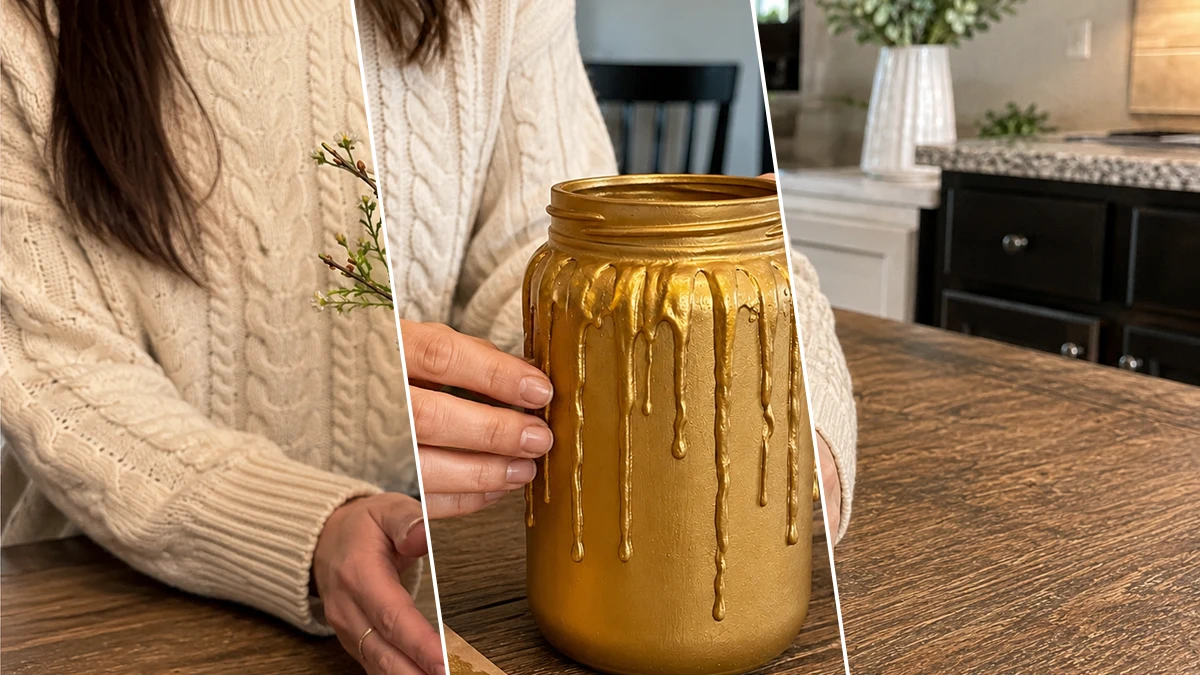
Ever walk into Dollar Tree just for paper towels and somehow leave with a basket full of stuff you didn’t know you needed? Same, friend, same! That’s exactly how I ended up with all the goodies to make this super cute Gilded Lemon Drip Farmhouse Vase: Dollar Tree DIY. My kitchen needed a little sunshine, and this craft totally delivered.
Theme: Farmhouse / Rustic
Materials Needed
- Recycled Glass Jar (e.g., Mason jar)
- Hot Glue Gun & Glue Sticks
- Gold Metallic Paint (Spray or Acrylic)
- Faux Lemon & Greenery Stems
- Faux Twig & Filler Flower Stems
- Floral Foam or Paper for filling
- Optional Primer/Sealer
Why This Craft Works
This Gilded Lemon Drip Farmhouse Vase is seriously perfect for adding a touch of bright, rustic charm to your Home Decor. I love mine sitting on my farmhouse kitchen counter with some pretty faux flowers, but it would also look amazing on a coffee table, a bedroom dresser, or even as a cheerful centerpiece for a summer potluck. It totally fits that cozy, welcoming Farmhouse / Rustic vibe we all love.
And let’s talk budget, because that’s my favorite part! This entire project, getting all the bits and bobs from Dollar Tree, ran me about $10-13 total. You just can’t beat that for a custom piece of Home Decor that looks way more expensive than it actually is. It’s proof that you don’t need to spend a fortune to make your home feel special and put together.
Good news for all my fellow busy moms and craft beginners, this is an easy project! Seriously, anyone can do this. From start to finish, including drying time for the paint, it took me about 30-45 minutes. It’s the perfect craft for a quick afternoon session, a fun project with older kids, or when you need a last-minute handmade gift.
Step-by-Step Instructions for Gilded Lemon Drip Farmhouse Vase: Dollar Tree DIY
Alright, my fellow crafters, are you ready to get your hands a little bit dirty and make some magic happen? You are going to absolutely love how easy and fun it is to create your very own Gilded Lemon Drip Farmhouse Vase: Dollar Tree DIY. We’re talking quick, simple steps that anyone can follow, even if you think you’re not ‘crafty.’ This Home Decor project took me around 30-45 minutes, and it’s super satisfying to see come to life. Let’s grab those Dollar Tree goodies and get started!
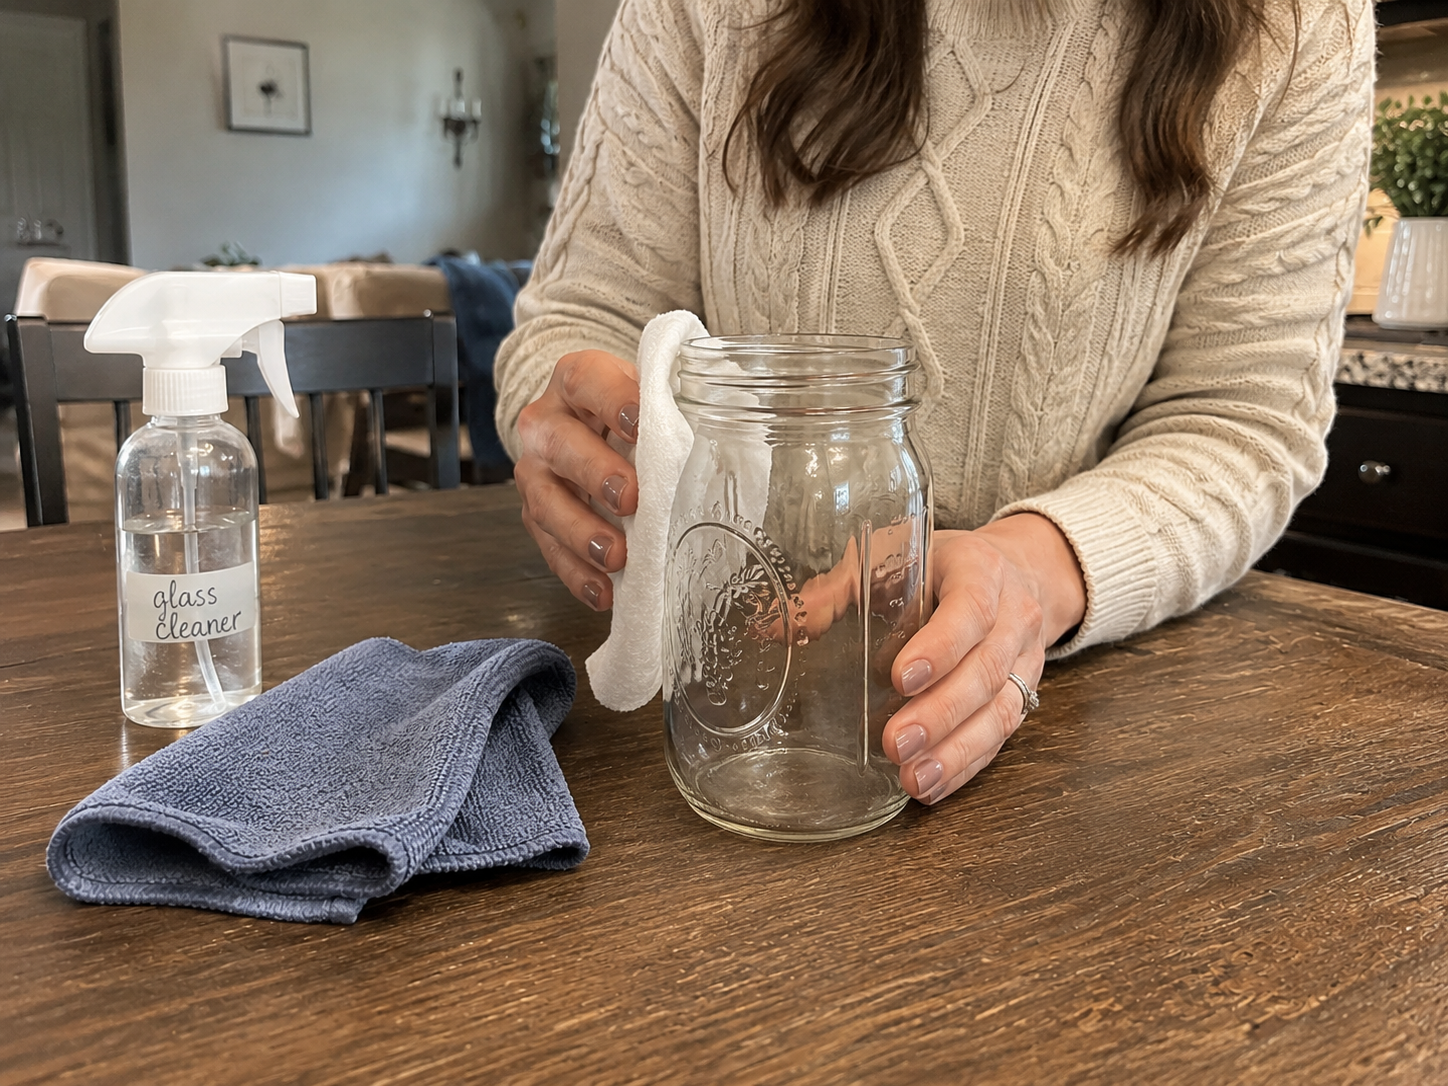
Step 1: Prepare Your Glass Jar Base
Begin by thoroughly cleaning your recycled glass jar or Mason jar. Remove any labels, wash the jar with soap and water, and dry it completely. Ensuring the surface is pristine will allow for optimal adhesion of both the glue and paint. If desired, apply an optional primer or white chalk paint base coat to ensure your gold paint adheres smoothly and achieves a rich, opaque finish, especially if using a lighter gold acrylic paint.
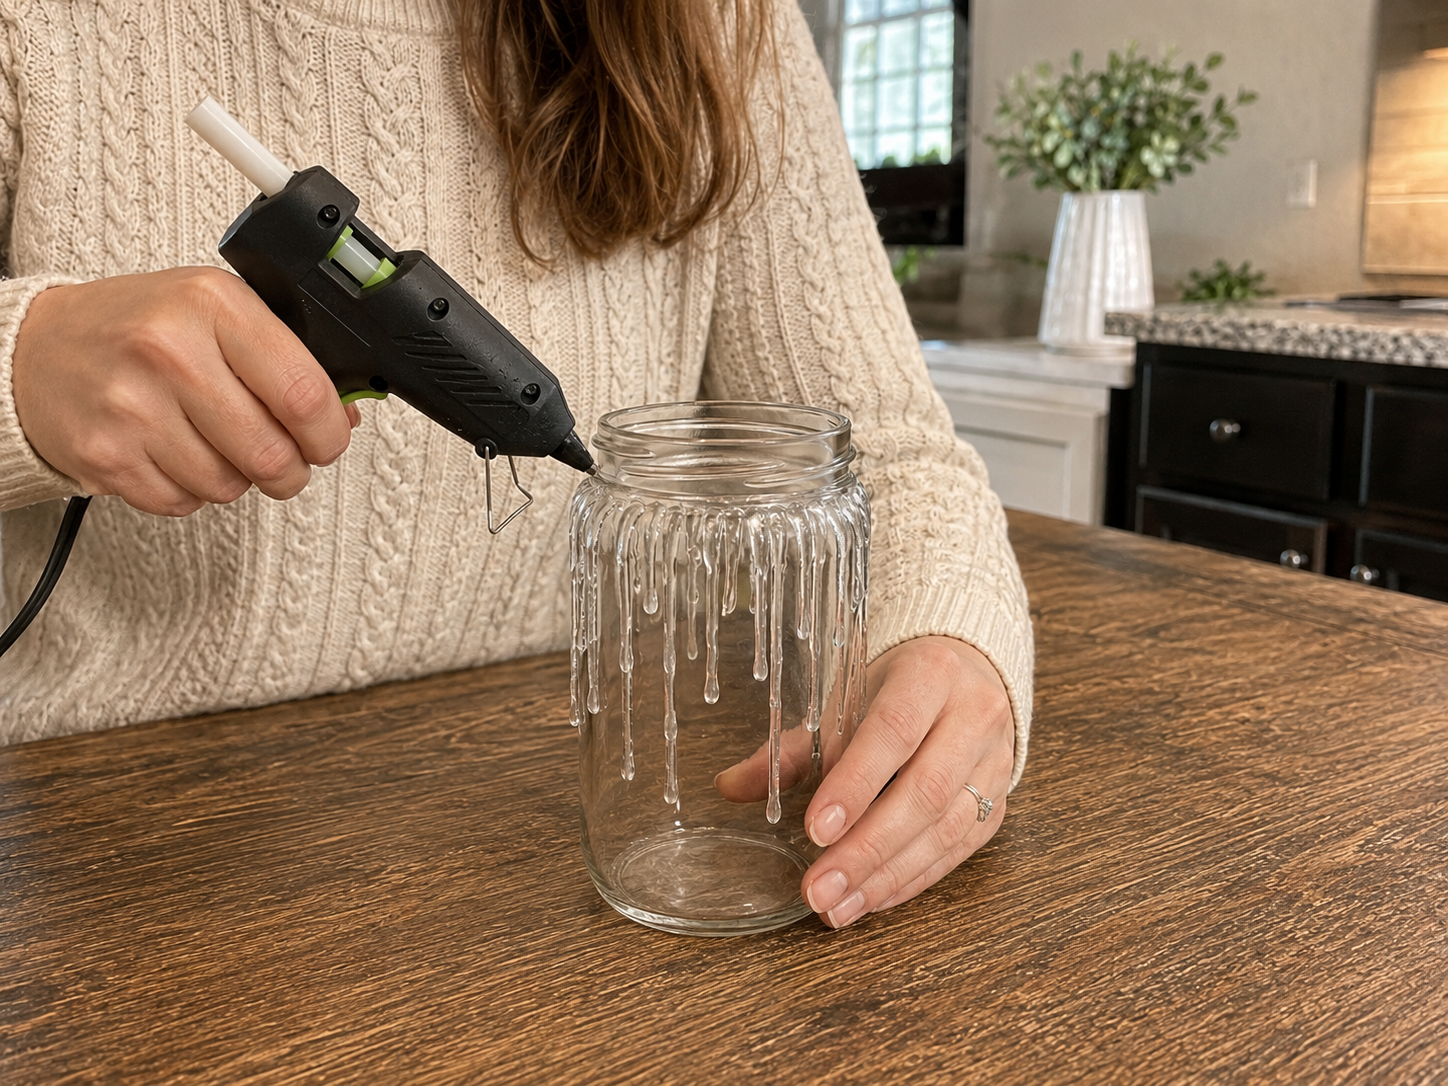
Step 2: Craft Golden Drip Texture
With your jar clean and dry, turn it upright and grab your hot glue gun. Starting around the upper rim, apply thick lines of hot glue, allowing them to naturally drip downward. Work your way around the jar’s circumference, creating varying lengths of drips – some running halfway down, others stopping shorter – to mimic a melted wax texture. You can add extra dollops of glue near the top edge to encourage thicker, more prominent drips. Focus on creating an organic, uneven appearance for a handmade feel.
Step 3: Paint the Vase Gold
Once all the hot glue drips are fully cool and hard, it’s time to paint. If using metallic spray paint, apply light, even coats in a well-ventilated area, rotating the jar to ensure full coverage of both the glass and the raised glue texture. If using acrylic paint and a brush, use a small craft brush to dab and spread the paint evenly, getting into all the crevices of the glue drips. Let the first coat dry completely. Depending on your paint and desired richness, apply a second coat for a deeper, more luxurious metallic finish. Ensure all surfaces are thoroughly covered so the glue and glass appear as one cohesive sculptural piece.

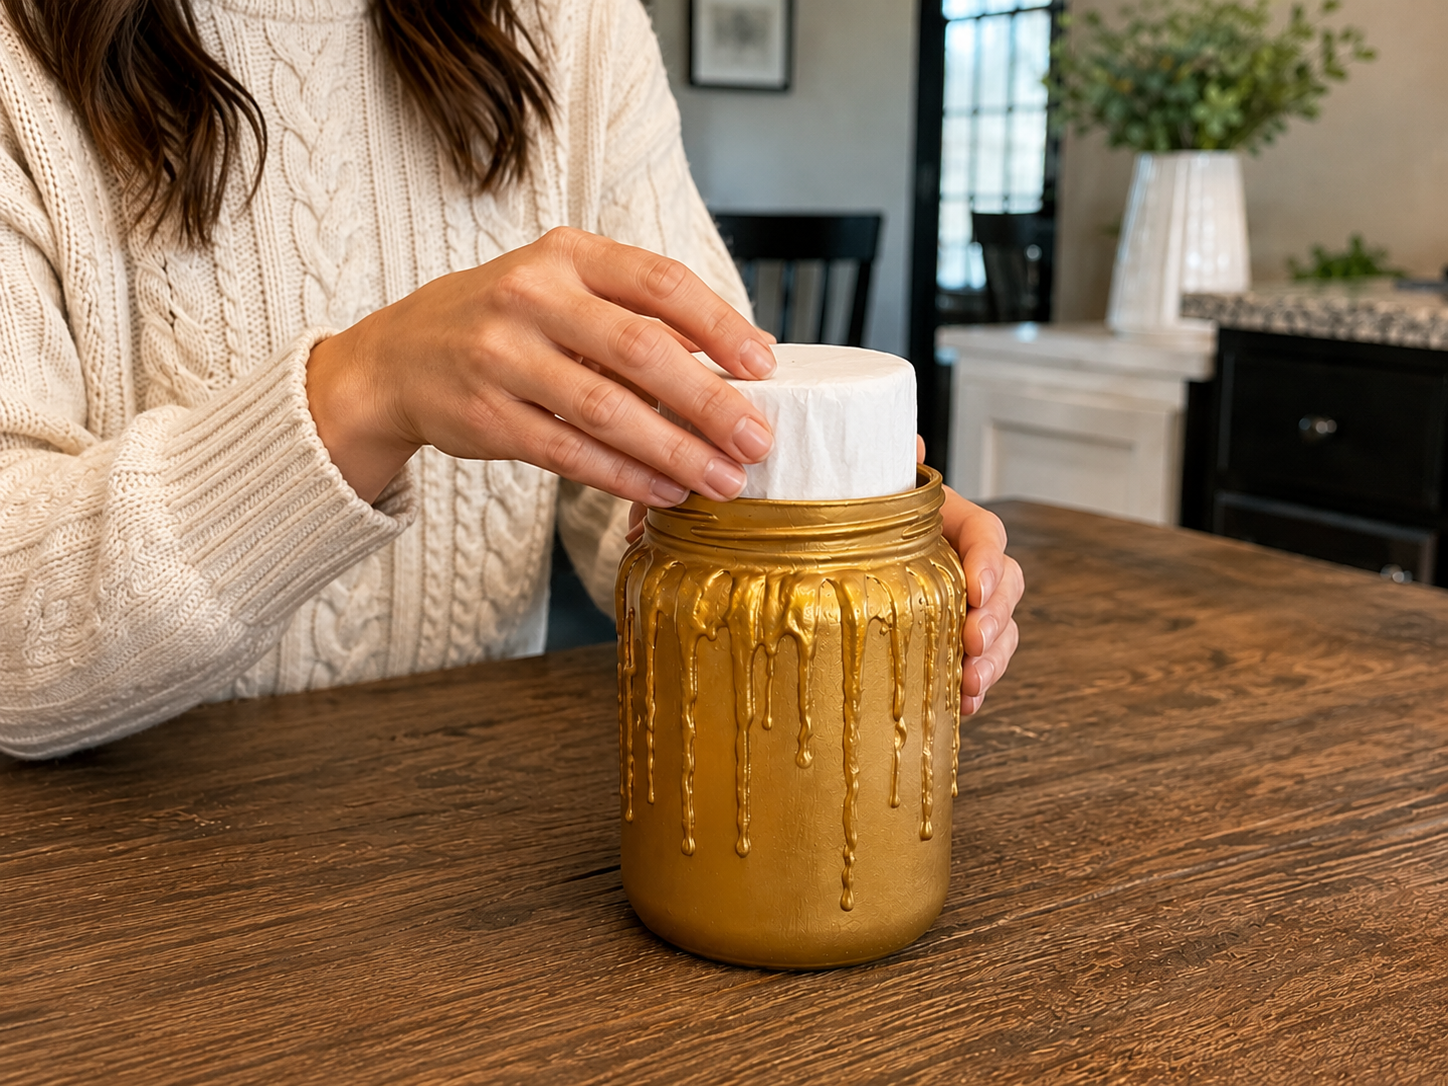
Step 4: Secure Floral Arrangement Base
After your golden vase is completely dry, prepare its interior for the floral arrangement. Place a piece of floral foam inside the jar to provide a stable base for your stems. If you don’t have floral foam, firmly pack crumpled paper (like newspaper or tissue paper) into the jar. The goal is to create a secure anchor that will hold your faux stems upright and in position.
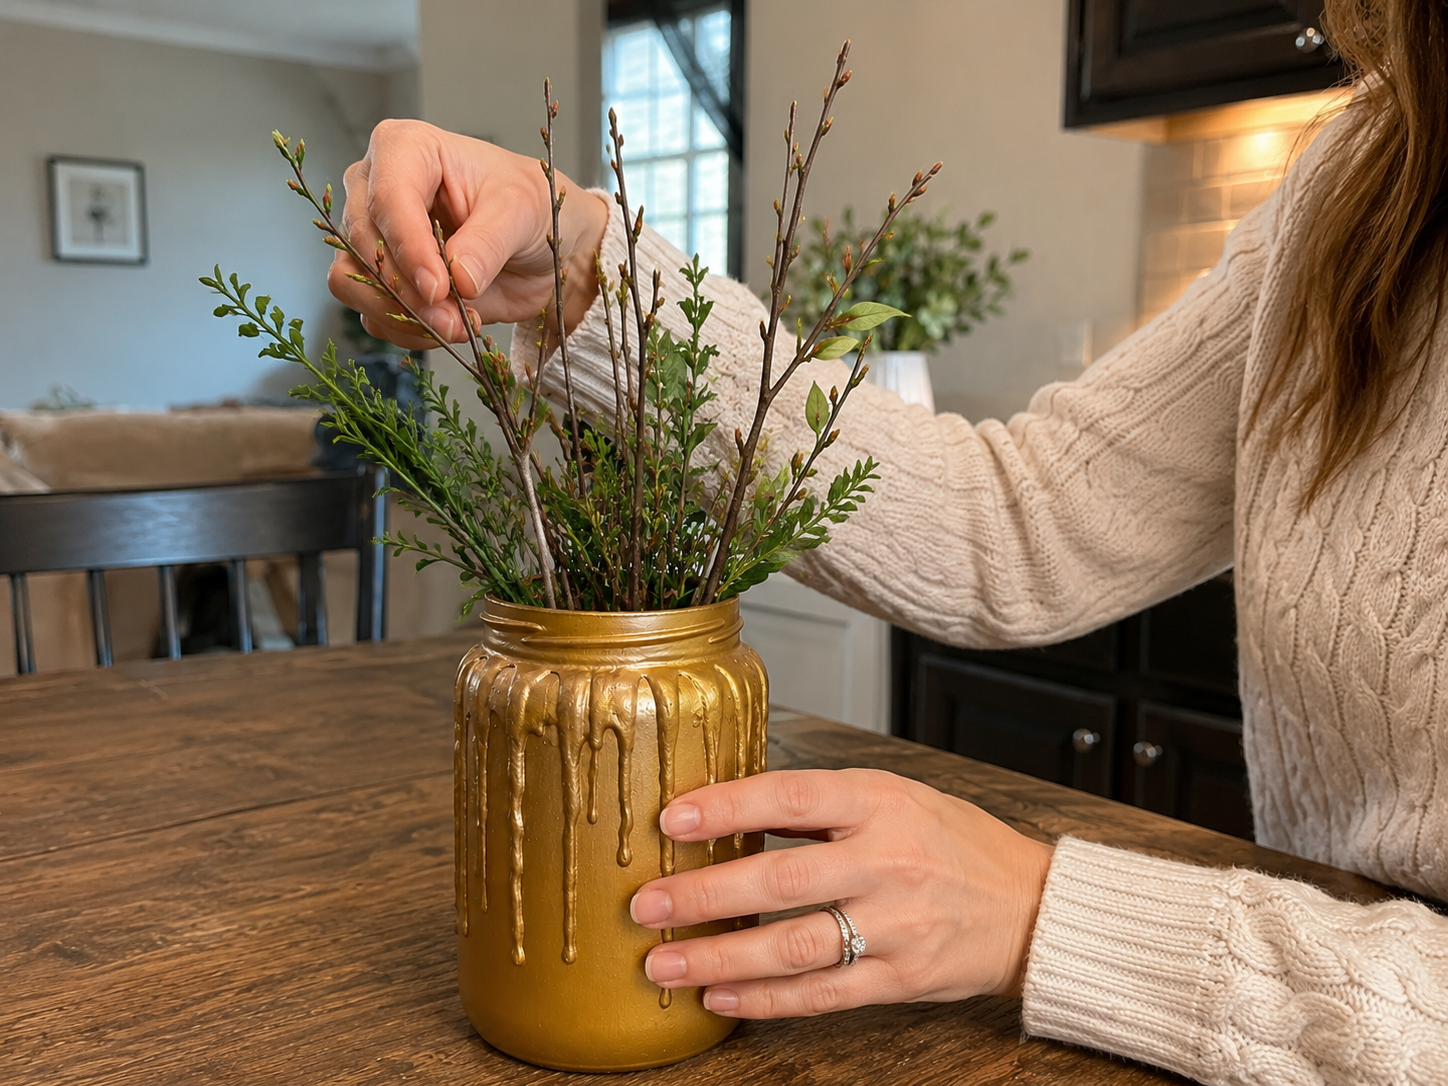
Step 5: Build Twig & Greenery Structure
Now, begin building your lemon branch arrangement. Start by inserting the thin brown twig-style floral stems into the floral foam or crumpled paper. Arrange them to create varying heights and a natural, airy structure. Next, add the small greenery stems, distributing them around the twig base to add fullness and a natural leaf texture. Keep the placement organic and slightly uneven, mimicking how a real branch would grow.
📱 Craftino App
Make more crafts like this
1,000+ Farmhouse / Rustic ideas with photo guides & Pro Tips
✓ Step-by-step photo tutorials, nothing left out
✓ Pro Tips for every step
✓ Save crafts & browse fully offline
✓ New ideas added every week

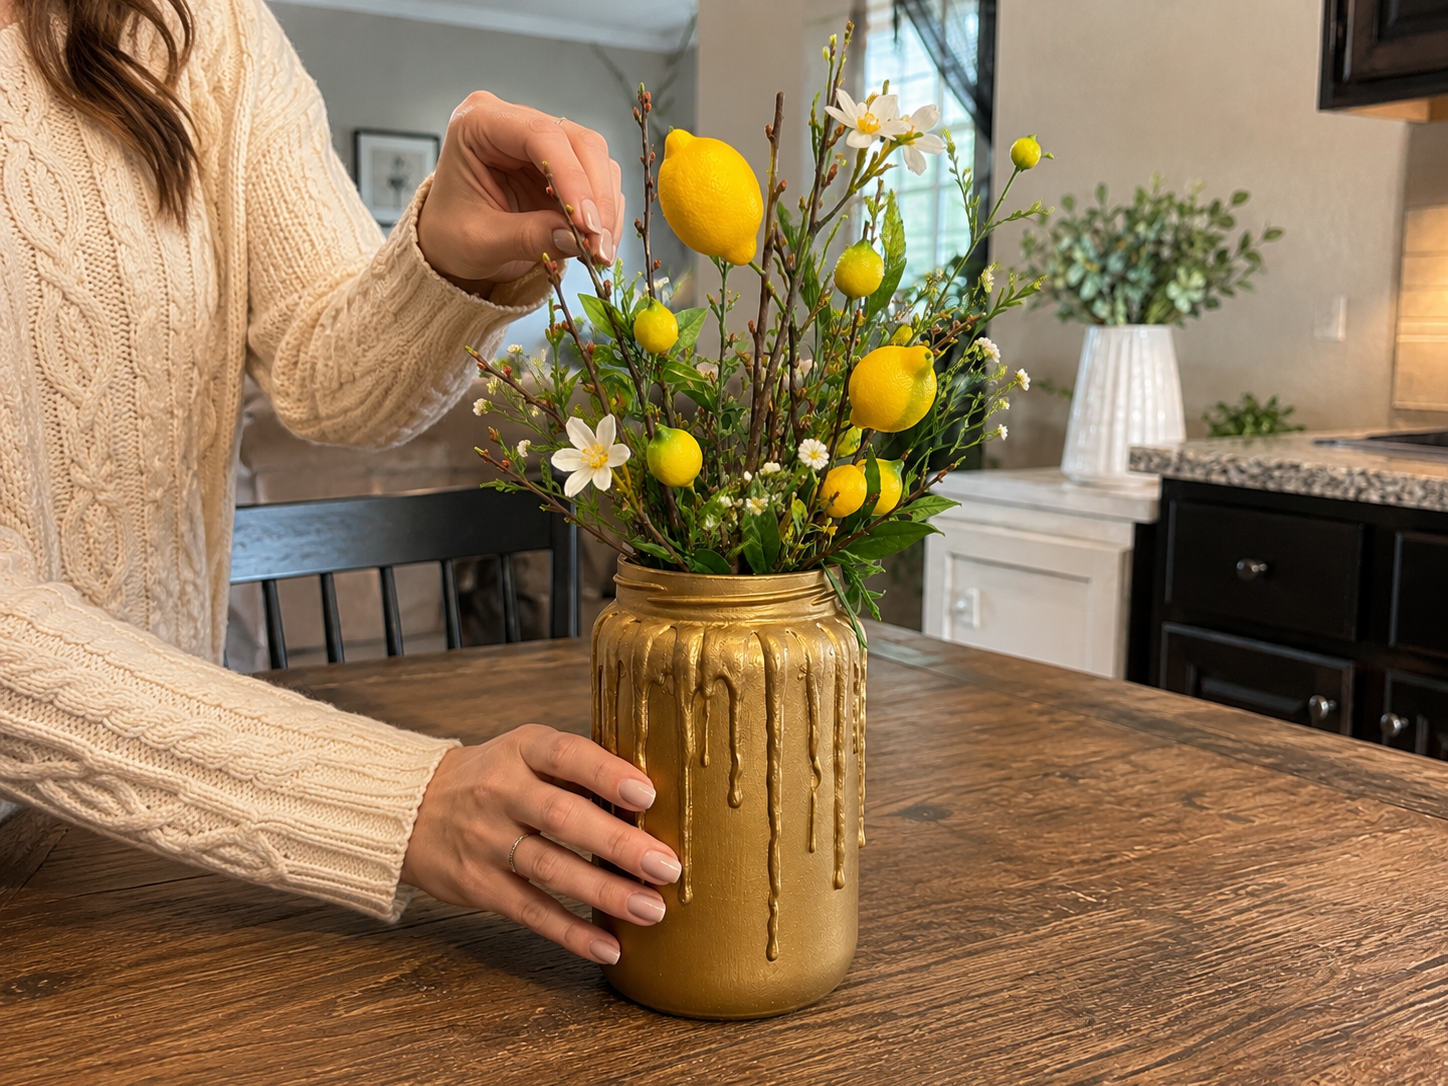
Step 6: Add Lemons & Filler Flowers
With your basic structure in place, it’s time to add the stars of the show! Carefully insert the mini faux lemons and a few tiny white filler flowers into the arrangement. Distribute the lemons naturally, ensuring one or two are taller and some are nestled lower for balance and visual interest. The white flowers should be sparingly used to add a delicate pop of contrast without overwhelming the lemons. Aim for a simple lemon branch centerpiece feel, rather than a dense bouquet.
Step 7: Final Adjustments & Sealing
Take a step back and examine your complete arrangement. Trim any stems that appear too long or disrupt the balance. Adjust the position of leaves, lemons, and twigs until you are happy with the overall shape and flow. Ensure the beautiful golden drip jar remains the main focal point of the piece. If desired, apply a clear matte or satin sealer spray over the painted jar to protect the finish and add durability, especially if it will be in a high-traffic area or near moisture. Let the sealer dry completely before placing your new decor piece.

See also: Charming Farmhouse Blush Floral Jar For Mothers Day
📋 Love staying organized while crafting? Check out our printable planners & craft designs at CraftersDT on Etsy and use code CRAFT20 for 20% off your entire order!
Your Gilded Lemon Drip Farmhouse Vase Is Ready!
And there you have it, your very own beautiful Gilded Lemon Drip Farmhouse Vase! Isn’t it just the cutest? I just love how it brightens up my space and adds that perfect touch of Farmhouse / Rustic charm. Pop in some faux flowers or greenery, and get ready for compliments. Don’t forget to share your version with me, or try it with different fruits like oranges or limes!
📱 Craftino App
Make more crafts like this
1,000+ Farmhouse / Rustic ideas with photo guides & Pro Tips
✓ Step-by-step photo tutorials, nothing left out
✓ Pro Tips for every step
✓ Save crafts & browse fully offline
✓ New ideas added every week
Frequently Asked Questions
What is the total cost to make the Gilded Lemon Drip Farmhouse Vase: Dollar Tree DIY?
The total cost to make the Gilded Lemon Drip Farmhouse Vase: Dollar Tree DIY is approximately $10-13. This estimate covers all necessary supplies when purchased from Dollar Tree, making it a highly budget-friendly Home Decor project.
How long does it take to complete the Dollar Tree Gilded Lemon Drip Farmhouse Vase craft?
The Dollar Tree Gilded Lemon Drip Farmhouse Vase craft takes about 30-45 minutes from start to finish. This includes time for painting, gluing, and allowing paint to dry, making it a quick and satisfying project.
Is the Gilded Lemon Drip Farmhouse Vase: Dollar Tree DIY suitable for beginners?
Yes, the Gilded Lemon Drip Farmhouse Vase: Dollar Tree DIY is an easy project perfectly suited for beginners. It involves simple painting and gluing techniques, requiring minimal crafting experience for a beautiful Farmhouse / Rustic result.
What specific Dollar Tree supplies are recommended for this Gilded Lemon Drip Farmhouse Vase?
For this Gilded Lemon Drip Farmhouse Vase, recommended Dollar Tree supplies include a clear glass vase (around 7-8 inches tall), white and yellow acrylic craft paint, gold metallic craft paint, faux lemon slices (usually in a pack of 4-6), hot glue sticks, and a small paintbrush.
Can I customize the colors of my Gilded Lemon Drip Farmhouse Vase for different Home Decor styles?
Yes, you can easily customize the colors of your Gilded Lemon Drip Farmhouse Vase to match various Home Decor styles. Instead of yellow and gold, try blues and silvers for a coastal look, or reds and greens for a festive holiday twist.
Is the Gilded Lemon Drip Farmhouse Vase: Dollar Tree DIY a good handmade gift idea?
Absolutely, the Gilded Lemon Drip Farmhouse Vase: Dollar Tree DIY makes a wonderful handmade gift. Its charming Farmhouse / Rustic aesthetic and personal touch are perfect for Mother’s Day, housewarmings, or birthday presents, all for a budget-friendly cost of $10-13.
What type of glue should I use for attaching the faux lemons to the Dollar Tree vase?
Hot glue is the best type of adhesive for attaching the faux lemons to the Dollar Tree vase. It provides a strong, instant bond that securely holds the lightweight plastic fruit in place for your Farmhouse / Rustic Home Decor.
How much paint will I need for the Gilded Lemon Drip Farmhouse Vase: Dollar Tree DIY project?
Standard 2-ounce bottles of acrylic craft paint for each color (white, yellow, gold) will be sufficient for the Gilded Lemon Drip Farmhouse Vase: Dollar Tree DIY. You’ll likely have plenty left over for other projects too.
What are common mistakes to avoid when making a Gilded Lemon Drip Farmhouse Vase?
A common mistake to avoid when making a Gilded Lemon Drip Farmhouse Vase is not allowing paint to fully dry between coats, which can lead to smudges. Also, ensure a thin, even application of hot glue to prevent visible excess, especially for the faux lemon attachments.
Leave a Reply