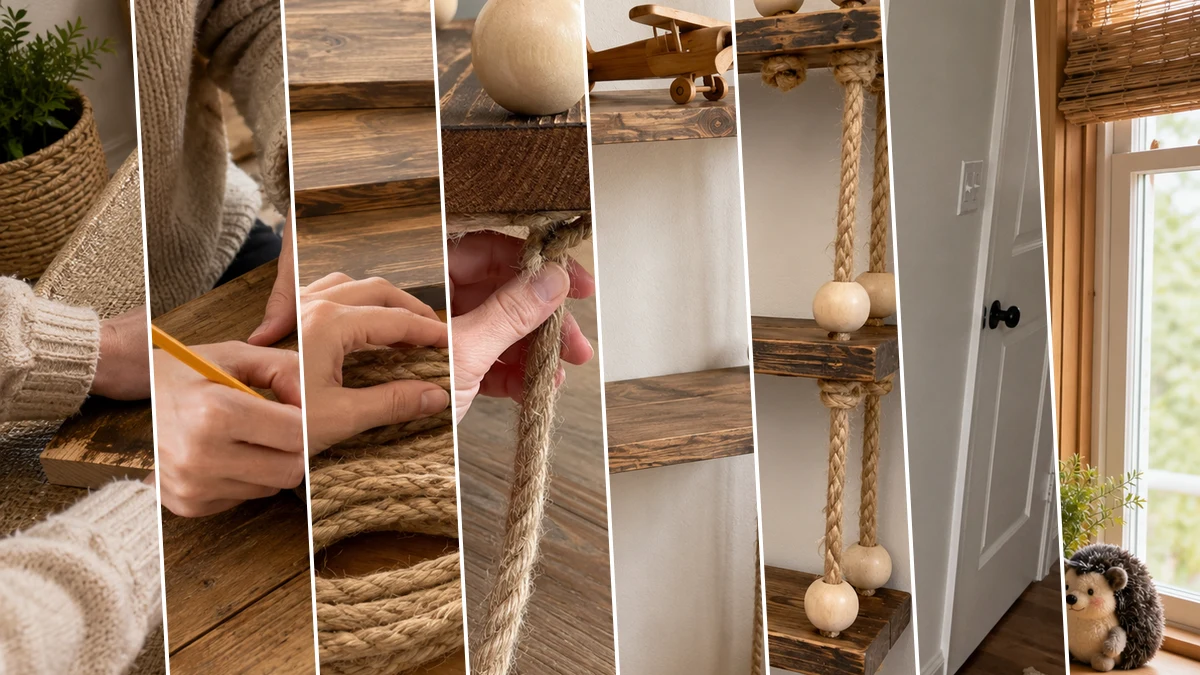
Okay, moms and crafters, confession time! I was scrolling Pinterest the other day, looking for ideas to spruce up my sister’s new nursery, and I just knew I had to make something special. That’s when I dreamed up these adorable Cozy Boho Kids Room Hanging Rope Shelves. They add so much cuteness and are perfect for little knick-knacks!
See also: Boho Celestial Moon Phase Wall Art Dollar Tree Diy
Theme: Baby & Nursery
Materials Needed
- Lightweight Wood Craft Boards (3)
- Thick Jute or Nautical Rope
- Natural Wooden Beads (Large)
- Wood Stain or Brown Acrylic Paint
- Basic Craft Tools (Sandpaper, Hot Glue, Scissors, Ruler, Pencil)
- Drill with Wood Bit OR Craft Knife/Awl
- Optional Jute Twine for Tassels
📋 Love staying organized while crafting? Check out our printable planners & craft designs at CraftersDT on Etsy and use code CRAFT20 for 20% off your entire order!
Why This Craft Works
These cute little shelves are just perfect for adding a touch of rustic charm to any Baby & Nursery space. Imagine them holding tiny little booties, a sweet rattle, or even a small plant above the changing table or crib. They’re such a neat way to add vertical Organizing & Storage without taking up floor space, which is a lifesaver in smaller rooms.
📱 Free to Download
Join 50,000+ crafters already using Craftino
Browse 63+ Baby & Nursery ideas and thousands more in the app
✓ Save crafts & browse fully offline
✓ Download printable PDF guides for every project
✓ Step-by-step photo tutorials, nothing left out
✓ 1,000+ craft projects with new ones added every week

And let’s talk budget! You can whip up a pair of these Cozy Boho Kids Room Hanging Rope Shelves for seriously under $5, especially if you grab most of your supplies from Dollar Tree. I found all the wood pieces and rope there, which kept the cost super low. It’s an absolute steal for something so custom and charming.
This project is definitely on the easy side, perfect for beginners or even if you have an older kiddo who wants to help out. I actually made mine in about 30-45 minutes, not counting drying time for the paint. It’s a great quick craft for when you need a cute Baby & Nursery gift in a pinch or just want to add a little something special to your own home.
Step-by-Step Instructions for Cozy Boho Kids Room Hanging Rope Shelves
Alright, friends, are you ready to get your craft on? This project is so much fun and goes together super quick. You’ll be amazed at how fast you can create these adorable Cozy Boho Kids Room Hanging Rope Shelves. I promise, even if you’re new to crafting, you’ll totally nail this one!
Step 1: Prepare & Stain Wood Boards
Begin by preparing your three lightweight wooden craft boards. Lightly sand all surfaces and edges to ensure they are smooth and free of splinters. Apply a warm rustic brown wood stain or brown acrylic paint evenly to all sides of each board. Allow them to dry completely according to product instructions. Once dry, lightly sand the edges again to give them a natural, slightly worn, distressed look.
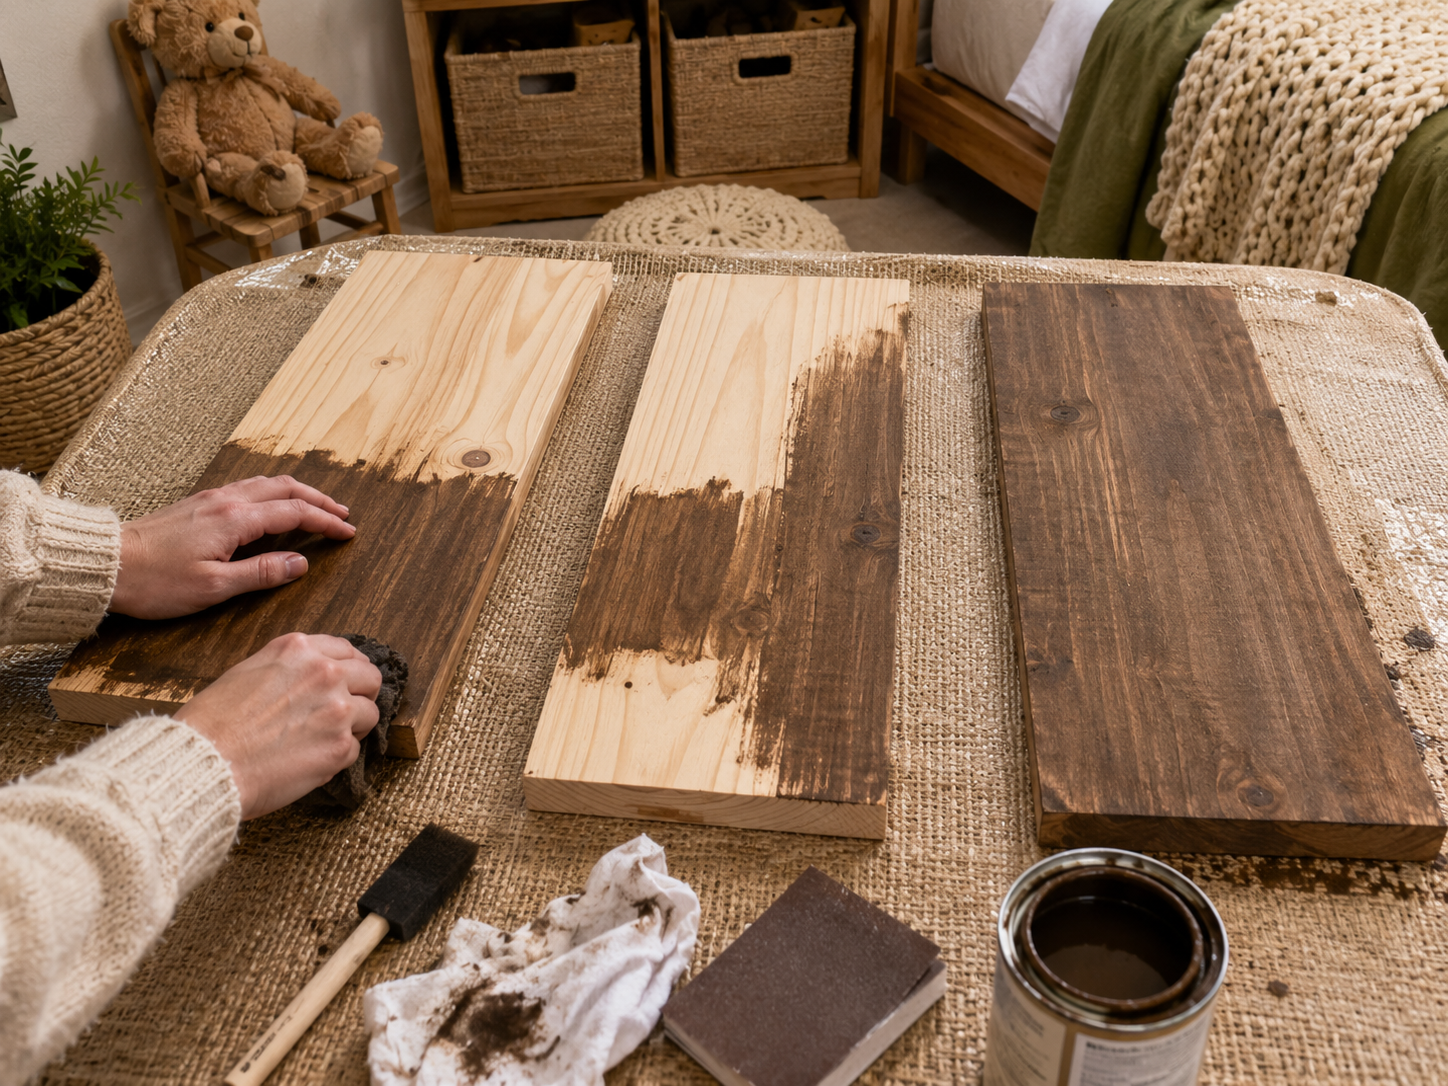
💡 Pro Tip: For a consistent finish, apply stain in the direction of the wood grain using a rag or foam brush, wiping off excess. If using acrylic paint, thin it slightly with water for a ‘wash’ effect to mimic stain, and let each coat dry fully (at least 30 minutes) before applying another or sanding. The light sanding on the edges after staining will reveal some natural wood for a perfectly aged aesthetic.
Step 2: Mark & Create Holes
Using a ruler and pencil, carefully measure and mark four corner holes on each of the three stained boards. Ensure that the holes are positioned identically on all boards so they will align perfectly when stacked. If using a drill, select a wood bit slightly larger than your rope’s diameter and drill through each marked spot. If using thin craft boards or foam board covered in contact paper, carefully create holes with a sharp craft knife or awl, ensuring they are clean and wide enough for the rope.
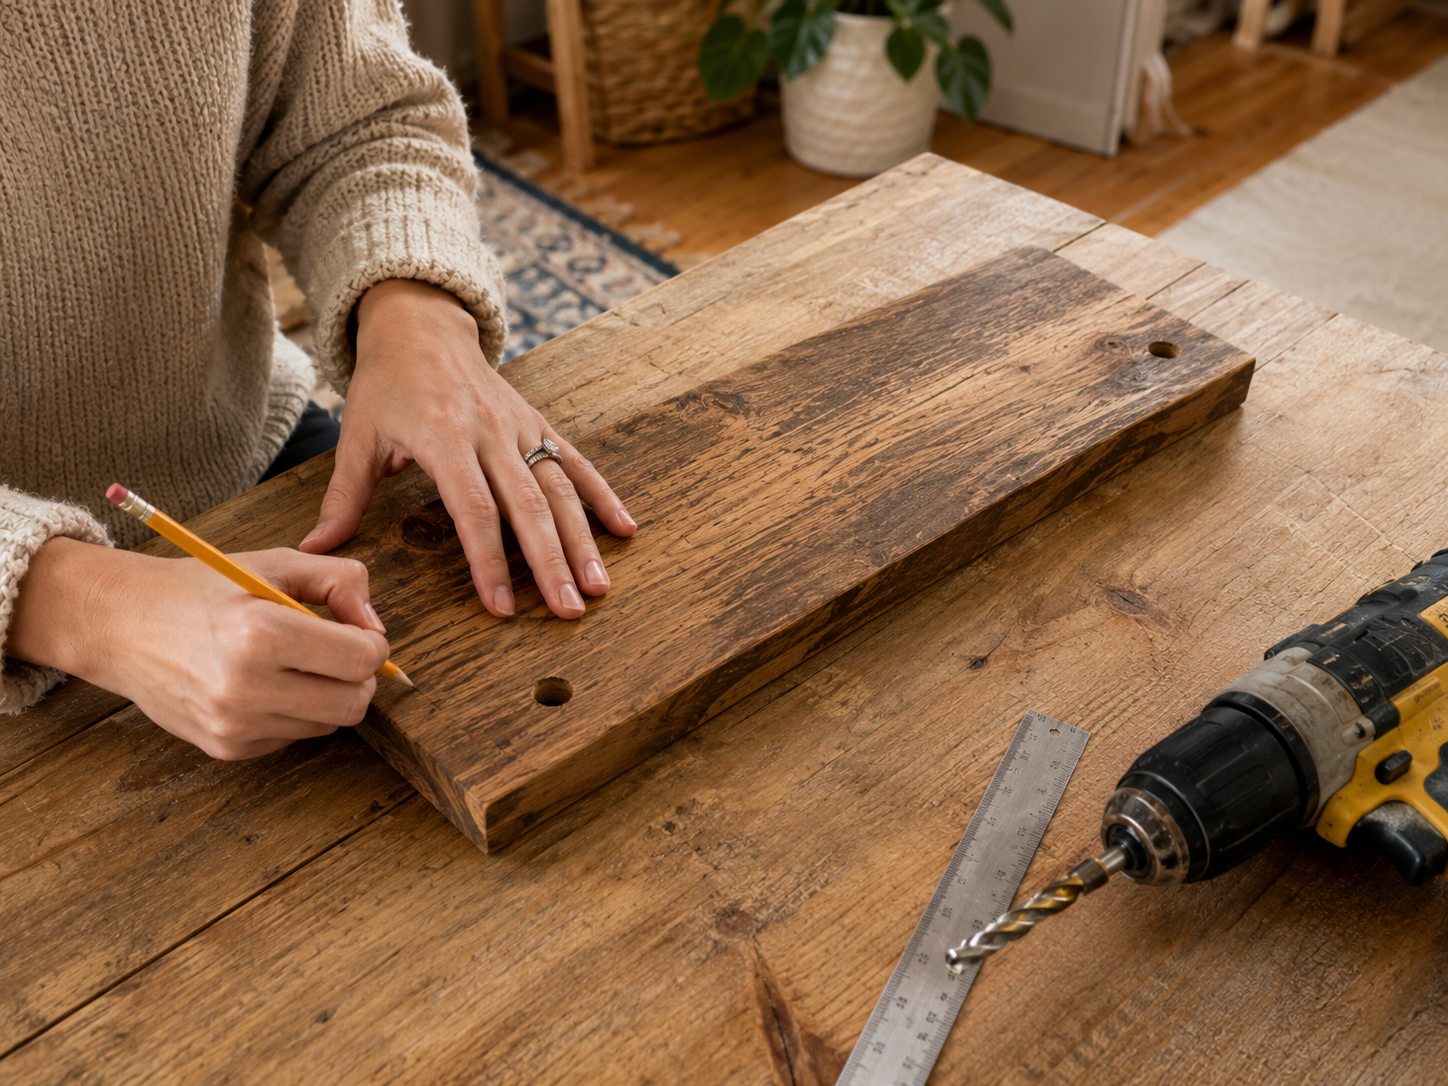
💡 Pro Tip: Consistency is key for level shelves! Create a template on paper or use the first drilled board as a guide to mark subsequent boards. When drilling, place a scrap piece of wood underneath to prevent splintering. For foam board or thin craft wood, a heated awl can create cleaner holes. Always double-check hole diameter with your rope before proceeding.
🗓️ Keep all your craft projects on track! Explore our printable planners & templates at CraftersDT on Etsy and use code CRAFT20 for 20% off!
Step 3: Cut Rope & Prep Beads
Measure and cut two long pieces of thick jute or nautical rope. The length needed will depend on your desired shelf height and spacing. A good estimate is to measure the total desired height from the hanging point to the bottom of the lowest shelf, then multiply by two and add extra for knots, beads, and the top hanging loop. Gather your large natural wooden beads, ensuring you have enough for above or below each corner of every shelf (total of 12 for 3 shelves) plus any extra you want for the top hanging section.
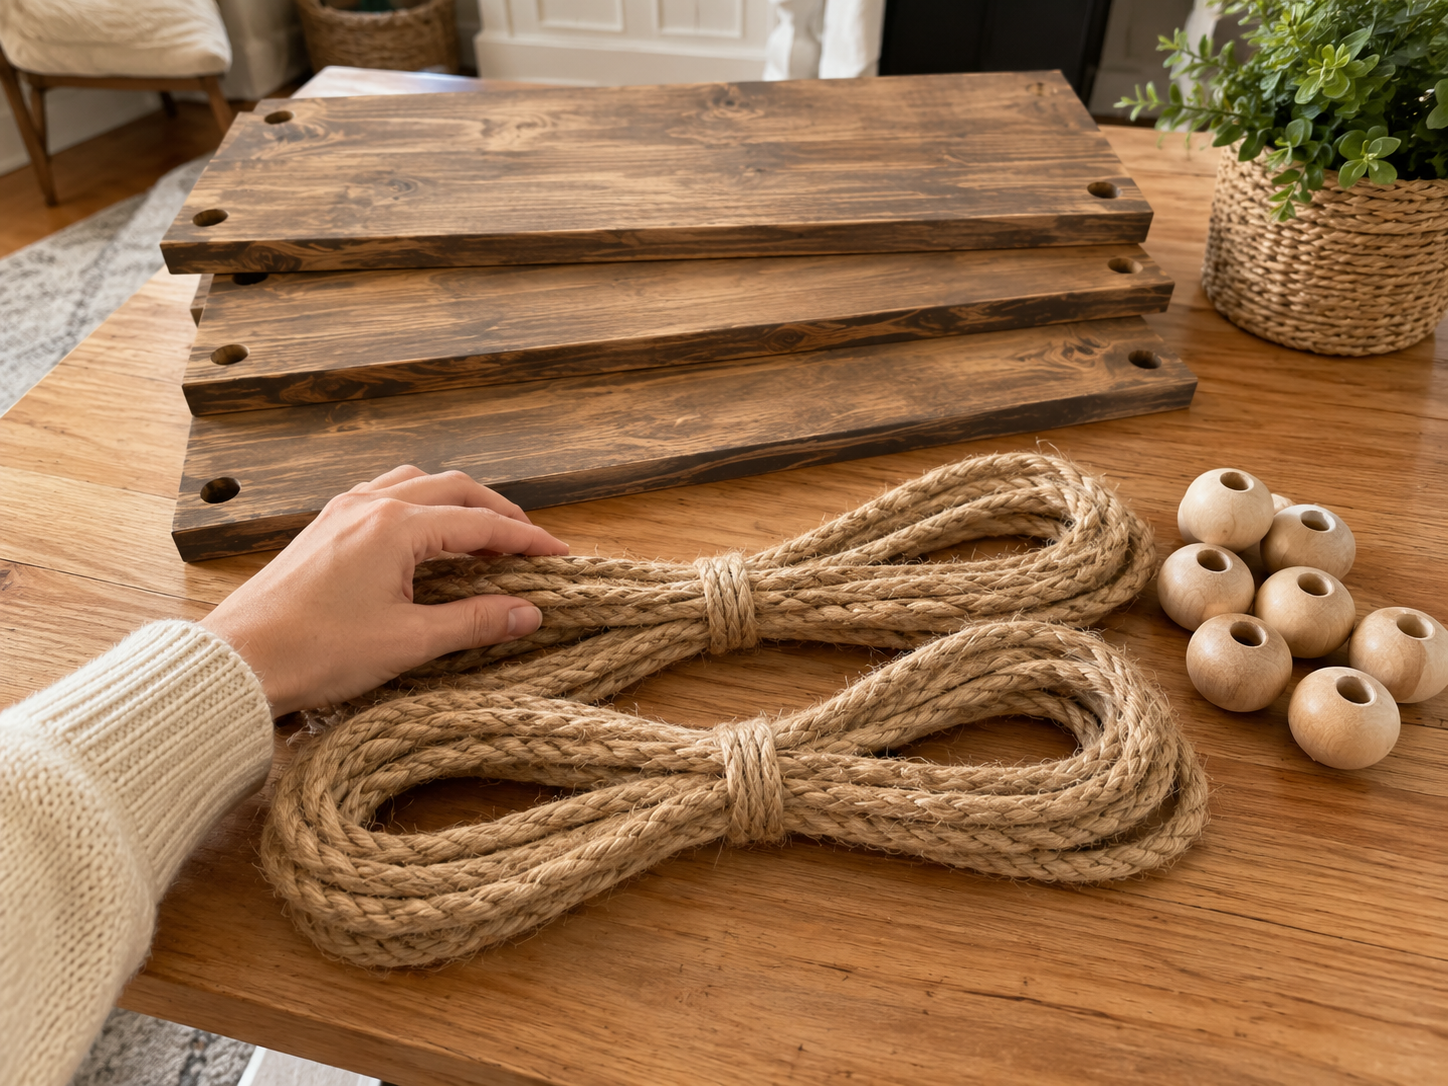
💡 Pro Tip: To calculate rope length precisely: (Desired total height from hanging point to lowest shelf bottom) + (Desired space between shelves x 2) + (Shelf thickness x 2) + (Length for top hanging loop) + (Extra 12-18 inches for knots and trimming). To prevent rope ends from fraying while threading, wrap them tightly with masking tape or dip them in a small amount of hot glue and let dry.
Step 4: Thread Rope & Secure Top Shelf
Take one of your long rope pieces and thread it through the two holes on one side of the top shelf, from the top surface down. Adjust the rope to ensure an equal length hangs below the board. Now, thread the second long rope piece through the two holes on the other side of the same top shelf. Once both ropes are threaded through the top board, carefully tie strong, secure knots directly underneath each of the four holes on the bottom side of the shelf. These knots will support the shelf. Add a decorative wooden bead directly above each knot on the top surface of the board.
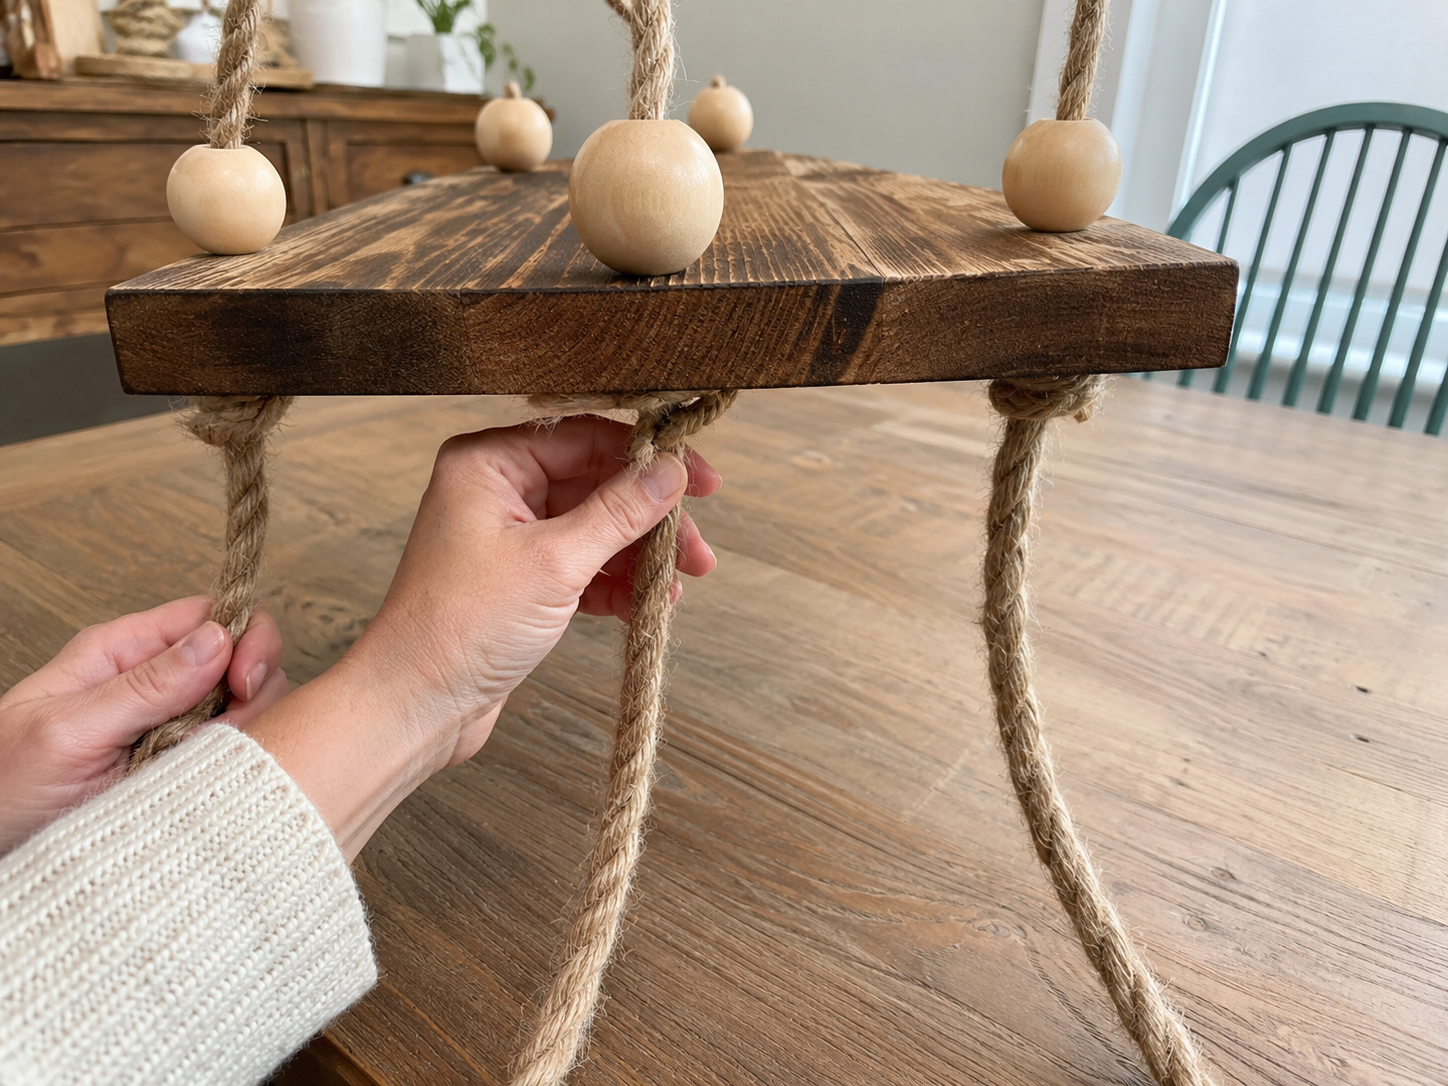
💡 Pro Tip: Use a simple overhand knot or a double-overhand knot for maximum security, pulling it very tight. Ensure the knots are snug against the board to prevent sagging. If your rope is fraying during threading, use the tape/hot glue tip from before. For easy bead placement, a drop of hot glue inside the bead can keep it from sliding, but ensure the knots below are doing the primary support.
Step 5: Add Beads & Level Middle Shelf
For the second shelf, decide on your desired spacing from the top shelf. Thread the four rope ends down through the corresponding holes of the middle shelf, from the top surface down. Before tying the knots, slide a decorative wooden bead onto each of the four ropes, positioning them just above where the second shelf will sit. Carefully tie strong, level knots directly underneath each corner of the second shelf, ensuring the board is even and parallel to the top shelf. Repeat the bead placement on the top surface of the second shelf.
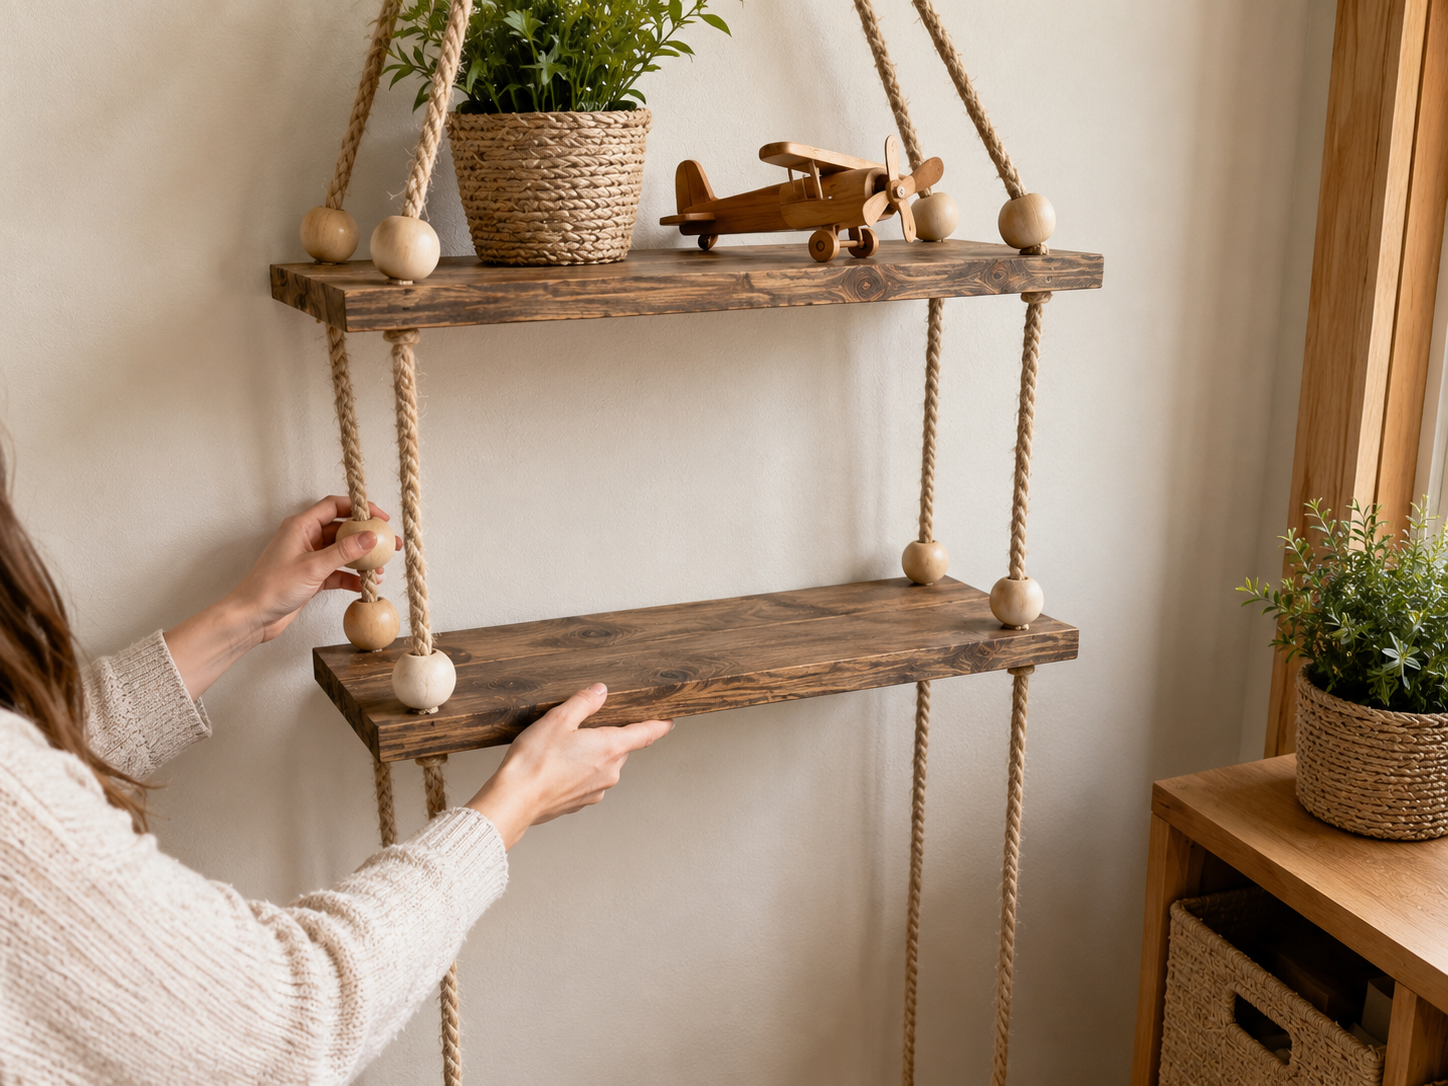
💡 Pro Tip: To ensure even spacing, use a ruler or a scrap piece of wood cut to your desired shelf-to-shelf distance. Hang the assembly (or have a helper hold it) to visually check for levelness before tightening knots completely. Once satisfied, pull the knots extremely tight. For extra security, a tiny dab of hot glue under each knot can prevent slippage, but remember this makes adjustments difficult.
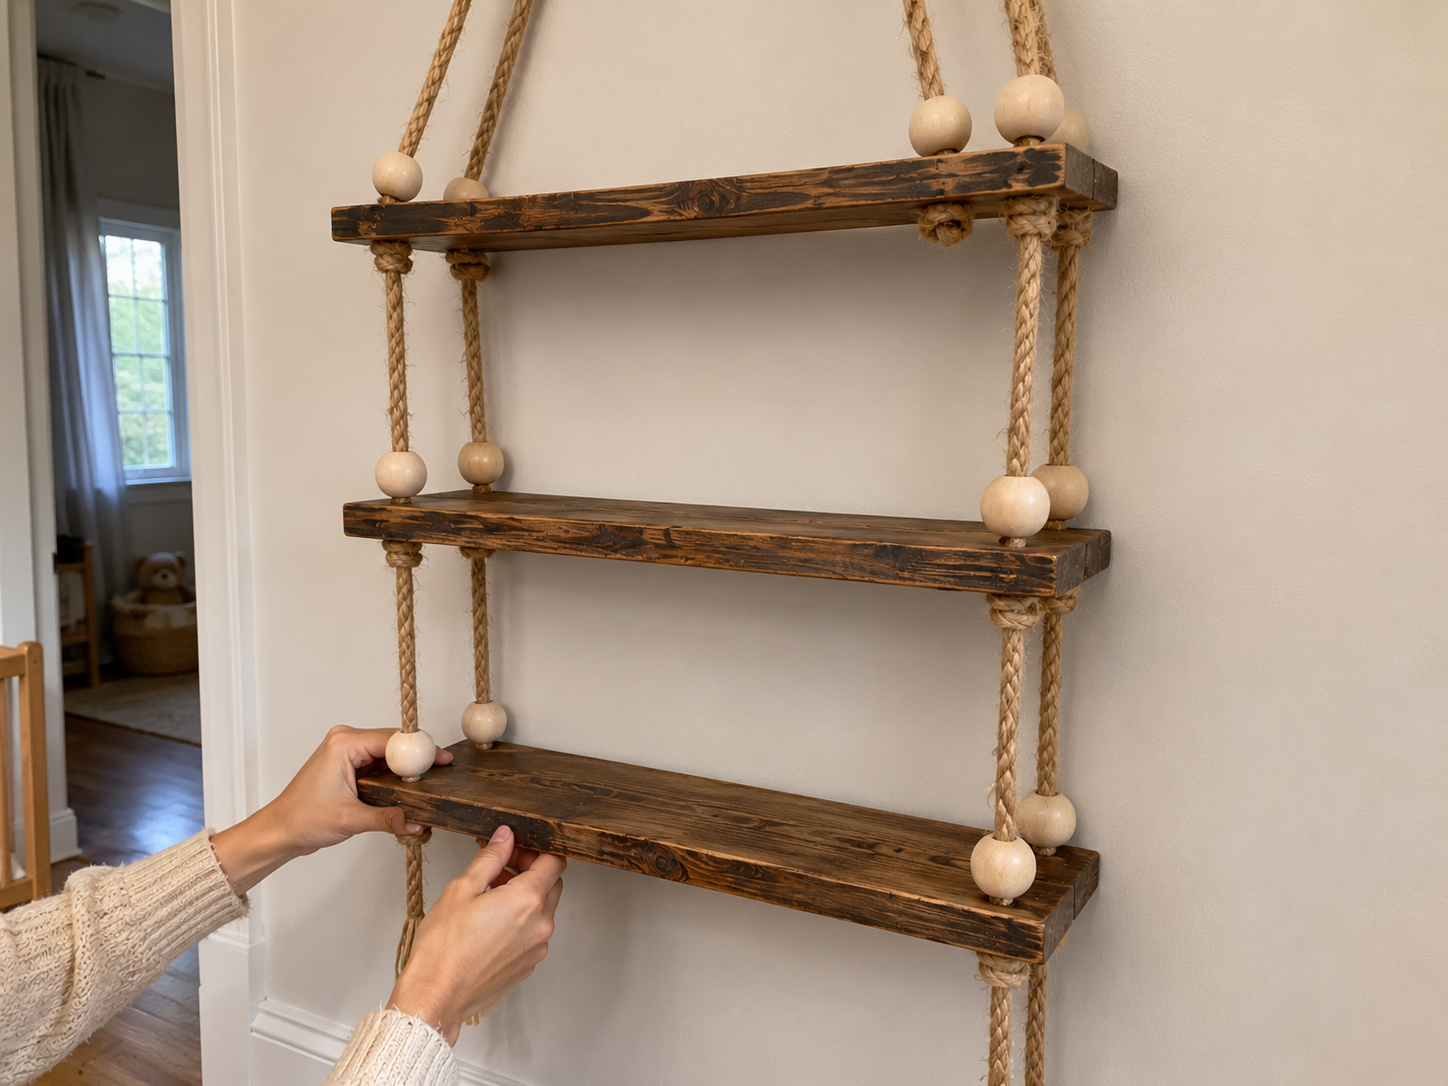
Step 6: Complete Third Shelf & Secure
Repeat the process for the third and final shelf. Thread the remaining four rope ends through the holes of the bottom shelf. Slide a decorative wooden bead onto each rope to sit just above this shelf. Tie strong, secure knots directly underneath each corner of the bottom shelf, ensuring it is level with the others and consistently spaced. Trim any excess rope ends below the final knots, leaving enough length for optional tassels or frayed ends.
💡 Pro Tip: Before making the final knots, step back and view your entire shelf unit from a distance to ensure all shelves are visually level and the spacing is even. Minor adjustments can be made by carefully loosening and retightening knots. Once satisfied, consider applying a dab of hot glue to secure all knots in place permanently.
Step 7: Form Hanging Loop & Add Tassels
Gather the four rope ends at the top of the shelf unit, bringing them together to form a strong, centralized hanging loop. Tie a very secure and robust knot to hold the loop in place and support the weight of the entire shelf unit and its contents. For the bottom ends of the ropes, you can either fray the rope for a natural, rustic look or create / attach soft jute tassels for a boho-chic finish using hot glue or by tying them securely.
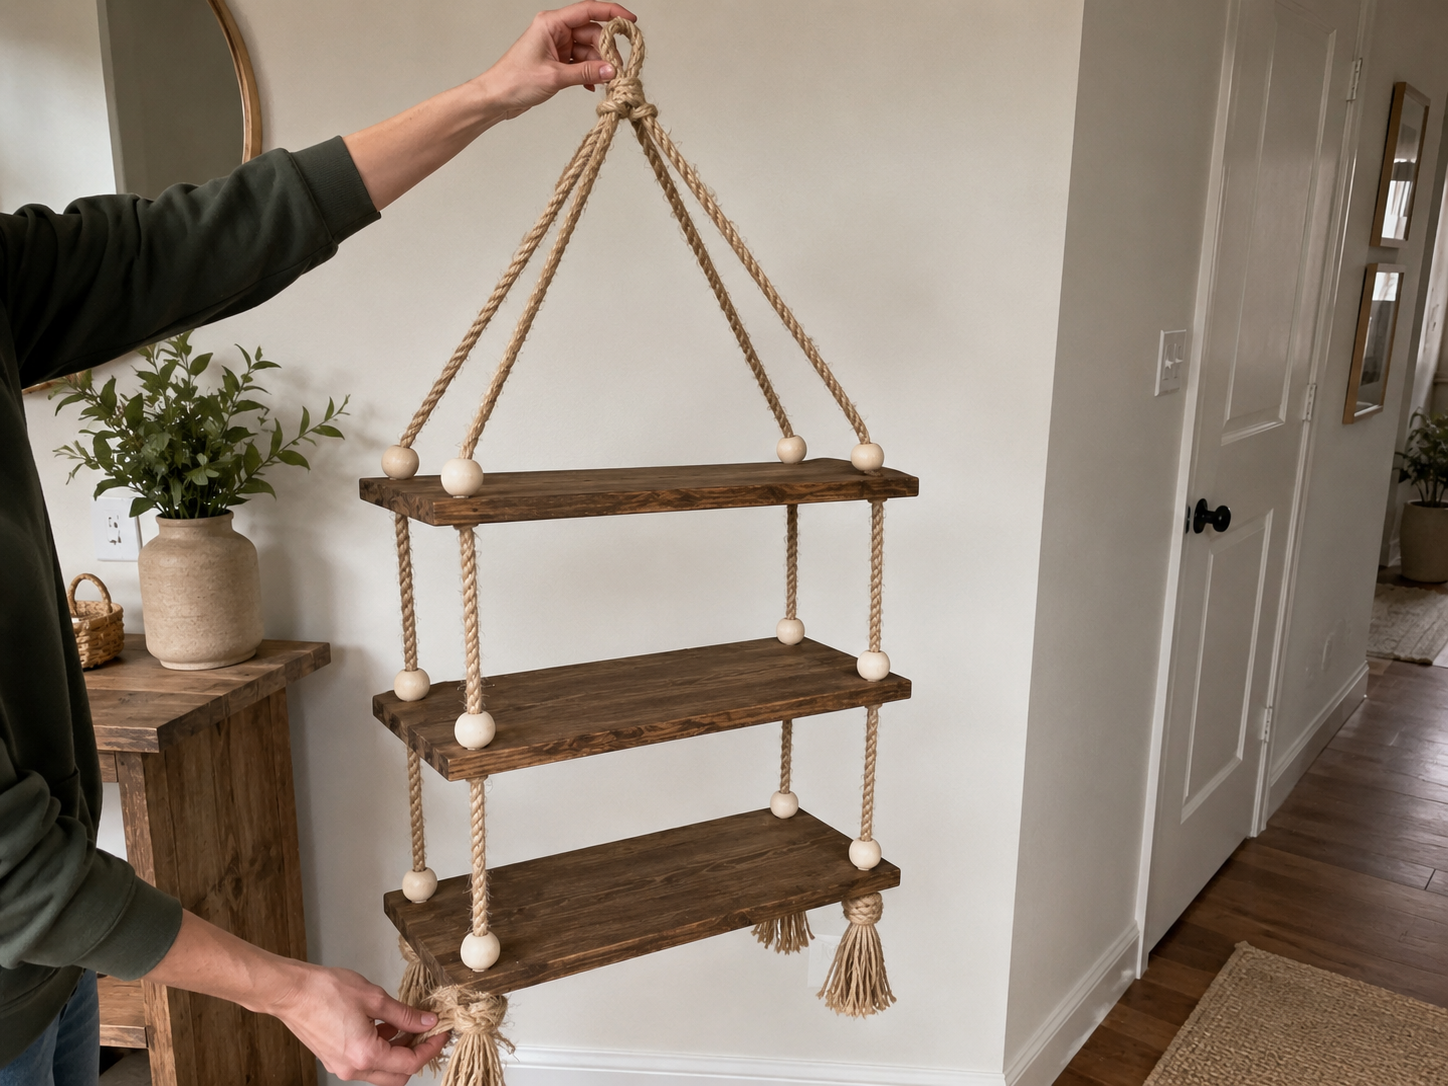
💡 Pro Tip: For the top hanging loop, an overhand knot or a figure-eight knot can be very strong. Test the hanging strength carefully before placing items on the shelves. To make simple tassels, wrap jute twine around your fingers or a small card, then tie off the top and cut the bottom loops. Attach with hot glue or by tying them into the rope ends. Ensuring the tassels are securely attached will prevent them from falling off with use.
📱 Free to Download
Join 50,000+ crafters already using Craftino
Browse 84+ Baby & Nursery ideas and thousands more in the app
✓ Save crafts & browse fully offline
✓ Download printable PDF guides for every project
✓ Step-by-step photo tutorials, nothing left out
✓ 1,000+ craft projects with new ones added every week
Step 8: Mount & Style Display
Find a suitable wall location in a child’s bedroom or playroom and securely mount your hanging rope shelf using an appropriate wall anchor or sturdy hook, ensuring it can safely bear the weight of the shelves and any items you plan to display. Arrange small books, beloved stuffed animals, wooden toys, little plants, or other nursery decor items on the shelves to complete your cozy boho kids’ room look.
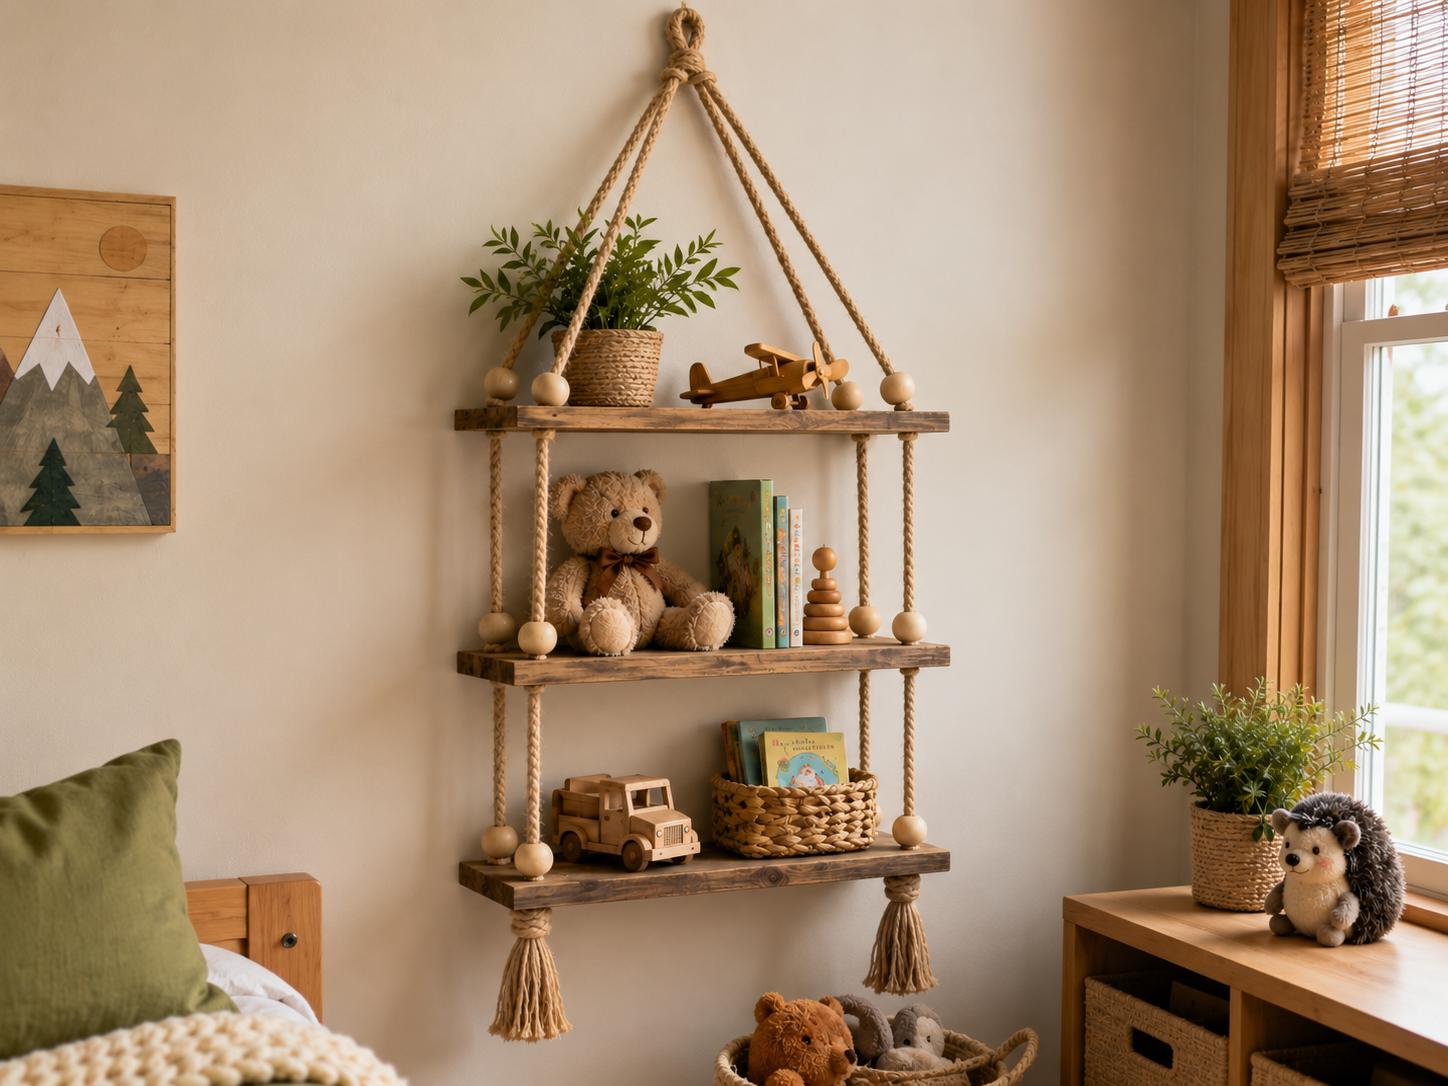
💡 Pro Tip: Always use a stud finder to locate a wall stud for maximum support, or use heavy-duty wall anchors suitable for the weight of your shelf and its potential contents. Distribute the weight evenly across the shelves for stability. When styling, vary heights and textures of items to create visual interest, keeping safety in mind for items displayed in a child’s room.
Your Boho Shelves Are Ready to Hang!
Woohoo, you did it! Your Cozy Boho Kids Room Hanging Rope Shelves are all done and looking fabulous. Hang them up in a nursery or a kid’s room to add that perfect touch of charm and extra storage. Don’t forget to share your finished project with me on social media, I’d love to see your personal touch!
📱 Free to Download
Join 50,000+ crafters already using Craftino
Browse 90+ Baby & Nursery ideas and thousands more in the app
✓ Save crafts & browse fully offline
✓ Download printable PDF guides for every project
✓ Step-by-step photo tutorials, nothing left out
✓ 1,000+ craft projects with new ones added every week
Frequently Asked Questions
What Dollar Tree supplies do I need for these Cozy Boho Kids Room Hanging Rope Shelves?
You’ll need two small wooden signs (about 5×7 inches works great), some jute rope (a 30-foot roll is plenty), and two packs of wooden beads from Dollar Tree for each set of shelves.
How much rope should I use for each tier of the DIY Hanging Rope Shelves?
For a two-tier shelf, cut four pieces of rope, each about 36 inches long. This gives you plenty of slack for knotting and adjusting your Cozy Boho Kids Room Hanging Rope Shelves.
Can I paint the wooden shelves for a Baby & Nursery theme?
Absolutely! I used a light blush pink acrylic paint on mine, but any craft acrylic paint will work. Just make sure to let each coat dry for at least 20-30 minutes before adding another or assembling.
How long does it take to make these Cozy Boho Kids Room Hanging Rope Shelves?
You can typically assemble one set of these DIY hanging shelves in about 30-45 minutes, not including any paint drying time. It’s a quick project perfect for a crafting afternoon!
Are these DIY rope shelves durable enough for a Baby & Nursery?
Yes, if constructed correctly with secure knots, they are quite sturdy. They can hold small, lightweight items like stuffed animals, small books, or decorative pieces up to about 1-2 pounds per shelf. Avoid heavy objects for safety in a Baby & Nursery.
What’s the estimated total cost for making these Cozy Boho Kids Room Hanging Rope Shelves?
When using mostly Dollar Tree supplies, the total cost for one set of these shelves is usually under $5, making it a super budget-friendly option for Organizing & Storage.
Explore more home decor & floral craft essentials at Dollar Tree.
Leave a Reply