Okay, so my husband brought home a bunch of old fishing stuff he was gonna toss, and honestly, I saw those floats and thought, Dollar Tree dupe inspiration! That’s how this super cute DIY Rustic Fishing Bobber Porch Decor idea popped into my head. It was so much fun to make and adds the perfect touch to our deck for summer.
See also: Charming Farmhouse Floral Porch Garland Craft
Theme: Summer & Beach
Materials Needed
- Large Plastic Bowls/Planters (x2)
- Small Round Plastic Container Lid
- Acrylic Paints (Red, White, Dark Bronze/Black)
- Thick Jute or Nautical Rope
- Wooden Fish Cutout or Foam Board
- Craft Wire (for hook)
- Hot Glue Gun & Glue Sticks
- Basic Craft Tools (Scissors, Sandpaper, Painter’s Tape)
- Clear Outdoor Sealer (Optional)
📋 Love staying organized while crafting? Check out our printable planners & craft designs at CraftersDT on Etsy and use code CRAFT20 for 20% off your entire order!
Why This Craft Works
This craft is just perfect for adding some easygoing, laid-back charm to your outdoor spaces. Think about hanging these little bobbers on your porch railing, by the pool, or even in a sunroom for a touch of that coastal, lake house vibe. They really scream “Summer & Beach” without being too over the top, making them great for any outdoor gathering or just everyday enjoyment.
📱 Free to Download
Join 50,000+ crafters already using Craftino
Browse 30+ Summer & Beach ideas and thousands more in the app
✓ Save crafts & browse fully offline
✓ Download printable PDF guides for every project
✓ Step-by-step photo tutorials, nothing left out
✓ 1,000+ craft projects with new ones added every week

And let’s talk budget! You can whip up a few of these adorable fishing bobbers for under $5, easy peasy. Most of the bits and pieces, like the wooden balls, paint, and twine, come straight from my favorite place, Dollar Tree. It’s amazing what you can create with just a few bucks and a little creativity.
This project is seriously so easy, it’s perfect for beginners or even crafting with older kids. You can put one together in about 20 to 30 minutes, so it’s great for a quick afternoon craft session. Plus, it makes a super cute last-minute gift for anyone who loves that rustic, beachy look!
Step-by-Step Instructions for DIY Rustic Fishing Bobber Porch Decor
Ready to get your craft on? This DIY Rustic Fishing Bobber Porch Decor is seriously one of the easiest and most fun projects I’ve done lately. It took me less than 30 minutes to make a few, and you’ll be amazed at how quickly your own cute bobbers come to life. Grab your Dollar Tree goodies and let’s make some summer magic!
Step 1: Assemble the Bobber Body
Begin by preparing your two large plastic bowls or round plastic planter bowls. Ensure they are clean and dry for optimal adhesion. Apply a generous bead of hot glue to the rim of one bowl, then quickly and firmly press the rim of the second bowl onto it, aligning them perfectly to create a unified, round bobber shape. Hold them together for a minute or two until the glue sets completely, forming a stable sphere.
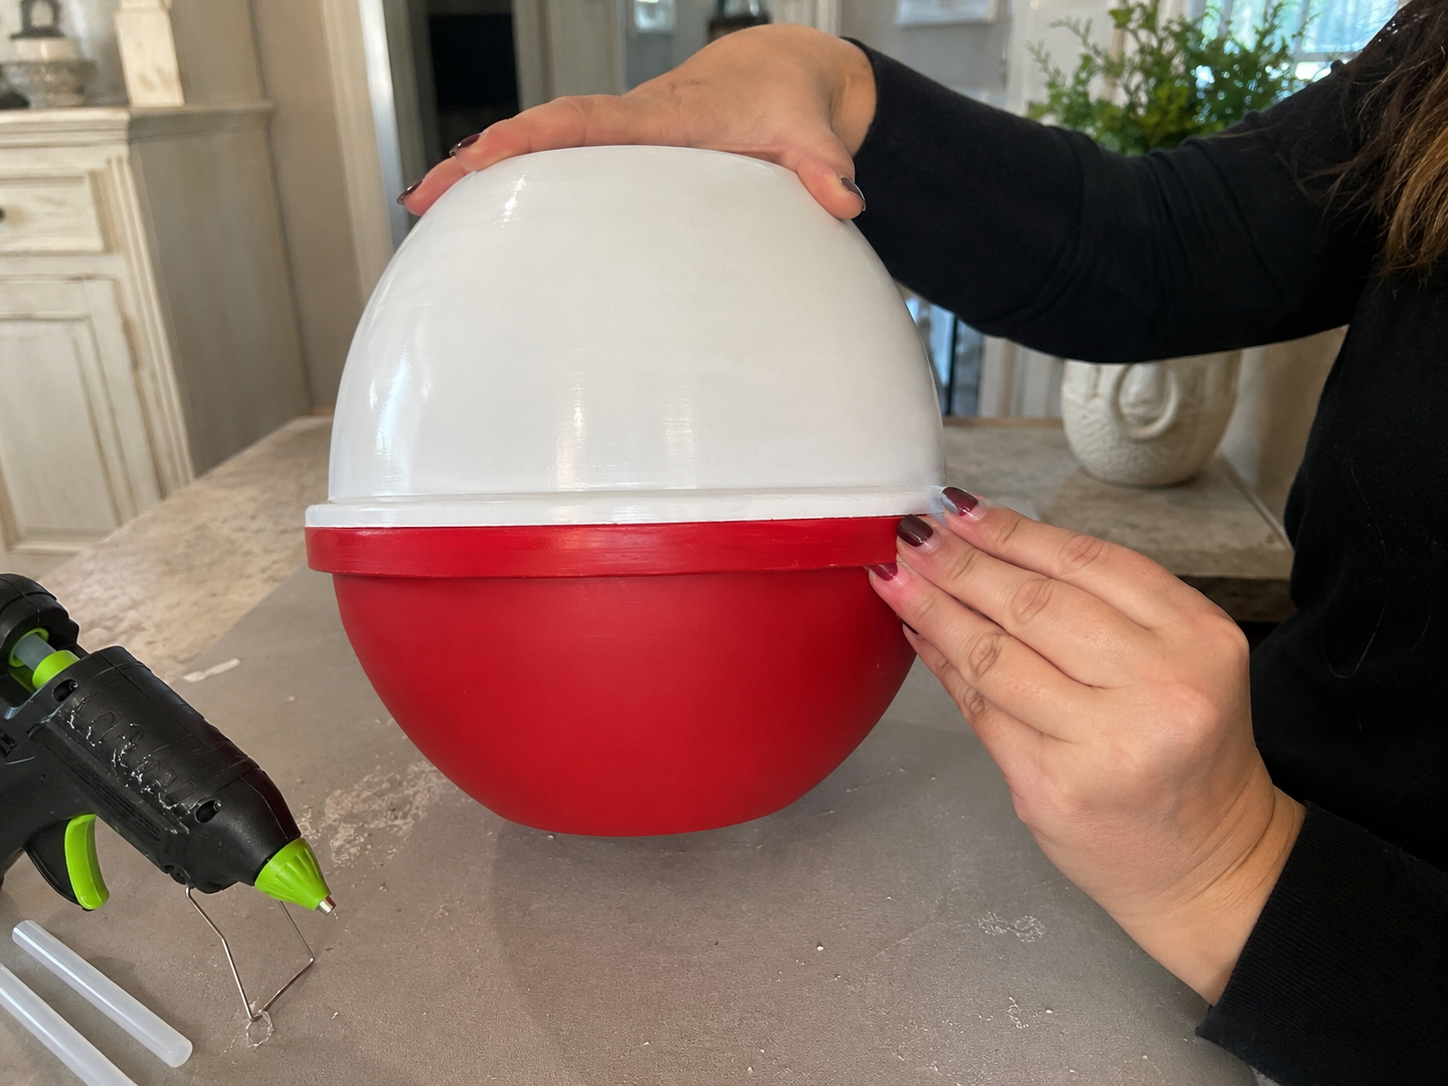
💡 Pro Tip: For a stronger and more lasting bond, lightly scuff the rims of both plastic bowls with fine-grit sandpaper before applying the hot glue. This creates a slightly rougher surface that the glue can grip onto more effectively, preventing separation over time. Use high-temp hot glue for the best durability.
Step 2: Paint the Iconic Colors
Once the bobber body is securely assembled and the glue is dry, it’s time to add its signature red and white colors. Use painter’s tape to mark a clean, even line around the middle of the bobber, separating the top and bottom halves. Paint the entire top section with white acrylic or spray paint, ensuring full, even coverage. After the white paint is dry to the touch, carefully paint the bottom section with bright red acrylic or spray paint. Remove the painter’s tape while the red paint is still slightly tacky to reveal a crisp color separation. Allow both colors to dry completely.
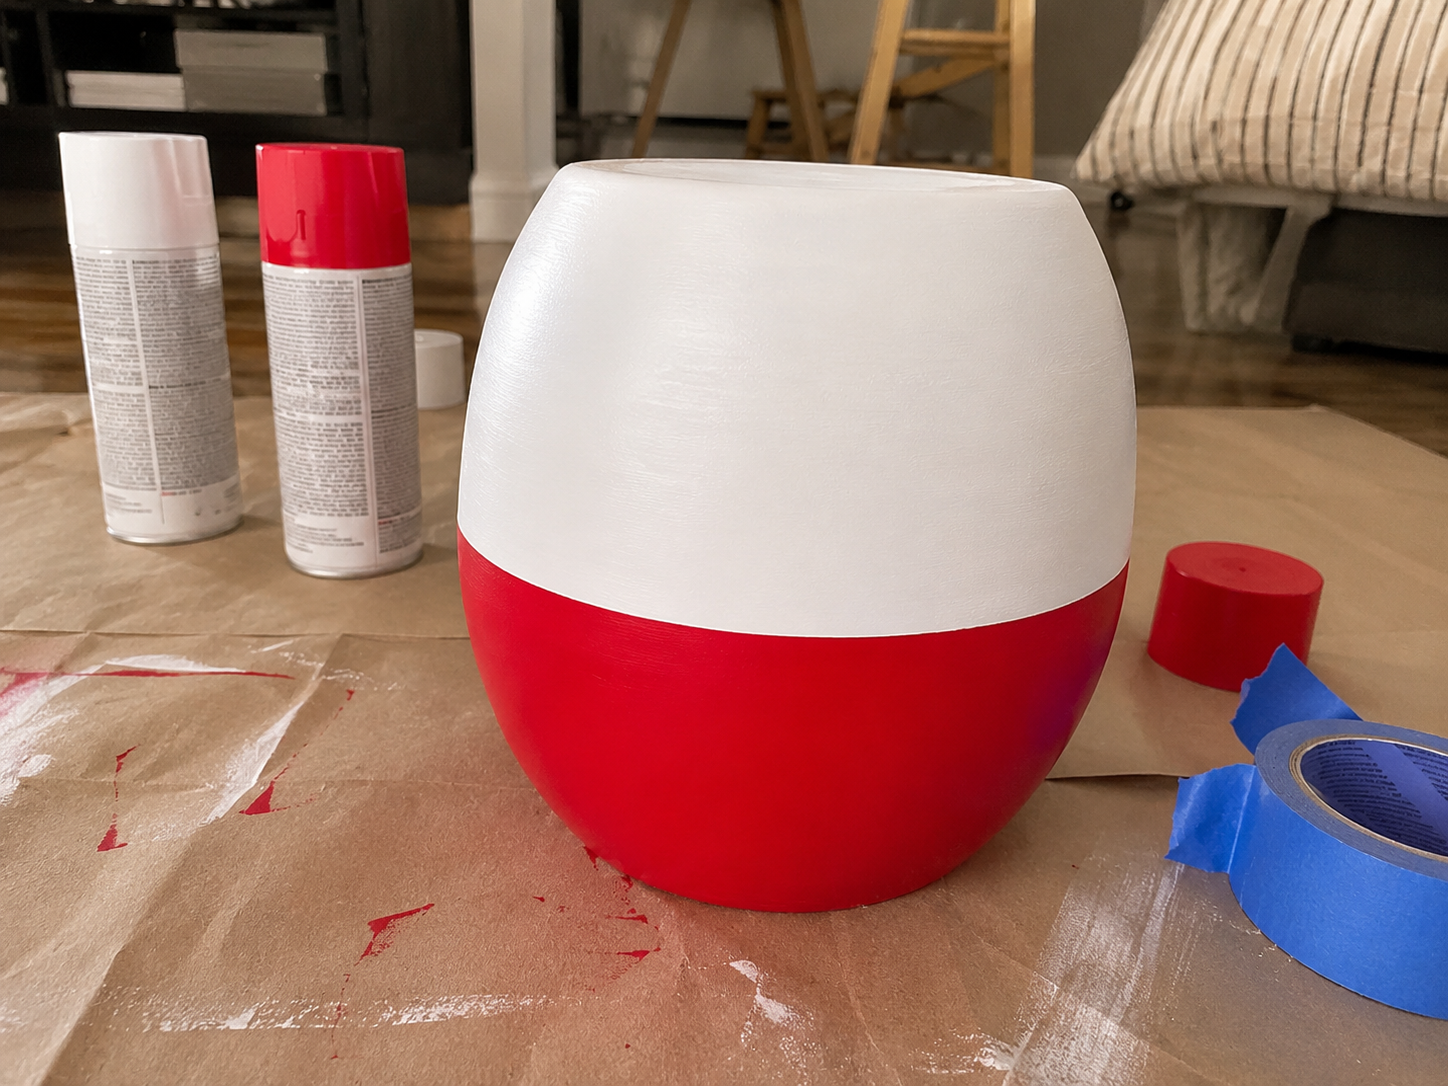
💡 Pro Tip: Achieve a professional finish by applying multiple thin coats of paint rather than one thick coat. This prevents drips, streaking, and ensures a smoother, more durable surface. For spray paint, work in a well-ventilated area using even, sweeping motions, allowing at least 15-20 minutes drying time between coats.
🗓️ Keep all your craft projects on track! Explore our printable planners & templates at CraftersDT on Etsy and use code CRAFT20 for 20% off!
Step 3: Attach the Bobber Cap
Take your small round plastic container lid or mini bucket lid. Paint this lid entirely with the same bright red acrylic or spray paint used for the bobber’s bottom half, ensuring it matches. Once the paint on the lid is completely dry, apply a bead of hot glue around the bottom rim of the painted lid. Carefully center it on the very top of your white-painted bobber body and press firmly to secure it in place, creating the distinctive cap of the fishing bobber.
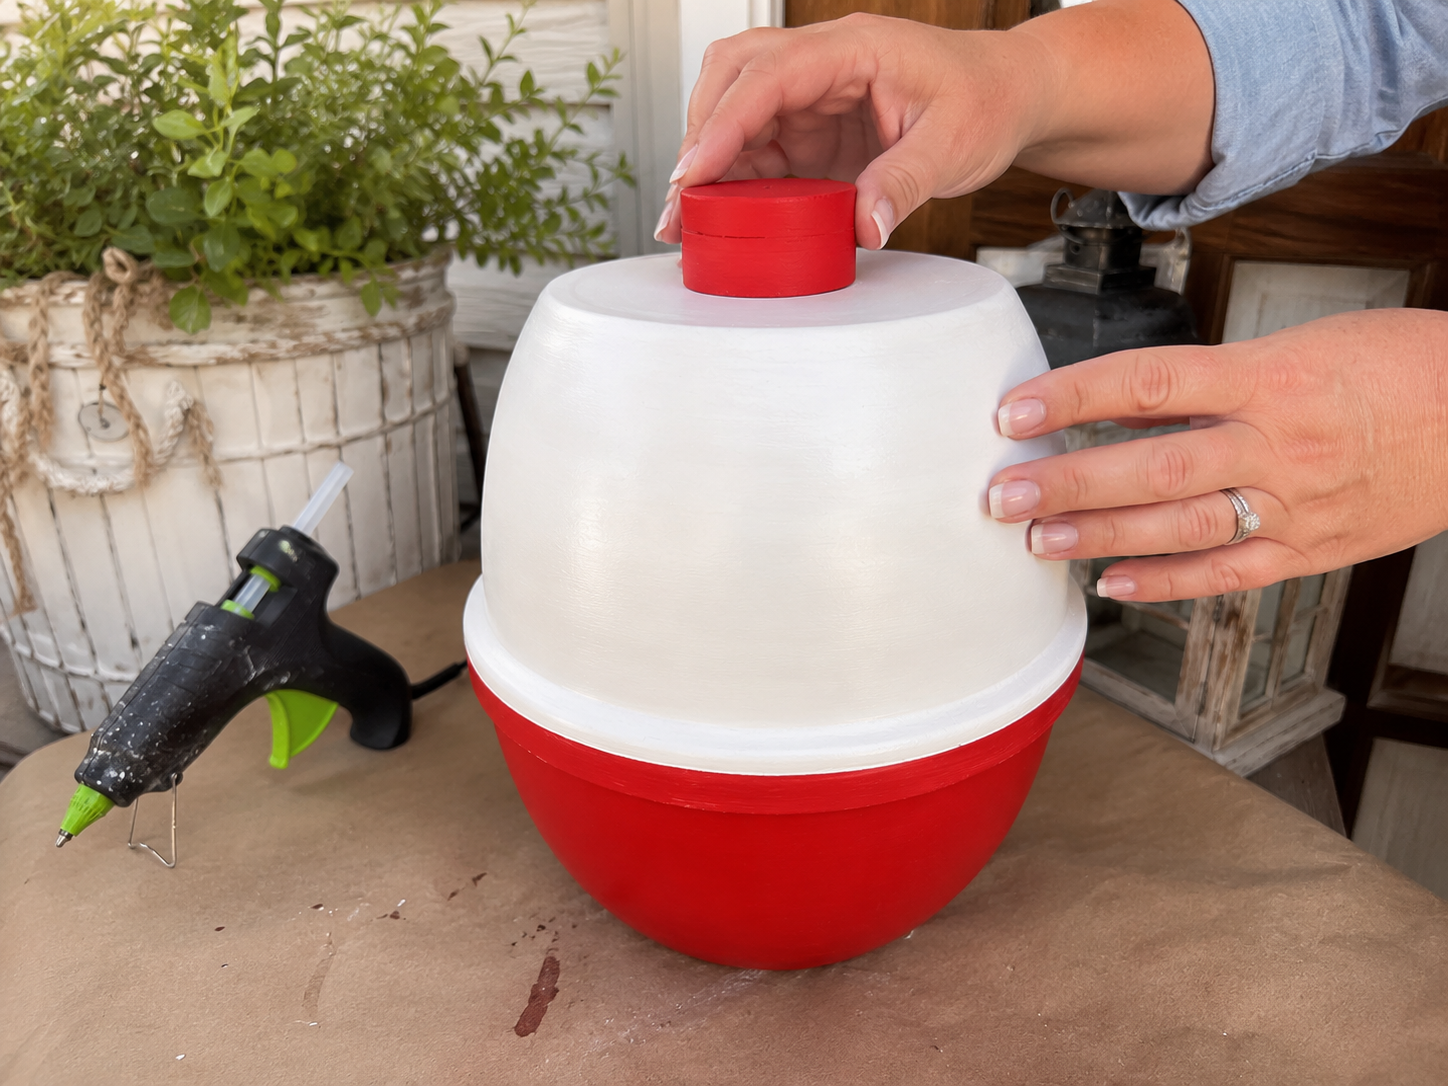
💡 Pro Tip: If your plastic lid is very smooth and glossy, lightly scuffing its surface with fine-grit sandpaper before painting will significantly improve paint adhesion and reduce the risk of chipping. Ensure both the lid’s paint and the bobber’s paint are fully dry before gluing to prevent smudges.
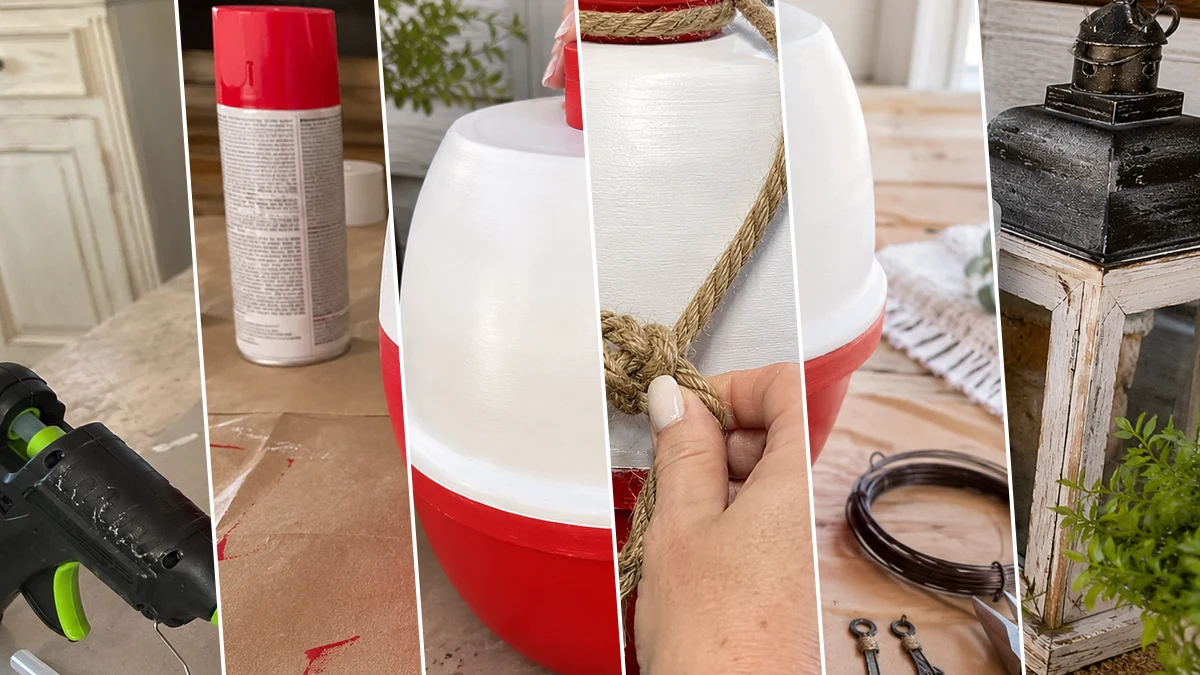
Step 4: Add Rope & Distress (Optional)
For an authentic farmhouse porch look, gently distress the painted bobber. Use fine-grit sandpaper or a dry brush technique to lightly scuff edges and raised areas, such as the seam where the bowls meet and around the base of the red cap, mimicking natural wear. Next, take your thick nautical or jute rope. Wrap one end around the base of the red cap, securing it discreetly with a dab of hot glue if necessary. Bring the rope down the front of the bobber, creating a decorative loop, and tie it into a messy, rustic nautical knot. Leave some frayed ends for added texture and charm.
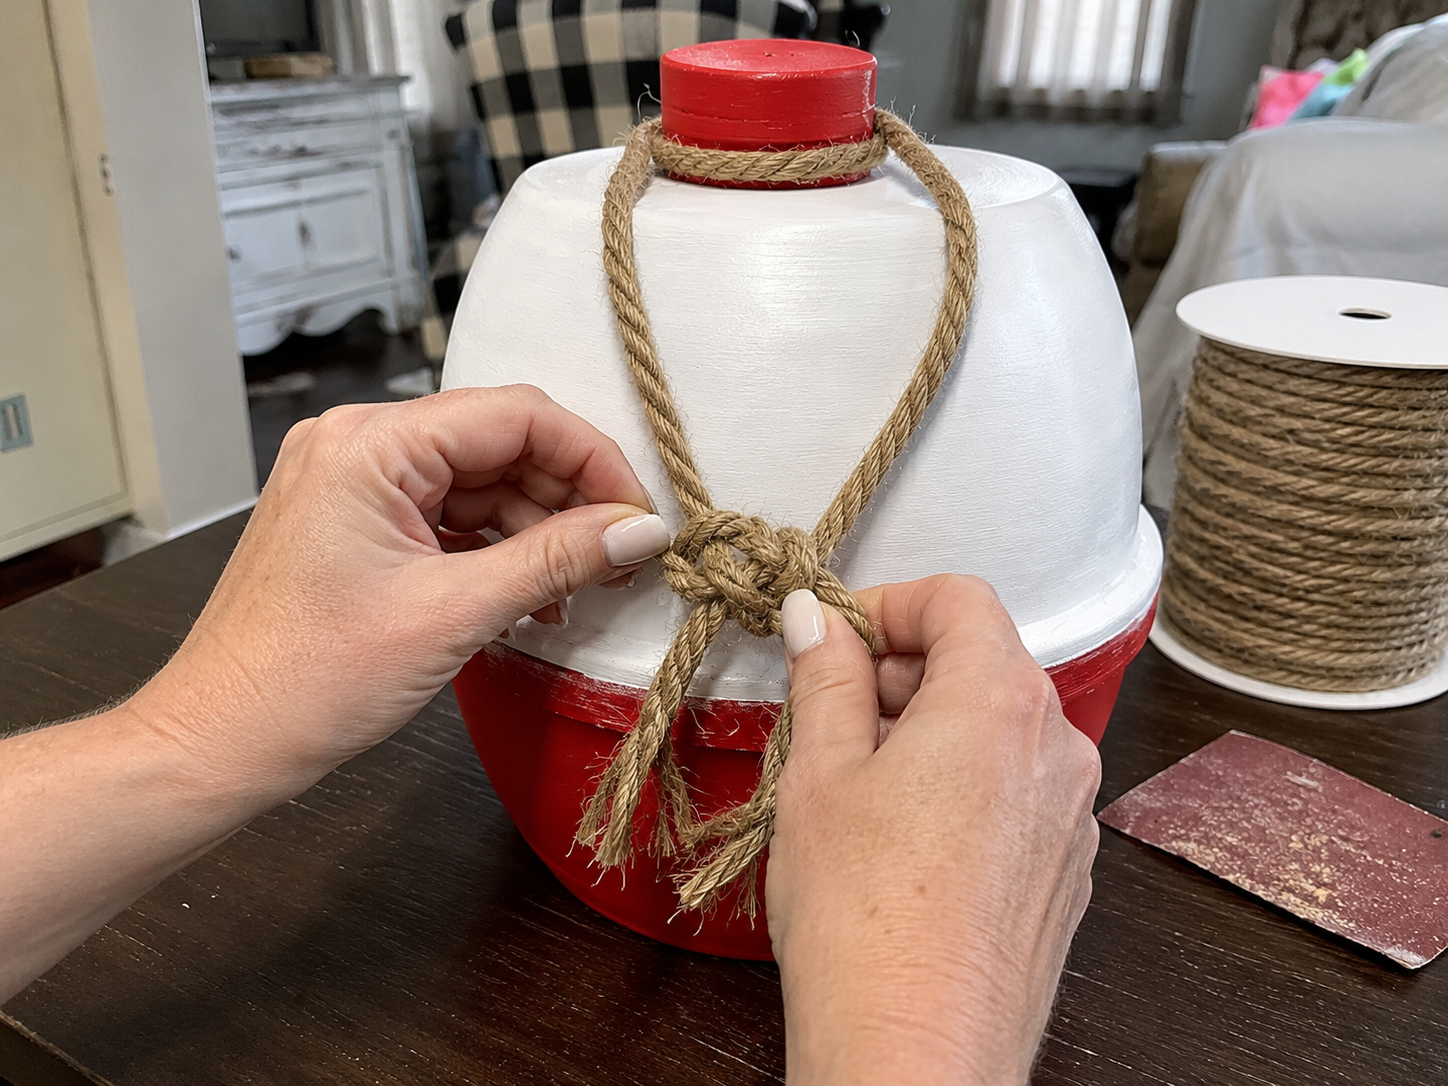
💡 Pro Tip: When distressing, start with very light pressure; you can always remove more paint but it’s hard to put it back! For the nautical knot, practicing a simple overhand knot or a figure-eight knot on a scrap piece of rope first can help achieve the desired rustic look.
Step 5: Craft & Attach Charms
Now, create your small fish charm. If using a wooden cutout, simply paint it red or leave it natural wood for a rustic feel. If using foam board, cut out a fish shape, paint it, and perhaps outline it with a marker for definition. Next, form the fishing hook ornament. Using Dollar Tree wire or floral wire, bend it into a classic hook shape. You can paint it dark bronze or black to give it a weathered, metal look. Once dry, attach the fish charm to the rope using floral wire, a small loop of jute, or by tying directly. Secure the wire hook charm beside it, either directly to the rope or with a small dab of hot glue to the bobber body near the rope for stability.
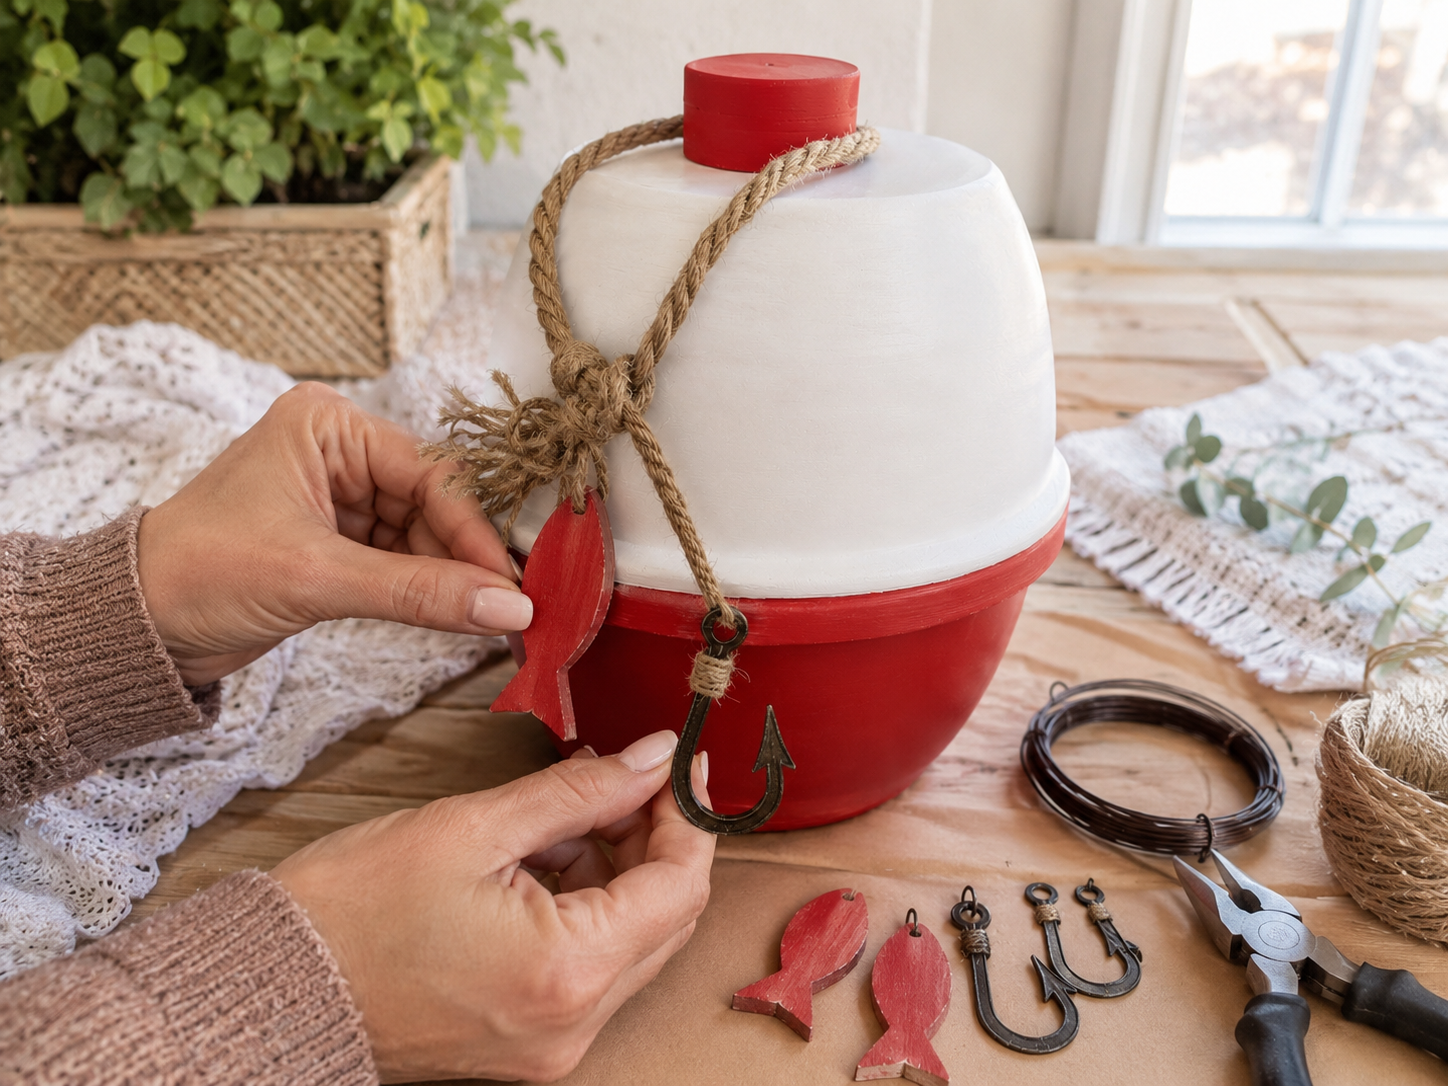
💡 Pro Tip: For bending the wire hook, use needle-nose pliers for precision, especially when creating the small eyelet at the top. If painting wire, a metal primer or acrylic paint formulated for multi-surfaces will adhere best. Ensure all paint on the charms is fully dry before attaching to prevent smudges.
📱 Free to Download
Join 50,000+ crafters already using Craftino
Browse 30+ Summer & Beach ideas and thousands more in the app
✓ Save crafts & browse fully offline
✓ Download printable PDF guides for every project
✓ Step-by-step photo tutorials, nothing left out
✓ 1,000+ craft projects with new ones added every week
Step 6: Optional Outdoor Sealer
To protect your rustic fishing bobber from the elements if it will be displayed outdoors, consider applying a clear outdoor sealer. Follow the manufacturer’s instructions for application, typically involving multiple thin coats with adequate drying time between each. This crucial step will help prevent fading, chipping, and water damage, ensuring your charming porch decor lasts longer and maintains its rustic appeal.
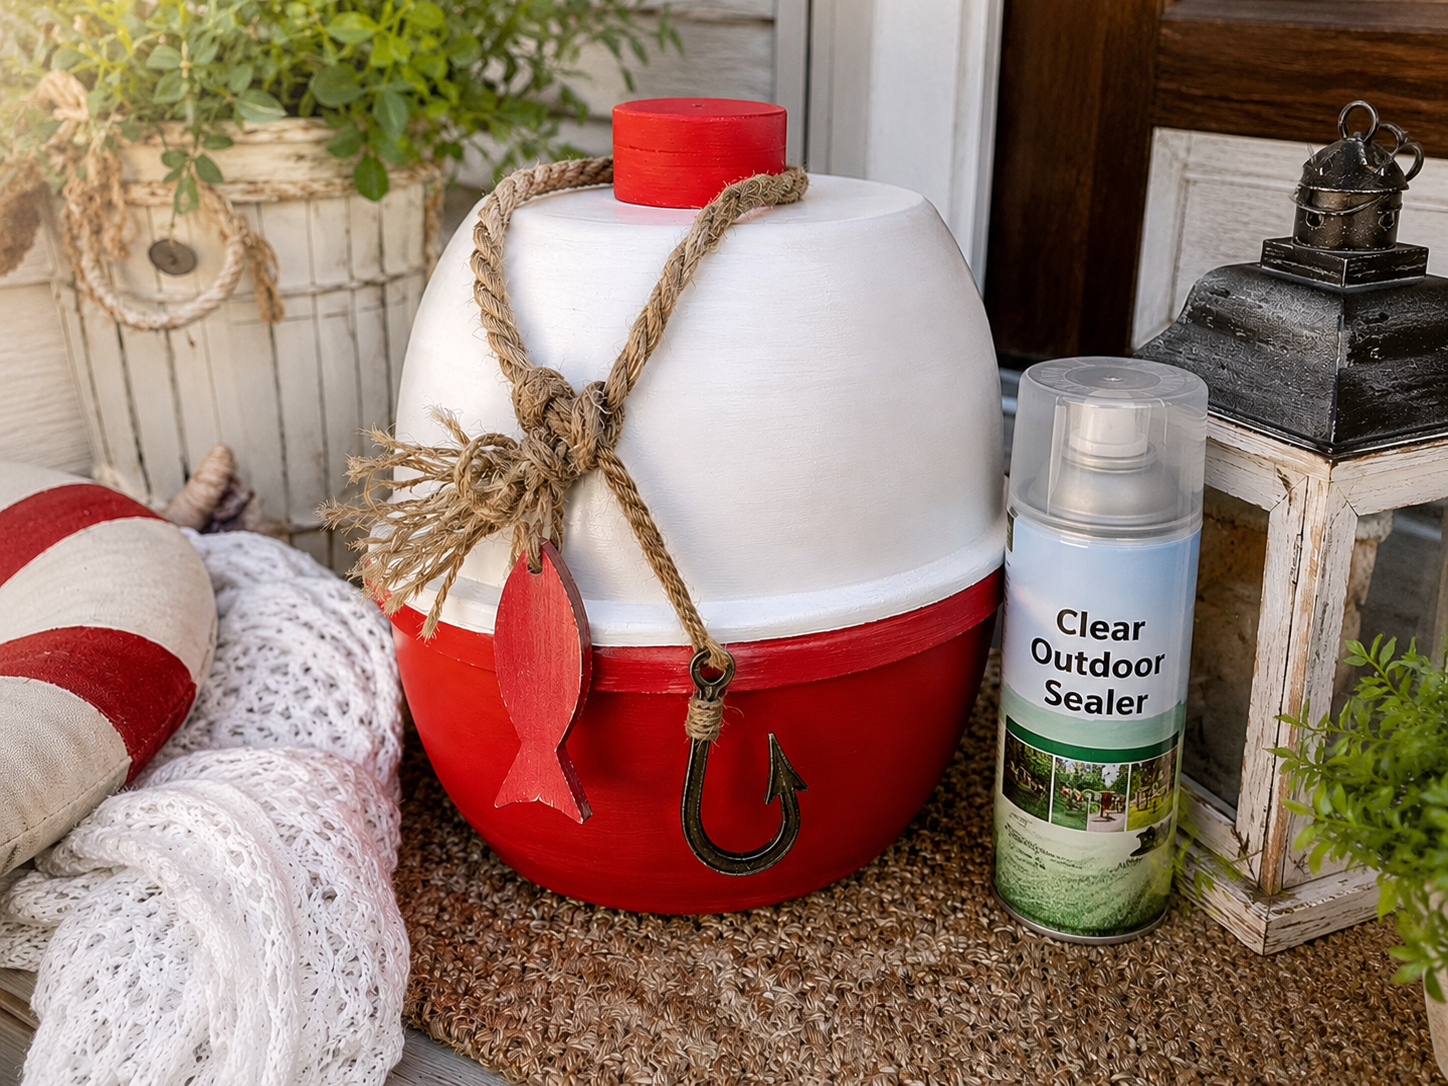
💡 Pro Tip: Always apply sealer in a well-ventilated area, preferably outdoors on a non-windy day. Test the sealer on an inconspicuous spot first to ensure it doesn’t react negatively with your paint colors or alter the desired finish. A matte or satin sealer usually complements the rustic look best, avoiding a high-gloss finish that might detract from the farmhouse aesthetic.
Your Sweet Summer Porch Decor Awaits!
Woohoo, you did it! Your DIY Rustic Fishing Bobber Porch Decor is ready to shine. Hang these little beauties on your porch, deck, or even inside for a fun Summer & Beach feel. Don’t forget to snap a pic and share your creations with me, or try mixing up the colors for your own unique twist!
📱 Free to Download
Join 50,000+ crafters already using Craftino
Browse 34+ Summer & Beach ideas and thousands more in the app
✓ Save crafts & browse fully offline
✓ Download printable PDF guides for every project
✓ Step-by-step photo tutorials, nothing left out
✓ 1,000+ craft projects with new ones added every week
Frequently Asked Questions
What Dollar Tree supplies do I need for this DIY Rustic Fishing Bobber Porch Decor?
You’ll want to grab wooden balls (about 1.5 to 2 inches in diameter), some red and white craft paint, and a roll of natural twine. You might also find small screw eyes there, which are perfect for hanging.
How much does it cost to make one of these DIY Fishing Bobbers?
Each bobber costs less than $1 to make if you already have basic craft paint and glue. If you buy all supplies new from Dollar Tree, you can make several for about $3-5 total.
How long does it take to create one DIY Rustic Fishing Bobber for Summer & Beach decor?
You can typically assemble and paint one bobber in about 15-20 minutes, not including drying time for the paint. If you’re making multiple, the hands-on time per bobber is even quicker.
What kind of paint works best for these Dollar Tree fishing bobbers?
Any basic acrylic craft paint works perfectly. I use the cheap bottles from Dollar Tree or Walmart, usually just 50 cents to $1 each, in classic red and white colors.
Can kids help make this Summer & Beach Home Decor craft?
Absolutely! This is a super fun and easy craft for kids, especially with adult supervision for painting and attaching the screw eyes. It’s great for ages 6 and up, fostering creativity and fine motor skills.
How can I customize my DIY Rustic Fishing Bobber Porch Decor?
You can easily customize them by using different paint colors like blue or yellow, adding distress ink for a more weathered look, or even tying on little charms or beads with your twine. Try varying the size of your wooden balls too!
Explore more home decor & floral craft essentials at Dollar Tree.
Inspiration / Credit: Lee Ann Hinote Casaday
Leave a Reply