My kiddos saw the cutest popsicle garland online and begged me to make something similar for their playroom, but you know me, I love a good Dollar Tree hack! So, we grabbed some pool noodles and got creative. This DIY Summer Popsicle Wall Hanging: A Pool Noodle Craft! turned out even cuter than I imagined, and it’s perfect for adding some happy vibes to any room.
Theme: Summer & Beach
Materials Needed
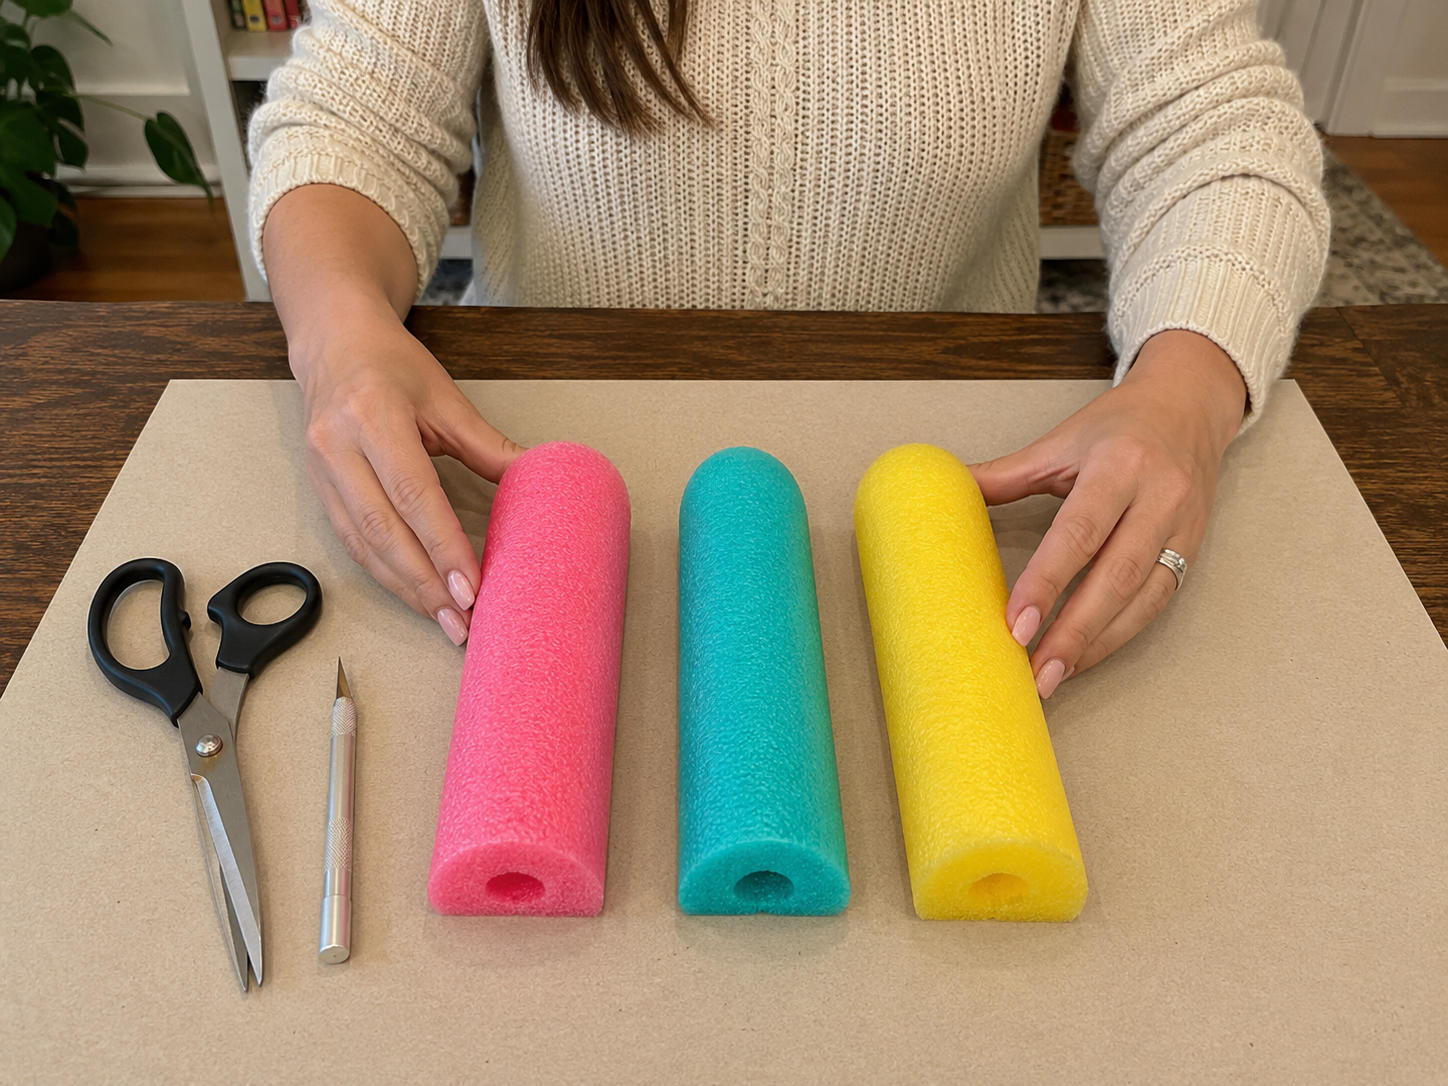
- Pool Noodles (pink, turquoise, yellow)
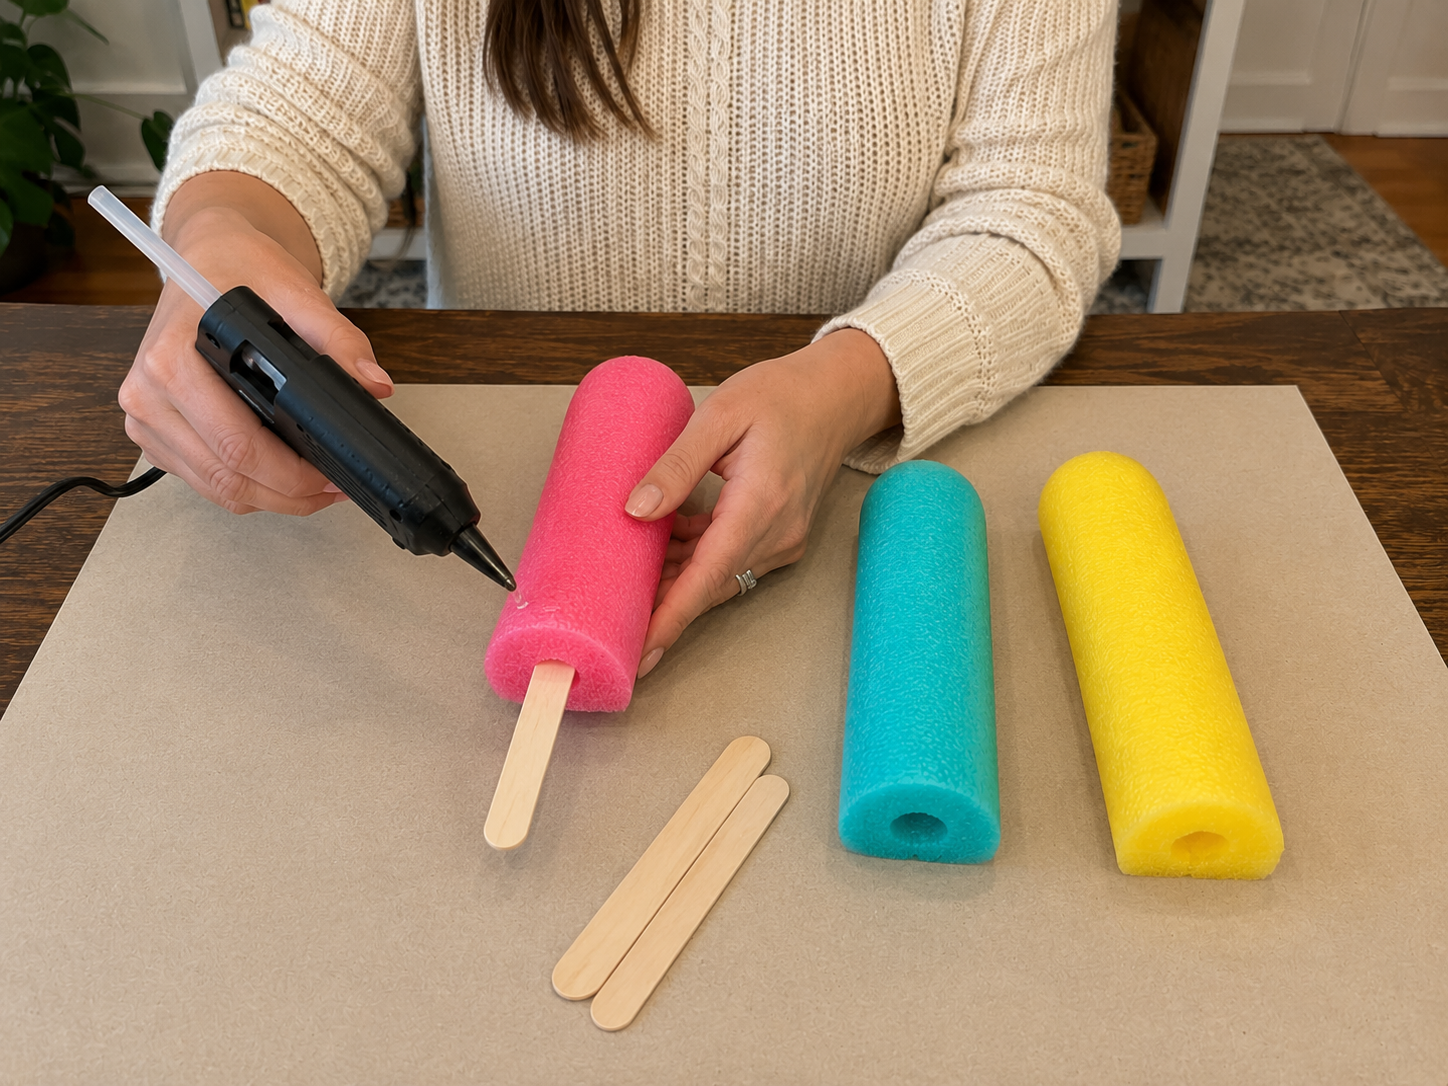
- Jumbo Craft Sticks (3)
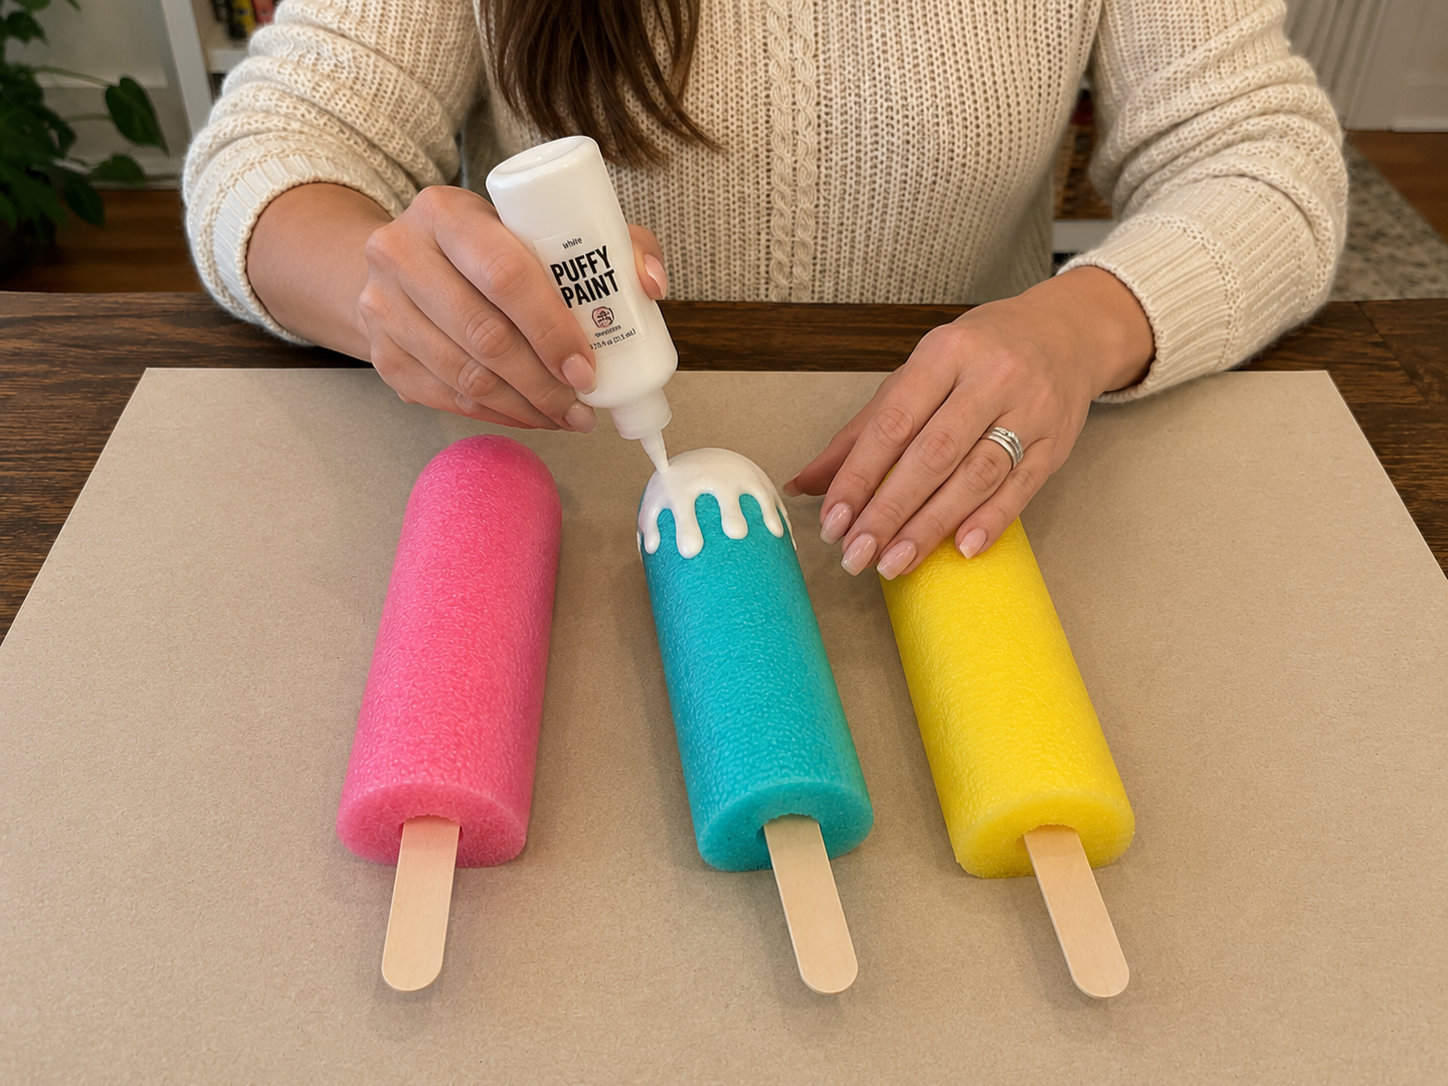
- White Puffy Paint (or white craft foam sheet)
- Colorful Craft Foam Sheets/Cardstock (for sprinkles & embellishments)
- Jute Twine
- Small Summer Embellishments (e.g., flamingo, flowers)
- Hot Glue Gun & Glue Sticks
- Scissors or Craft Knife
Why This Craft Works
This little project is just perfect for bringing those sunny Summer & Beach vibes indoors! I hung mine in my daughter’s room, and it brightened up her wall instantly. It would also be super cute for a pool party decoration or even to jazz up a playroom for the season.
And can we talk about the budget? Because that’s my favorite part! You’ll be super happy to know this whole DIY Summer Popsicle Wall Hanging: A Pool Noodle Craft! ran me about $11-14 in supplies. Almost everything I used came straight from my happy place, Dollar Tree, so you know it’s a steal!
Don’t even worry about skill level, because this craft is as easy as pie. Seriously! From start to finish, the whole thing took me about 40-60 minutes, which is perfect for a quick afternoon project. It’s super beginner-friendly, and even older kids can jump in and help out with this fun Summer & Beach craft.
Step-by-Step Instructions for DIY Summer Popsicle Wall Hanging: A Pool Noodle Craft!
Alright, my crafty friends, are you ready to get started on this adorable DIY Summer Popsicle Wall Hanging? You are going to have so much fun with this one, and trust me, it’s way easier than it looks! We’re talking a super quick Summer & Beach project that’s perfect for beginners, and you’ll be amazed at how fast it comes together. Let’s make some colorful popsicle magic!
Step 1: Shape Your Popsicles
Using a craft knife or sturdy scissors, carefully cut three 6-8 inch lengths from your colorful pool noodles (one pink, one turquoise, one yellow). For a more realistic popsicle shape, gently round one end of each pool noodle piece with your scissors or knife. This will be the top of your popsicle.
Step 2: Attach Popsicle Sticks
Take one jumbo craft stick for each pool noodle popsicle. Apply a generous line of hot glue along one end of a craft stick and carefully press it into the bottom (flat) end of a pool noodle piece, ensuring it’s centered. Hold firmly for a few seconds until the glue sets. Repeat for all three popsicles.
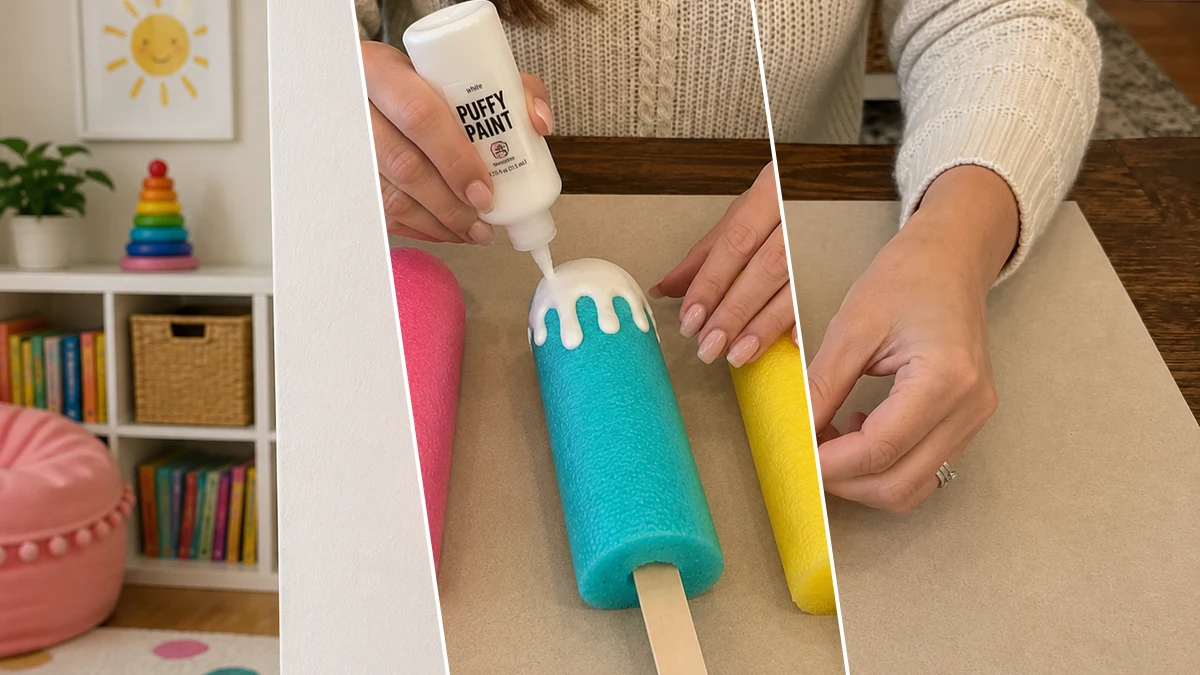
Step 3: Create Dripping Topping
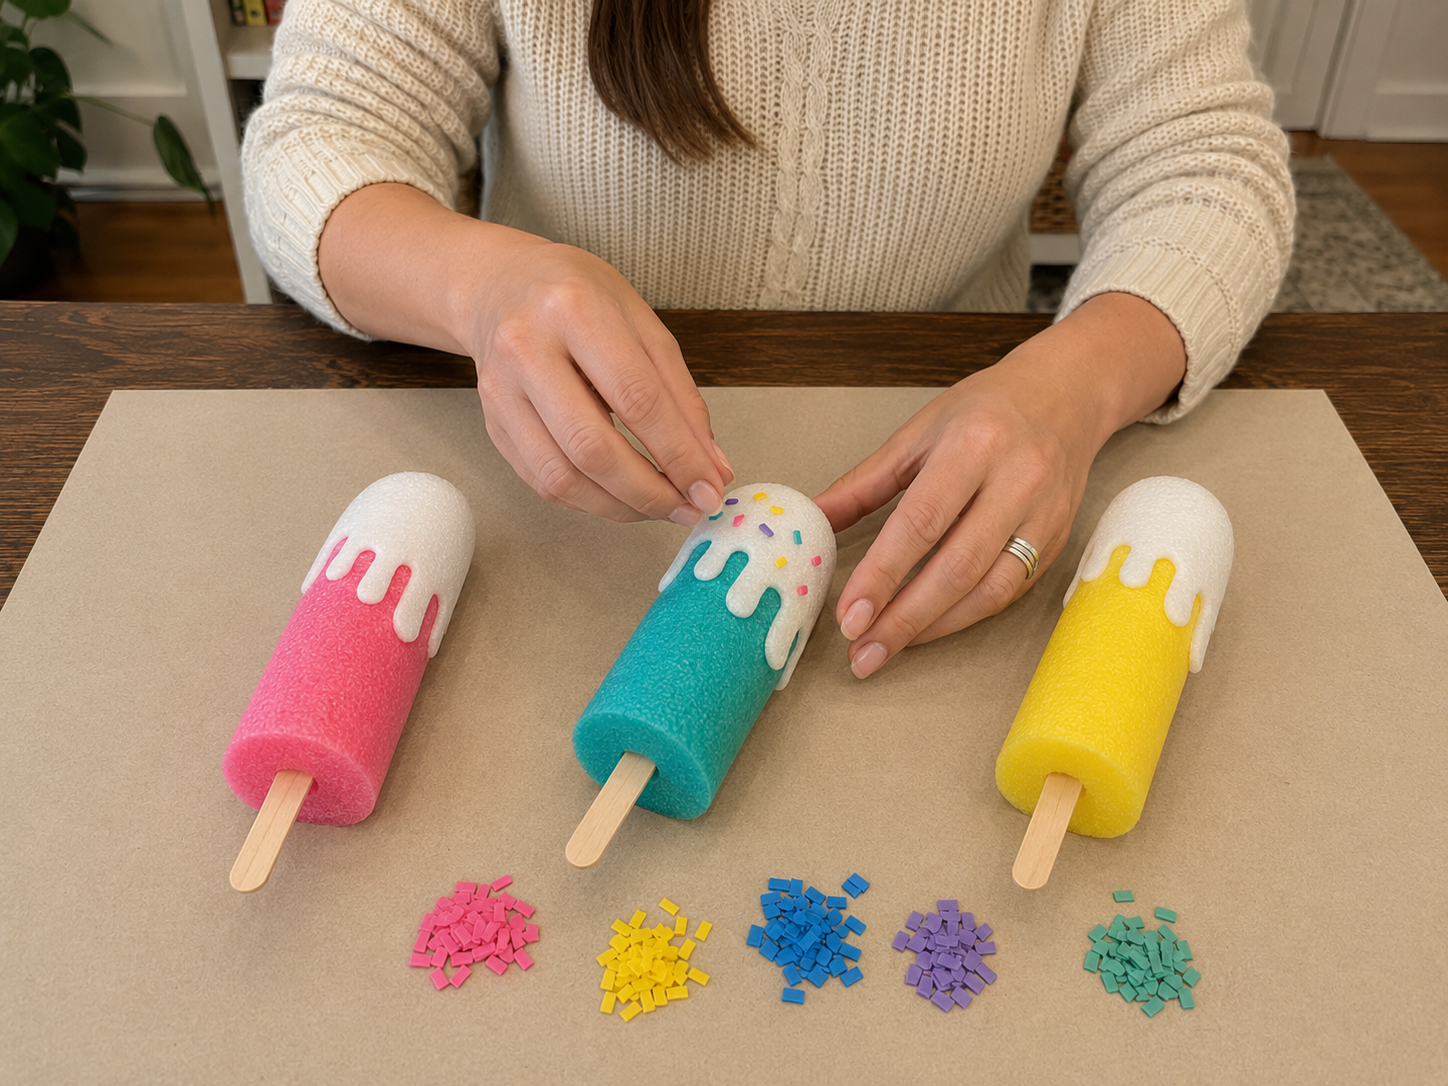
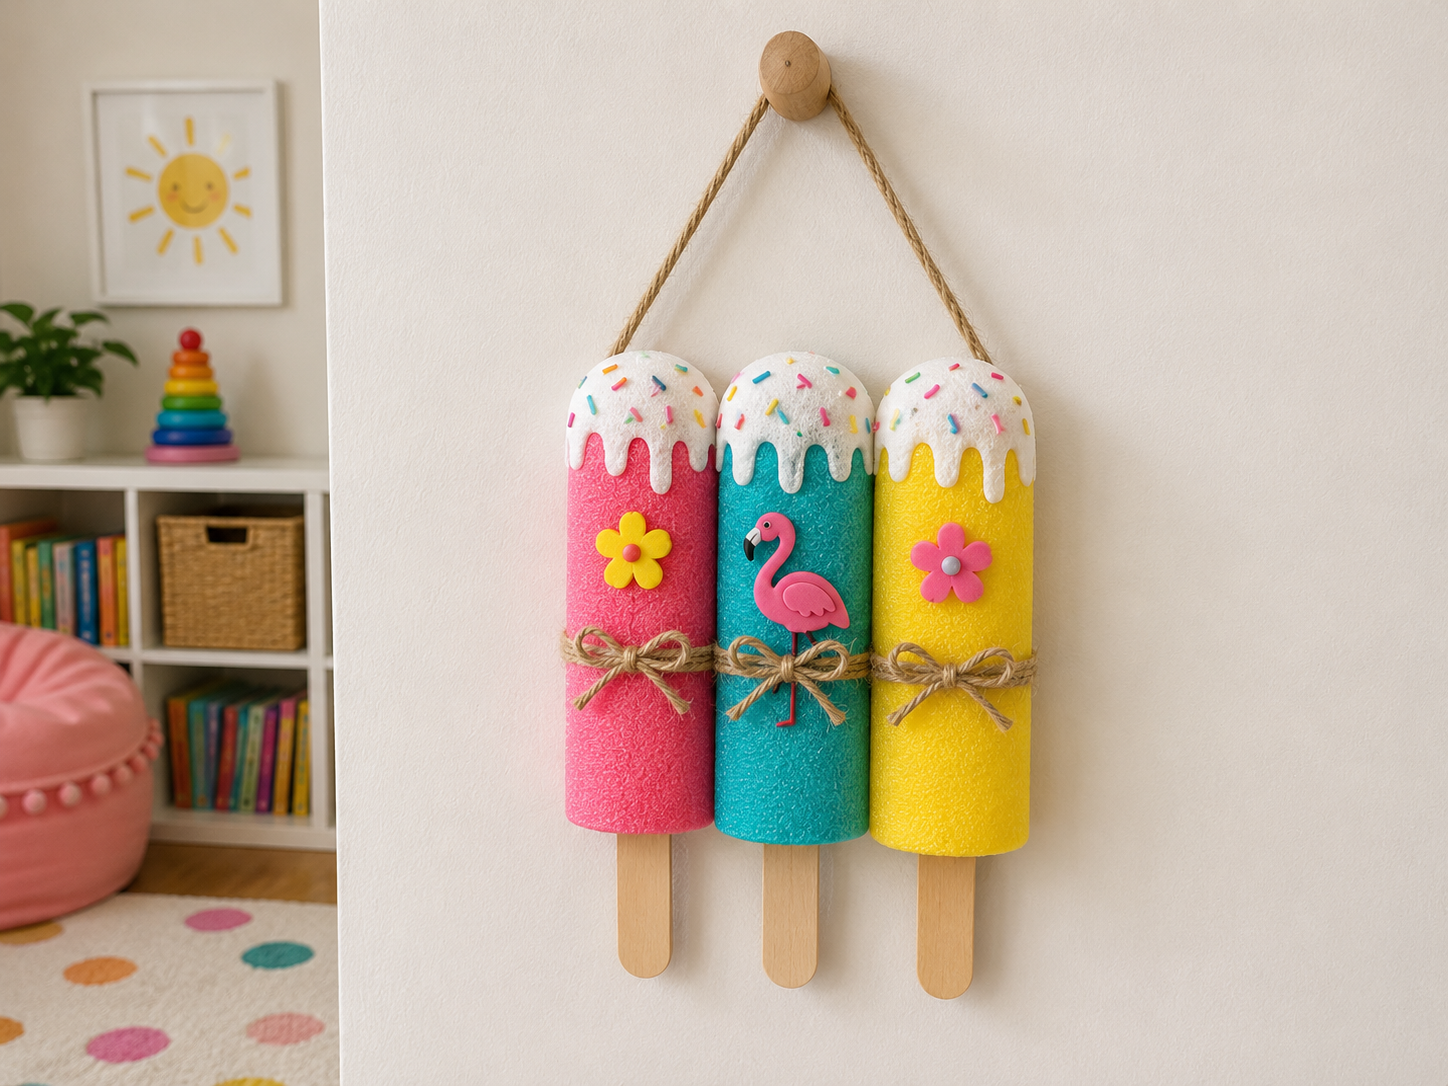
Now for the fun part! On the rounded top of each popsicle, apply white puffy paint in a ‘melting’ or ‘dripping’ pattern. Start by creating a solid white area on the very top, then let it gently drip down the sides in wavy lines. Alternatively, if using white craft foam, cut irregular ‘dripping’ shapes and hot glue them onto the top of each popsicle.
Step 4: Add Colorful Sprinkles
While the white puffy paint is still wet (or if using foam, apply a thin line of hot glue), immediately start pressing your colorful sprinkles onto the white topping. Cut small, thin rectangular strips from various colorful foam sheets or cardstock to create your sprinkles. Distribute them evenly but randomly for a playful look. Allow puffy paint to dry completely if used, which can take several hours.
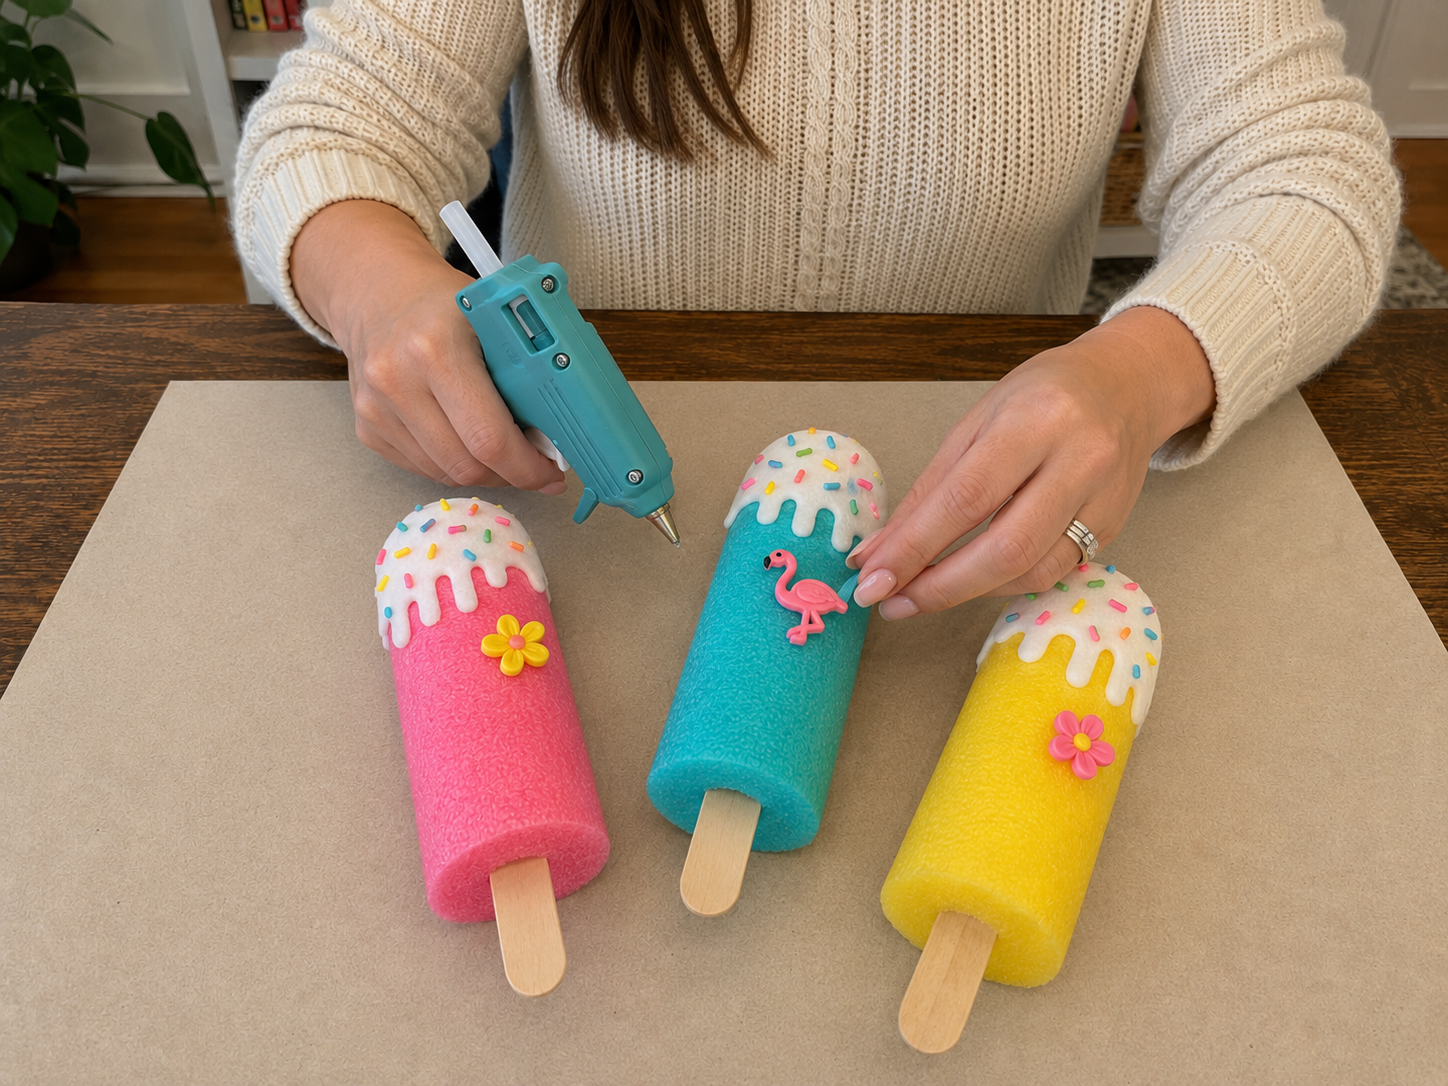
Step 5: Embellish Each Popsicle
Once the toppings and sprinkles are set, it’s time to add your small summer embellishments. Hot glue one embellishment onto the front of each popsicle. For instance, attach a tiny pink flamingo to the turquoise popsicle, a yellow flower to the pink one, and a pink flower to the yellow one, or mix and match as desired. Position them slightly off-center for visual interest.
📱 Craftino App
Make more crafts like this
1,000+ Summer & Beach ideas with photo guides & Pro Tips
✓ Step-by-step photo tutorials, nothing left out
✓ Pro Tips for every step
✓ Save crafts & browse fully offline
✓ New ideas added every week

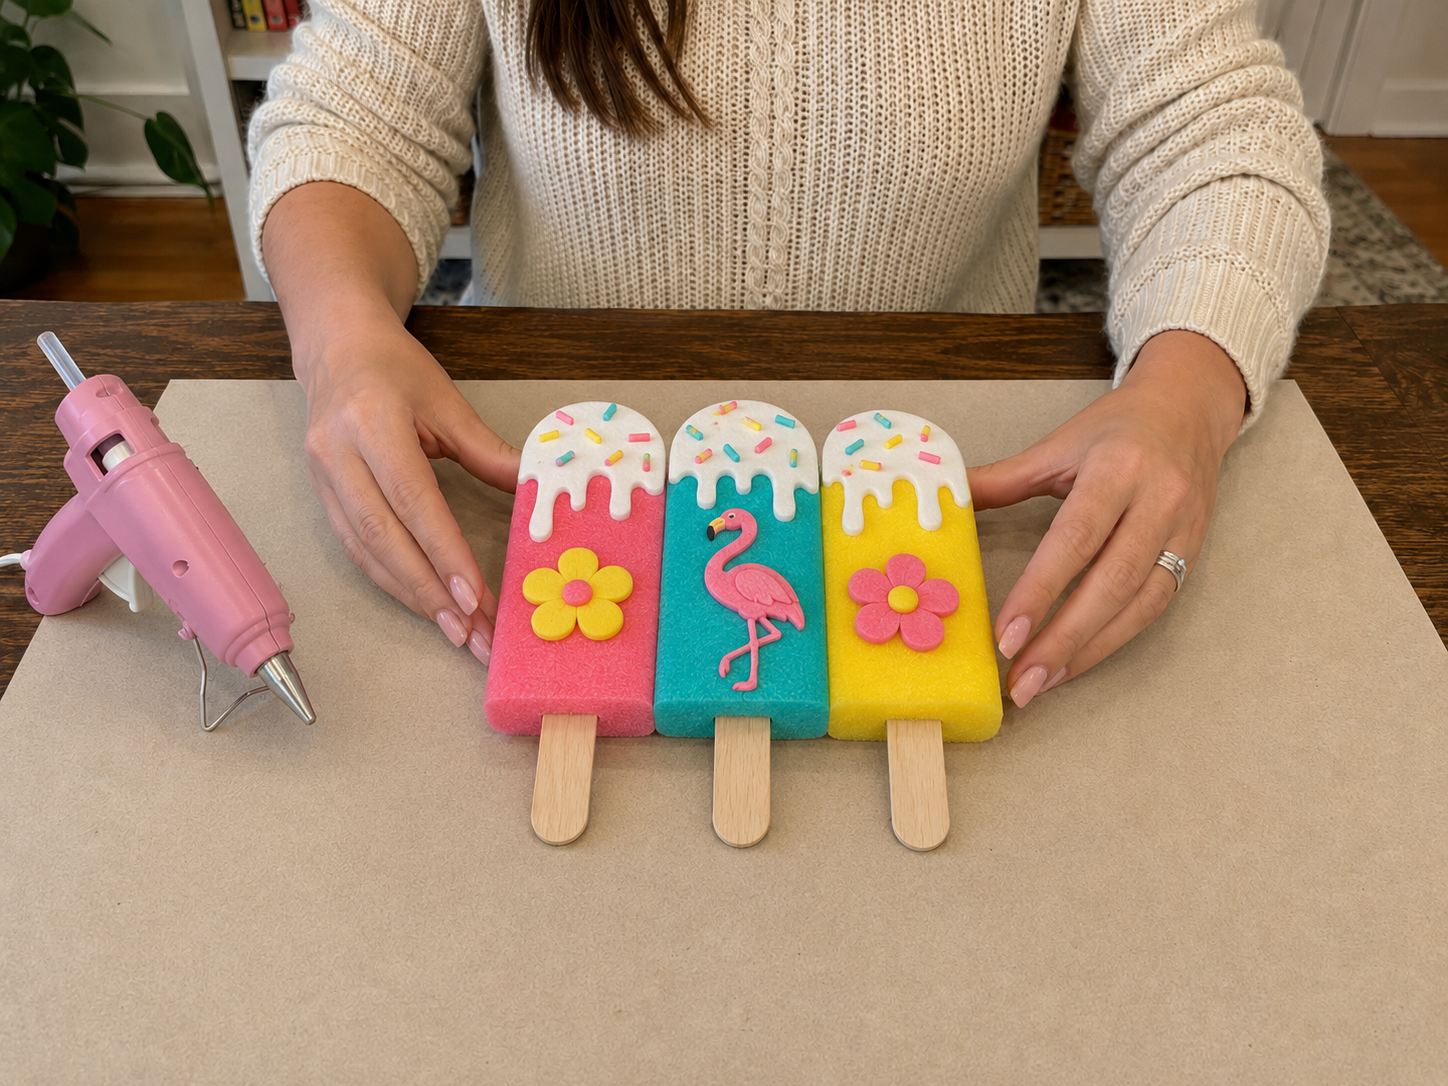
Step 6: Group Popsicles Together
Arrange your three decorated popsicles side-by-side. Ensure they are aligned at the top and bottom. Apply a generous line of hot glue down the side of the pink popsicle where it will meet the turquoise one, and press them firmly together. Hold until secure. Repeat this for the turquoise and yellow popsicles. The goal is a tightly grouped trio.
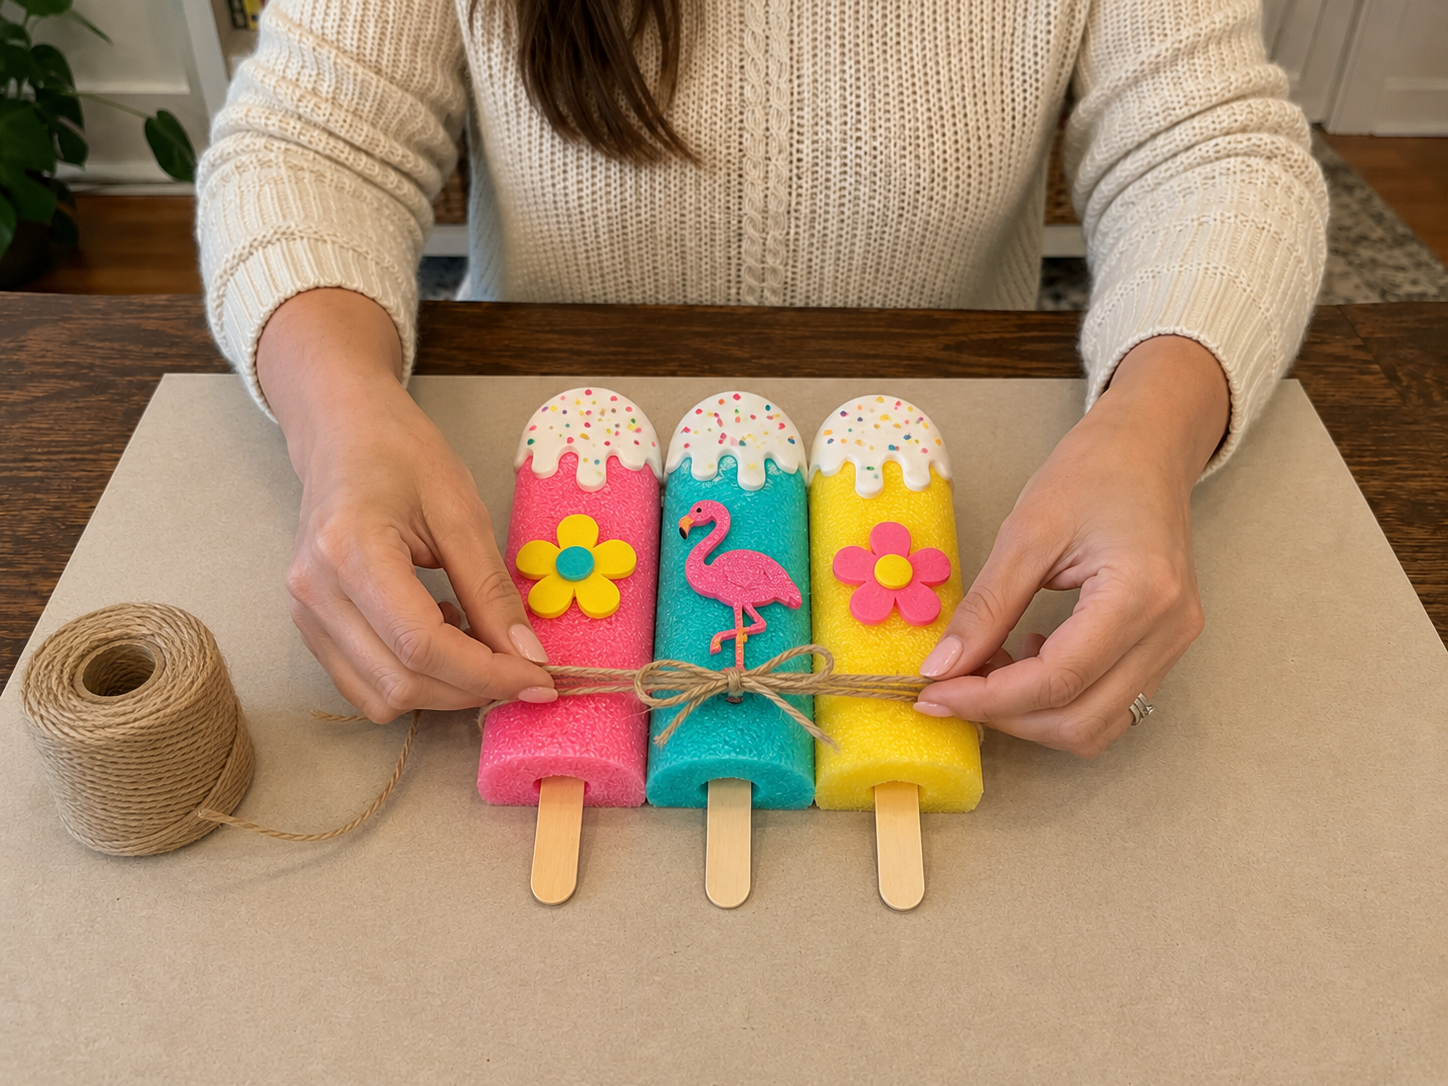
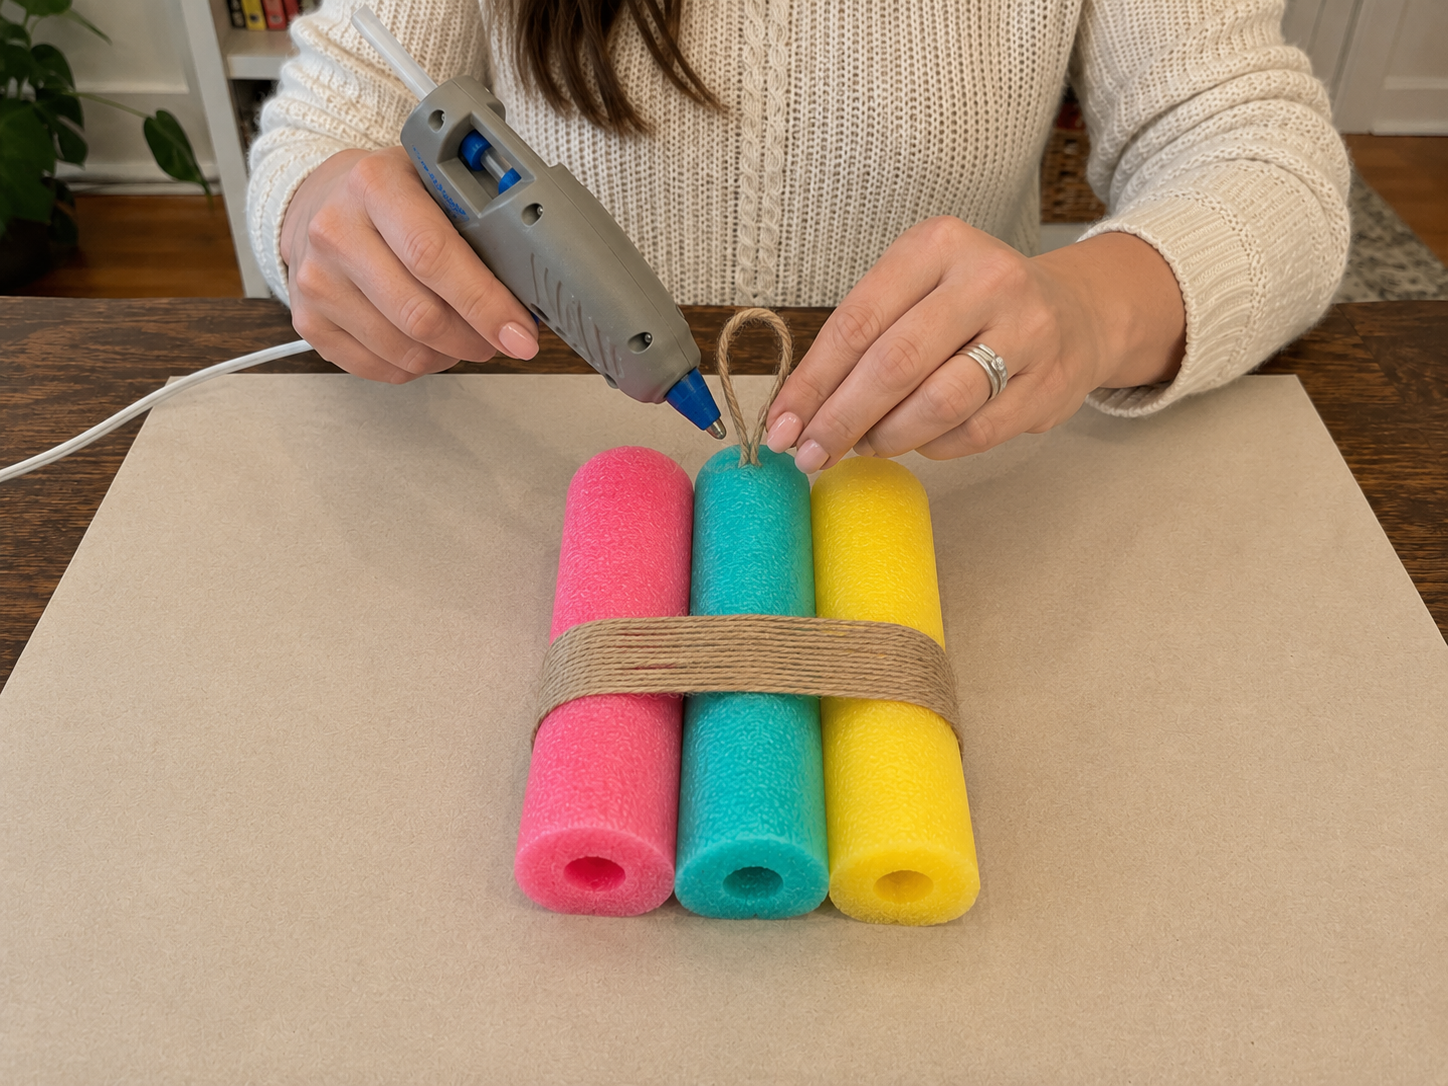
Step 7: Wrap with Jute Twine
Cut a length of jute twine (approx. 24-30 inches). Center it around the middle of your grouped popsicles, wrapping it around several times for a rustic, handmade look. Bring the ends to the front and tie them into a neat small bow. You can add a tiny dot of hot glue under the twine on the back to prevent it from slipping.
Step 8: Add Hanging Loop
Cut another piece of jute twine, about 12-15 inches long. Form it into a loop and hot glue the ends securely to the upper back of the grouped popsicles. Position the loop so that the popsicles will hang straight. Apply a generous amount of glue and hold until completely dry and firm.
Step 9: Display Your Decor
Your vibrant summer popsicle wall hanging is now complete! Find the perfect spot to display your creation. It’s ideal for adding a touch of summer fun to a child’s bedroom, a play area, a kitchen, or even as festive decor for a summer party. Enjoy your handmade, cheerful art!
See also: Charming Coastal Summer Wreath
📋 Love staying organized while crafting? Check out our printable planners & craft designs at CraftersDT on Etsy and use code CRAFT20 for 20% off your entire order!
Your Sweet Summer Popsicle Wall Hanging!
Look at that! Your DIY Summer Popsicle Wall Hanging: A Pool Noodle Craft! is all done and ready to brighten up your home. Hang it on a door, a wall, or even by the pool for some extra splashy fun! I just know you’ll love how cute it looks, and please share your finished project with me, I love seeing your creations!
📱 Craftino App
Make more crafts like this
1,000+ Summer & Beach ideas with photo guides & Pro Tips
✓ Step-by-step photo tutorials, nothing left out
✓ Pro Tips for every step
✓ Save crafts & browse fully offline
✓ New ideas added every week
Frequently Asked Questions
What is the total cost to make the DIY Summer Popsicle Wall Hanging: A Pool Noodle Craft?
The total cost to create the DIY Summer Popsicle Wall Hanging: A Pool Noodle Craft! is typically between $11-14. This budget-friendly project largely uses supplies from Dollar Tree, making it an affordable Summer & Beach decoration.
How long does it take to complete the DIY Summer Popsicle Wall Hanging: A Pool Noodle Craft?
Completing the DIY Summer Popsicle Wall Hanging: A Pool Noodle Craft! takes approximately 40-60 minutes from start to finish. This timeframe includes cutting, painting, and assembly, making it a quick and rewarding Summer & Beach DIY project.
Is the DIY Summer Popsicle Wall Hanging: A Pool Noodle Craft! suitable for beginners?
Yes, the DIY Summer Popsicle Wall Hanging: A Pool Noodle Craft! is an easy and beginner-friendly project. It involves simple steps like cutting pool noodles, painting, and gluing, making it perfect for anyone new to crafting or for a fun activity with kids.
How many pool noodles are needed for this DIY Summer Popsicle Wall Hanging?
You will need about 2-3 standard Dollar Tree pool noodles to create a typical DIY Summer Popsicle Wall Hanging. Each pool noodle can yield several popsicle ‘sticks’ depending on the desired length of your popsicles.
What type of glue works best for the Dollar Tree DIY Summer Popsicle Wall Hanging?
Hot glue is the best type of adhesive for the Dollar Tree DIY Summer Popsicle Wall Hanging, as it provides a strong, fast-drying bond for the pool noodles and craft sticks. A low-temp hot glue gun is recommended, especially if crafting with children, for safety.
Where can I buy the supplies for this budget-friendly DIY Summer Popsicle Wall Hanging craft?
Most of the supplies for this budget-friendly DIY Summer Popsicle Wall Hanging craft, like pool noodles, paint, and craft sticks, can be found at Dollar Tree. You can also find these common craft items at stores like Walmart or Hobby Lobby if Dollar Tree isn’t nearby.
Can I customize the colors for my DIY Summer Popsicle Wall Hanging?
Absolutely, you can customize the colors for your DIY Summer Popsicle Wall Hanging to match your decor or favorite Summer & Beach themes. Acrylic craft paints come in a wide variety of colors, allowing you to create any ‘flavor’ popsicle you desire, from bright neons to pastel hues.
Is the DIY Summer Popsicle Wall Hanging suitable for outdoor use?
The DIY Summer Popsicle Wall Hanging is primarily designed for indoor use, such as kids’ bedrooms or playrooms. While pool noodles are water-resistant, continuous exposure to harsh sun and rain could fade the paint or weaken the glue over time, so indoor display is recommended for longevity.
What common mistakes should I avoid when making a Dollar Tree Pool Noodle Popsicle Craft?
A common mistake to avoid when making a Dollar Tree Pool Noodle Popsicle Craft is applying too much paint, which can cause cracking as it dries. Use thin, even coats of acrylic paint, allowing each layer to dry completely for the best finish and durability.
Is the DIY Summer Popsicle Wall Hanging a good gift for kids?
Yes, the DIY Summer Popsicle Wall Hanging makes a fantastic gift, especially for kids or anyone who loves fun Summer & Beach decor. It’s a handmade, thoughtful present that can brighten up a child’s bedroom or add a playful touch to a shared space.
Leave a Reply