
Ever walk into Dollar Tree and grab stuff you don’t even need? Guilty as charged, friends! That’s exactly how I ended up with the perfect supplies to whip up this super cute Elegant Farmhouse Beaded Tray Centerpiece. It’s truly one of my favorite little projects to make the house feel extra cozy.
See also: Chic Blessed Minimalist Farmhouse Tray Decor
Theme: Farmhouse / Rustic
Materials Needed
- Round Wooden Tray/Charger Plate
- Wooden Pedestal Base (or small candle holder)
- Natural Wooden Beads (or half beads)
- White Chalk Paint
- Fine-Grit Sandpaper
- Hot Glue Gun & Glue Sticks
- Faux Eucalyptus Stems
- Small White Faux Flowers
- Cream Pillar Candle (or LED candle)
📋 Love staying organized while crafting? Check out our printable planners & craft designs at CraftersDT on Etsy and use code CRAFT20 for 20% off your entire order!
Why This Craft Works
This little tray centerpiece is just perfect for so many spots in your home. I love putting mine right on the dining room table or on the coffee table in the living room to hold a candle or a tiny plant. It adds that perfect touch of Farmhouse / Rustic charm to any space, making it feel warm and inviting. You can even use it on a dresser in the bedroom for jewelry!
📱 Free to Download
Join 50,000+ crafters already using Craftino
Browse 30+ Farmhouse / Rustic ideas and thousands more in the app
✓ Save crafts & browse fully offline
✓ Download printable PDF guides for every project
✓ Step-by-step photo tutorials, nothing left out
✓ 1,000+ craft projects with new ones added every week

Okay, let’s talk about the best part, the cost! Most of the supplies for this project, like the tray and the beads, came straight from my Dollar Tree haul. You can easily make this whole Elegant Farmhouse Beaded Tray Centerpiece for about $3 to $4, depending on the paint you already have on hand. It’s such a steal for something so cute!
You’ll be so surprised how quick and easy this project is. I’d say it’s definitely an Easy craft, even if you’re a total beginner or just dipping your toes into DIY. From start to finish, you can have this beautiful centerpiece done in about 30 to 45 minutes. It’s perfect for a quick afternoon craft session or if you need a last-minute gift that looks way more expensive than it is.
Step-by-Step Instructions for Elegant Farmhouse Beaded Tray Centerpiece
Alright, crafters, are you ready to get your hands a little messy and make something truly adorable? This Elegant Farmhouse Beaded Tray Centerpiece comes together so fast, you won’t believe it. It’s such a fun little Home Decor project, even for the kiddos to help with (with adult supervision, of course!). Let’s grab our Dollar Tree goodies and turn them into something amazing!
Step 1: Prepare & Paint Wooden Pieces
Begin by ensuring your wooden tray/charger and pedestal base are clean and free of dust. Apply your first thin, even coat of white chalk paint to all visible surfaces of both wooden pieces. Chalk paint adheres well but a clean surface ensures the best finish. Cover the top, bottom, and edges of the tray, and the entire pedestal base.
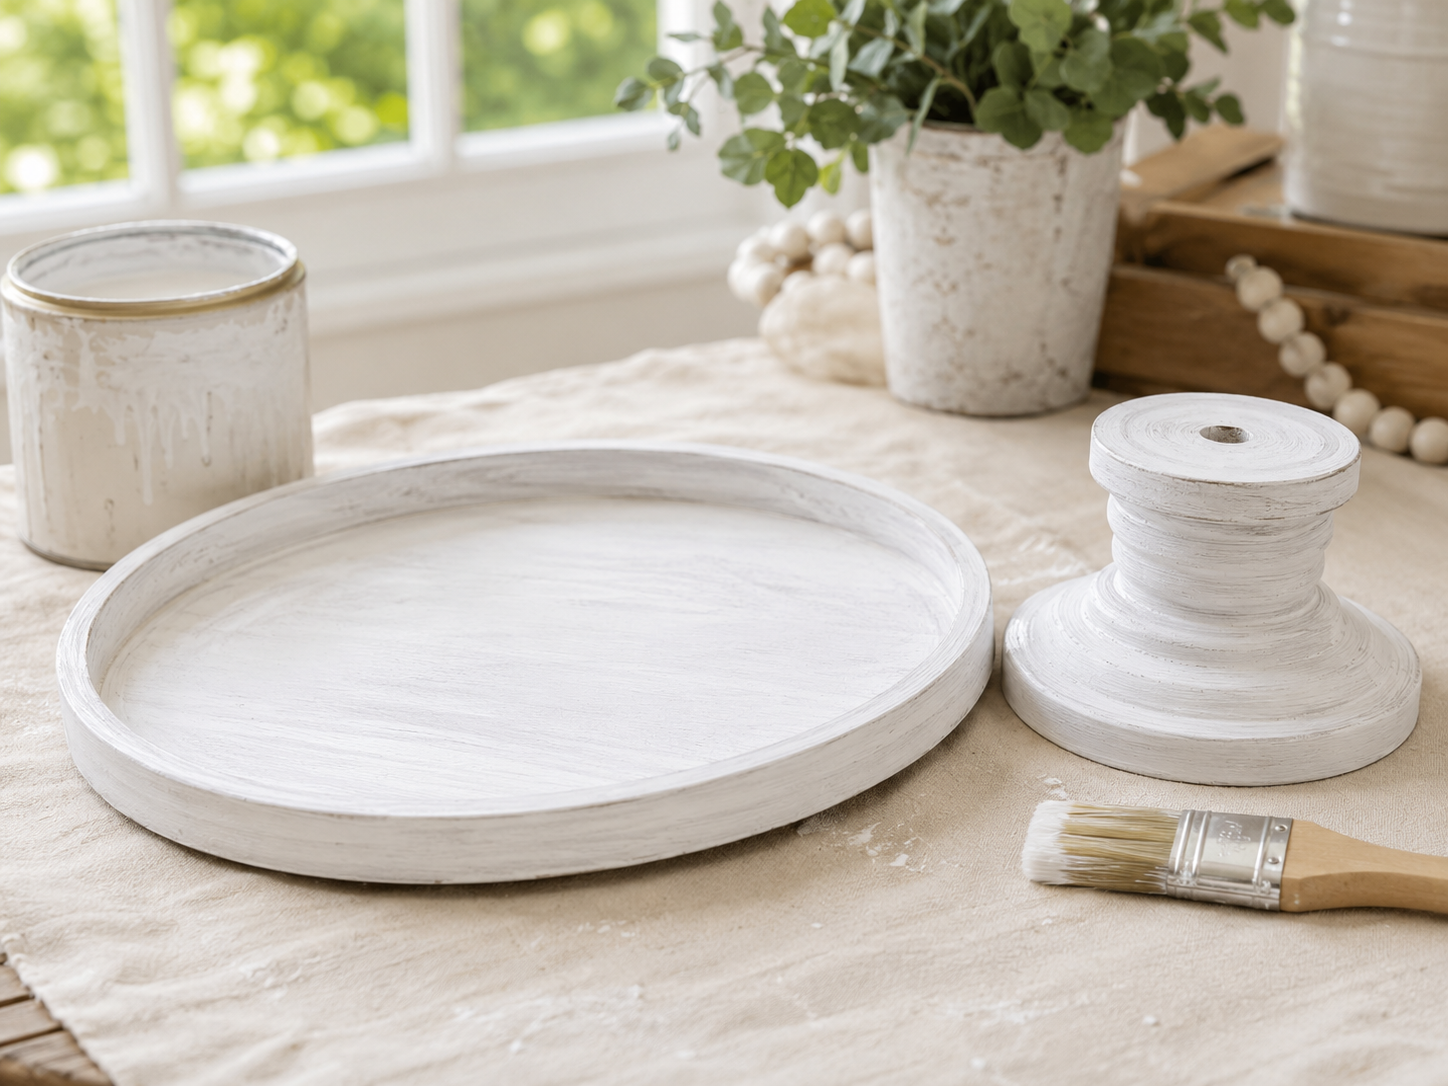
💡 Pro Tip: For the smoothest application and to avoid brush strokes, use a good quality synthetic brush and apply thin coats. Allow each coat to dry completely, typically 15-20 minutes, before handling or applying subsequent layers. Patience is key for a professional-looking base!
Step 2: Apply Second Coat & Distress
Once the first coat is fully dry, apply a second even coat of white chalk paint to both the tray and the pedestal base to achieve full, opaque coverage. After this second coat has dried completely, take your fine-grit sandpaper and lightly rub the edges, raised details, and any areas where natural wear would occur. The goal is to gently reveal some of the natural wood beneath, creating a soft, rustic, and weathered farmhouse look.
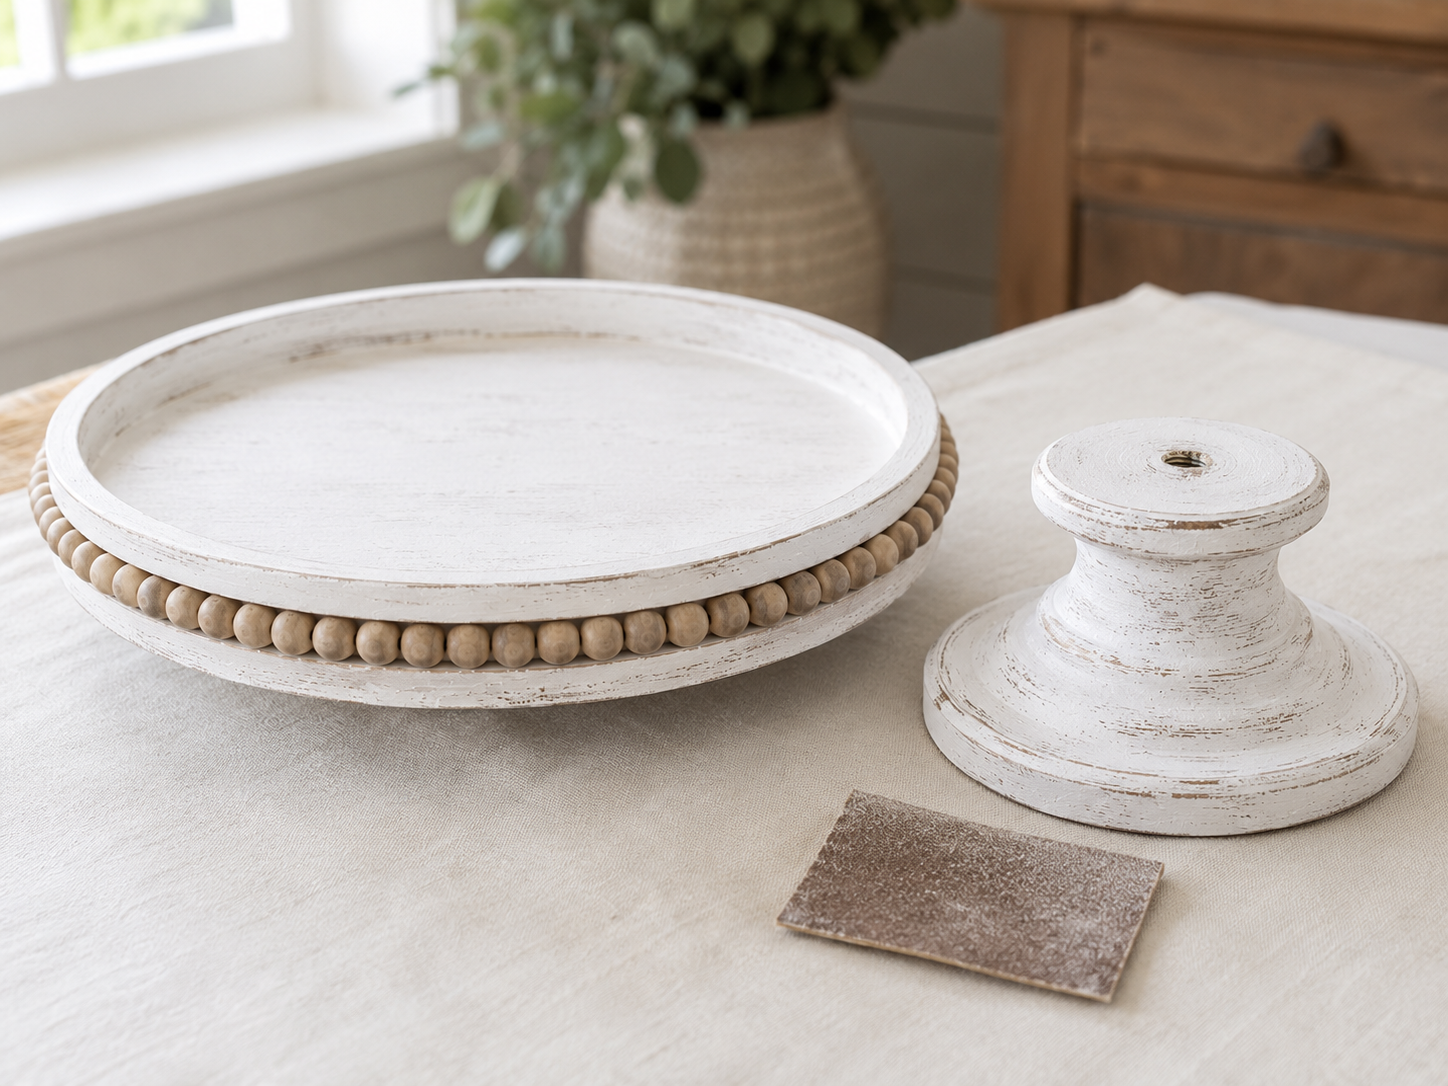
💡 Pro Tip: When distressing, less is more! Start with very light pressure and gradually increase if needed. Focus on corners, edges, and any raised design elements where paint would naturally chip or wear over time. Step back frequently to assess your progress and avoid over-distressing.
🗓️ Keep all your craft projects on track! Explore our printable planners & templates at CraftersDT on Etsy and use code CRAFT20 for 20% off!
Step 3: Embellish with Wooden Beads
With your painted and distressed tray ready, carefully apply hot glue around the entire outer rim. Working in small sections, firmly press the natural wooden beads (or half beads) onto the hot glue, ensuring they are evenly spaced and form a continuous decorative border. If using half beads, ensure the flat side is against the tray for a secure adhesion.
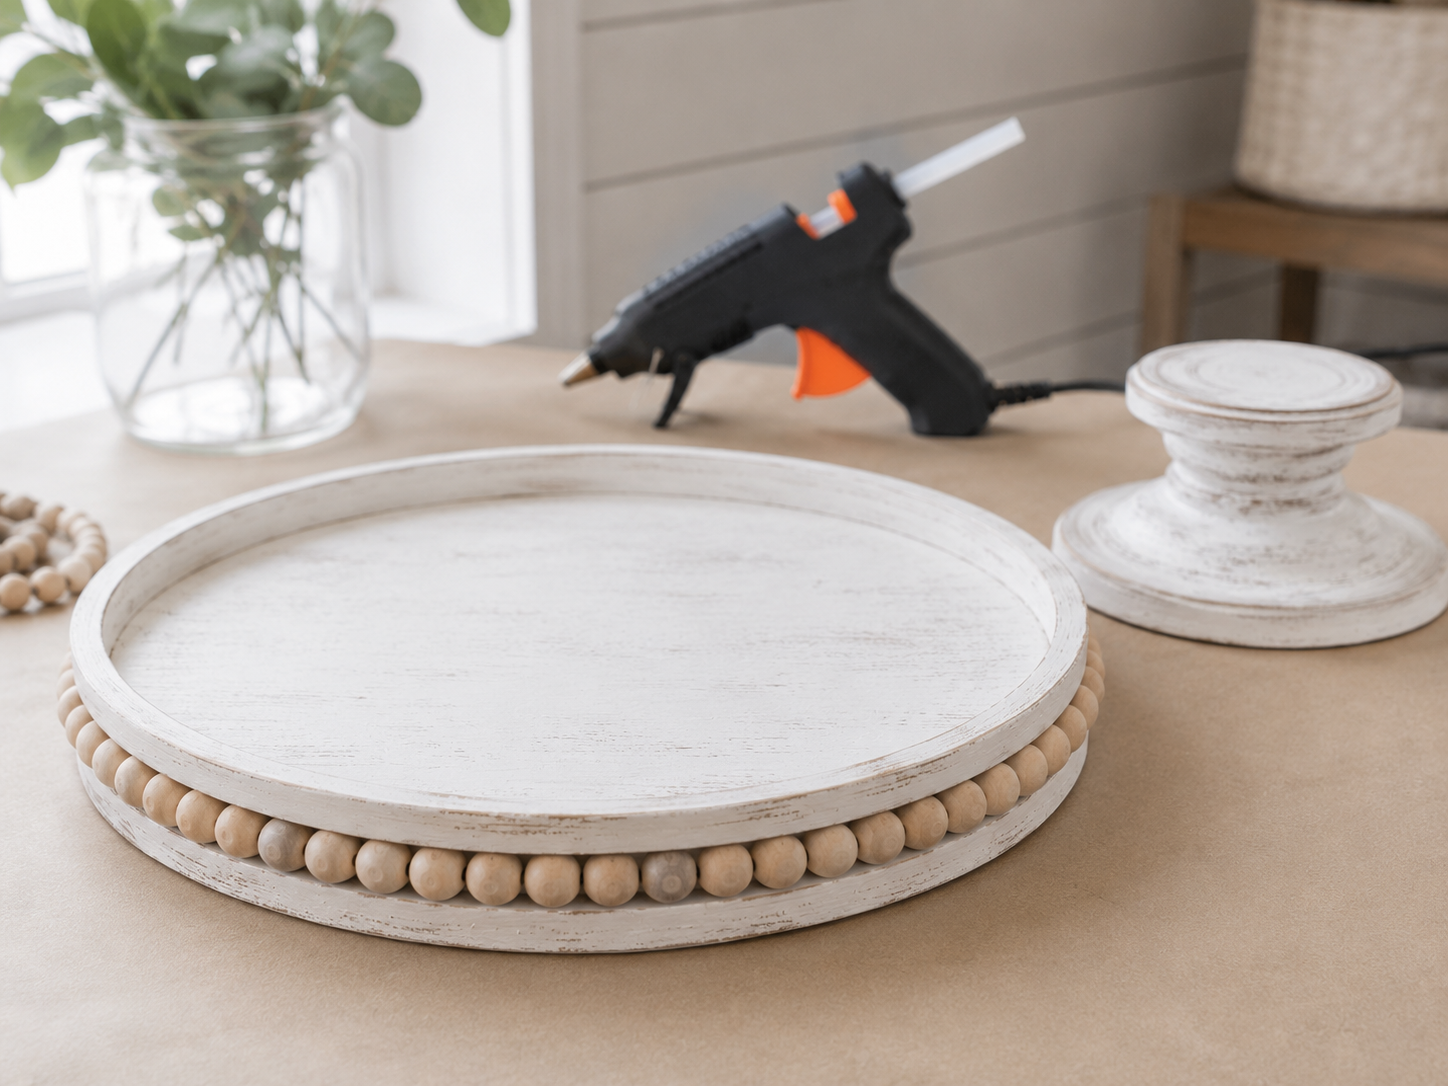
💡 Pro Tip: To ensure even spacing, you can dry-fit a section of beads before applying glue, or mark your starting and ending points lightly with a pencil. Use a low-temp hot glue gun if possible to give yourself a little more working time before the glue sets, especially when working with many small pieces.
Step 4: Assemble Tray Pedestal
Now it’s time to bring your two main components together. Apply a generous amount of hot glue to the top surface of your distressed wooden pedestal base. Carefully center the bottom of your beaded tray onto the glued surface of the pedestal base. Press down firmly for about 30-60 seconds to ensure a strong, secure bond. Allow the glue to cool and harden completely before moving the assembled stand.
💡 Pro Tip: Before applying glue, dry-fit the tray onto the pedestal to get a feel for centering. Use a ruler or eye-ball it from several angles to ensure the tray is perfectly balanced. For extra security, you can trace the pedestal’s outline onto the tray’s underside and apply glue just inside that line.
📱 Free to Download
Join 50,000+ crafters already using Craftino
Browse 44+ Farmhouse / Rustic ideas and thousands more in the app
✓ Save crafts & browse fully offline
✓ Download printable PDF guides for every project
✓ Step-by-step photo tutorials, nothing left out
✓ 1,000+ craft projects with new ones added every week
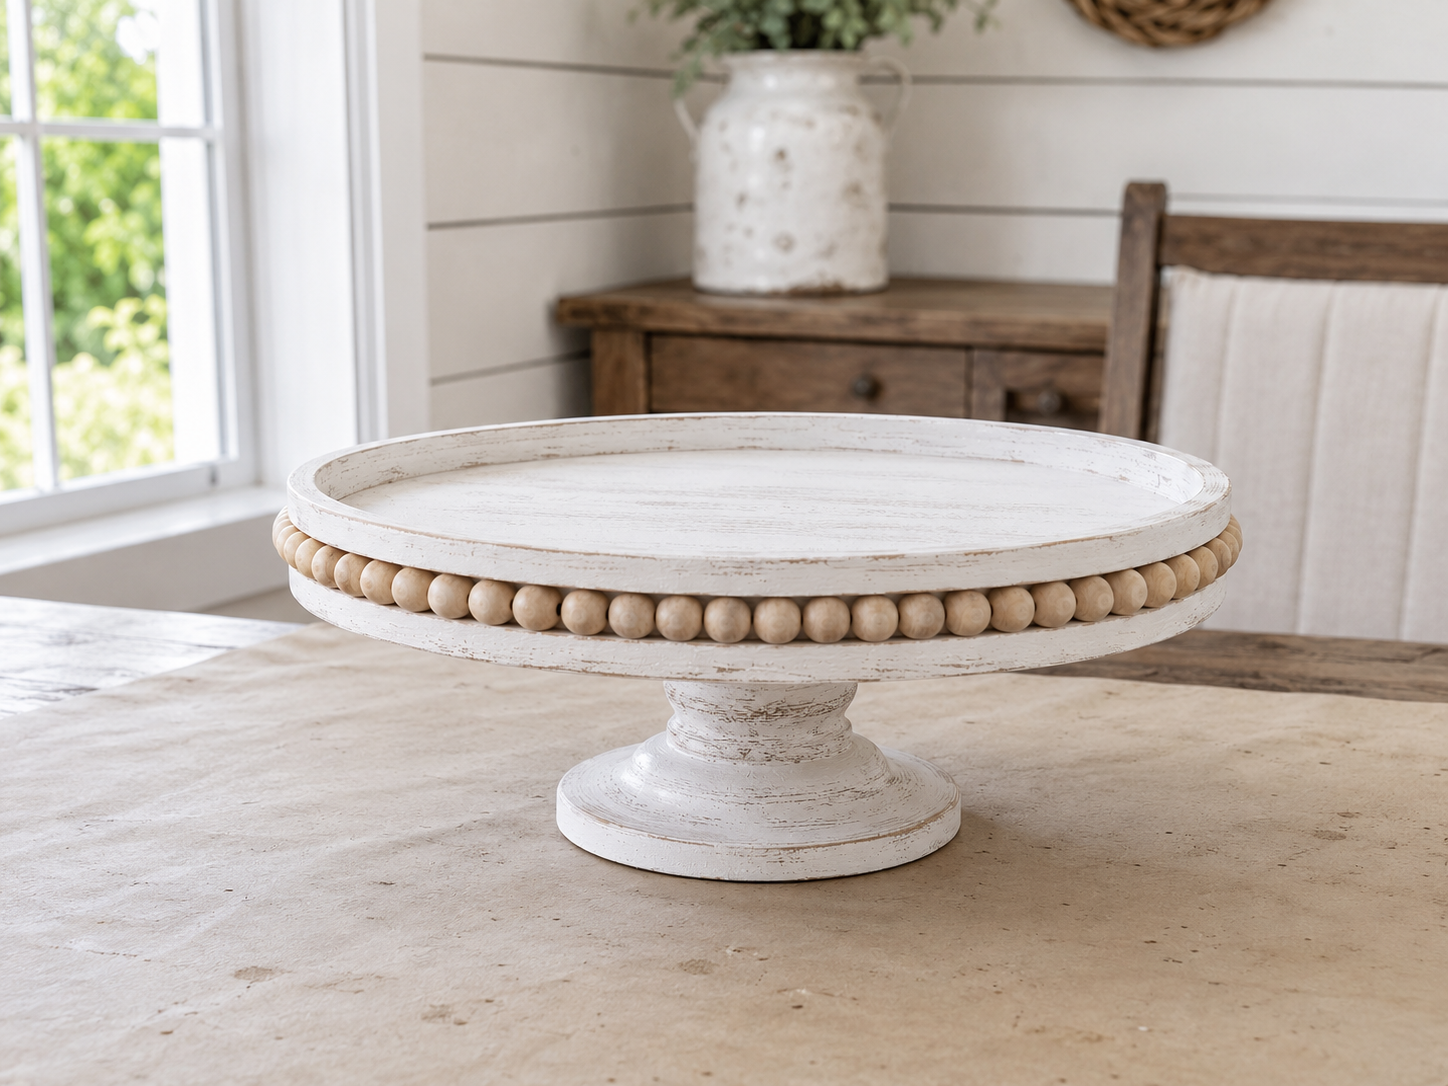
Step 5: Decorate with Candle & Greenery
The final step is to personalize your beautiful new centerpiece! Place your cream pillar candle (real or LED) securely in the center of the raised tray. Then, artfully arrange the faux eucalyptus leaves and small white faux flowers around the base of the candle. Create a natural-looking wreath shape, layering the greenery and flowers for a full and inviting display.
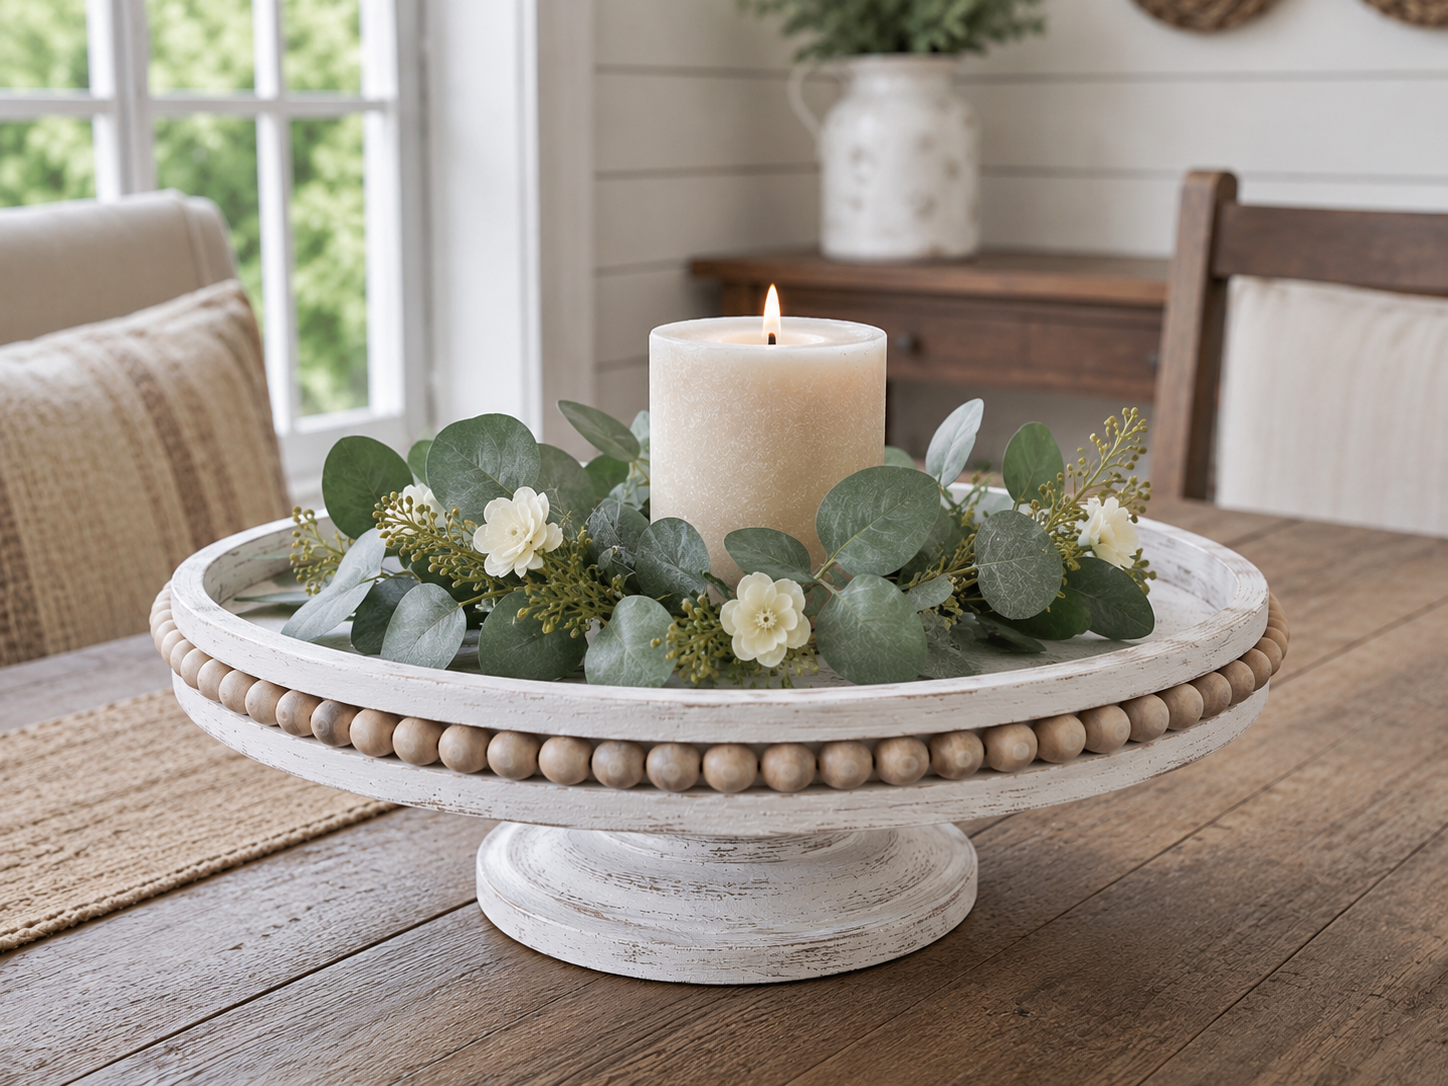
💡 Pro Tip: When arranging, start with the larger eucalyptus stems to build your base, then tuck in the smaller white flowers for pops of color and texture. Trim your floral stems with wire cutters to adjust their length and make them fit perfectly. You can use a dab of hot glue to secure any pieces that tend to shift, especially if the centerpiece will be moved often.
Your Beautiful Farmhouse Tray Centerpiece Awaits!
Look at you, all done with your gorgeous Elegant Farmhouse Beaded Tray Centerpiece! Now you can put it on display on your kitchen counter or gift it to a friend who loves that cozy Farmhouse / Rustic look. Don’t forget to snap a pic and share your version with me, I just love seeing what you all create!
📱 Free to Download
Join 50,000+ crafters already using Craftino
Browse 46+ Farmhouse / Rustic ideas and thousands more in the app
✓ Save crafts & browse fully offline
✓ Download printable PDF guides for every project
✓ Step-by-step photo tutorials, nothing left out
✓ 1,000+ craft projects with new ones added every week
Frequently Asked Questions
How many wooden beads do I need for a Dollar Tree Elegant Farmhouse Beaded Tray Centerpiece?
You’ll typically need about 20-25 wooden beads that are 20mm in size to go around the rim of a standard Dollar Tree round tray. Make sure they have a good size hole for stringing!
What’s the best glue to use for a DIY Farmhouse Beaded Tray?
For strong adhesion that lasts, I highly recommend using E6000 glue or a good quality hot glue gun with strong adhesive sticks. E6000 takes about 24 hours to fully cure, but hot glue sets in minutes.
Can I make this Elegant Farmhouse Beaded Tray Centerpiece for under $5?
Absolutely! If you source your tray and beads from Dollar Tree, your total cost will likely be around $3-$4, excluding paint and glue which you might already have.
How long does it take to make this Rustic Home Decor tray?
This is a super quick craft! You can usually complete the entire Elegant Farmhouse Beaded Tray Centerpiece project in about 30-45 minutes of active crafting time, plus drying time for paint and glue.
What kind of paint works best for a Dollar Tree DIY Farmhouse tray?
Acrylic craft paint works wonderfully for this project. You can use chalk paint for a matte, distressed Farmhouse / Rustic look, or regular acrylic paint if you prefer a smoother finish. One small bottle of paint (2 oz) is plenty.
Is this Elegant Farmhouse Beaded Tray Centerpiece a good DIY gift idea?
Yes, it’s a fantastic gift! It’s budget-friendly, customizable, and looks beautiful, making it a thoughtful present for birthdays, Mother’s Day, or just because.
Get inspired with daily seasonal ideas on the Dollar Tree Craft Blog.
Leave a Reply