Ever walk into Dollar Tree and grab stuff you don’t need? Same. One day I spotted these little craft sticks and my brain just went ‘DING!’ I knew exactly what I wanted to make for all my friends planning their big day. It’s my super cute Charming Dollar Tree Mini Ladder Favor Display.
Theme: Wedding & Party
Materials Needed
- Wood Craft Sticks & Dowels
- Small Wood Rectangle / Chalkboard
- White Chalk Paint & Sandpaper
- Kraft Favor Bags
- Party Tags Kit (Clothespins, Black Cardstock, Pink Hearts)
- Assorted Party Ribbons
- Faux Greenery & Small Flowers
- Crinkle Paper Filler
- Hot Glue Gun & Glue Sticks
- White Paint Marker or Chalk Marker
Why This Craft Works
This little ladder is just the sweetest touch for any special get-together. I designed it especially for Wedding & Party events, like bridal showers, baby showers, or even the big wedding day itself! Imagine it holding tiny succulent favors at a garden party, or maybe little bottles of bubbles for guests to grab after a ceremony. It’s also super cute for a dessert table, holding small treats or even just little thank you notes. It just adds that charming handmade touch without breaking the bank.
And speaking of not breaking the bank, this whole project is a total steal! I mean, who doesn’t love a good Dollar Tree haul, right? All the supplies for this Charming Dollar Tree Mini Ladder Favor Display ran me about $12-15 in total. That’s a huge win when you’re thinking about decorating for a big event where costs can really add up fast.
You’ll be amazed at how quickly this comes together. It’s definitely an easy craft, perfect for beginners or even if you just need a fun, quick project. From start to finish, this Charming Dollar Tree Mini Ladder Favor Display took me about 40-60 minutes. That’s less than an hour for something so adorable and versatile, which is perfect for busy moms and party planners alike!
Step-by-Step Instructions for Charming Dollar Tree Mini Ladder Favor Display
Okay, crafters, are you ready to get your hands a little gluey? This Charming Dollar Tree Mini Ladder Favor Display is seriously so much fun to put together. It’s a quick win and totally beginner-friendly, so don’t even worry if you’re new to crafting. We’ll walk through each step, and before you know it, you’ll have an adorable little ladder ready to charm all your Wedding & Party guests!
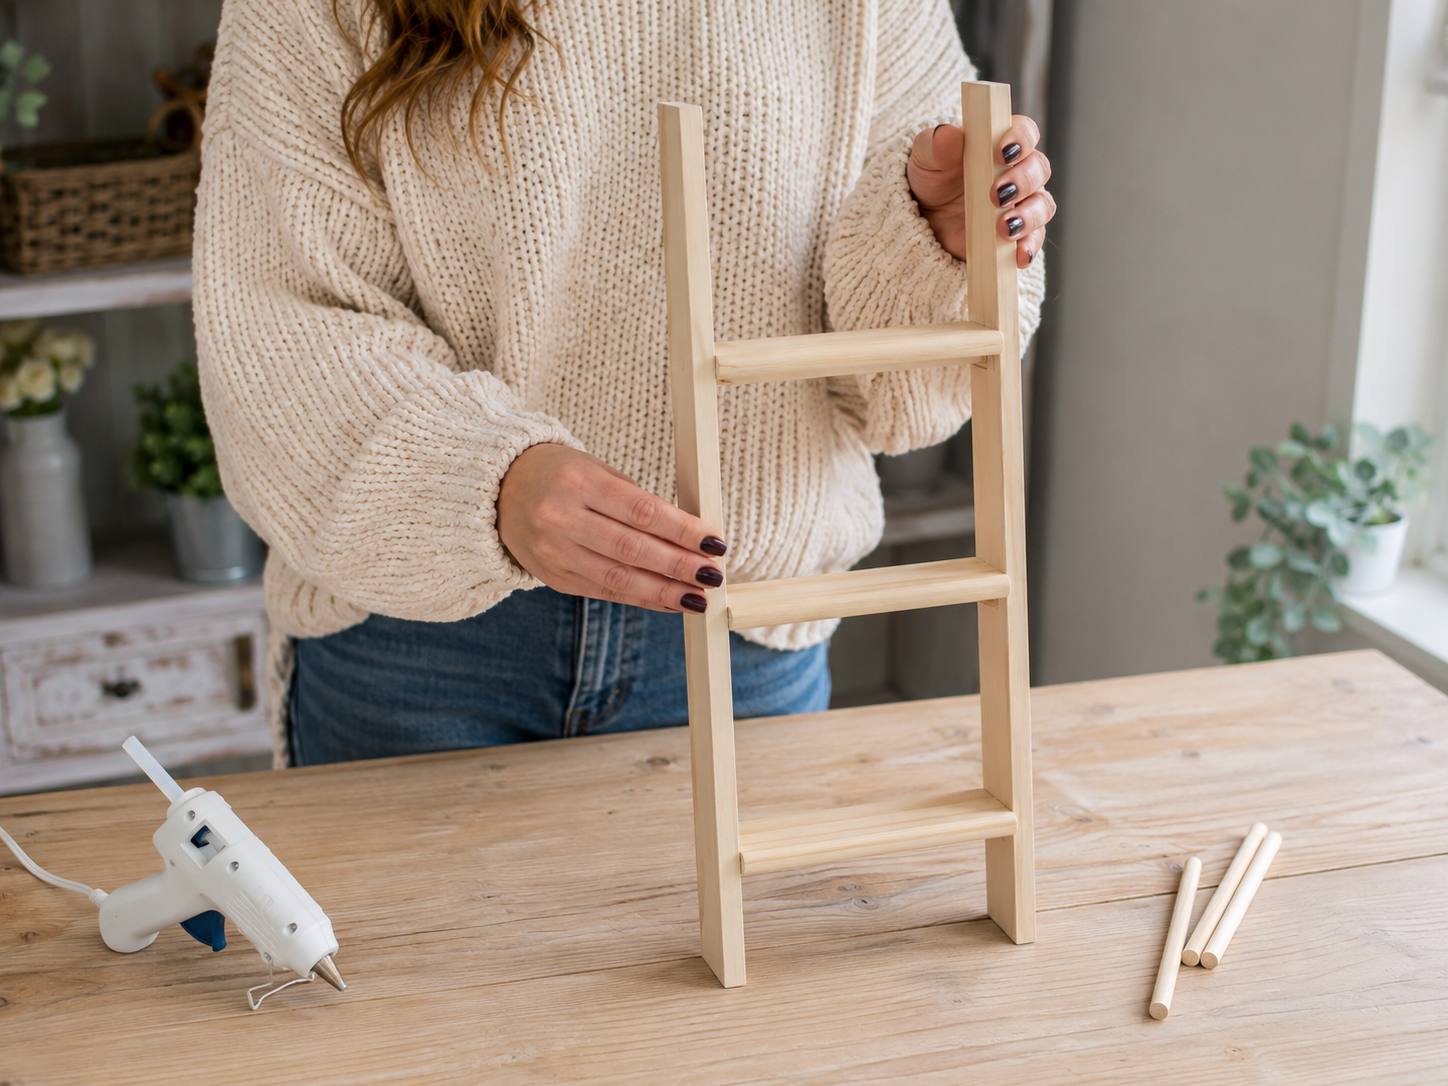
Step 1: Assemble Ladder Structure
Begin by selecting two longer wooden slats or dowels to serve as the vertical side rails for your ladder. Cut three shorter wooden slats to an equal length for the horizontal shelves. Using a hot glue gun, carefully attach the ends of the shorter slats across the longer rails, ensuring they are evenly spaced. Aim for three shelves, each wide enough to comfortably hold two small favor bags side-by-side. Hold each joint firmly until the glue sets to create a sturdy, freestanding ladder frame.
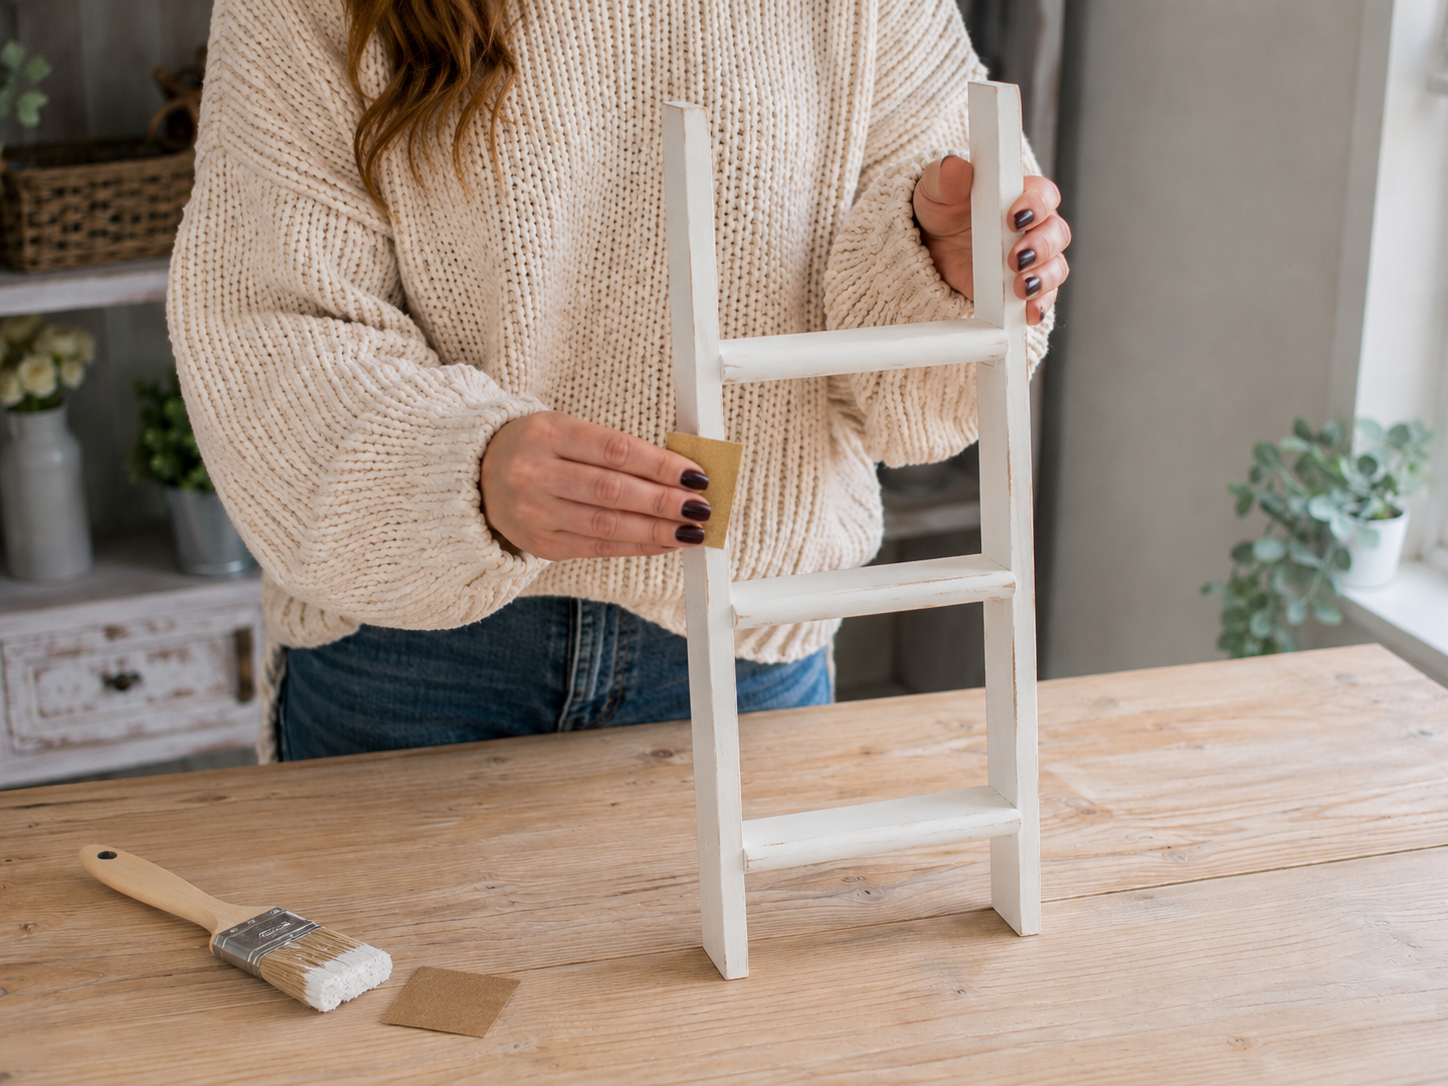
Step 2: Whitewash & Distress Ladder
Once the ladder frame is fully assembled and the glue is dry, apply a coat of white or cream chalk paint over the entire structure. Chalk paint is ideal for its matte finish and easy distressing. Allow the paint to dry completely. For a charming, rustic look, lightly sand the edges and prominent surfaces with fine-grit sandpaper, or use a dry brush technique to subtly reveal the wood beneath, making it appear weathered and handmade.
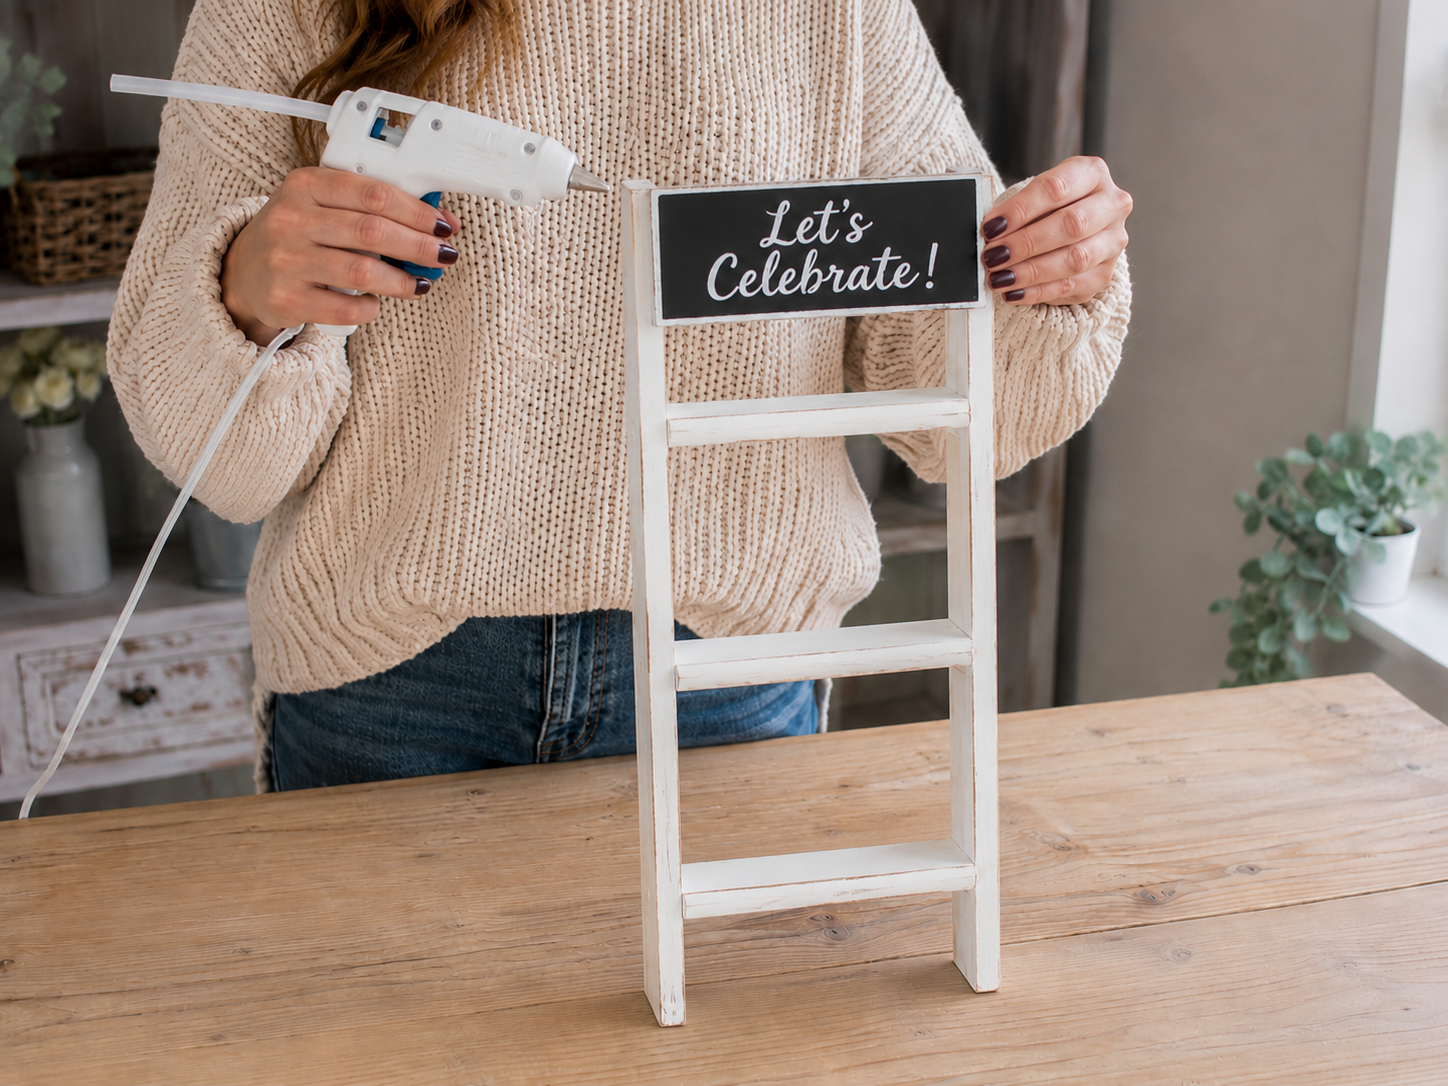
Step 3: Craft Chalkboard Sign
Take a small wooden rectangle or a pre-made mini chalkboard sign. If using wood, paint it entirely black to create a chalkboard effect. Once dry, use a white paint marker or chalk marker to write a festive phrase like “Let’s Celebrate!” on the sign. You can add a small heart or simple flourish for extra charm. If desired, frame the black rectangle with thin white craft sticks for a finished edge, or leave a distressed white border if it’s a pre-painted piece.

Step 4: Secure Sign to Ladder Top
With the sign completely dry, apply a bead of hot glue along the back top edge of the mini chalkboard sign. Carefully center and press the sign onto the top shelf or just below the top edge of the ladder’s side rails, so it sits proudly at the very top of your display. Hold firmly until the glue is secure.
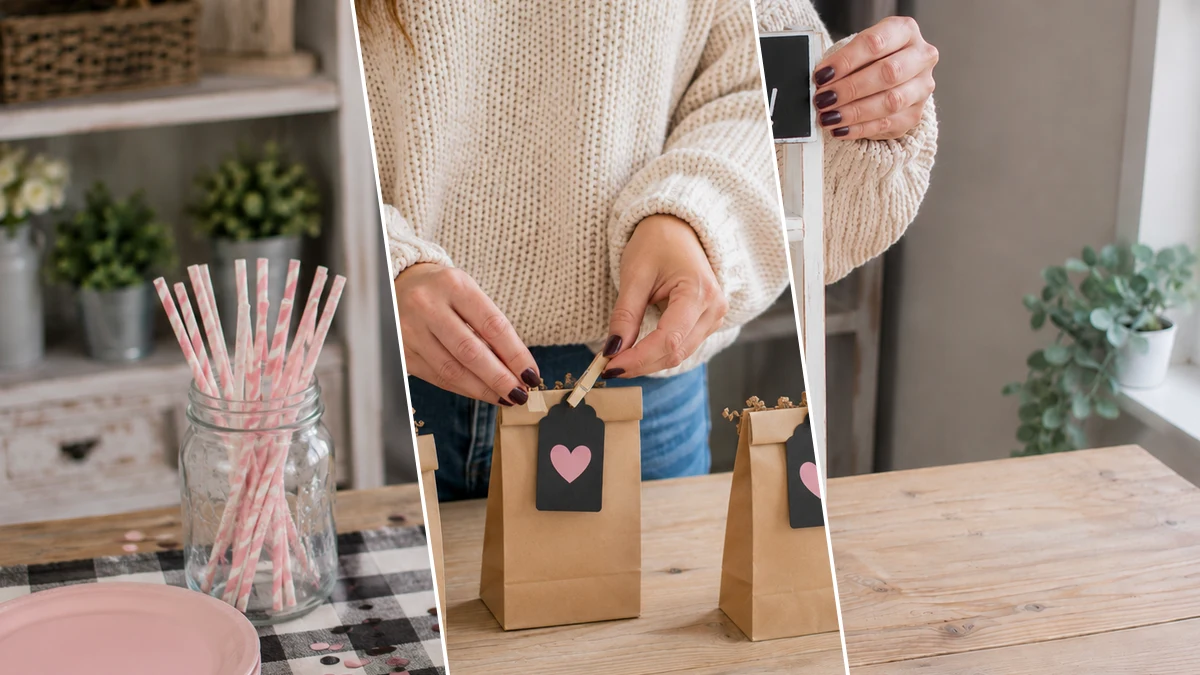
Step 5: Assemble Favor Bags
Take six small kraft paper favor bags. Fill each bag with a small handful of crinkle paper filler to give them volume and a soft base. Fold the top edges of each bag slightly to create a neat opening. Then, using black cardstock, cut out small tags, and adhere a pink heart sticker or a cut-out pink cardstock heart to the front of each tag. Clip one tag to the folded top of each favor bag using a mini clothespin.

📱 Craftino App
Make more crafts like this
1,000+ Wedding & Party ideas with photo guides & Pro Tips
✓ Step-by-step photo tutorials, nothing left out
✓ Pro Tips for every step
✓ Save crafts & browse fully offline
✓ New ideas added every week

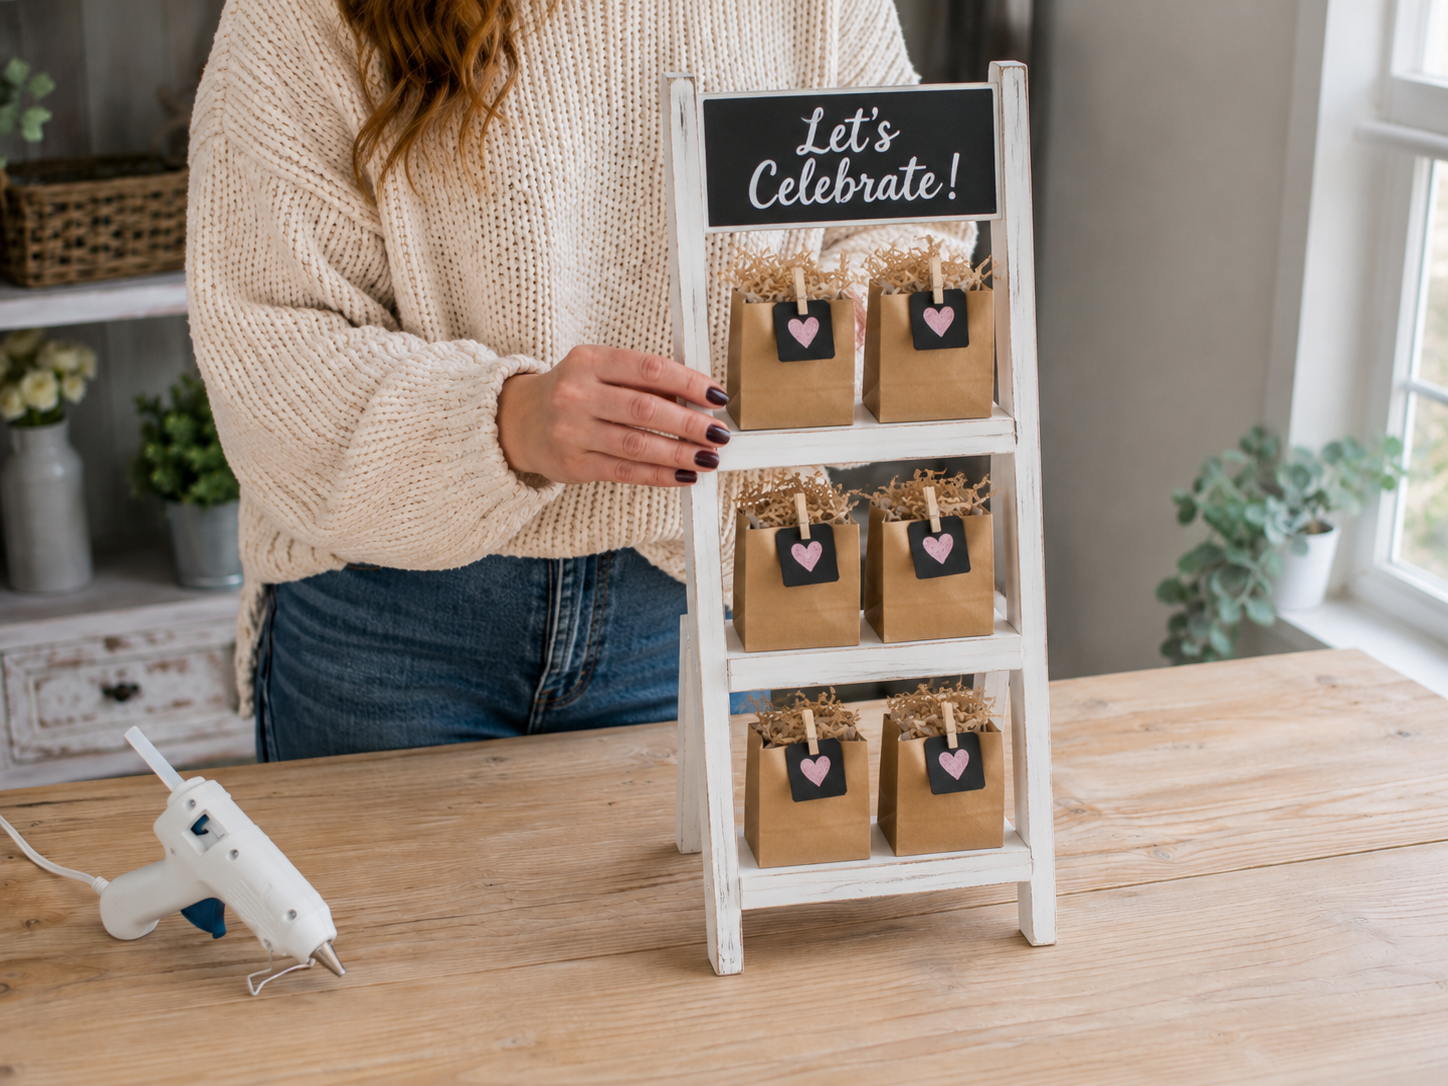
Step 6: Display Favor Bags
Carefully place two prepared favor bags onto each shelf of the mini ladder. Arrange them to face forward, showcasing the tags. If your ladder shelves are narrow, you can add a tiny dot of hot glue to the bottom of each bag to secure them lightly in place, or simply use the mini clothespins to clip them directly to the shelf edge for a removable option. Ensure they look full and appealing.
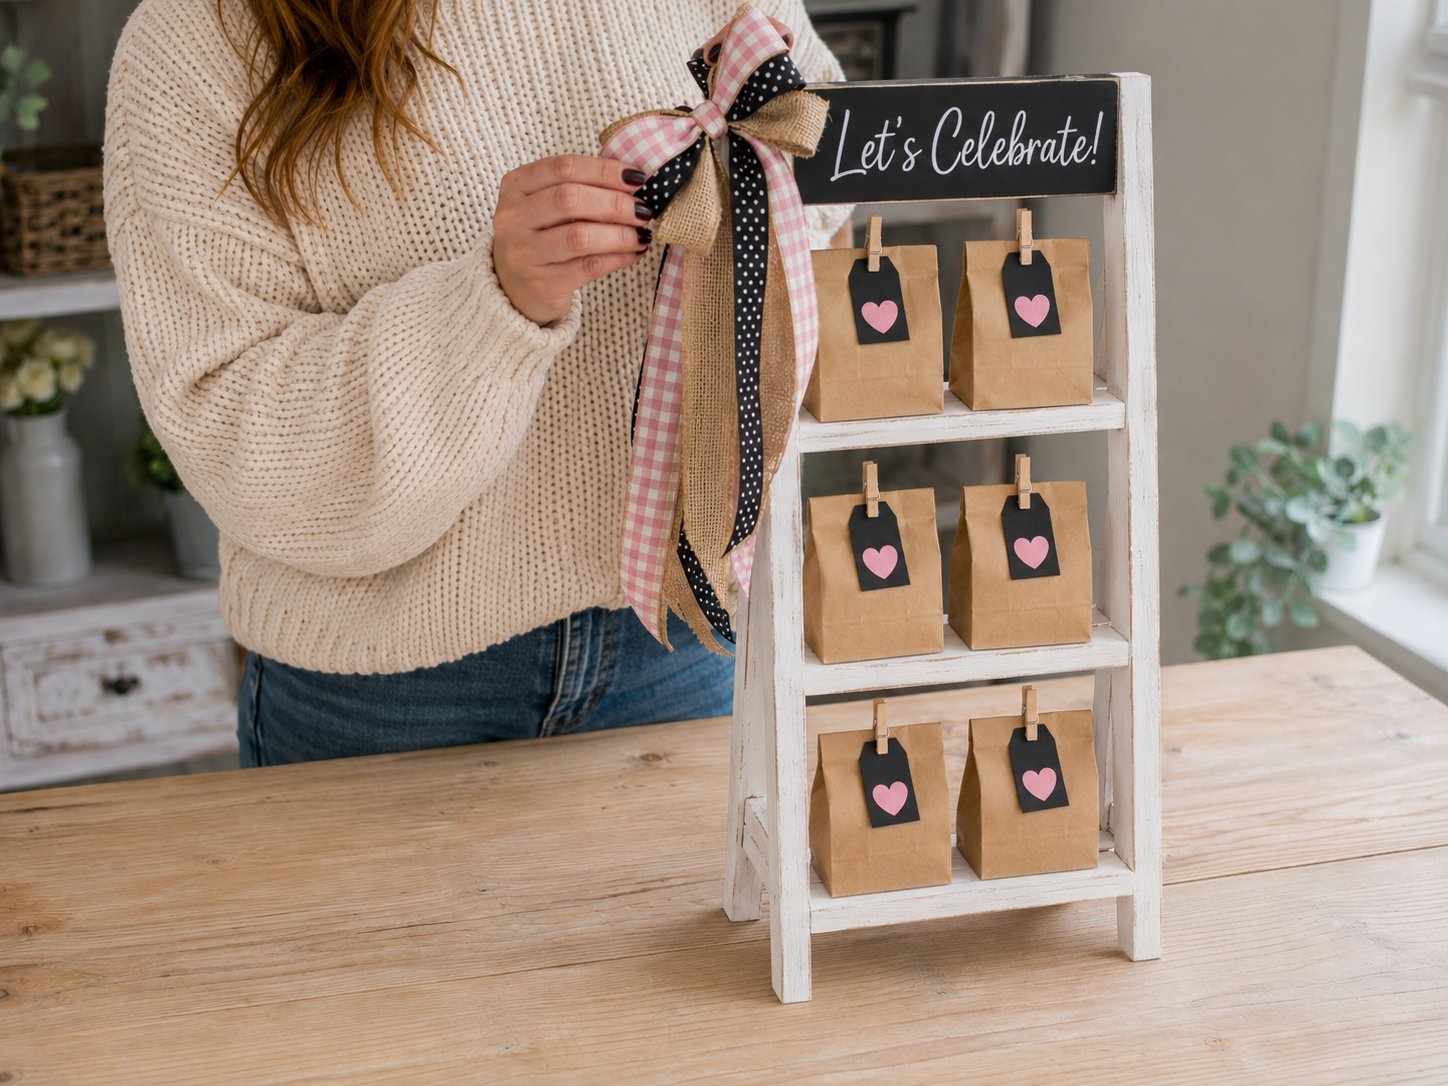
Step 7: Create Ribbon Bow
Gather your assorted ribbons: pink gingham, black polka-dot, and burlap. Cut several lengths of each ribbon. Layer them together and tie them into a loose, multi-textured statement bow. Secure the bow with a small piece of floral wire or by tightly tying it with an extra piece of ribbon. Trim the tails of the bow to varying lengths for an elegant drape. Hot glue this layered ribbon bow to the upper left corner of the ladder, allowing the tails to cascade naturally down the side.
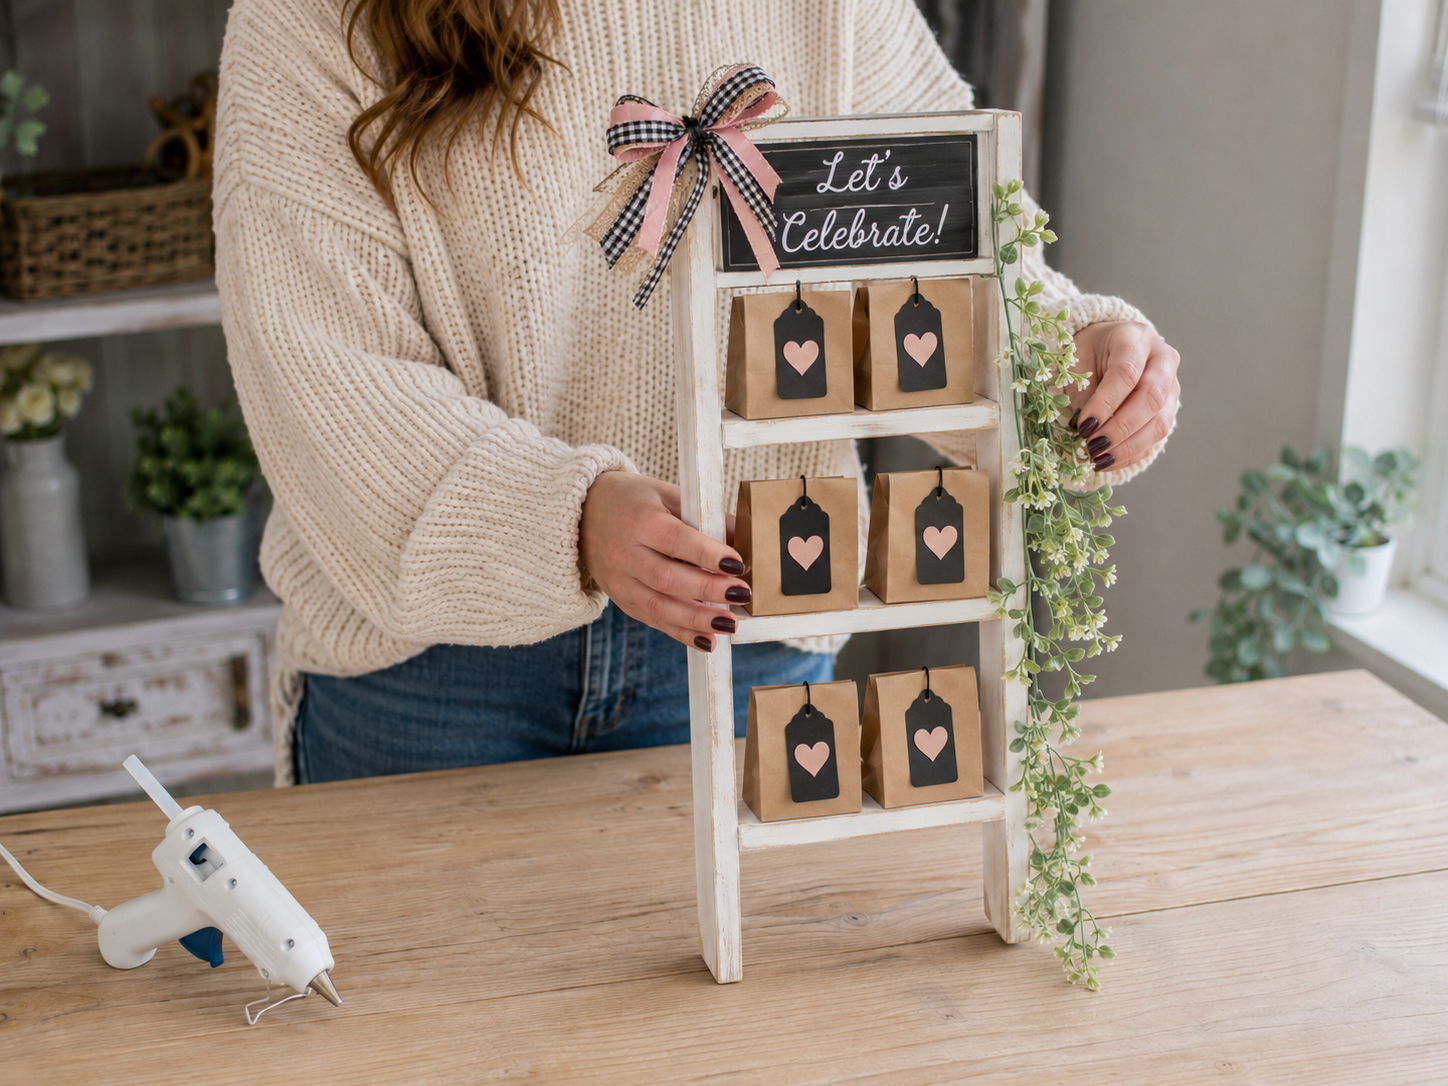
Step 8: Embellish with Greenery
Select a faux greenery garland or several small greenery stems. Gently hot glue the greenery along one side of the ladder, starting from near the top and letting it trail naturally down the edge. Arrange the leaves and stems to create a flowing, organic look. Tuck in tiny white faux flowers amongst the greenery for a soft, delicate touch, securing them with small dots of hot glue.
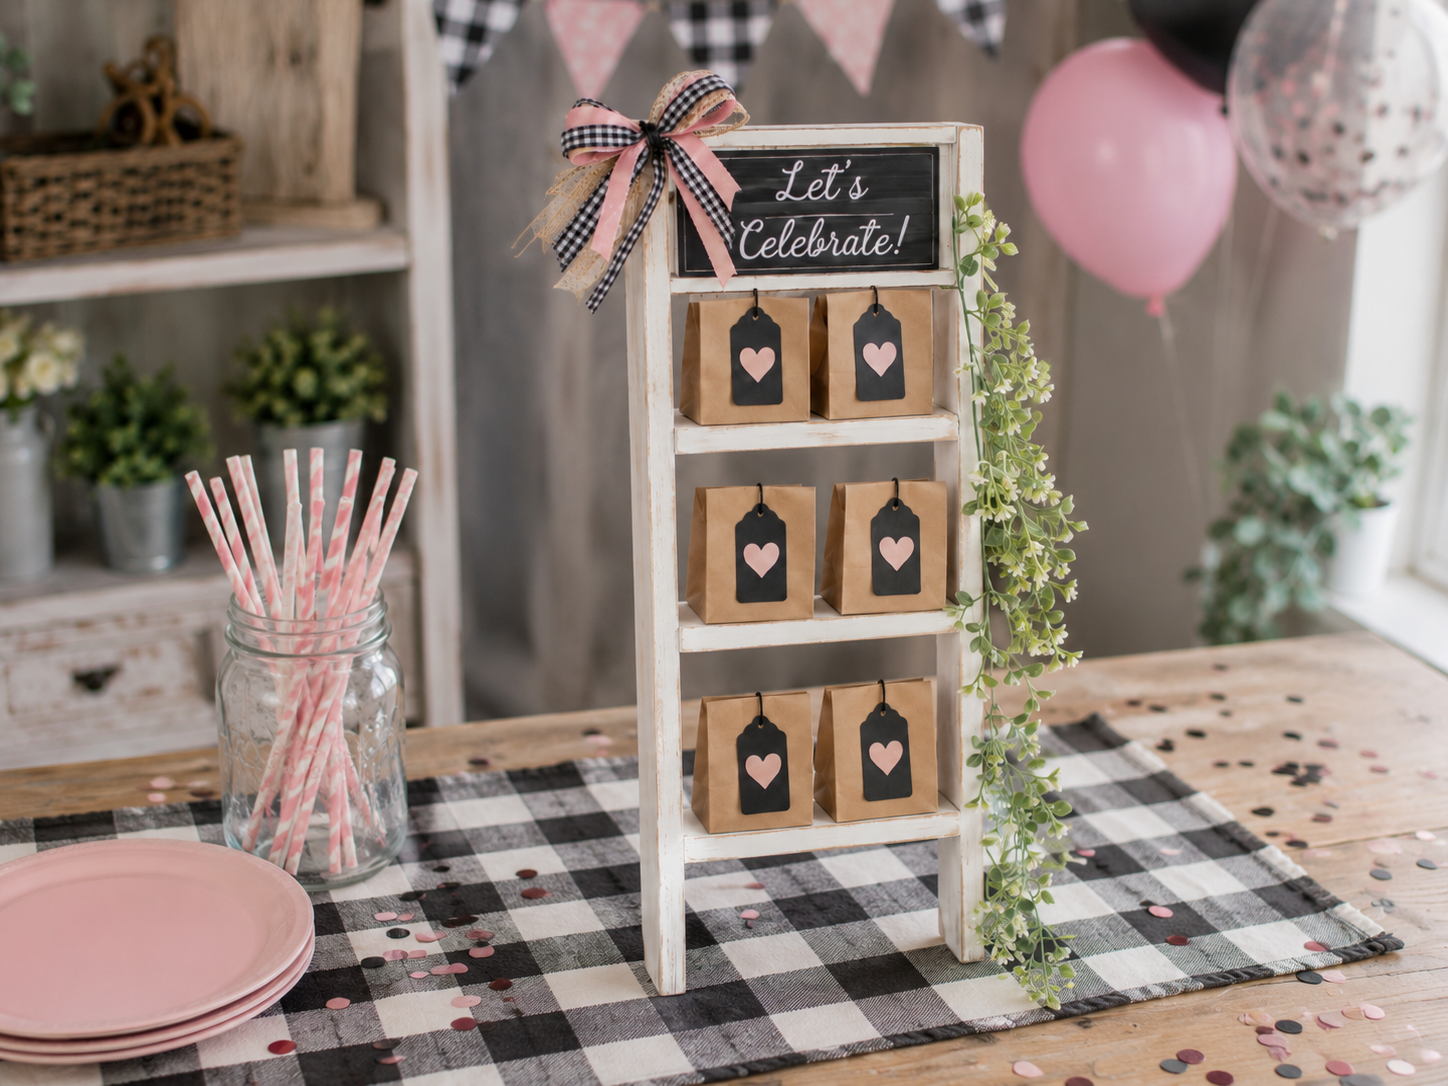
Step 9: Arrange & Display
Step back and admire your finished mini party favor ladder! Make any final adjustments to the favor bags, fluff the ribbons, and ensure the greenery is arranged just right. Place the completed ladder display on your party table, surrounded by coordinating party elements such as plates, straws, balloons, confetti, or simple background decorations to complete your festive setup.
See also: Cozy Boho Kids Room Hanging Rope Shelves
📋 Love staying organized while crafting? Check out our printable planners & craft designs at CraftersDT on Etsy and use code CRAFT20 for 20% off your entire order!
Your Charming Dollar Tree Ladder Display!
See? I told you it was easy peasy! Now you’ve got this adorable Charming Dollar Tree Mini Ladder Favor Display ready to make your Wedding & Party extra special. Stick it on a table with little treats, or add cute personalized tags. Don’t forget to show me your version, maybe try painting it a different color next time!
📱 Craftino App
Make more crafts like this
1,000+ Wedding & Party ideas with photo guides & Pro Tips
✓ Step-by-step photo tutorials, nothing left out
✓ Pro Tips for every step
✓ Save crafts & browse fully offline
✓ New ideas added every week
Frequently Asked Questions
What is the total cost to DIY the Charming Dollar Tree Mini Ladder Favor Display?
The total cost to DIY the Charming Dollar Tree Mini Ladder Favor Display is typically around $12-15. This budget-friendly project uses almost entirely supplies from Dollar Tree, making it an affordable option for Wedding & Party decor.
How long does it take to make a Charming Dollar Tree Mini Ladder Favor Display?
Making a Charming Dollar Tree Mini Ladder Favor Display takes approximately 40-60 minutes from start to finish. This timeframe includes gathering materials, assembly, and allowing for basic drying times for glue and paint.
Is the Charming Dollar Tree Mini Ladder Favor Display suitable for beginner crafters?
Yes, the Charming Dollar Tree Mini Ladder Favor Display is an easy craft, making it perfect for beginner crafters. The steps involve simple cutting, gluing, and painting techniques that don’t require advanced skills.
What kind of glue is best for assembling the DIY Mini Ladder Favor Display?
Wood glue or a strong craft adhesive like E6000 is best for assembling the DIY Mini Ladder Favor Display. These glues provide a durable hold for the wooden craft sticks, ensuring your ladder stands strong for your Wedding & Party event.
Where can I buy the supplies for this budget-friendly Wedding & Party favor display?
You can buy almost all the supplies for this budget-friendly Wedding & Party favor display at Dollar Tree. Items like craft sticks, paint, and small embellishments are readily available there for $1.25 each.
Can I customize the Charming Dollar Tree Mini Ladder Favor Display for different themes?
Absolutely, you can easily customize the Charming Dollar Tree Mini Ladder Favor Display for various themes. Try painting it different colors, adding floral accents for a spring Wedding & Party, or using glitter for a more festive look.
Besides a Wedding & Party, what other occasions is the DIY Mini Ladder Display good for?
Beyond Wedding & Party events, the DIY Mini Ladder Display is perfect for baby showers, graduation parties, or even as a unique Mother’s Day gift. It can hold small photos, jewelry, or tiny decorative items, making it versatile for many celebrations.
What common mistakes should I avoid when making my DIY Charming Dollar Tree Mini Ladder?
A common mistake to avoid when making your DIY Charming Dollar Tree Mini Ladder is using too much glue, which can ooze out and create a messy finish. Apply a thin, even layer and allow adequate drying time, about 15-20 minutes per glued section, before handling.
How durable is the Charming Dollar Tree Mini Ladder Favor Display?
The Charming Dollar Tree Mini Ladder Favor Display is quite durable for indoor use, especially when assembled with strong wood glue. It’s designed to last for your Wedding & Party event and can be reused for future decor for several years if stored properly.
How many craft sticks do I need for one Charming Dollar Tree Mini Ladder?
You will need approximately 10-12 regular-sized wooden craft sticks for one Charming Dollar Tree Mini Ladder Favor Display. Dollar Tree sells large packs, so one or two packs will be more than enough for this Wedding & Party DIY.
Leave a Reply