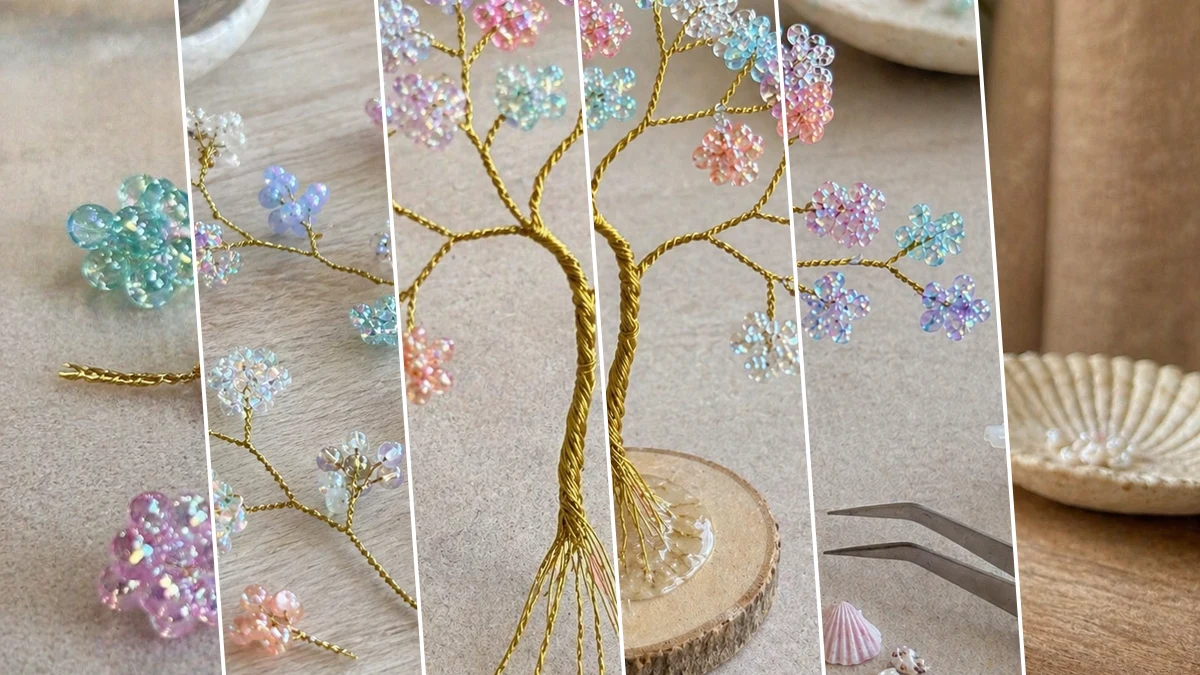
My kids are OBSESSED with mermaids this summer, and honestly, so am I! We were strolling through Dollar Tree last week, and I just knew all those pretty beads and wire could become something magical. That’s how this super cute Mermaid’s Dream Beaded Wire Tree idea splashed into my head, perfect for adding some ocean vibes to our Summer & Beach decor.
See also: Bead Crafts Ideas Tips
Theme: Summer & Beach
Materials Needed
- Thin Gold Craft Wire (24-28 gauge)
- Assorted Pastel & Iridescent Beads (seed beads, small faceted, pearl-like)
- Small Round Wood Slice Base
- Tiny Seashells & Pearl Beads (for base decoration)
- Strong Craft Glue (e.g., E6000 or super glue gel)
- Wire Cutters
- Round-Nose Pliers
📋 Love staying organized while crafting? Check out our printable planners & craft designs at CraftersDT on Etsy and use code CRAFT20 for 20% off your entire order!
Why This Craft Works
This little Mermaid’s Dream Beaded Wire Tree is just perfect for so many spots! Imagine it on a bathroom counter, bringing a calm, beachy feel, or maybe on a bedside table in a kid’s room. It’s also super cute as a centerpiece for a Summer & Beach themed party, or even nestled on a bookshelf in your living room for that relaxed coastal vibe.
📱 Free to Download
Join 50,000+ crafters already using Craftino
Browse 39+ Summer & Beach ideas and thousands more in the app
✓ Save crafts & browse fully offline
✓ Download printable PDF guides for every project
✓ Step-by-step photo tutorials, nothing left out
✓ 1,000+ craft projects with new ones added every week

You won’t believe how budget-friendly this project is! I whipped up my Mermaid’s Dream Beaded Wire Tree for about $3-4 using mostly Dollar Tree supplies. We’re talking wire, beads, and maybe a little base, all for a few bucks. It’s an absolute steal for such pretty Home Decor!
This is totally an “easy” craft, perfect for beginners or if you just need a quick win! You can finish your Mermaid’s Dream Beaded Wire Tree in about 30-45 minutes, maybe even less if you’re a super speedy crafter. It’s a fantastic project for a rainy afternoon with the kids or if you need a last-minute handmade gift.
Step-by-Step Instructions for Mermaid’s Dream Beaded Wire Tree
Okay, crafters, are you ready to dive into making your own little piece of the ocean? This Mermaid’s Dream Beaded Wire Tree project is seriously so much fun and way easier than it looks. I had mine shaped and beaded in under an hour, and I know you’ll love making one too. It’s perfect for beginners and a great way to add some sparkle to your Summer & Beach decor.
Step 1: Create Beaded Wire Clusters
Cut several short lengths (approx. 4-6 inches) of thin gold craft wire. Thread a small selection of 3-7 pastel and iridescent beads onto each wire. Twist the wire tightly just below the beads, forming a secure, small cluster or ‘flower’ shape, leaving a short tail of twisted wire (approx. 1-2 inches). Repeat this process many times; you will need a large quantity of these individual beaded clusters to build your tree.
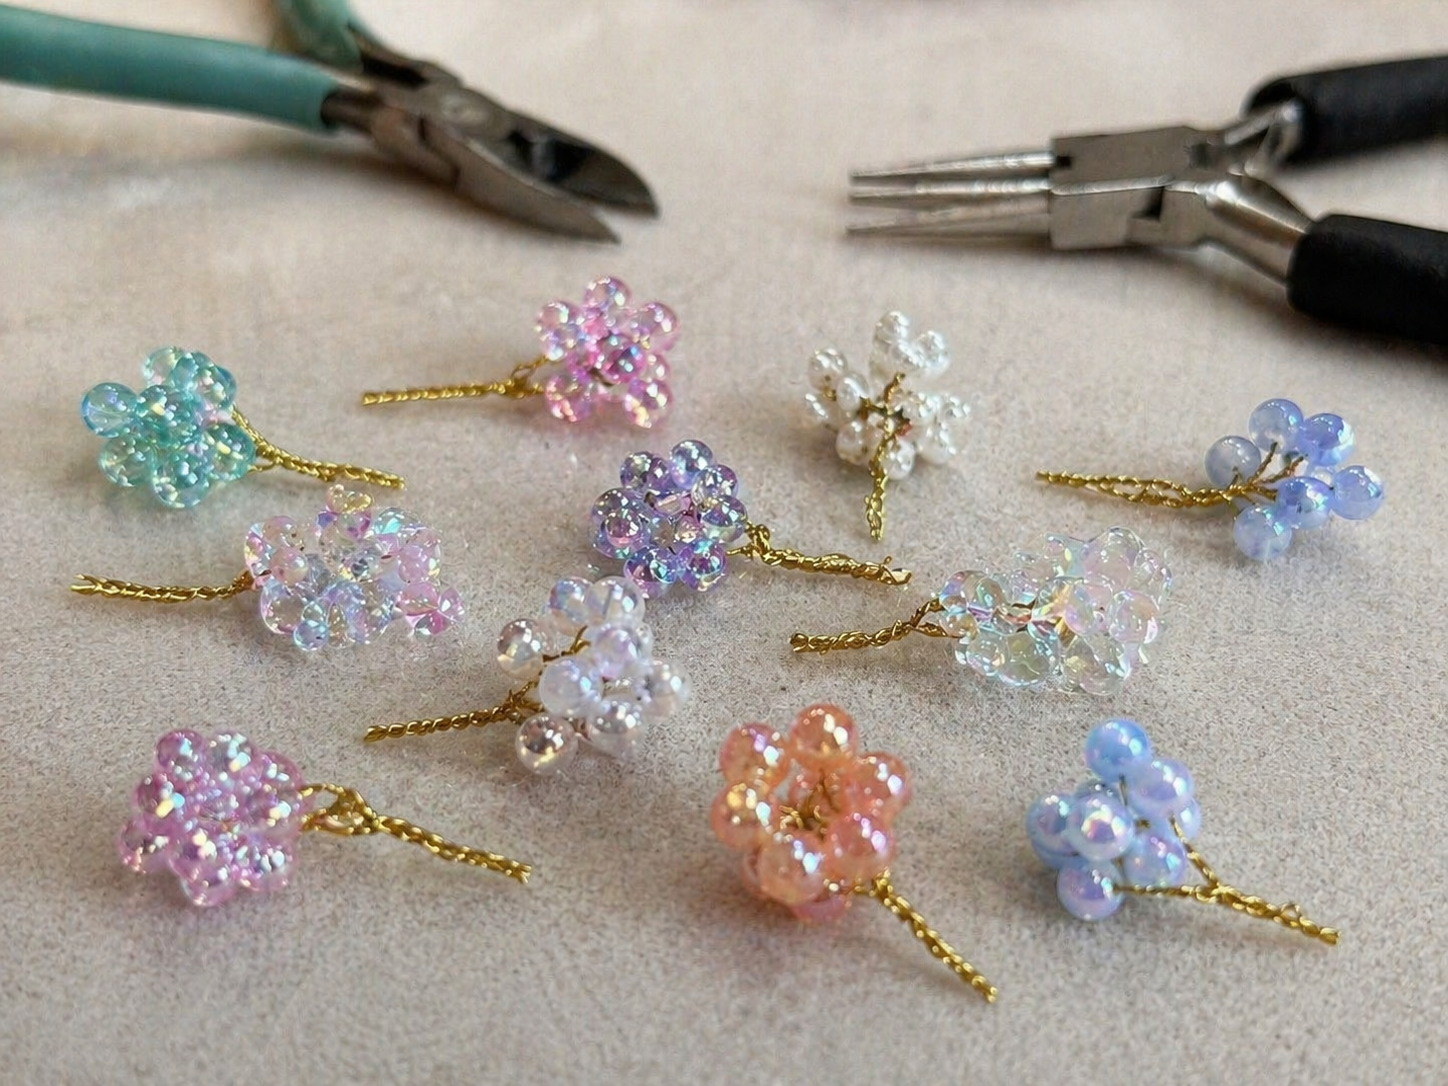
💡 Pro Tip: Using a mix of 24 and 26 gauge wire offers a good balance: 24g for slightly sturdier clusters and 26g for more delicate ones. Vary the bead colors and sizes within each cluster for a more organic and whimsical look, mimicking tiny blossoms or bubbles.
Step 2: Form Mini Branches
Gather 2-4 of the individual beaded clusters created in Step 1. Hold their twisted wire tails together and twist them firmly to form a small mini branch. Ensure the beads are somewhat spaced out along the branch, not overly clumped. Continue this process until you have a good number of these mini branches, aiming for variety in their length and bead distribution to create a natural-looking tree canopy.
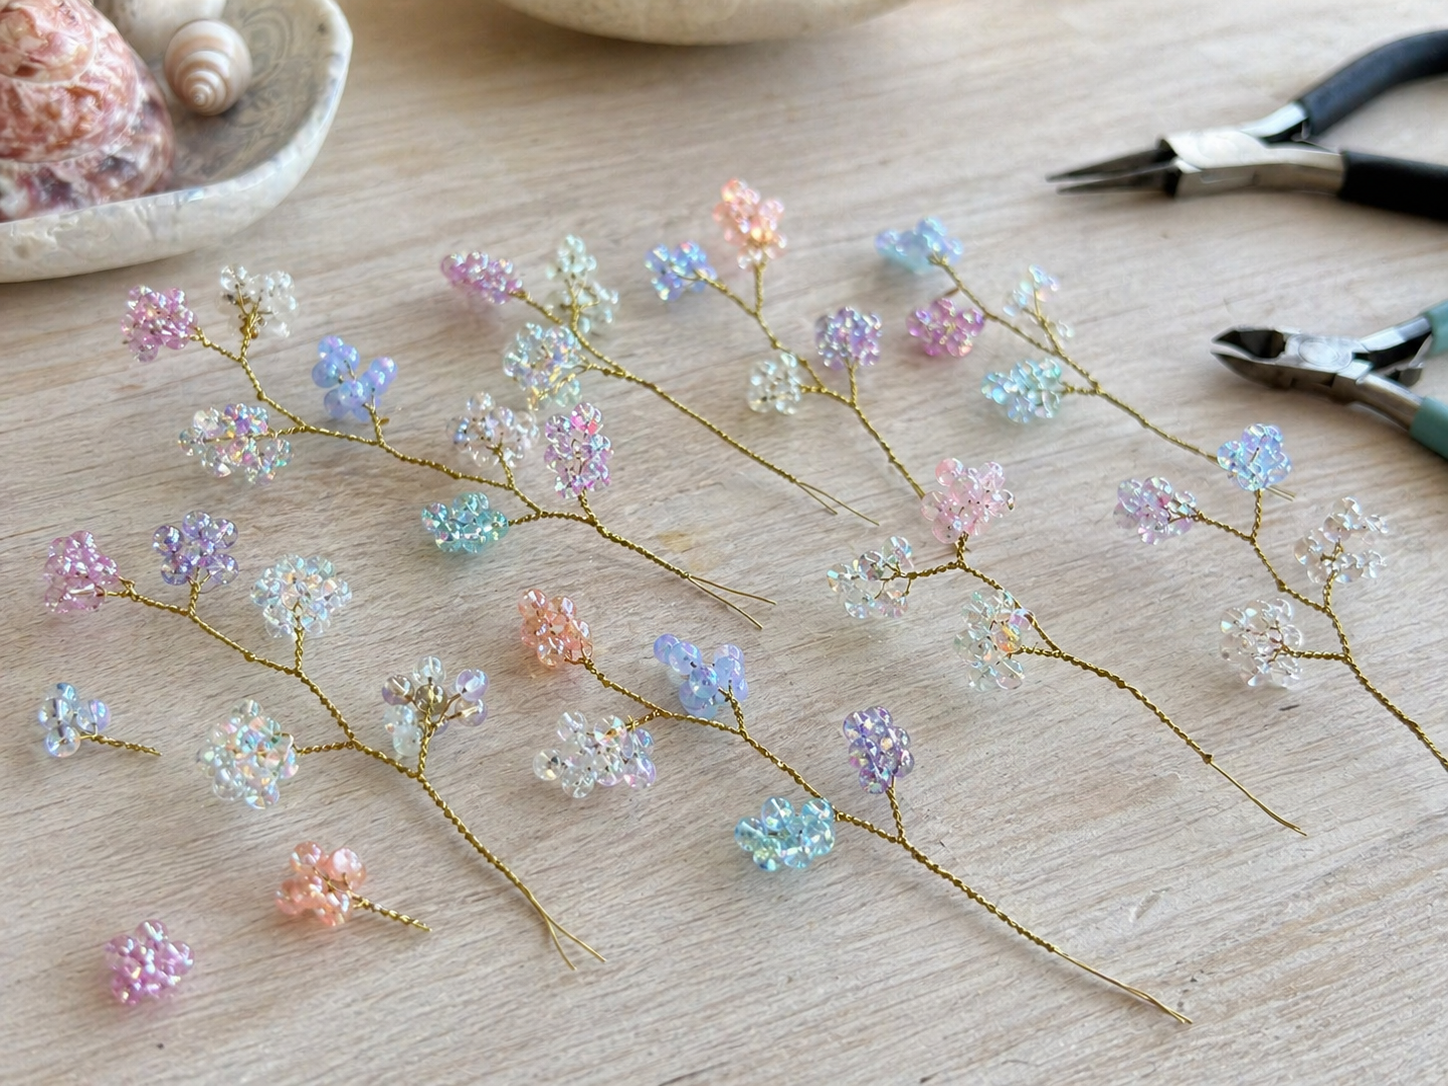
💡 Pro Tip: Use your round-nose pliers for a tighter and more consistent twist on the branch stems, which provides better stability and a neater look. Periodically untwist and re-twist if you’re not happy with the spacing of the clusters; the wire is forgiving.
🗓️ Keep all your craft projects on track! Explore our printable planners & templates at CraftersDT on Etsy and use code CRAFT20 for 20% off!
Step 3: Assemble the Tree Trunk
Begin by selecting a few of your mini branches and twisting their main wire stems together to form the initial section of the tree trunk. Gradually add more mini branches, twisting their stems securely into the growing trunk, working your way downwards. Continue twisting the wires together, compacting them to create a stable, thicker trunk section at the base. Aim for a slightly asymmetrical, natural tree shape, allowing some branches to extend further than others.
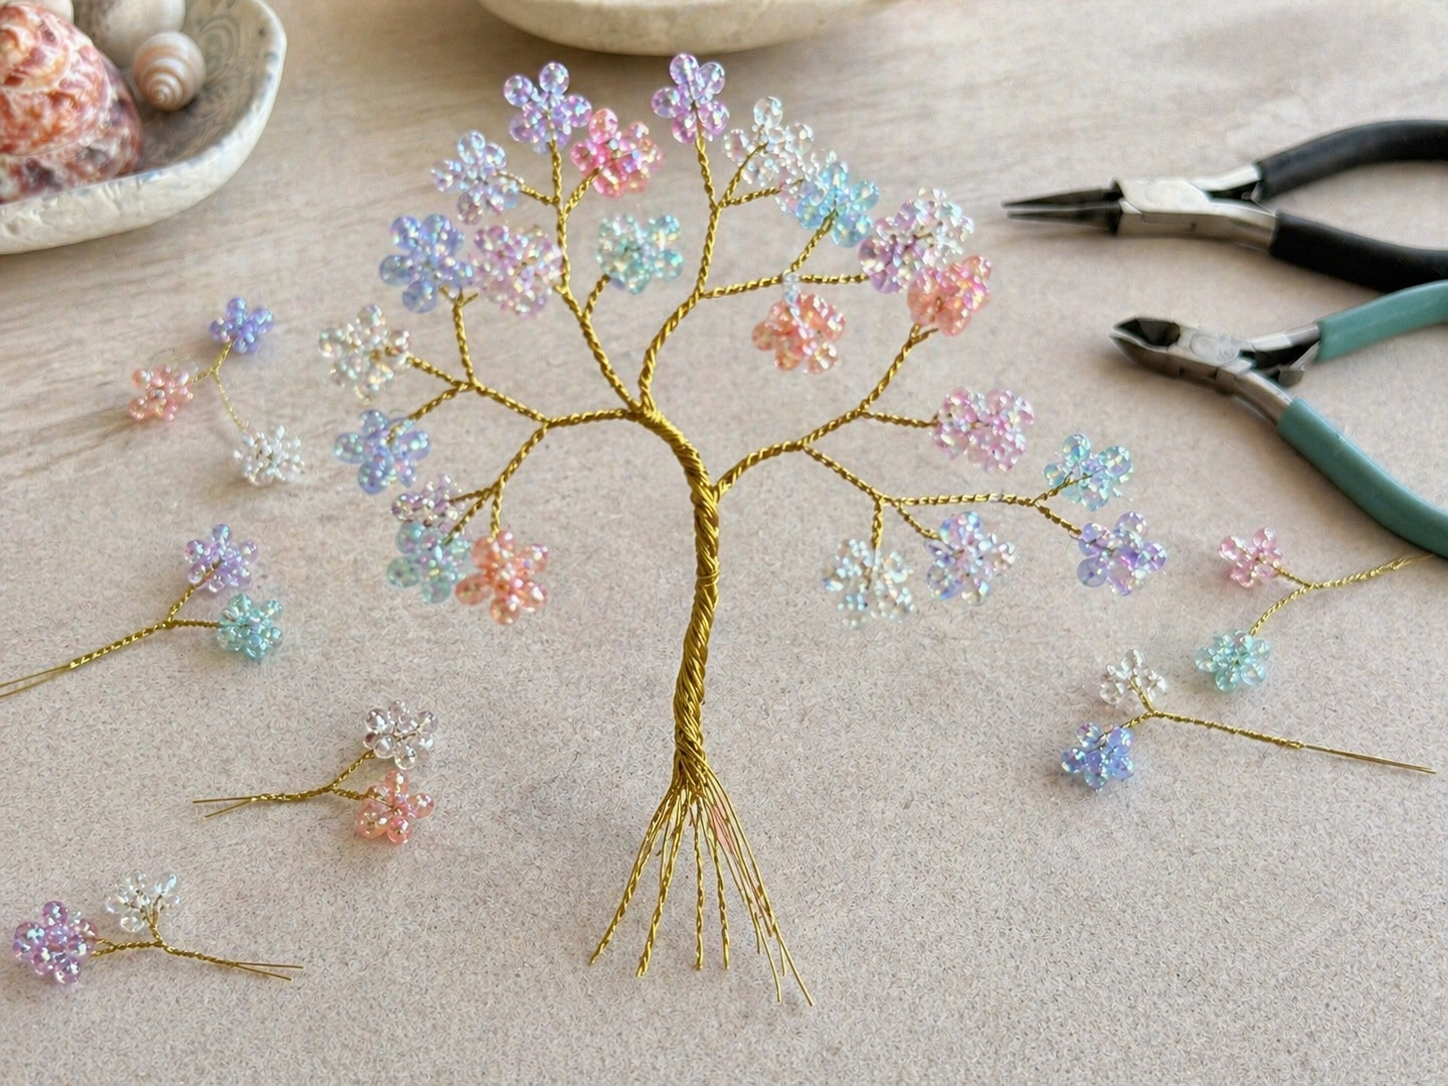
💡 Pro Tip: As you twist the trunk, hold the tree upright occasionally to assess its shape and balance. A sturdy, tightly twisted trunk is crucial for the tree’s overall stability. Don’t worry about perfection; a handmade, slightly irregular trunk adds to the charm.
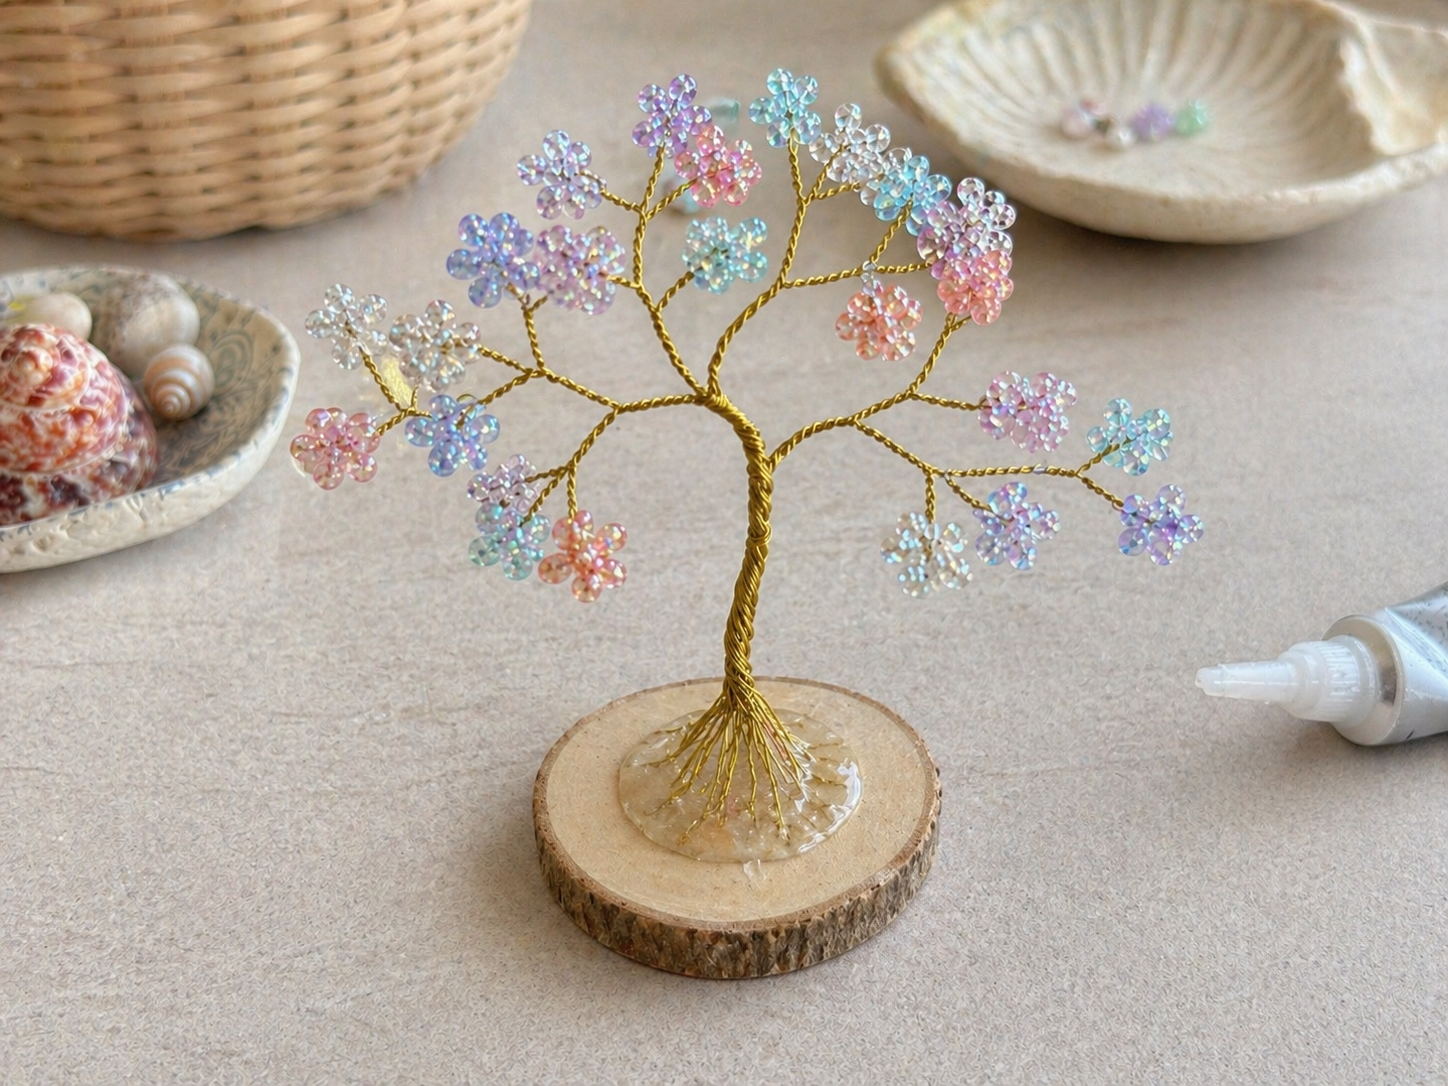
Step 4: Secure Tree to Base
Once your tree structure is complete with a well-twisted trunk, gather the bottom-most wires of the trunk and fan them out slightly to create a wider base. Apply a generous amount of strong, clear-drying craft glue to the center of your wood slice base. Press the fanned-out wires firmly into the glue, ensuring good contact between the wire and the wood. Hold in place or weigh down gently until the glue sets completely, which may take several hours.
💡 Pro Tip: Using a strong, clear-drying adhesive like E6000 or a super glue gel is vital for a secure, long-lasting bond. If using super glue, work quickly and carefully. Allow ample drying time (at least 4-6 hours, preferably overnight) before moving on to prevent the tree from detaching.
Step 5: Decorate the Base
Once the tree is securely attached and the glue from the previous step is completely dry, apply small dots or a thin layer of craft glue around the base of the tree on the wood slice. Carefully arrange and press tiny seashells and pearl-like beads into the wet glue, creating a whimsical, mermaid-inspired landscape around the trunk. Fill in any small gaps for a cohesive and natural look, ensuring not to overcrowd the design.
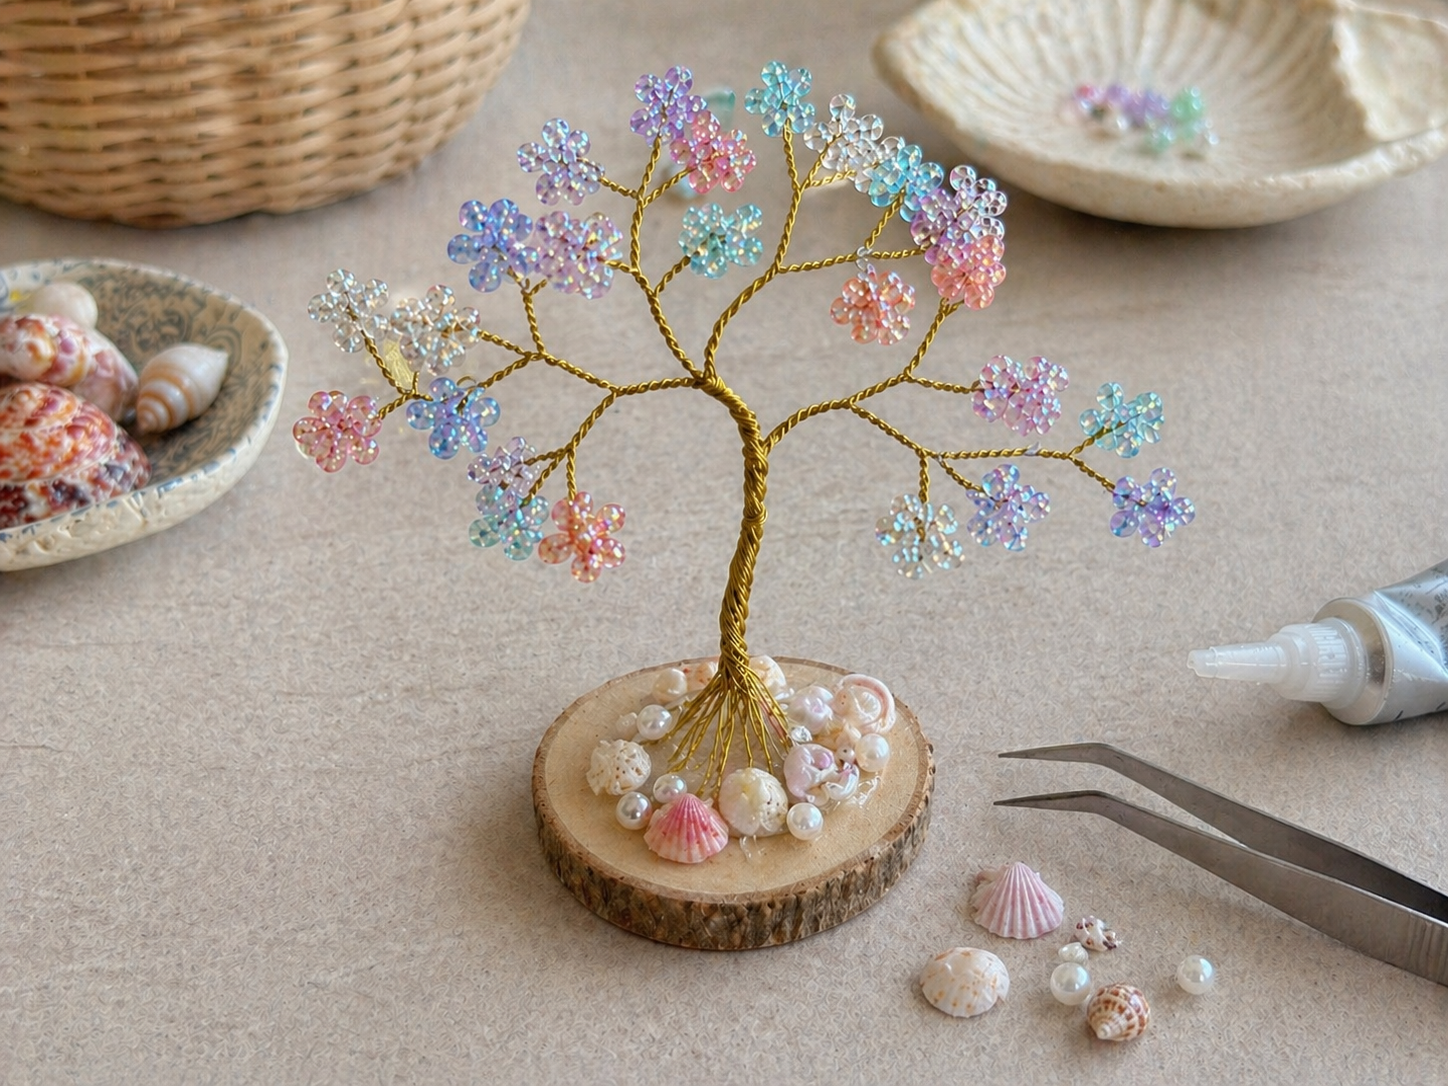
💡 Pro Tip: Use tweezers for precise placement of the tiny shells and beads, especially for creating delicate patterns. Mix different sizes and shapes of shells for visual interest. Remember, a subtle touch is key to maintaining the delicate mermaid aesthetic rather than an overly busy design.
📱 Free to Download
Join 50,000+ crafters already using Craftino
Browse 86+ Summer & Beach ideas and thousands more in the app
✓ Save crafts & browse fully offline
✓ Download printable PDF guides for every project
✓ Step-by-step photo tutorials, nothing left out
✓ 1,000+ craft projects with new ones added every week
Step 6: Final Branch Shaping & Finish
Once all the glue is completely dry (for both tree attachment and base decoration), gently and carefully bend and arrange the individual wire branches to achieve your desired airy, delicate, and slightly asymmetrical ‘fairy-tale’ silhouette. Ensure beads are evenly distributed and the tree feels balanced from all angles. Take your time to refine the shape. For extra durability and a subtle sheen, you may optionally apply a light mist of clear acrylic sealer spray to the entire piece, focusing on the base and wire, allowing it to dry fully in a well-ventilated area.

💡 Pro Tip: Start shaping from the bottom branches upwards, gradually defining the canopy and ensuring no branches are directly overlapping. Step back occasionally to view the tree from different angles and ensure overall balance. The sealer spray will protect the base and wire from dust and give a professional finish.
Your Mermaid’s Dream Beaded Wire Tree Awaits!
Look at that, you did it! Your Mermaid’s Dream Beaded Wire Tree is sparkling and ready to bring those lovely Summer & Beach vibes into your home. Pop it on a shelf, your desk, or even gift it to a friend who loves the ocean as much as you do. Don’t forget to share your version with me, I love seeing what you create!
📱 Free to Download
Join 50,000+ crafters already using Craftino
Browse 95+ Summer & Beach ideas and thousands more in the app
✓ Save crafts & browse fully offline
✓ Download printable PDF guides for every project
✓ Step-by-step photo tutorials, nothing left out
✓ 1,000+ craft projects with new ones added every week
Frequently Asked Questions
How many beads do I need for the DIY Mermaid’s Dream Beaded Wire Tree?
You’ll want about 50-70 small beads (around 6-8mm) from Dollar Tree, plus maybe 5-10 slightly larger accent beads (10-12mm) for your Mermaid’s Dream Beaded Wire Tree.
What kind of wire works best for this Mermaid’s Dream Beaded Wire Tree craft?
Craft wire in 20-gauge or 22-gauge is perfect for this DIY Home Decor. It’s sturdy enough to hold its shape but flexible enough to bend easily, and you can usually grab a roll at Dollar Tree.
Can kids make this Mermaid’s Dream Beaded Wire Tree project for Summer & Beach decor?
Yes, older kids (around 8 and up) can definitely help with this easy craft! Just make sure an adult handles any wire cutting and supervises the shaping to keep little fingers safe.
How long does it take to make one Mermaid’s Dream Beaded Wire Tree?
Most crafters can finish their Mermaid’s Dream Beaded Wire Tree in about 30 to 45 minutes from start to finish. It’s a quick and fun DIY project for your Summer & Beach theme.
What’s the total cost to make a Dollar Tree Mermaid’s Dream Beaded Wire Tree?
You can make this entire Mermaid’s Dream Beaded Wire Tree for roughly $3-4, assuming you get most of your supplies like beads and wire from Dollar Tree. It’s super budget-friendly Home Decor!
What if I can’t find specific colors of beads at Dollar Tree for my Mermaid’s Dream Beaded Wire Tree?
No worries! Dollar Tree stock changes, so just grab whatever blue, green, purple, or clear beads you find. Mixing colors makes your Summer & Beach themed wire tree unique and beautiful.
Get inspired with daily seasonal ideas on the Dollar Tree Craft Blog.
Leave a Reply