Okay, so who else walks into Dollar Tree just for ‘one thing’ and leaves with a cart full of possibilities? Guilty! That’s exactly how I ended up with the goodies for these adorable Rustic Garden Birdhouses from Upcycled Containers. I saw some super expensive ones at a fancy store and knew I could make something just as cute, but way cheaper, for my backyard this Spring.
See also: Creative 10 Dollar Tree Garden Projects On A Budget
Theme: Spring & Garden
Materials Needed
- Upcycled Plastic Containers (e.g., yogurt containers, small bottles)
- Acrylic Craft Paint (soft dusty blue or pale gray) & Paintbrush
- Small Terracotta Saucers (one per birdhouse)
- Assorted Twigs & Bark Pieces (various sizes)
- Jute Twine (thin for ladders, thicker for hanging)
- Preserved Moss, Small Faux Berries, & Seed Pods (for decoration)
- Hot Glue Gun & Glue Sticks
- Craft Knife or Heavy-Duty Scissors
- Drill with small bit (or sharp awl/tool for holes)
- Wooden Beads (optional, for hanging twine)
📋 Love staying organized while crafting? Check out our printable planners & craft designs at CraftersDT on Etsy and use code CRAFT20 for 20% off your entire order!
Why This Craft Works
These are perfect for adding a touch of rustic charm to your yard or patio for Spring & Garden decor. You can hang them on a porch, tuck them into flower beds, or even display them on a tiered tray indoors if you want. They look so sweet peeking out from some greenery.
📱 Free to Download
Join 50,000+ crafters already using Craftino
Browse 94+ Spring & Garden ideas and thousands more in the app
✓ Save crafts & browse fully offline
✓ Download printable PDF guides for every project
✓ Step-by-step photo tutorials, nothing left out
✓ 1,000+ craft projects with new ones added every week

Seriously, you won’t believe how budget-friendly these are! Using mostly Dollar Tree finds, each Rustic Garden Birdhouse from Upcycled Containers costs about $3 to $4 to make, depending on what bits and bobs you already have at home. It’s such a steal compared to store-bought ones.
This is definitely an easy craft, perfect for beginners or even older kids who want to help out. You can whip up one of these beauties in about 30 to 45 minutes, making it a fantastic last-minute project or something fun to do on a lazy afternoon.
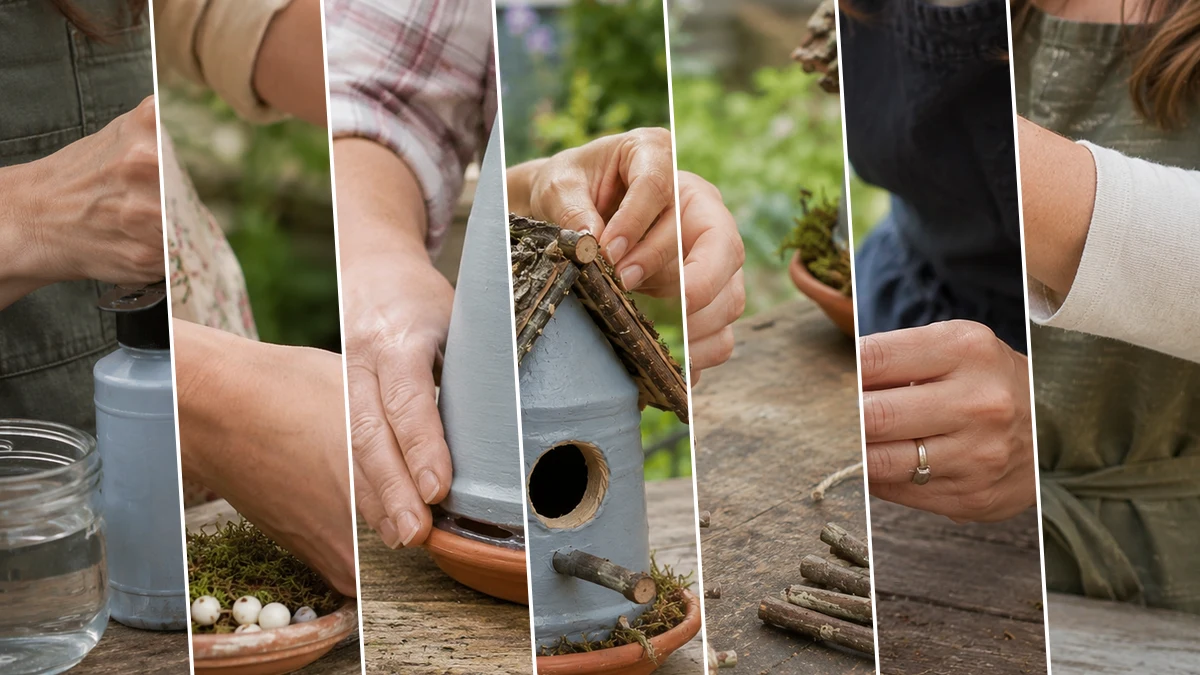
Step-by-Step Instructions for Rustic Garden Birdhouses from Upcycled Containers
Alright, grab your craft supplies and let’s get this party started! You’re going to love how quickly these Rustic Garden Birdhouses from Upcycled Containers come together. I actually made three of them in just over an hour, and it was so much fun. This is a super easy DIY project, perfect for beginners, and a great way to add some charm to your Spring & Garden decor without breaking the bank.
Step 1: Prep & Paint Containers
Thoroughly clean your chosen plastic containers with soap and water, ensuring all labels and residues are removed. Let them dry completely. Once dry, apply a base coat of your dusty blue or pale gray acrylic paint. You may need two to three thin coats for even coverage.
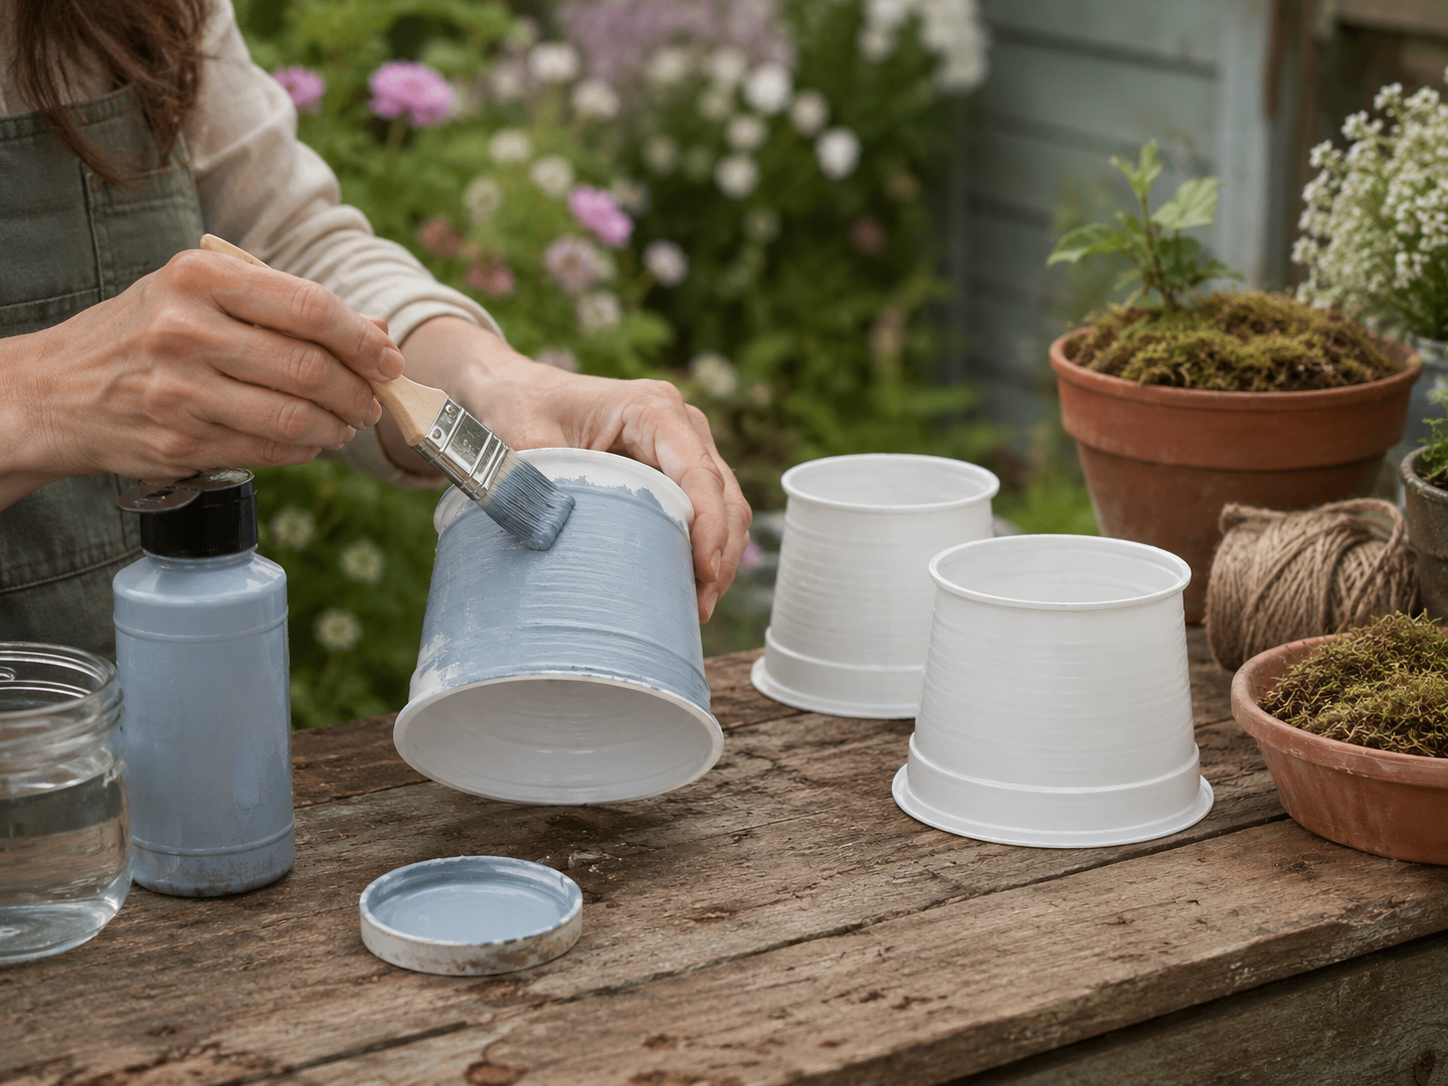
💡 Pro Tip: For best paint adhesion and a smooth finish, lightly sand the plastic containers with fine-grit sandpaper (around 220-grit) before cleaning. Always apply paint in thin, even layers, allowing each coat to dry to the touch before applying the next to prevent streaks and drips. A sponge brush can help create a slightly textured, rustic finish.
Step 2: Cut Entry Holes & Perches
Once your painted containers are fully dry, carefully mark and cut a round entry hole on the front of each using a craft knife or heavy-duty scissors. Make sure the hole is proportionate to your birdhouse. Just below the entry hole, use a drill (with a small bit suitable for plastic) or a sharp awl to make a hole for the perch twig. Insert a short, sturdy twig into this hole, securing it with a dab of hot glue from the inside if necessary.
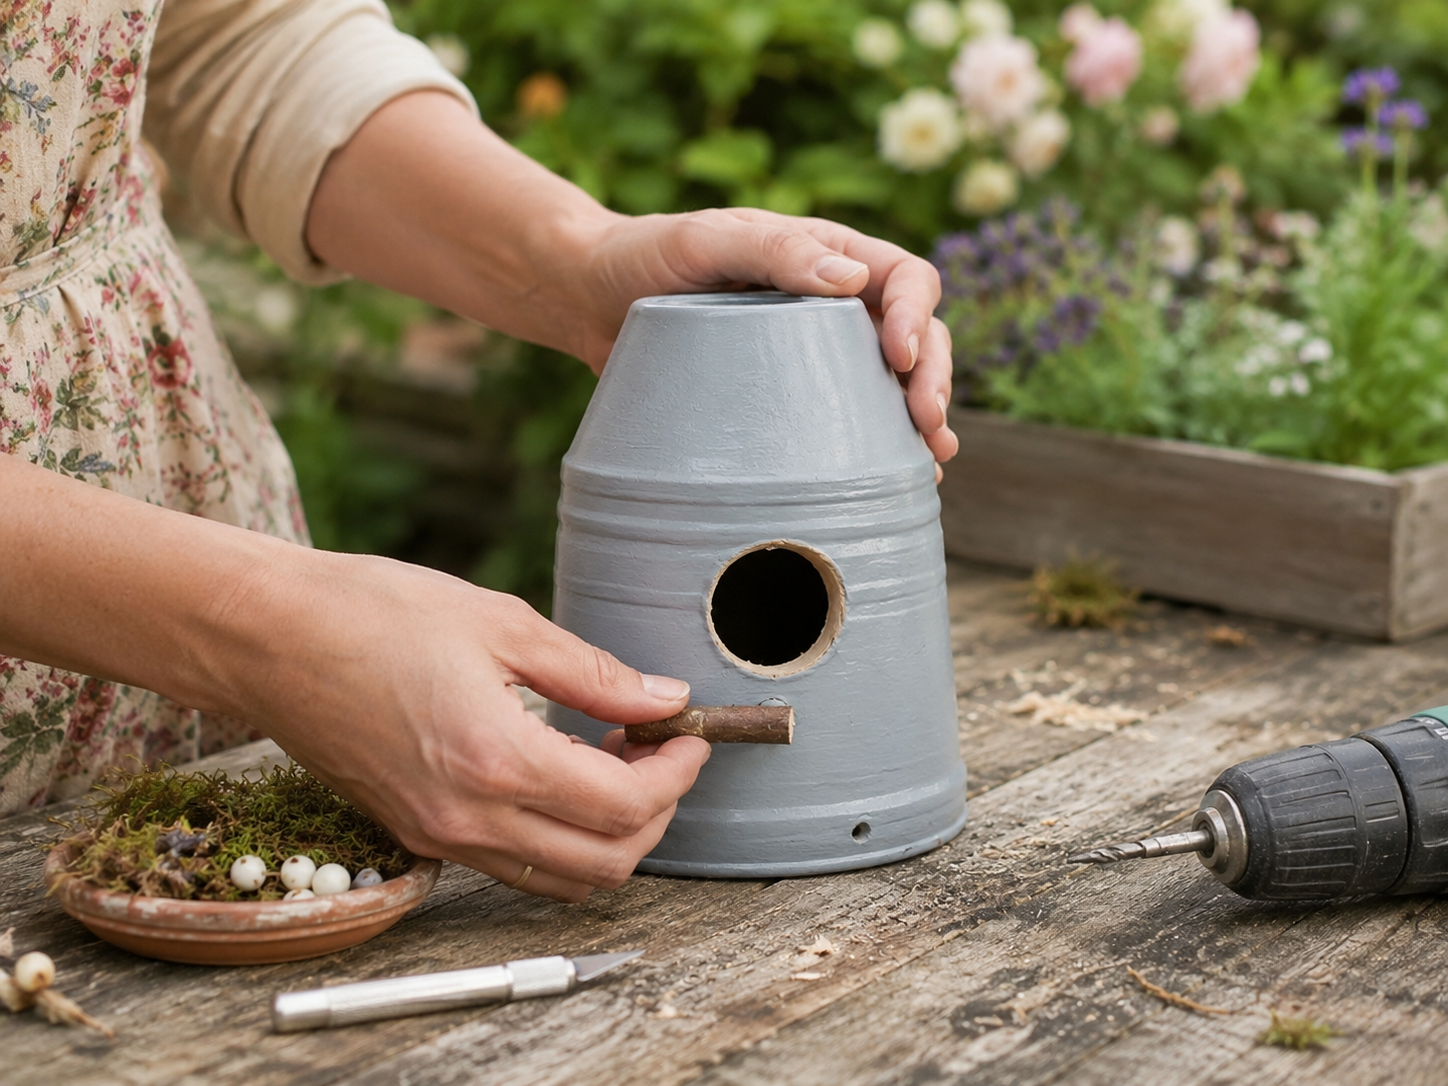
💡 Pro Tip: To prevent cracking the plastic when cutting the entry hole, warm the plastic slightly with a hairdryer on a low setting (be cautious not to melt it) or use a very sharp craft knife with multiple light passes rather than one deep cut. For the perch hole, start with a smaller drill bit and gradually increase if needed, or twist an awl gently to widen. Ensure the perch twig is snug but not overly tight to avoid stress on the plastic.
🗓️ Keep all your craft projects on track! Explore our printable planners & templates at CraftersDT on Etsy and use code CRAFT20 for 20% off!
Step 3: Attach Terracotta Bases
Take your small terracotta saucers and ensure they are clean and dry. Apply a generous ring of hot glue to the rim of each saucer, then carefully center and press the bottom of a painted birdhouse container onto it. Hold firmly until the glue sets, ensuring a secure and stable base.
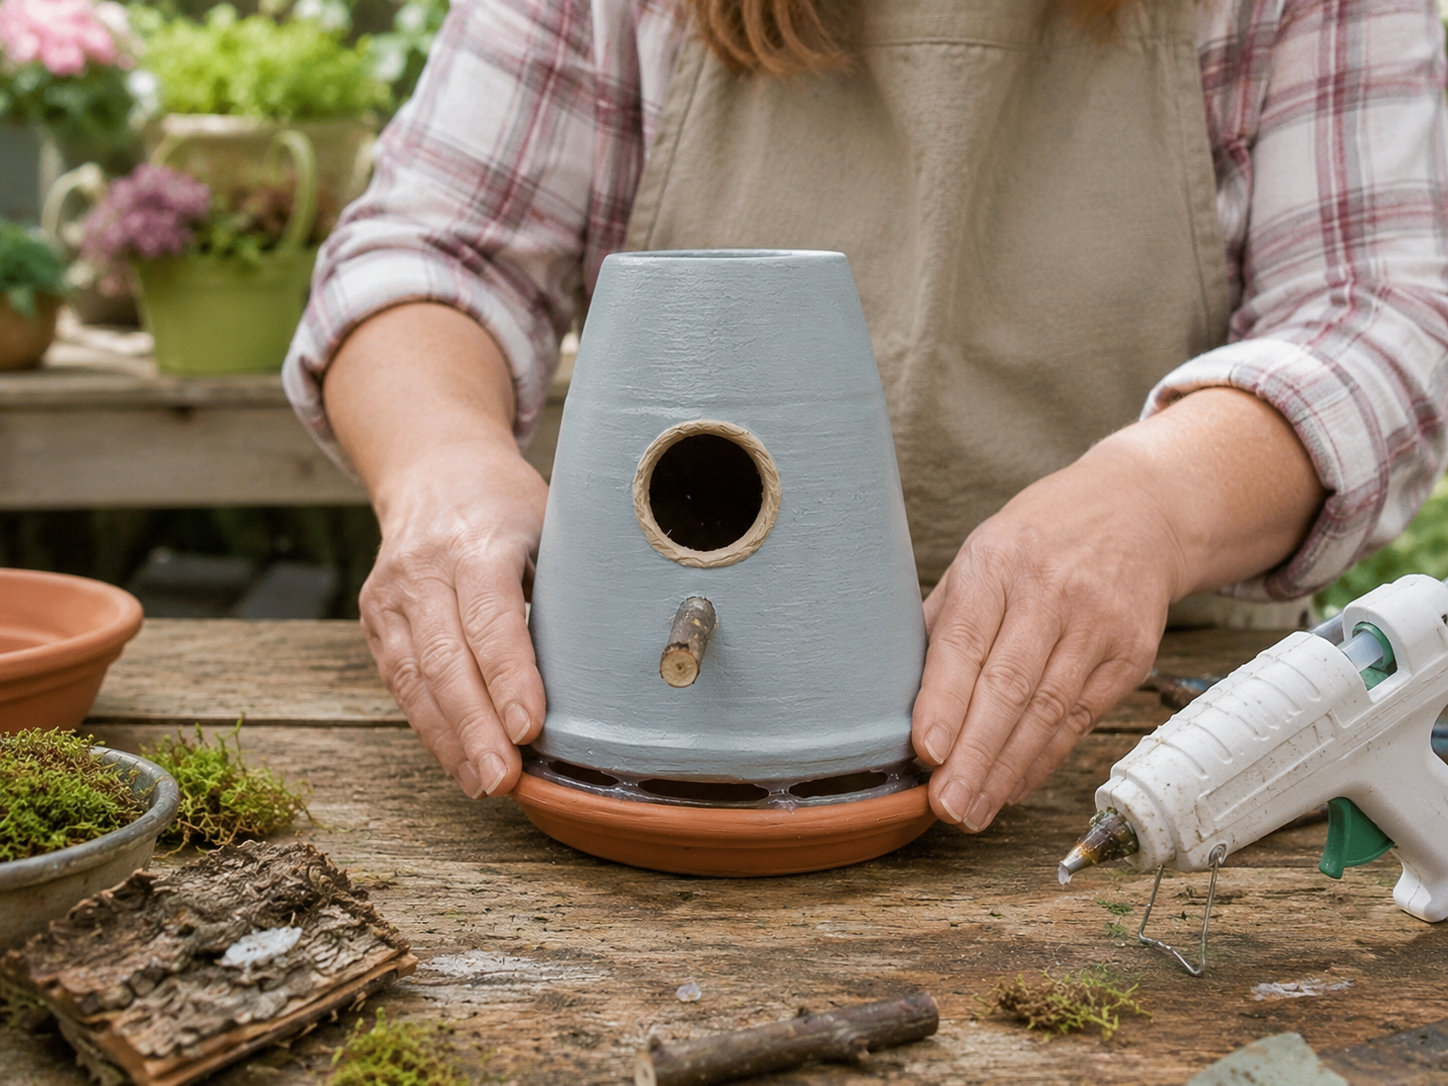
💡 Pro Tip: For a strong bond, apply hot glue quickly and press the container firmly onto the saucer. If working with multiple birdhouses, apply glue to one saucer at a time. To ensure perfect centering, you can draw a light circle guideline on the saucer before applying glue. Make sure the saucers are completely dry from any previous washing to prevent hot glue from losing adhesion.
Step 4: Construct Woodland Roofs
Select an assortment of twigs and flat bark pieces. Create a pitched roof shape by hot gluing two longer, thicker twigs to the top sides of your container, meeting at a point. Then, begin layering smaller twigs and bark pieces over this framework, working from the bottom edge of the roof upwards, overlapping them slightly to create a natural, rustic shingle effect. Ensure good coverage for a charming woodland look.
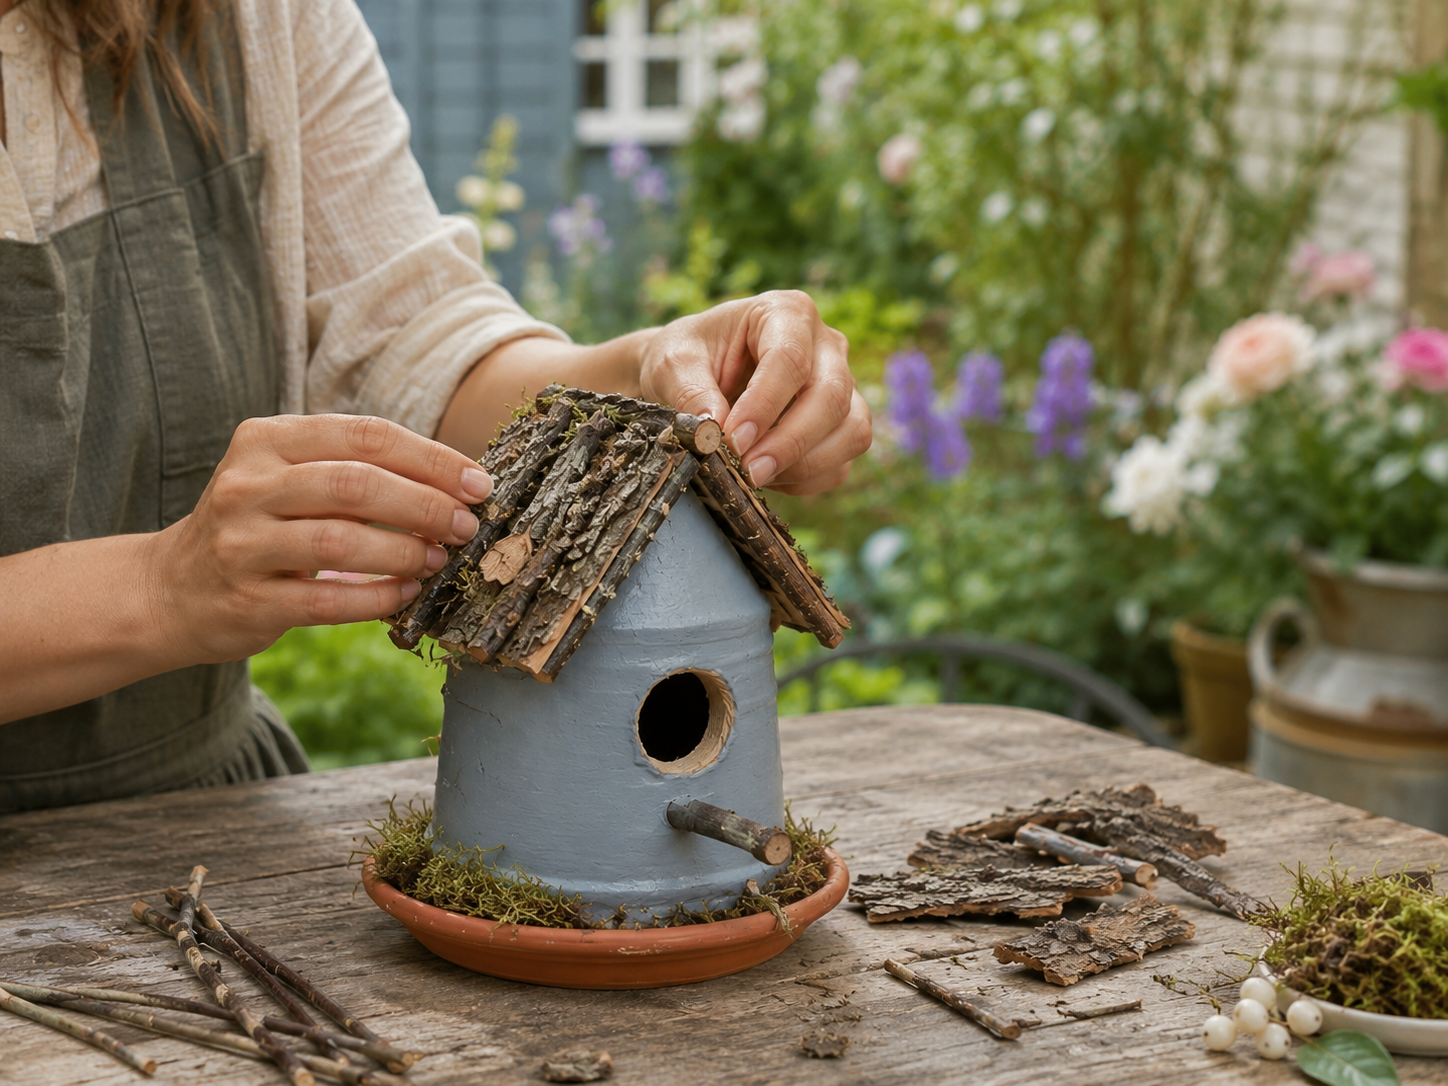
💡 Pro Tip: When selecting twigs for the roof framework, look for pieces that are relatively straight and of similar thickness. For the ‘shingles,’ vary the sizes and textures of the bark and smaller twigs for a more organic and visually appealing roof. Hot glue sets quickly, so work in small sections. Create a slight overhang at the front and back of the roof for a more realistic birdhouse appearance and to provide some protection for the entry hole.
Step 5: Assemble Hanging Ladders
Gather several short, thin twigs of similar length for the ladder rungs. Cut two longer pieces of thinner jute twine. Lay one piece of twine vertically. Starting from the bottom, tie the twig rungs horizontally onto the twine using a simple overhand or square knot, leaving even spacing between each rung. Repeat for the second vertical twine piece, mirroring the spacing to create a mini ladder. Make one ladder per birdhouse.
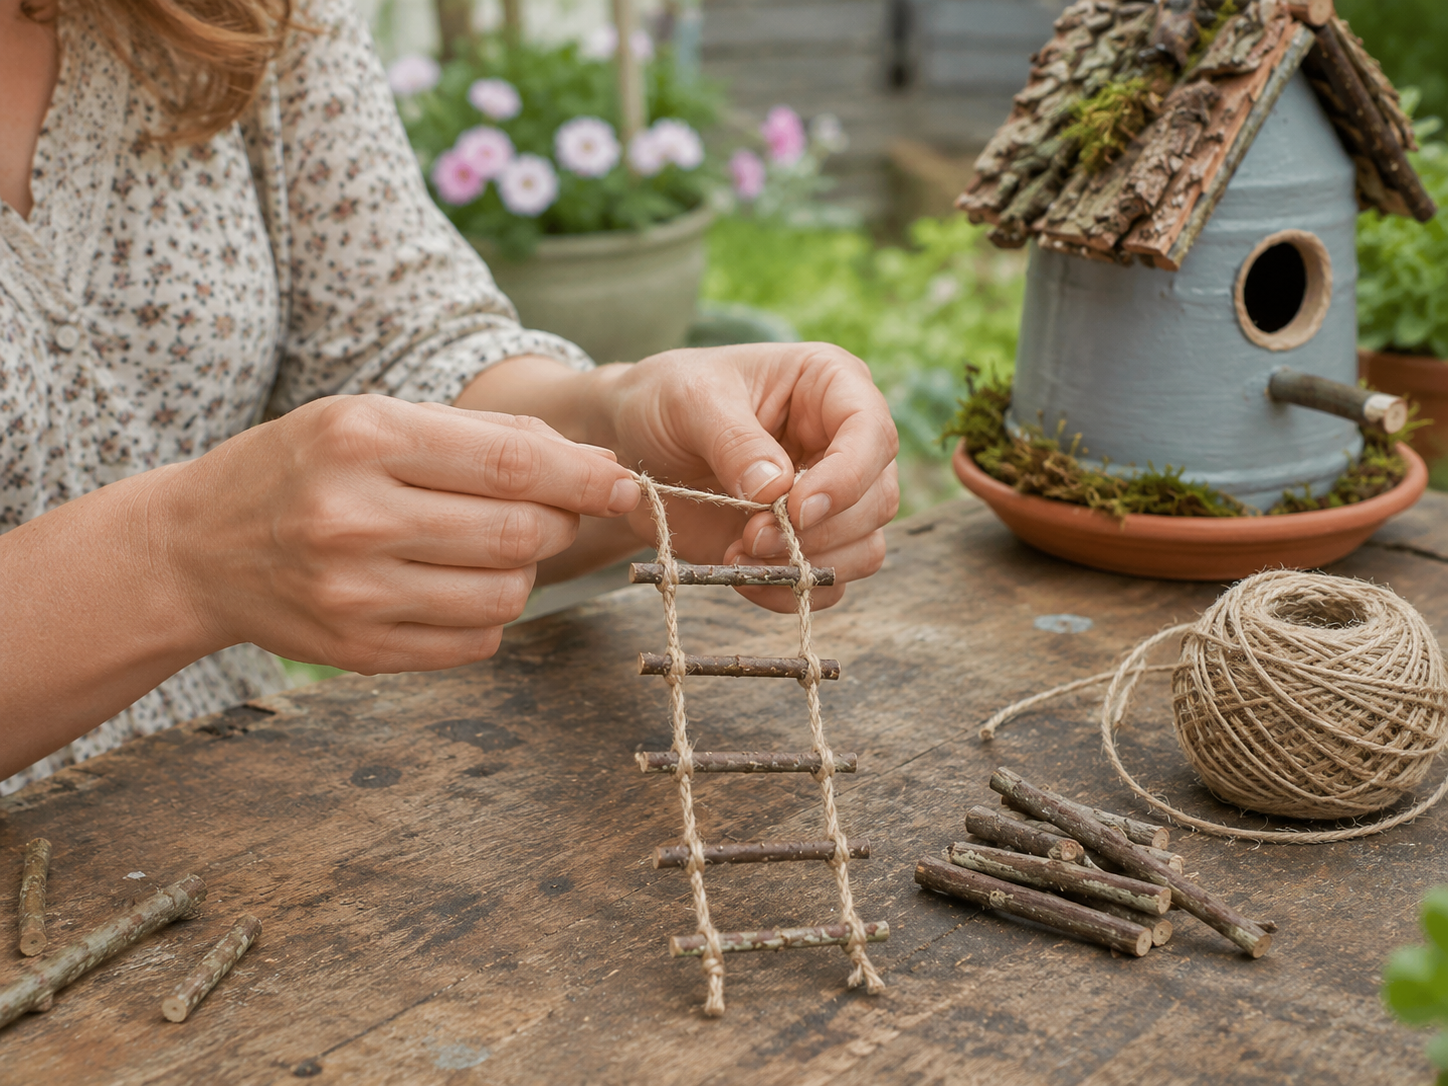
💡 Pro Tip: For consistent ladder rungs, use a ruler to measure and cut twigs to the same length, typically 2-3 inches. When tying, ensure the knots are tight and secure so the rungs don’t slide. You can place a small dab of clear craft glue on each knot for extra security once the ladder is assembled, but let it dry completely before handling. Aim for 4-6 rungs per ladder for an appealing dangle.
Step 6: Decorate & Attach Ladders
Now, it’s time to add the charming details! Use hot glue to attach bits of preserved moss, small faux berries, and tiny seed pods along the roofline and the edges of the terracotta saucer. Arrange them to create a natural, cozy woodland vignette. Once decorated, carefully hot glue the top of each mini twig ladder to the underside edge of its corresponding terracotta saucer, allowing it to dangle freely.
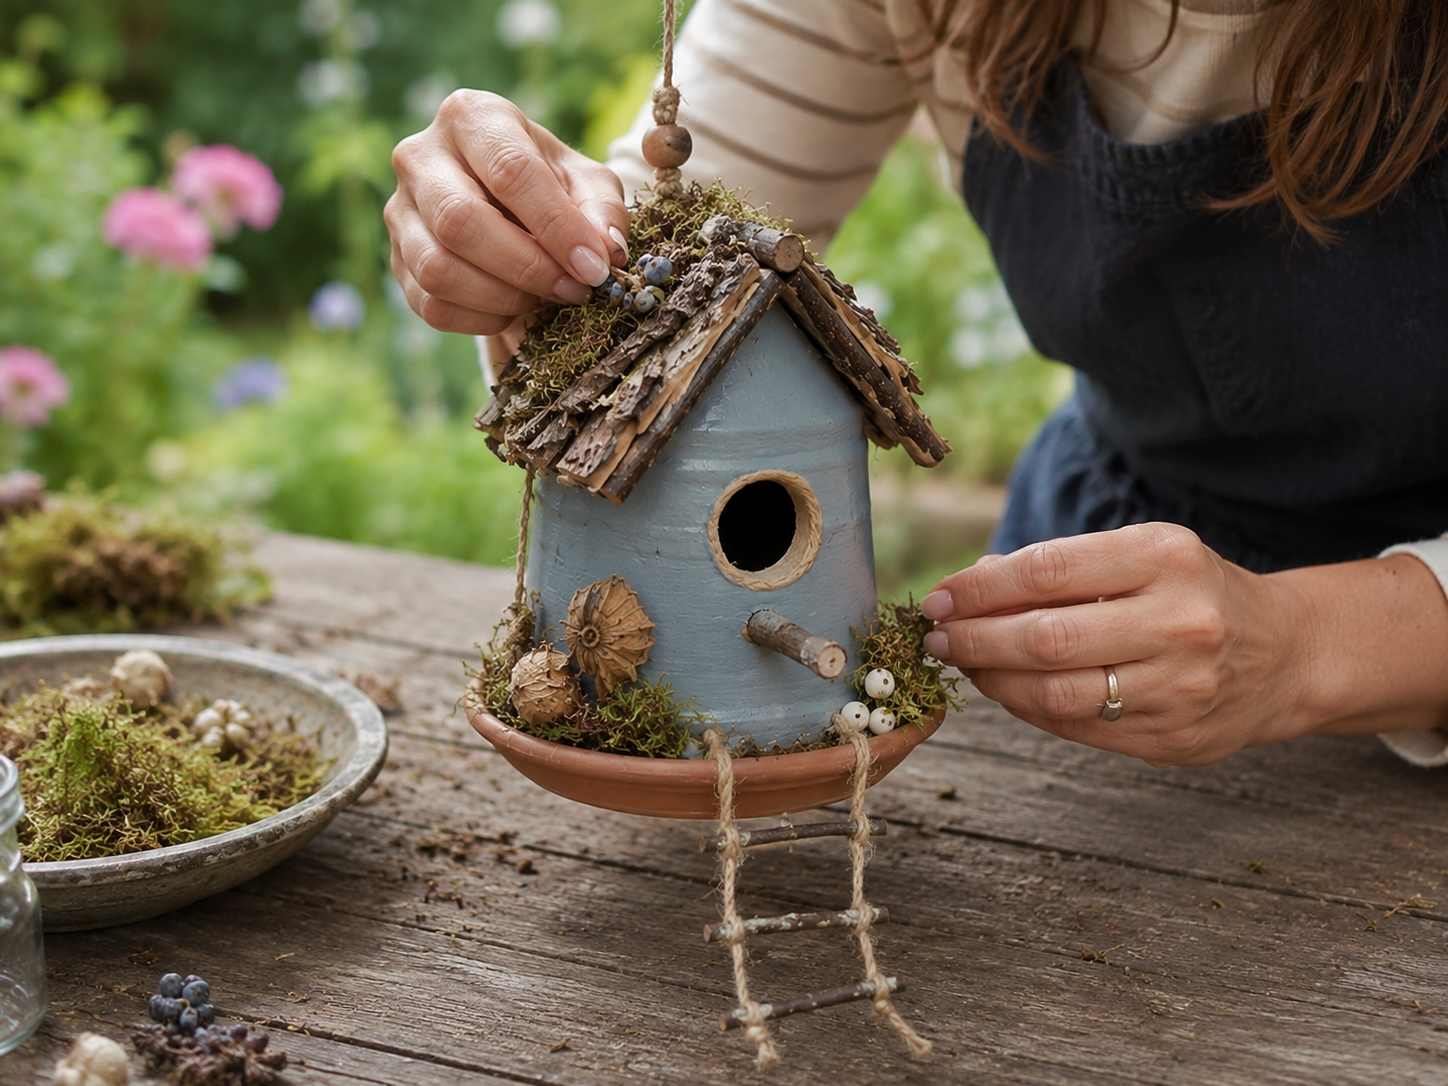
💡 Pro Tip: When decorating, less is often more to maintain a natural, rustic aesthetic. Vary the placement and types of decorative elements. Use a fine-tipped tool or tweezers to apply small bits of moss and berries precisely. For attaching the ladder, ensure the glue is applied to a clean, dry surface on the saucer and hold the ladder in place until the glue is fully set.
📱 Free to Download
Join 50,000+ crafters already using Craftino
Browse 31+ Spring & Garden ideas and thousands more in the app
✓ Save crafts & browse fully offline
✓ Download printable PDF guides for every project
✓ Step-by-step photo tutorials, nothing left out
✓ 1,000+ craft projects with new ones added every week
Step 7: Add Hanging Loops
To finish, cut a long, sturdy piece of thicker jute twine for hanging. Thread it through a pre-drilled hole at the peak of the birdhouse roof (or secure it around the top twig framework with a strong knot). If desired, thread a small wooden bead onto the twine for a decorative touch before tying the ends together to form a secure loop. Ensure the loop is strong enough to support the birdhouse for hanging outdoors.
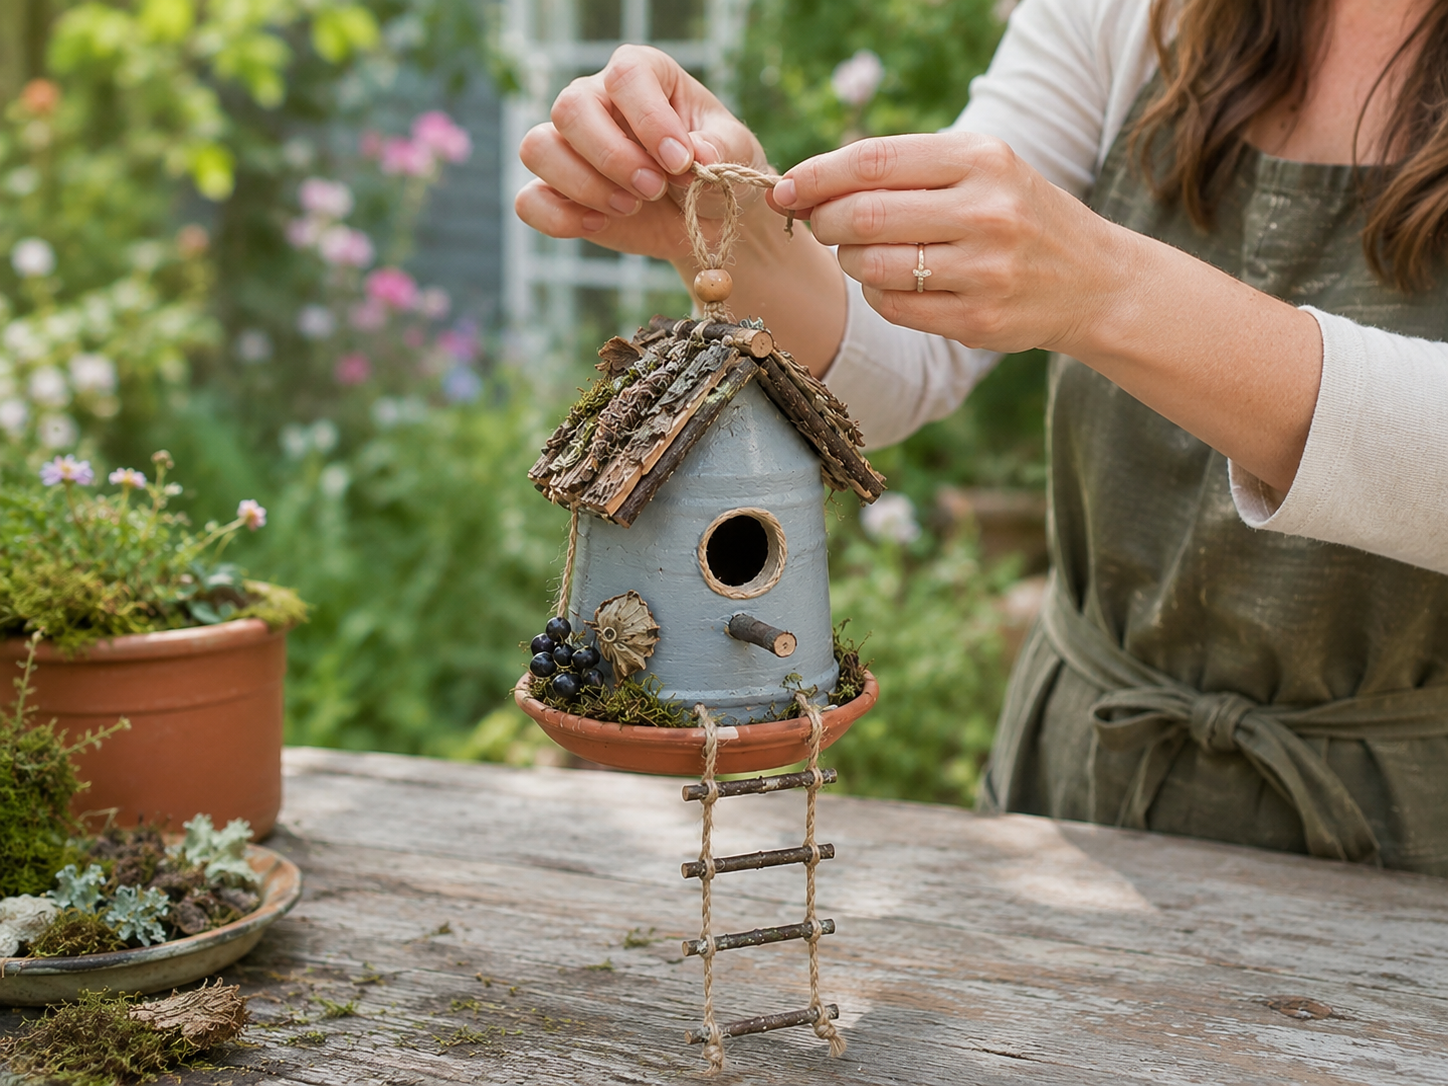
💡 Pro Tip: Before making the final knot for the hanging loop, hold the birdhouse up by the twine to test its balance and ensure it hangs straight. You can adjust the length of the twine loop to suit your hanging location. For extra security, apply a dab of hot glue to the knot where the twine meets the birdhouse. If you don’t want to drill, you can create a secure cradle with jute twine wrapped around the birdhouse and gathered at the top.
Show Off Your Rustic Garden Birdhouses!
See? Wasn’t that easy and fun? Now you have a super cute Rustic Garden Birdhouse from Upcycled Containers ready to make your outdoor space extra special. Hang it up, set it in a planter, or even make a few more to give as sweet Spring gifts! Don’t forget to share your creations with me, I love seeing what you make!
📱 Free to Download
Join 50,000+ crafters already using Craftino
Browse 80+ Spring & Garden ideas and thousands more in the app
✓ Save crafts & browse fully offline
✓ Download printable PDF guides for every project
✓ Step-by-step photo tutorials, nothing left out
✓ 1,000+ craft projects with new ones added every week
Frequently Asked Questions
How much does it cost to make these Rustic Garden Birdhouses from Upcycled Containers?
Each one of these cute Rustic Garden Birdhouses from Upcycled Containers costs around $3 to $4 to make, assuming you’re using mostly Dollar Tree supplies.
What’s the best type of glue for these DIY birdhouses?
Hot glue works best for quick and strong assembly. You’ll likely use about 5-6 regular size glue sticks per birdhouse, depending on how many embellishments you add.
How long does it take to make one of these Dollar Tree Spring & Garden crafts?
You can easily complete one Rustic Garden Birdhouse from Upcycled Containers in about 30-45 minutes, not including paint drying time if you choose to paint.
What kind of upcycled containers work best for these birdhouses?
Small plastic food containers, empty yogurt cups, or even cleaned-out spice jars that are roughly 3-4 inches tall and wide are perfect for the base.
Are these DIY Rustic Garden Birdhouses durable enough for outdoor use?
Yes, they can be! Just make sure to seal your finished birdhouses with 2-3 coats of an outdoor-safe clear sealer spray to protect them from the elements.
Can kids help make these Upcycling & Repurposing birdhouses?
Absolutely! With adult supervision for the hot glue gun, kids aged 8 and up can have a blast helping paint, decorate, and personalize their own Rustic Garden Birdhouses for Spring & Garden fun.
Read more official craft tips & tricks on the Dollar Tree Value Seekers Blog.
Leave a Reply